Arduino as wireless RC simulator dongle
Ever wanted to have wireless simulator dongle? Unfortunately there are no such dongle to buy anywhere. But you can easily do it by yourself!
List of parts
Everything you will need is Arduino Pro Micro board and any Flysky, Frsky or any other RC receiver compatible with your transmitter. Arduino Pro Micro can be purchased from Sparkfun, but there are a lot cheaper cloned boards on Ebay, Aliexpress or Amazon (Possible compatible boards: http://bit.ly/Aliexpress-Arduino-Atmega32U4, http://bit.ly/EBay-Arduino-Pro-Micro) . Actually almost any Arduino board with Atmega32u4 should work. Including Arduino Leonardo.
Actual parts costed $3.40 for Arduino Micro Pro board and $6.99 for iRangeX Flysky receiver. So the total price was $10.69.
You can choose the cheap and small receiver from Flysky receivers list and from Frsky receivers list.
The code is written by GregNau and original project is on GitHUB. Project was intended for Sparkfun Pro Micro board, cause it is based on ATmega 32U4 which can act as a game controller on USB. Although it should compile fine on other '32U4' boards also (eg. Leonardo, ProMicro).
I had a problem with my computer (64bit Windows 8 and Windows 10) not detecting arduino as HID Joystick, so I have modyfied the source to make the dongle work. My slightly modyfied Arduino project source code for RC simulator Dongle can be downloaded from here: http://www.dzskam.com/go/arduino-rc-simulator-dongle-project-files
Compiling requires Arduino IDE v1.8.2 at least and 2 external libraries:
Make sure these are installed properly before compiling, otherwise it will instantly fail. Both them have clearly detailed instructions about installing in the README.md file of the each project.
For your convenience, you can download all the three packages from here: http://www.dzskam.com/go/arduino-rc-simulator-dongle-drive-folder/
Schematics
The connection schematics is very simple, If you will use a receiver with PPM output, then you’ll only need to connect PPM out on receiver to D4 on Arduino board, +5 to VCC and GND to GND:
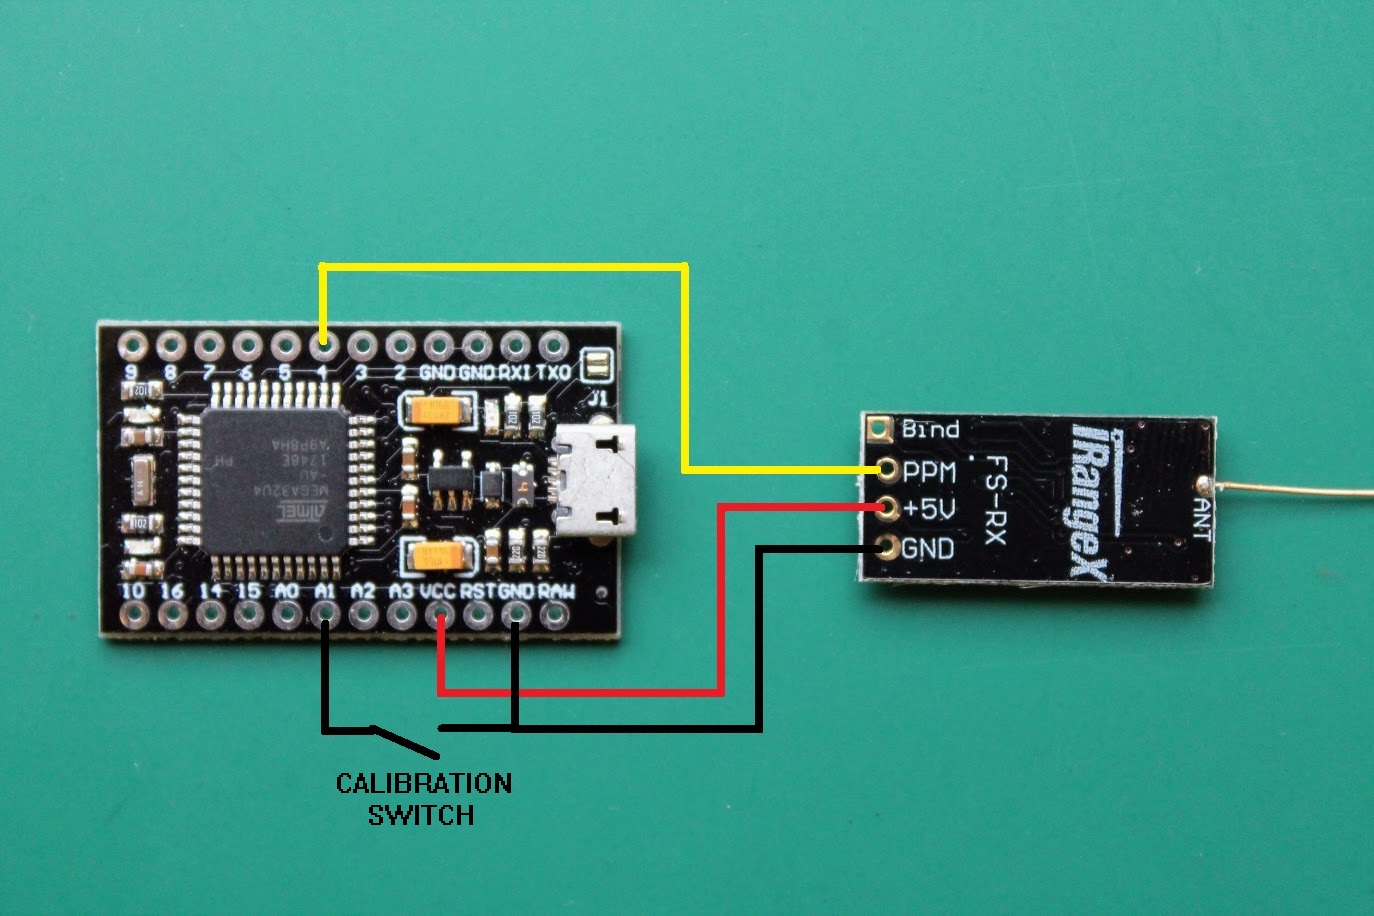
There is also an alternative Calibration Swith, connecting GND and A1 pin on the Arduino board. Calibration switch can be used for triggering the transmitter sticks/switches calibration. Actually the first time you power the Arduino with a RC simulator dongle firmware it triggers the calibration automatically so I’ve never needed this swich so far.
My soldered receiver to the Arduino board:
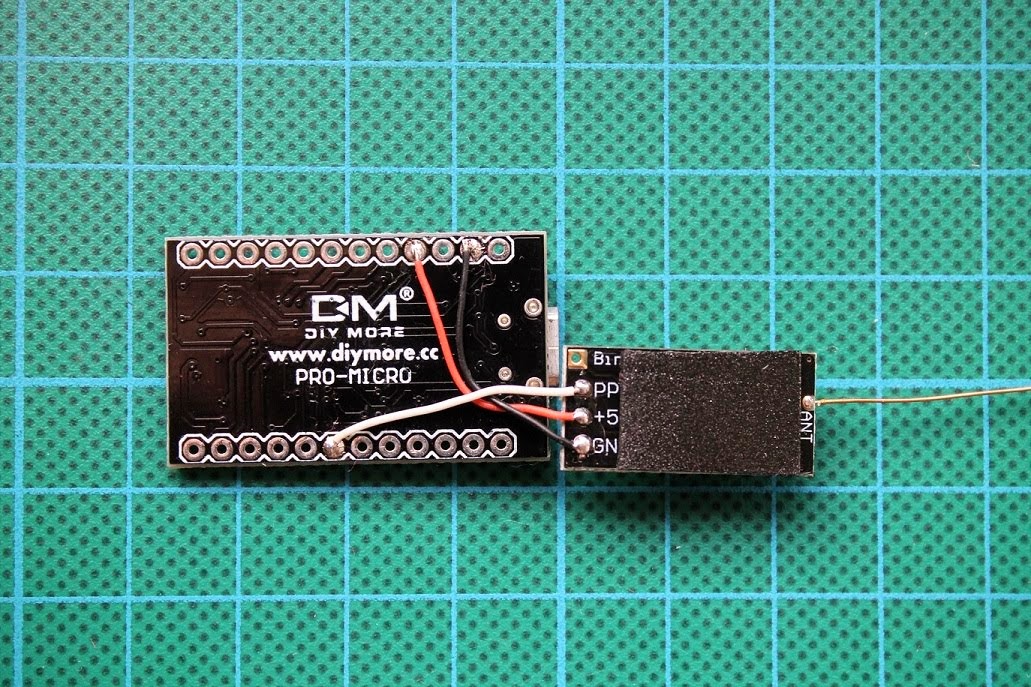
Attached it to the back of the arduino board with dual side adhesive tape:

You can also wrap the dongle into heat shrink to make it safe from accidental shorting of the electronics.
Installing the drivers for Arduino board
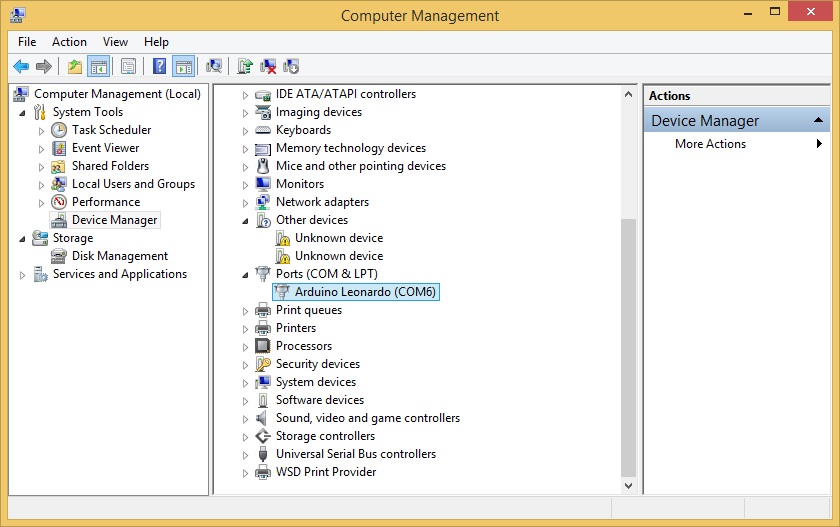
First time you connect the Arduino Pro Micro board (Arduino leonardo) it will show up as device without drivers:
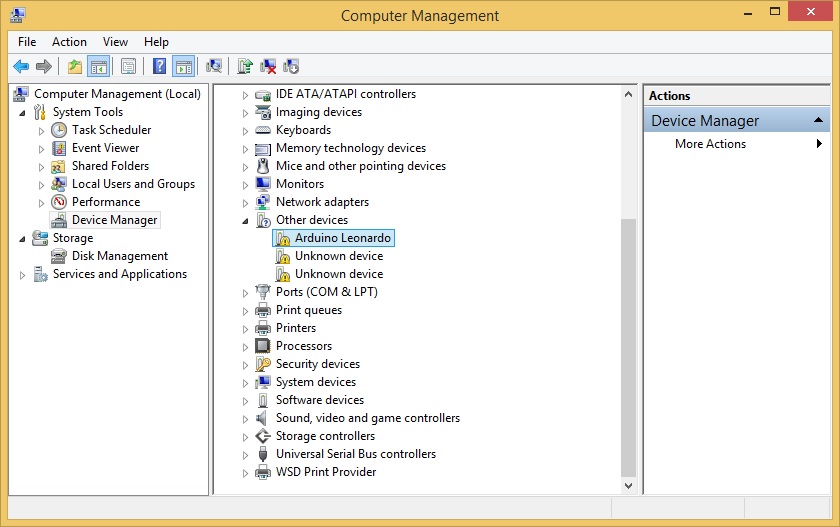
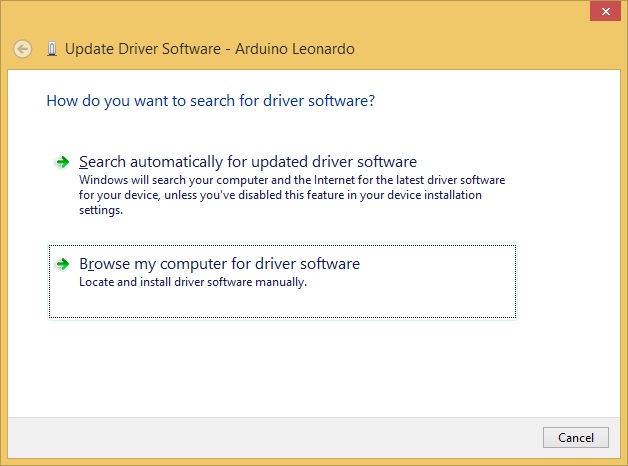
You need to right click on the device and select “Update Driver Software…”
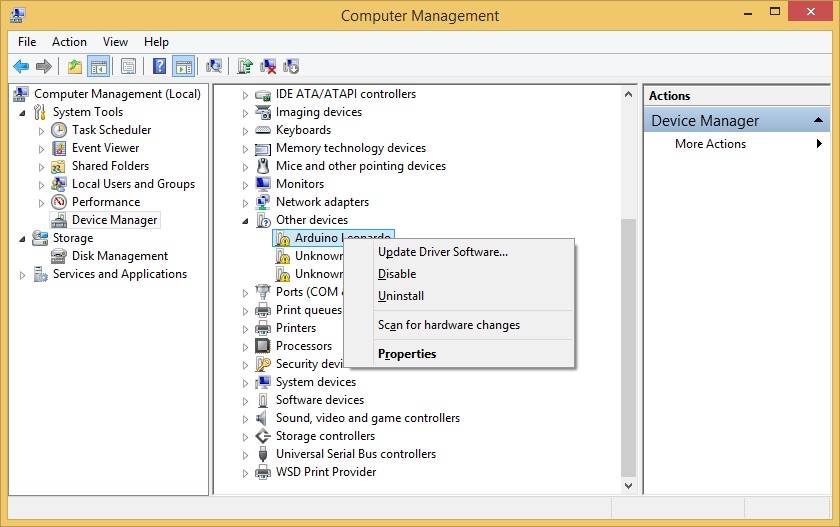
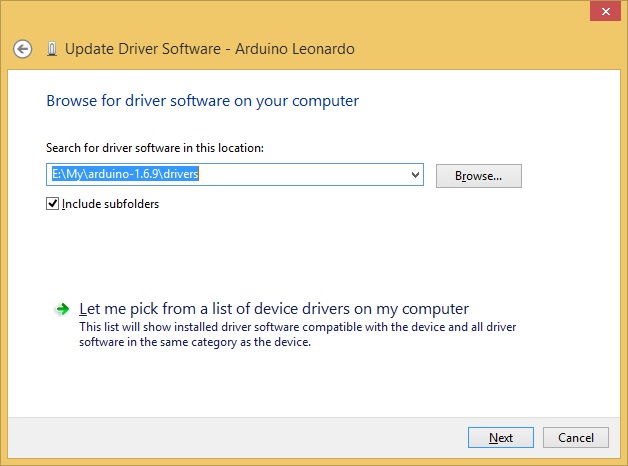
Choose “Browse my computer for driver software”
If you already have installled the Arduino IDE software, then the drivers should be in YourDriveLetter:\PathToArduinoFolder\Arduino-1.x.x\drivers\ folder
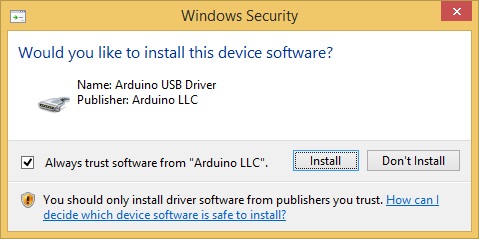
Select that you trust the Arduino Software and [Install]:
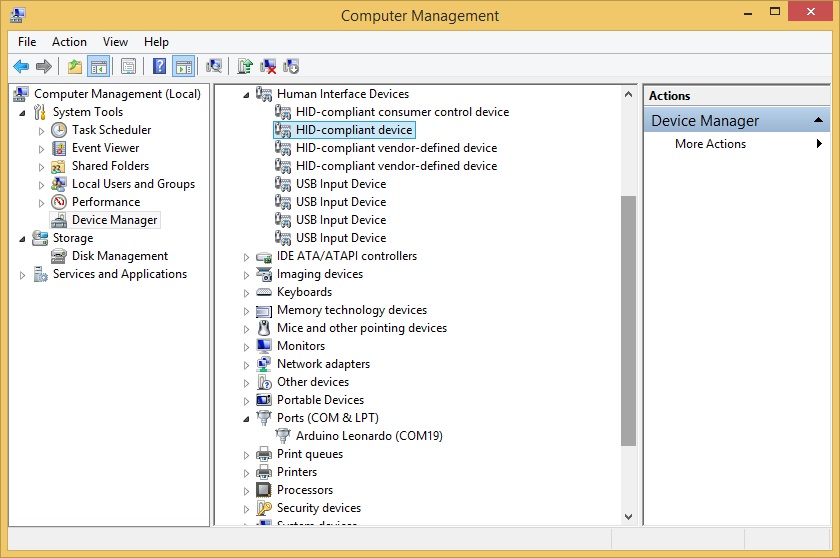
After the driver is sucessfully installed, you should see the Arduino Leonardo as Port device.
Flashing the code to Arduino
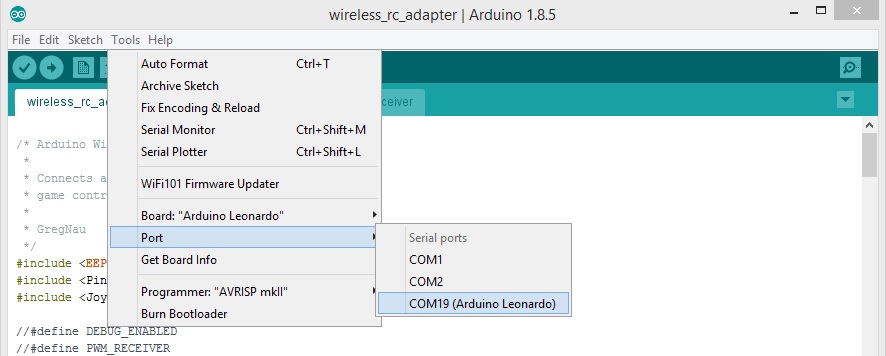
Open the wireless_rc_adapter.ino project in Arduino IDE. Select from menu Tools -> Board -> Arduino Leonardo and Tools-> Port -> COMxx (Arduino Leonardo)
Hit the Compile and Upload button.
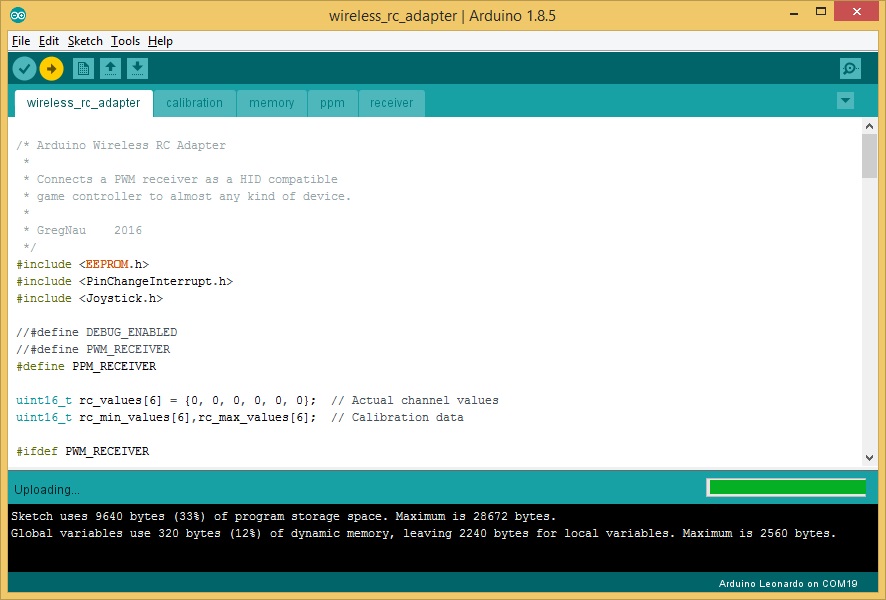
Project uploaded. Now the board is not only the Arduino but also HID (Human Interface Device).
If you Open Game controller panel (Start -> Run -> Joy.CPL), you should see the Arduino Leonardo as Game device.
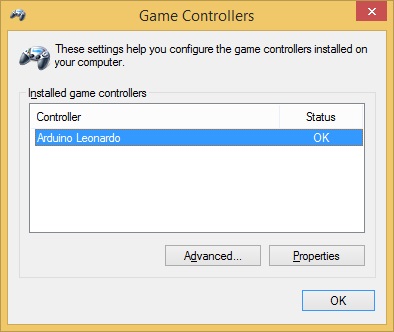
If you click the Properties, you should see the Axes and Bars moving whil moving the sticks on your TX.

Note: The first time you power on the dongle it will enter into auto calibration mode. The both leds will be lit on. You have to move all the sticks to their extents and AUX channel swiches to the on/off positions. After all the 6 channels were calibrated, the data will be stored on the Arduino EEPROM memory and dongle will start into working state.
Troubleshooting: Sometimes JOYSTICK_TYPE_MULTI_AXIS is not recognized as Joystic device. You can try changing into JOYSTICK_TYPE_JOYSTICK or JOYSTICK_TYPE_GAMEPAD in the code.
Setup in Simulators
Dongle was tested and perfectly working in DRL Simulator and Velocidrone simulator. Therefore it should work in other simulators that support USB Joystic.
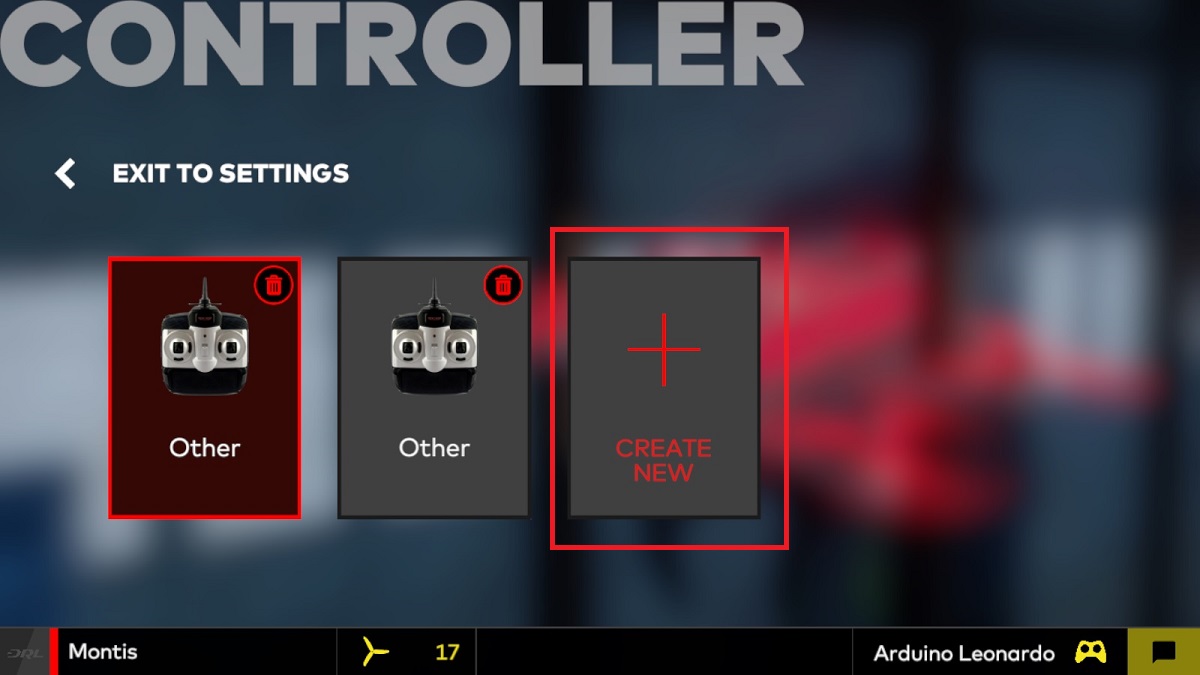
In each Simulator you have to set the controller to Arduino Leonardo device. On DRL Simulator you have to select new controller.
Choose Other type.
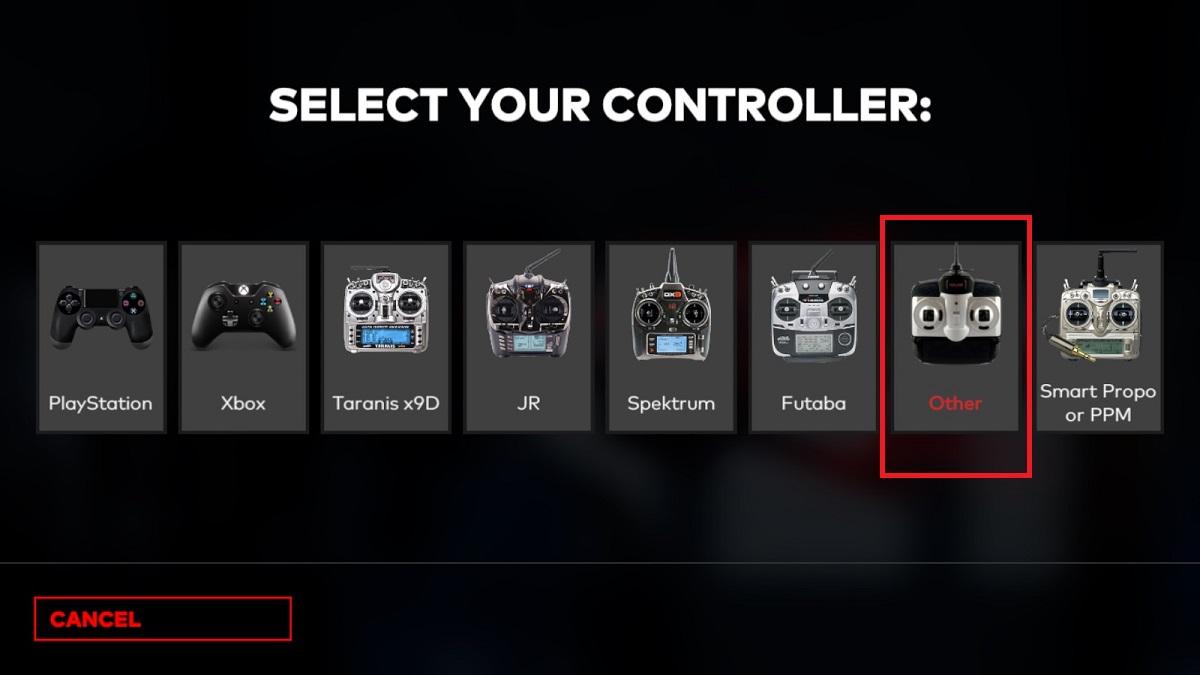
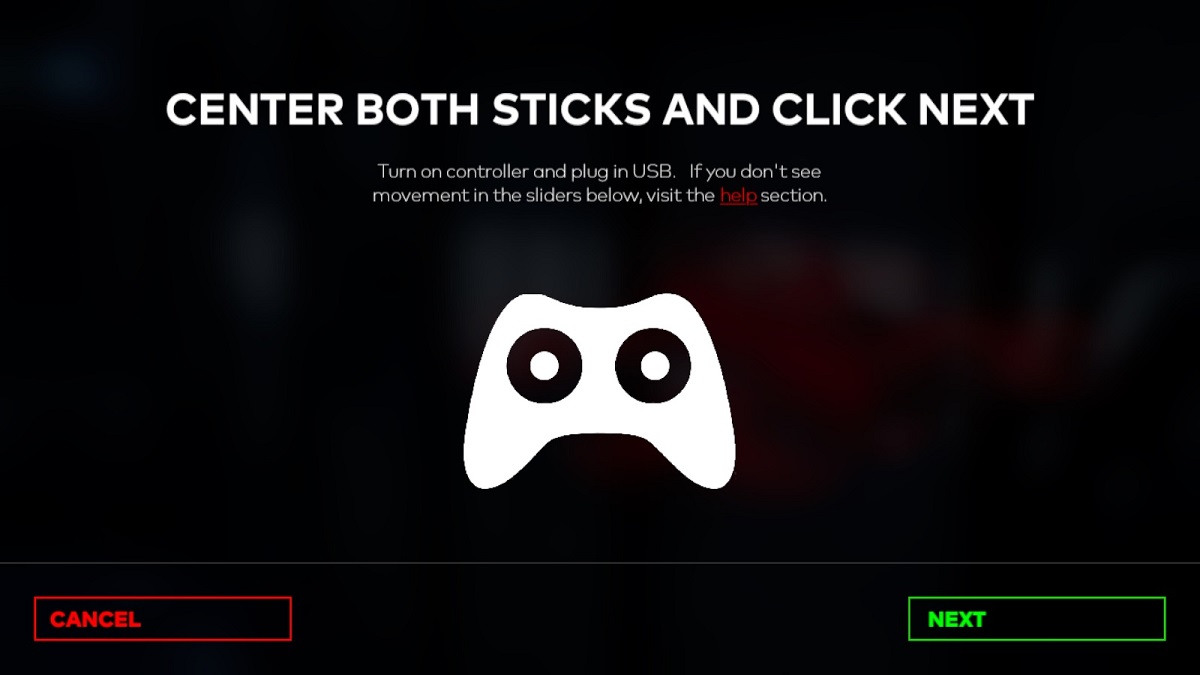
And then follow the calibration and setup wizzard. You may need to invert some of the RC channels.
In Velocidrone Simulator you have to selecto Controller tab. Velocidrone will autodetect the Arduino Leoinardo as RC controller automatically. You may need to invert some of the channels (on my setup I had to invert Throttle and Yaw channels).

Enjoy your flight in simulators with wireless RC dongle!
Related Posts
-
 ESC Firmware Guide
In this concise overview, we’ll explore the evolution of ESC (Electronic Speed Controller) firmware,
ESC Firmware Guide
In this concise overview, we’ll explore the evolution of ESC (Electronic Speed Controller) firmware, -
 List of brushless whoop/toothpick flight controllers
This is the list of brushless tiny whoop/toothpick style flight controllers with brief description
List of brushless whoop/toothpick flight controllers
This is the list of brushless tiny whoop/toothpick style flight controllers with brief description
this is a great guide, thank you for writing it. I’m having an issue where my windows 10 computer won’t see the leonardo board in the joystick menu.
everything flashed fine and it shows up as a HID. I’m wondering if you have any solutions for that?
Have you done the initial calibration? Once you power it for the first time it will enter into the calibration mode with both leds on.
Same here, both red lights are always on. I’m on windows 7. And for the note, I’m using the original eachine e011 remote. I tried to move both the joystick 45 degree when powering and move all axis and push all button with no luck.
Both LEDs on means you are stuck in the initial calibration stage. What receiver are you using? Does it output PPM signal?
The receiver is the same as yours “irangex fs-rx ppm” In your ppm.ino code for channel I dont see pin 4 written anywhere, instead pin 8, 9, 10, 16, 14, and 15. Isn’t that is for pvm code?
https://youtu.be/DPUWgnCPp00 this video is from my country, the language isn’t in english. He is using the original eachine e011 remote, so I think it could be done. Thank you for your reply, it means a lot, cheers
iRangeX fs-rx receiver can not work with original eachine e011 remote. iRangeX receiver uses FlySky protocol and Eachine E011 uses some Bayang type protocol. Also hardware is different.
I found the pin 4 on the PPM section. Maybe the Irangex tiny receiver doesnt detect my original eachine e011. I dont own any real transmitter at the momment so I can’t say for sure. Will keep explore the code for more answer. Thanks
First you need to bind the receiver to the transmitter. If you try you will notice, that iRangeX will not bind to the Eachine E011 transmitter. You need some Flysky compatible transmitter. Also be noted that Flysky has 2 protocols AFHDS and AFHDS 2A, also soon will have third protocol AFHDS 3. They are not compatible with eachi other.
finally gotten myself a flysky i6, Is there any setting I should change to bind the transmitter to the dongle? such as turn on ppm and turn off afhds 2A. Thank you
I think all you need is turn off the AFHDS 2A (if you are using the same receiver as I did).
My arduino is still registered as usb serial device in com ports, it should registered as HID compliant device right?
It should be always seen as USB serial device. You will be using for uploading the project from Arduino IDE. After you upload the Arduino project it should register also as HID device.
Hi,
Thanks for the awesome tutorial.
I have few pwm receivers laying around. Would it work?
Yes, you can use PWM receiver. Refer for the wiring to this site: https://github.com/wireless-rc-adapter/wireless-rc-adapter/wiki/wiring
Hi,
Nice tutorial, however I get the error “readMem was not declared in this scope”. How can I fix this?
Make sure you have selected the “Arduino Leonardo” in the Tools->Board selection of Arduino IDE. Otherwise it compiles with the wrong libraries. Also make sure You have memory.ino, calibration.ino, ppm.ino, recveiver.ino and wireless_rc_adapter.ino in the same directory.
Hi,
I decided to build one using srp8 ppm receiver FrSky compatible
https://www.banggood.com/Superior-Hobby-SRP8-8CH-PPM-Receiver-for-DHT-DFT-DJT-XJT-X9D-plus-X9E-Transmitter-p-1052003.html?cur_warehouse=CN
And Arduino micro with USB like this one
https://www.banggood.com/Wemos-ATMega32U4-BS-Micro-Pro-Micro-Leonardo-For-Arduino-Compatible-Development-Board-p-1176209.html?cur_warehouse=CN
Since I don’t have D4 on my board I edited the PPM.ino to define ppm pin to 9
I manage to upload it successfully to the board (I choose Micro from board list and tried Leonardo as well)
When I go to test it on JOY.CPL test tab I don’t get any response from my TX (And yeah I bind it to my receiver successfully)
I tried also https://github.com/wireless-rc-adapter/wireless-rc-adapter
RC adapter v2.1 without success.
Perhaps I’m doing something wrong that I can’t spot it out! (MAybe that ?? Arduino is not suitable? )
Can you assist me ?? ?
Any ATMega32U4 board should work. Just might need to make some pin definition modifications.
Make sure your receiver outputs PPM signal, then enable DEBUG in the arduino joystick project file. Try with the several PIN definitions (my suggestion is PIN 0 or PIN 1). Make sure your Arduino board decodes PPM signal correctly (look at the Arduino IDE – Tools – Serial Monitor).
does this work on an atmel 328p? .)
Laurin
No, it uses USB connection and libraries for Atmega32U4 MCU. There are a lot of inexpensive Atmega32U4 board in online shops.
Thanks for the awesome guide.
I hit a dead end. Everything seems to be doing as it should, but when I plug it in both of the red lights are on. If I understand correctly that means that it is on auto calibration. The thing is that I can’t get rid of this. In the Game Controllers tab, I can see the Arduino but when I move the sticks nothing happens. Do you have any idea what could cause this?
You should make sure, that your receiver is outputting the PPM signal and you need to move all the sticks to the ends and switches on-off (by default there are 6CH, so all 6 channels need to be calibrated) untill the leds turn off. There is a newer vesion of the firmware available https://github.com/wireless-rc-adapter/wireless-rc-adapter/ you could try that.
Hi, thanks for the amazing guide.
I was wondering what should I do after both of the red lights are turned on. I made sure everything was bound as it should be, but when I check the Arduino in the Game Controllers tab nothing is moving when moving the sticks.
You should make sure, that your receiver is outputting the PPM signal and you need to move all the sticks to the ends and switches on-off (by default there are 6CH, so all 6 channels need to be calibrated) untill the leds turn off. There is a newer vesion of the firmware available https://github.com/wireless-rc-adapter/wireless-rc-adapter/ you could try that.
Greetings — great utility, if I can get it working. I am wired for PWM, using a Spektrum-compatible receiver, which is bound to the transmitter. Like others, I get both red lights on the Arduino Pro Micro, but the transmitter sticks do not register any movement on the Windows Joystick configuration app. I am using only 4 channels on the receiver: throttle, aileron, elevator, and rudder, and have them wired to pins 15, 14, 16, and 10 — I don’t know if 6 channels is mandatory (I changed the # of channels in the sketch to 4, but that didn’t help). I ran the ground to the ground on the same side of the board as RAW, if that matters.
Enabling serial debug gives the message “NO SIGNAL ON CAL_CHANNEL”.
I’m a noob with Arduino, so any help is appreciated. Hoping to get this working.
-= Dave
For PWM receiver input you should comment out the #define PPM_RECEIVER line and uncomment the #define PWM_RECEIVER line in your Arduino sketch.
Not sure if the 6 channels is mandatory. Probably yes. Need to check.
Hi:
Don’t know if this is the right place to ask questions, but here goes:
I have a mid-2015 Macbook Pro laptop and I want to run my Aerofly RC8 simulator on it using a Jumper T16 Plus TX. Everything I see here references Windows. Am I right that this Arduino dongle won’t work in native macOS Mohave 10.14.6 on my Macbook Pro?
Thanks
Thanks
Hi, I don’t know much about the usage of HID devices (joysticks) on the Mac, therefore I can’t give you the definite answer. I’ll try to look around the web, maybe I’ll find something.
this will work with Aurdino UNO Orginal
No, Arduino Uno uses Atmega328 MCU and we need Atmega32U4 MCU (the one with USB connectivity). You need Leonardo or Pro Micro board.
i am getting NO SIGNAL ON CAL_CHANNEL! error while following your procedure for Flysky i6 Transmitter and receiver. can anyone help me to get it.
i am facing an issue with flysky i6, Is there any setting I should change to bind the transmitter to the Arduino Leonardo. i connected pin 4 to channel 1 single pin (PPM Mode). I changed the PPM to on state in Transmitter. anything i need to do.?
It is not working can anyone solve my problem
FrSky sell a USB Receiver module. I know, because I have one.
FrSky – yes, but there is no Flysky wireless USB sim dongle available. And you can make it by yourself for around $5.
This isn’t working for me. Using a Pro Micro with PWM receiver. Have all the wiring set and using my own sketch I can see that my throttle, aileron, pitch and rudder pwm signals are readable on the arduino.
I have uncommented PWM_RECEIVER and PPM_RECEIVER is commented.
All I get is NO SIGNAL ON CAL_CHANNEL! in the serial output.
Any help would be much appreciated! ??
Have you connected all 6 CH to the Arduino? As I remember, the caligration needs all 6 channels.
I have the same issue like “Sri Krishna” no signal from ppm, if i switch off calibration, signal is 0 per each of 8 channels…
I have similiar issues…
I am using Flysky i6 transmitter with ppm output, Arduino Uno R3, flysky X6B reciever connected to PPM output.
Arduino and X6B connected to pin D4 5V and GND.
In the code I am using #define PPM_RECEIVER and #define CAL_DISABLE options, in serial monitor I can see, that there are 0% per each of 8 channels.
If I comment #define CAL_DISABLE… I can see in serial monitor, that NO SIGNAL ON CAL_CHANNEL.
I am sure, that PPM on X6B is working, because I am using it on my quad.
any idea how to fix it?
Thanks for your comment. Will try to look at this later.
Hello,
Nice project.
I am interested in the slight modifications you have made to the joystick library. I have been trying to roll my own joystick adapter(but not an RC interface) with the same joystick library prior to finding your project. I believe I have run into the win10 compatibility issue you fixed, or something similar to it. I am unable to utilize more than 8 analog axes.
Would you please share the details of the slight mods you accomplished in the joystick library? I will be comparing the files side by side soon. But I thought I would ask the easy question first before going cross-eyed.
Thanks.
i have used this code but pc will not see the adapter as a game controller ?
any ideas
great work by the way
oh and im using a leonado micro pro board
any help greatly appreciated
Thanks for your jobs, but i have mode 1 TAER and channel sequence is not correct even it does the job. As a suggestion you have to underscore the part where you say to do calibration also for ALL 6 channnels including 5 and 6 otherwise people could skip this detail with null result. Thanks
You could try using a custom calibration channel by changing it in the sketch
exit status 1
#error No _RECEIVER modulation have been configured, please enable one in the configuration!
Bibliothèque non valide trouvée dans C:\Program Files (x86)\Arduino\libraries\wireless-rc-adapter-master : aucun fichier d’en-tête (.h) trouvé dans C:\Program Files (x86)\Arduino\libraries\wireless-rc-adapter-master
Bibliothèque non valide trouvée dans C:\Program Files (x86)\Arduino\libraries\wireless-rc-adapter-master : aucun fichier d’en-tête (.h) trouvé dans C:\Program Files (x86)\Arduino\libraries\wireless-rc-adapter-master
it work on liftoff but i can’t use it with phoenix, usb interface not detected. someone can help me ?
I have PWM working after disabling calibration.
Problem probably lies in the fact that it really wants 6 channels.
If I set a lower number of channels it fails at compiling saying I can’t have MORE then 6 channels.
Tried compiling on mega2560 today.
I get it working with all the channels but it will not install as a game controller on Windows 10 x64.
Any help would be appreciated.
Greetings Perry
so I followed this guide, albeit not without a massive amount of issues along every step of the way. first I couldnt get my board to connect to my PC, but I was finally able to use another arduino and an FTDI adapter to finally burn the bootloader, then I was able to upload the sketch normally.
After uploading the sketch and connecting it via usb, it no longer shows up in device manager as an arduino, and it opens a comm port but does not show as a specific device, just shows an open comm port. In addition, it does not show up at all as a controller
Hi, I have compiled it to pro micro using bayang RX.
adding Serial.print within the DEBUG code to check if the PPM stream readable from RX. and all is good, got 6 channel (4 AETR, 2 buttons).
But when I go to test it on JOY.CPL test tab I don’t get any response from the TX.
Already try changing JOYSTICK_TYPE_MULTI_AXIS or JOYSTICK_TYPE_JOYSTICK or JOYSTICK_TYPE_GAMEPAD.
Still no response, any clue what to check?
Regards
https://github.com/sfjuocekr/SBUS-joystick
For those who have a spare Teensy!
Hi, I have compiled it into a pro micro with an X4R receiver configured to ppm output.
I have successfully passed the calibration stage, where all 6 channels are identified and their min/max positions are stored.
This is where I get stuck. the pc reports the arduino as a game controller, but it does not see any movements from the transmitter, while the serial monitor is displaying the movements of the channels….
Any idea what I am missing?
Thanks in advance,
Marios
I made one set but the gamepad device does not appear. Any way to know what the problem is? Check list or some debugging method?? I already tried “JOYSTICK_TYPE_JOYSTICK or JOYSTICK_TYPE_GAMEPAD” but it didn’t work
I used flysky fs-i6 and ia6b for this build. RC setting is i-bus ppm.
And I can see each channel data. It worked good.
Thank you in advance~
After reading the description, I made one myself, but it doesn’t work completely. I checked that the value of the remote controller is coming out of the serial monitor, but after that, it is not recognized as a joystick in Windows 10 x64. What should I check?
Hi,
I’ve got Seeduino XIAO (https://www.seeedstudio.com/Seeeduino-XIAO-Arduino-Microcontroller-SAMD21-Cortex-M0+-p-4426.html) and I’m wondering, if boards with SAMD21 (like XIAO) could be used instead of Atmega32u4 boards. Unfortunately I’m not microcontroller expert. Do You know, if it has any chance to work?
This project is based on Atmel microcontroller. You cannot swap straightforward to another type of MCU. Of course it is possible, but you have to port the code (make some adjustments/changes to code) to use is with XIAO boards.
Thanks for reply
Hi there. Phoenix simulator doesn’t recognize the usb Leonardo joystick. Serial debug monitor is working and tx movement are working on joy.CPL. What to do ?