Review: BetaFPV 20A Toothpick F4 AIO FC
BetaFPV, the leader manufacturer of the whoop flight controllers, has released the next level whoop and toothpick AIO FC with F4 MCU and 20A 4in1 ESC. BetaFPV 20A F4 AIO FC comes in two options, the toothphick and the whoop version. Both boards have 20A 4in1 ESC, that can handle 25A burst! As far as I know it is the first 20A capable and the most powerful whoop/toothpick FC in the market up to date.
Specifications
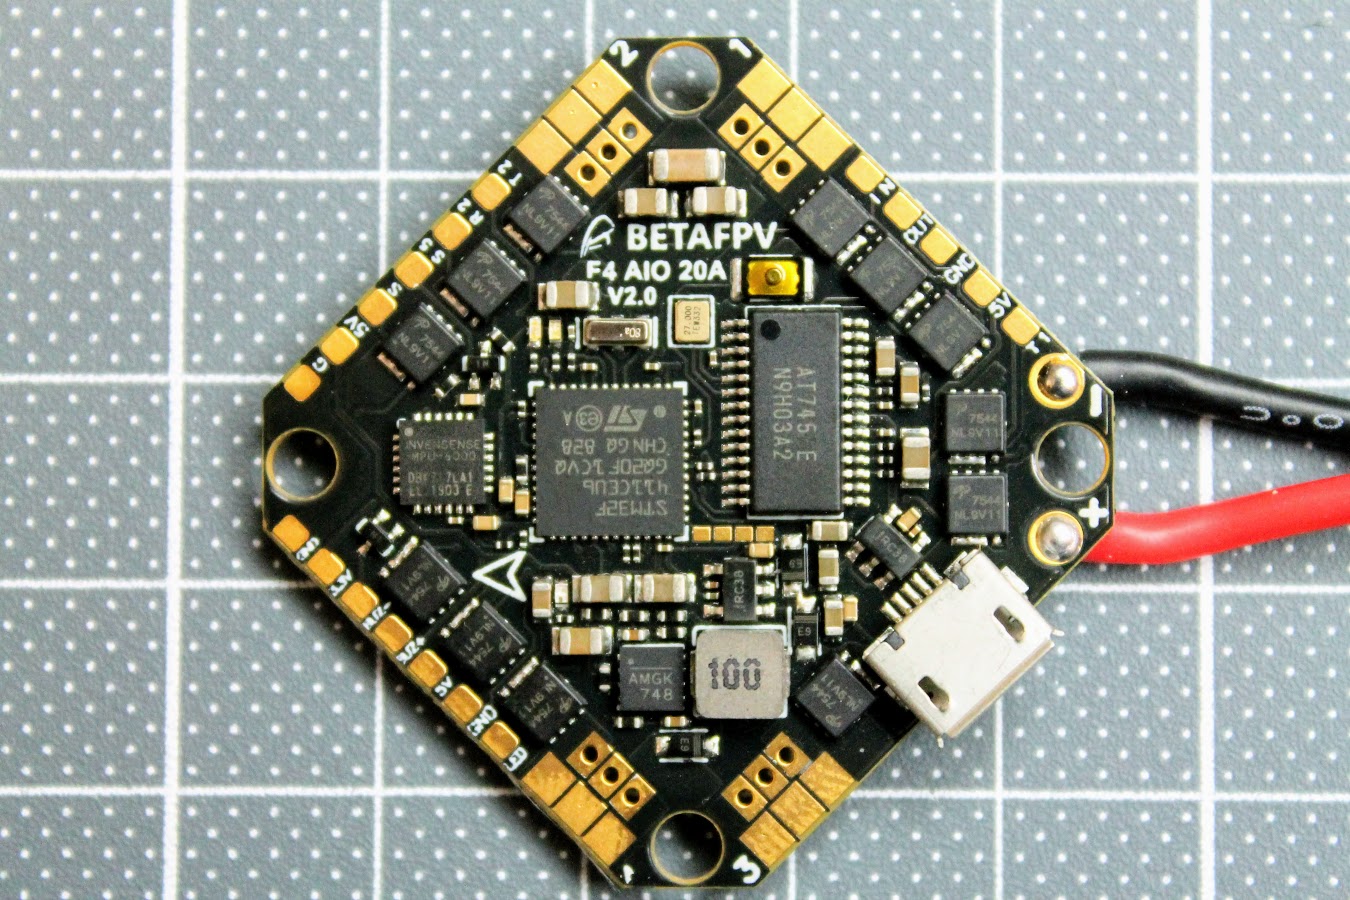
- CPU: STM32F411CEU6 (100MHZ)
- Six-Axis: MPU6000 (SPI connection)
- Size: 32.5*32.5mm (26.5mm mounting holes)
- Firmware version: Betaflight MATEKF411 (MK41)
- OSD: Built-in BetaFlight OSD (OSD chip: AT7456E)
- Receiver: Support Frsky XM/XM+ Receiver/ Futaba Receiver/ Flysky Receiver/ TBS Crossfire Receiver/DSMX Receiver
- Support programmable LED like WS2812 etc
- Built-in current sensor
- Weight: 6.63g (toothpick version), 5.63g (whoop version)
ESC
- Support BLheli/BLHELI_S suite Pass-through ready
- Support PWM, Oneshot125, Oneshot42, Multishot, Dshot150, Dshot300, Dshot600
- Input voltage: 2S-4S Lipo
- Continue current: 20A
- Peak current: 25A
- Firmware: BLHELI_S
- Processor: SILABS EFM8BB21F16G-C
- Motor Connectors: 1.25mm header pins connector
- Factory firmware: G-H-30-16.7
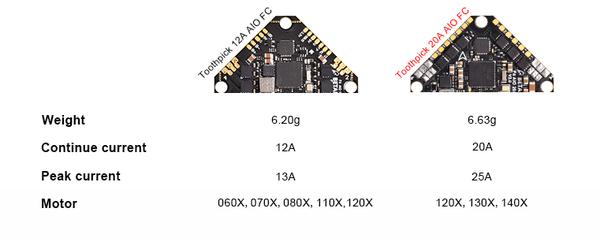
The toothpick 20A board is slightly heavier than previous 12A version 6.63g vs 6.20g, but the power output was almost doubled!
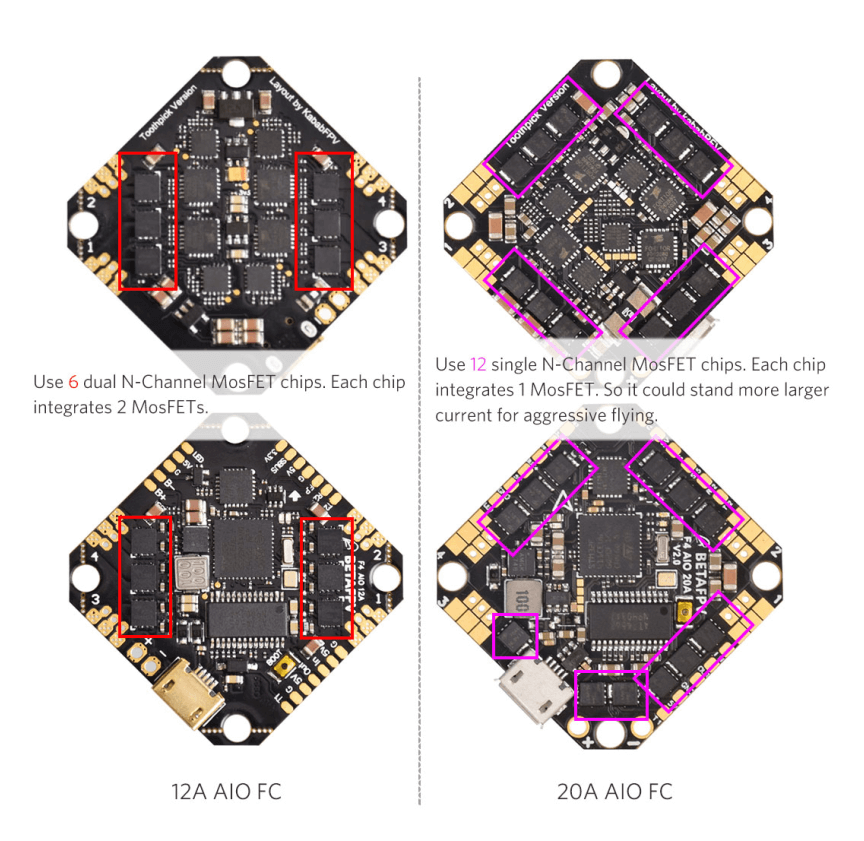
This 20A flight controller has a huge margin of the power. It was possible to achieve by populating 12 MOSFET chips on the board instead of the 6 MOSFET chips on the 12A board.
BetaFPV has released V3 version of this flight controller. The V3 version has all the function of V2 board plus following 2 additional functions:
- 8M Flash chip for Betaflight Black Box.
- Additional pads for DJI digital FPV unit and Caddx Vista digital FPV unit support. Additional UARTs – TX1/RX1, TX2/RX2, TX6/RX6
See the notes about the ports on this board below.
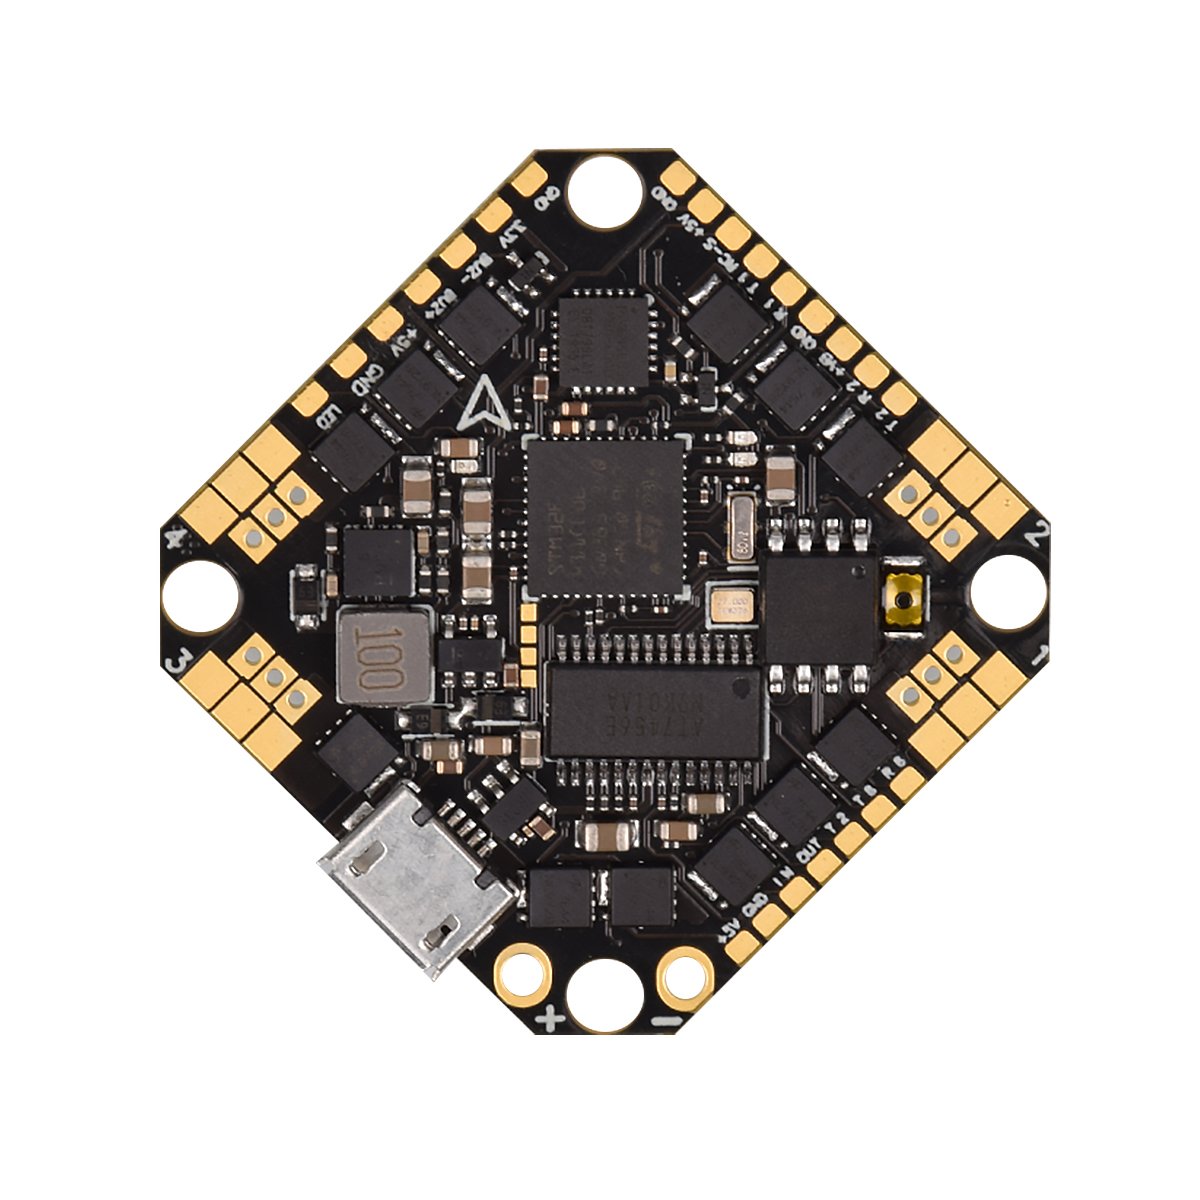
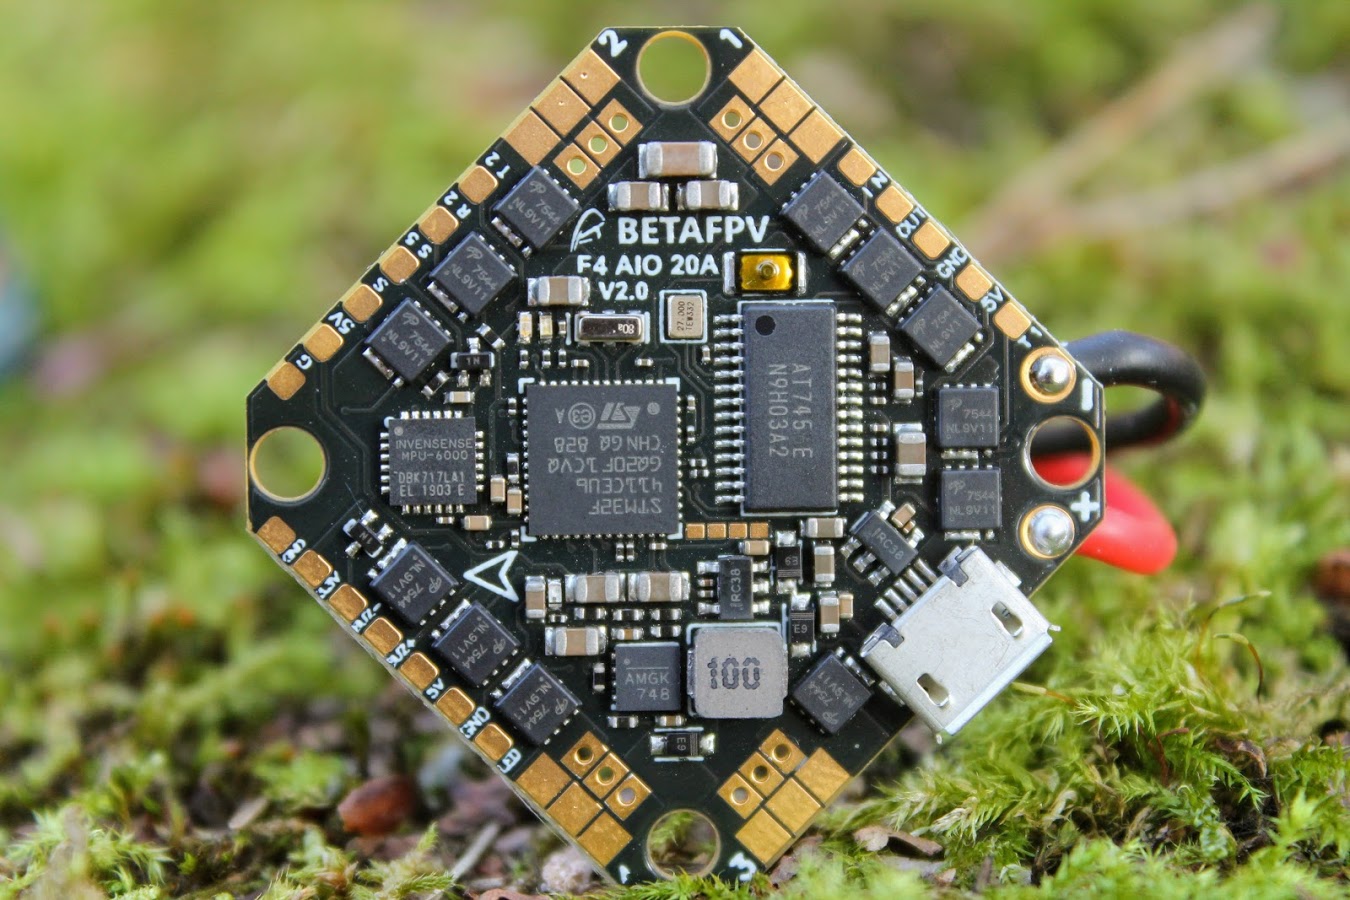
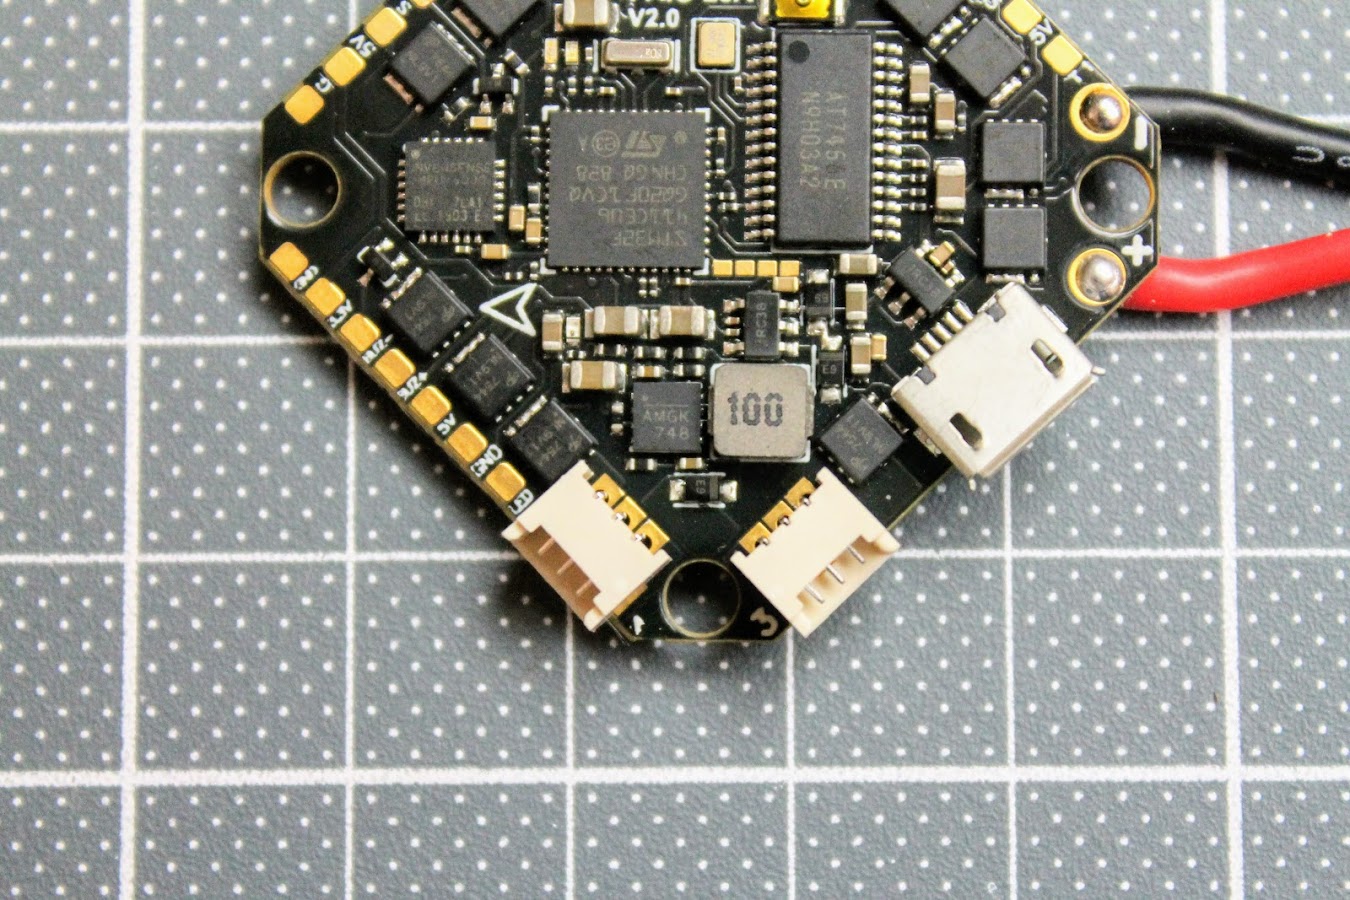
Closer look
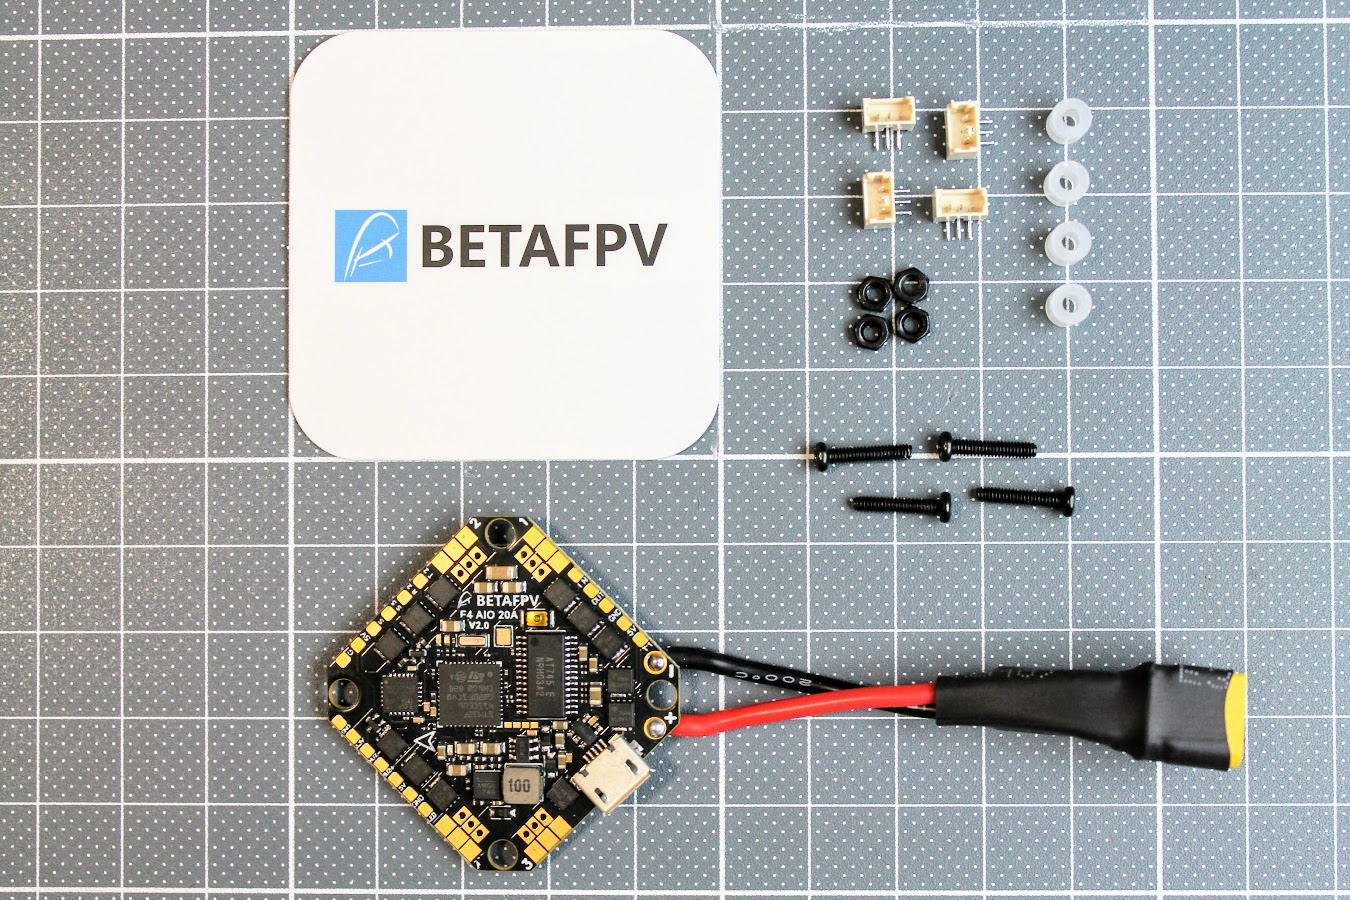
BetaFPV F4 20A AIO FC comes with the FC with XT30 pigtail, motor pluggable sockets, rubber vibration dampers and screws with nuts.
The top side of the board has all the connections as solder pads. All pads are big enough and easy to solder. They are also clearly marked. USB socket is located on the top side for easy access.
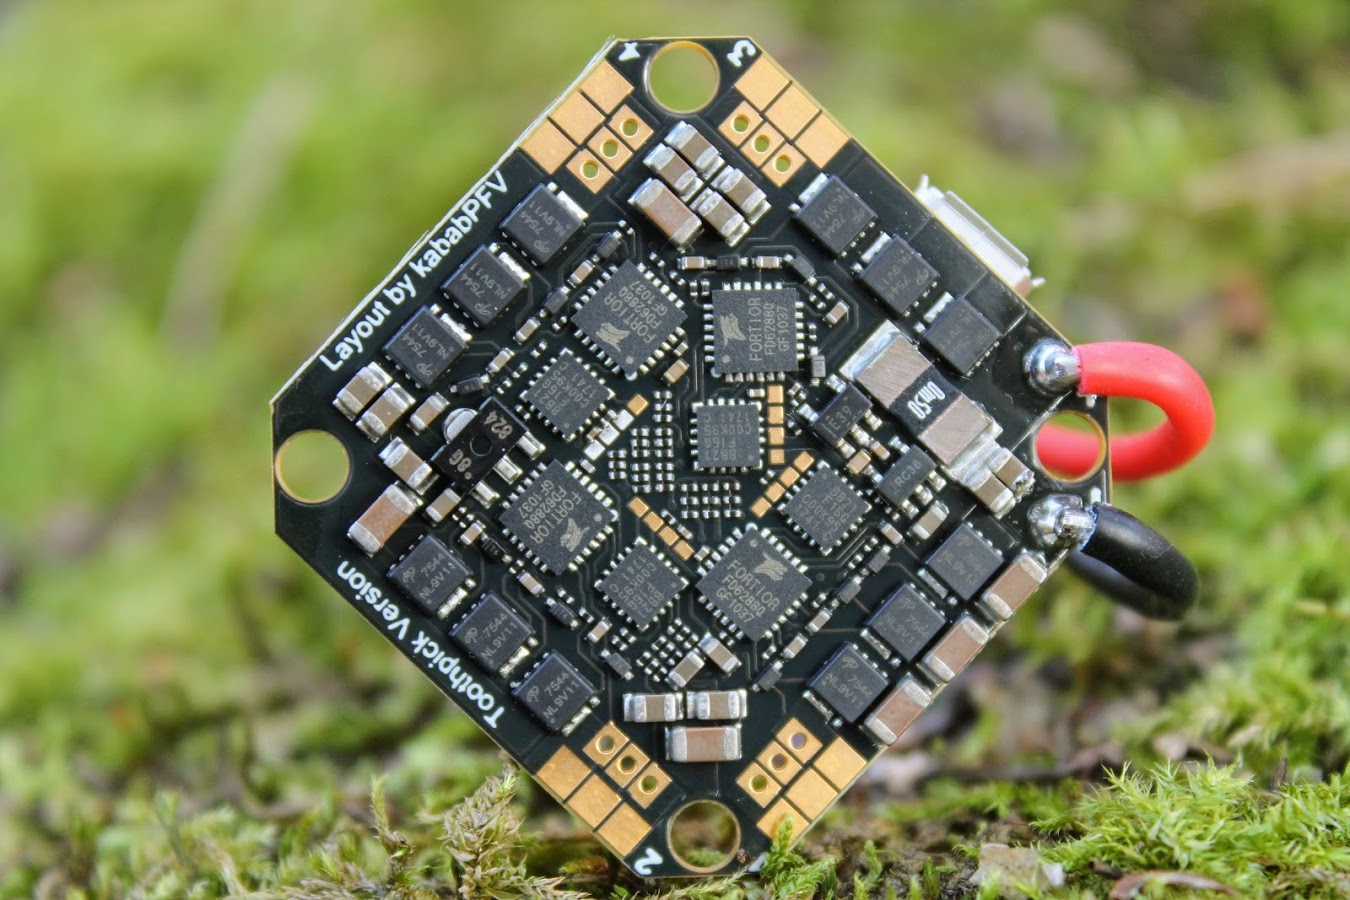
There are also motor solder pads on the bottom side of the board, so you can choose the side where to solder the motor wires.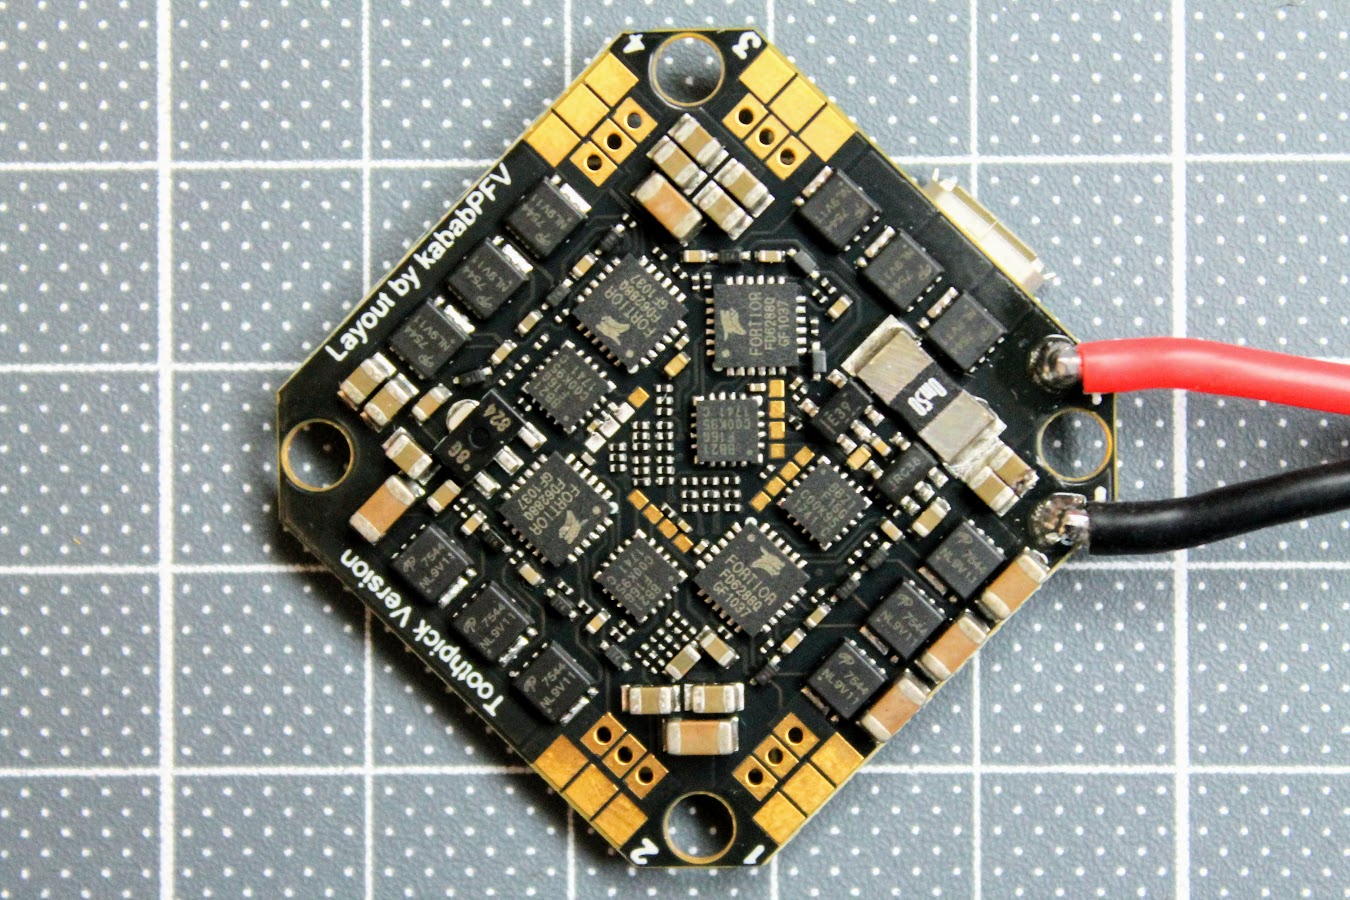
If you want, you can solder the motor plug sockets. Motor sockets are installed in horizontal orientation – this is far better than vertical for toothpick type quadcopters
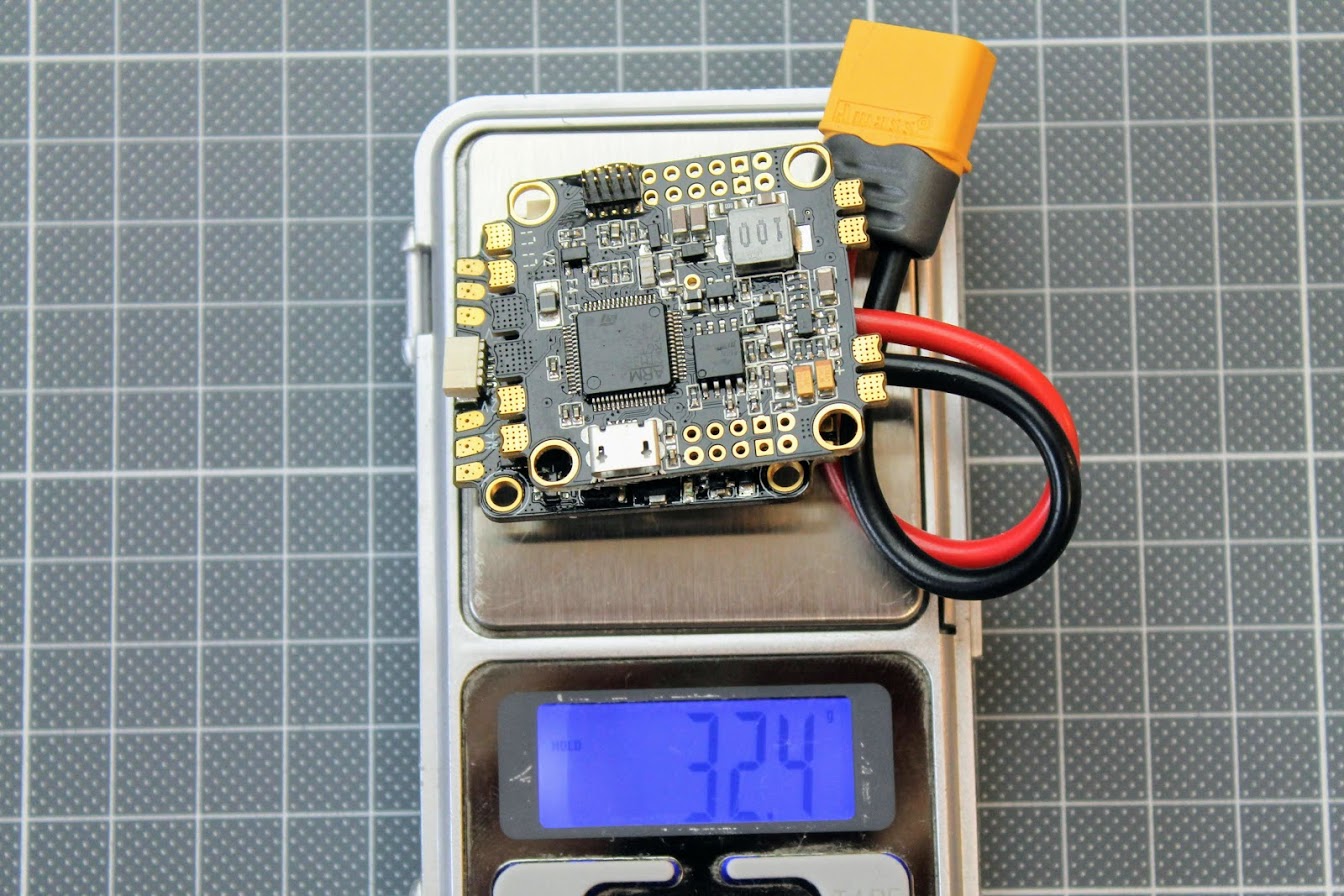
It is fascinating how the electronics have evolved. Jus in the year 2017 we had separate F4 and 20A ESC full size boards. Here is the BetaFPV F4 20A AIO comparison with the DYS F4 FC and F20A 4in1 ESC.
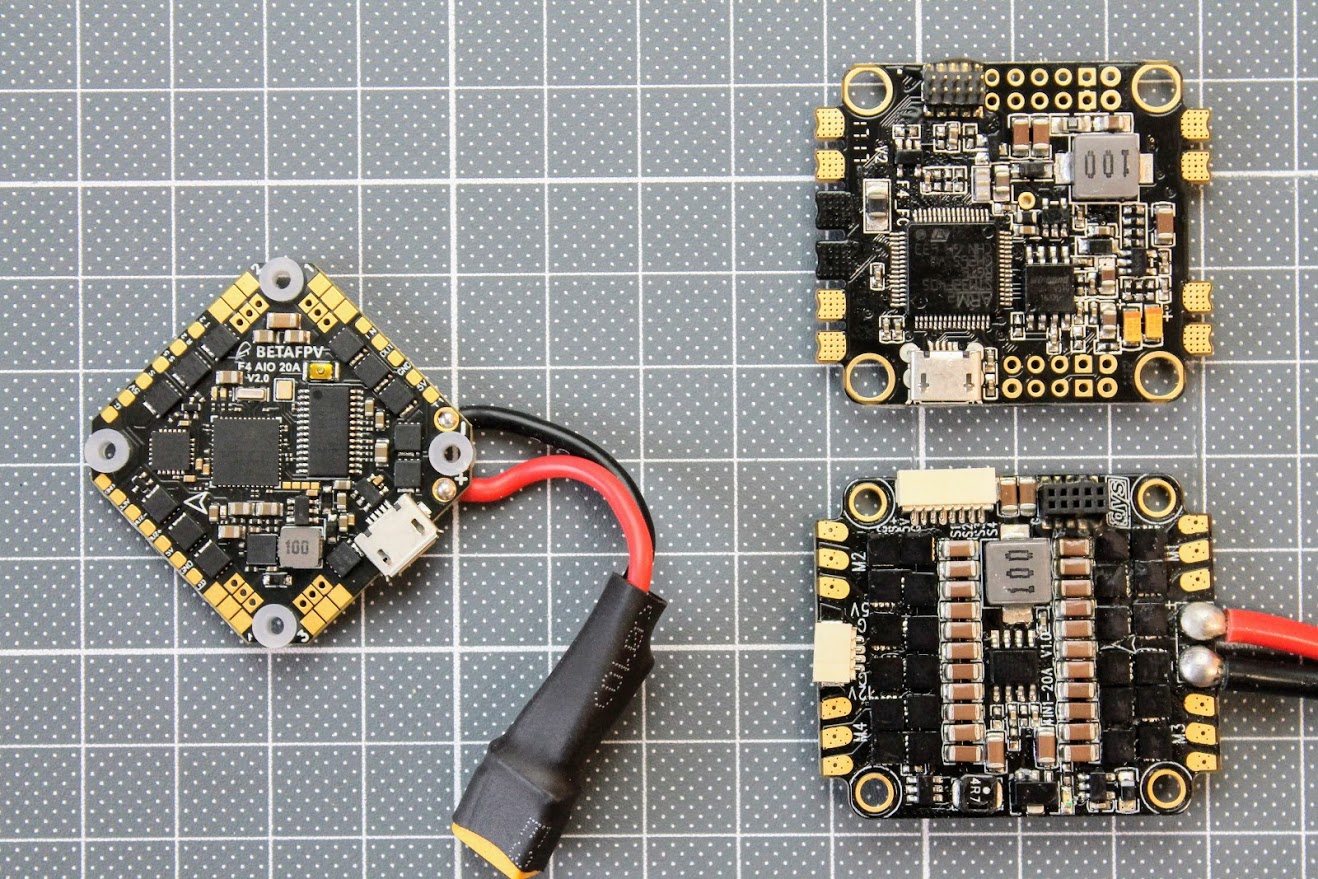
The difference in the weight – DYS F4 and 20A ESC combo weights about 32 grams.
And BetaFPV Toothpick F4 20A AIO board weights only 10.1 grams.
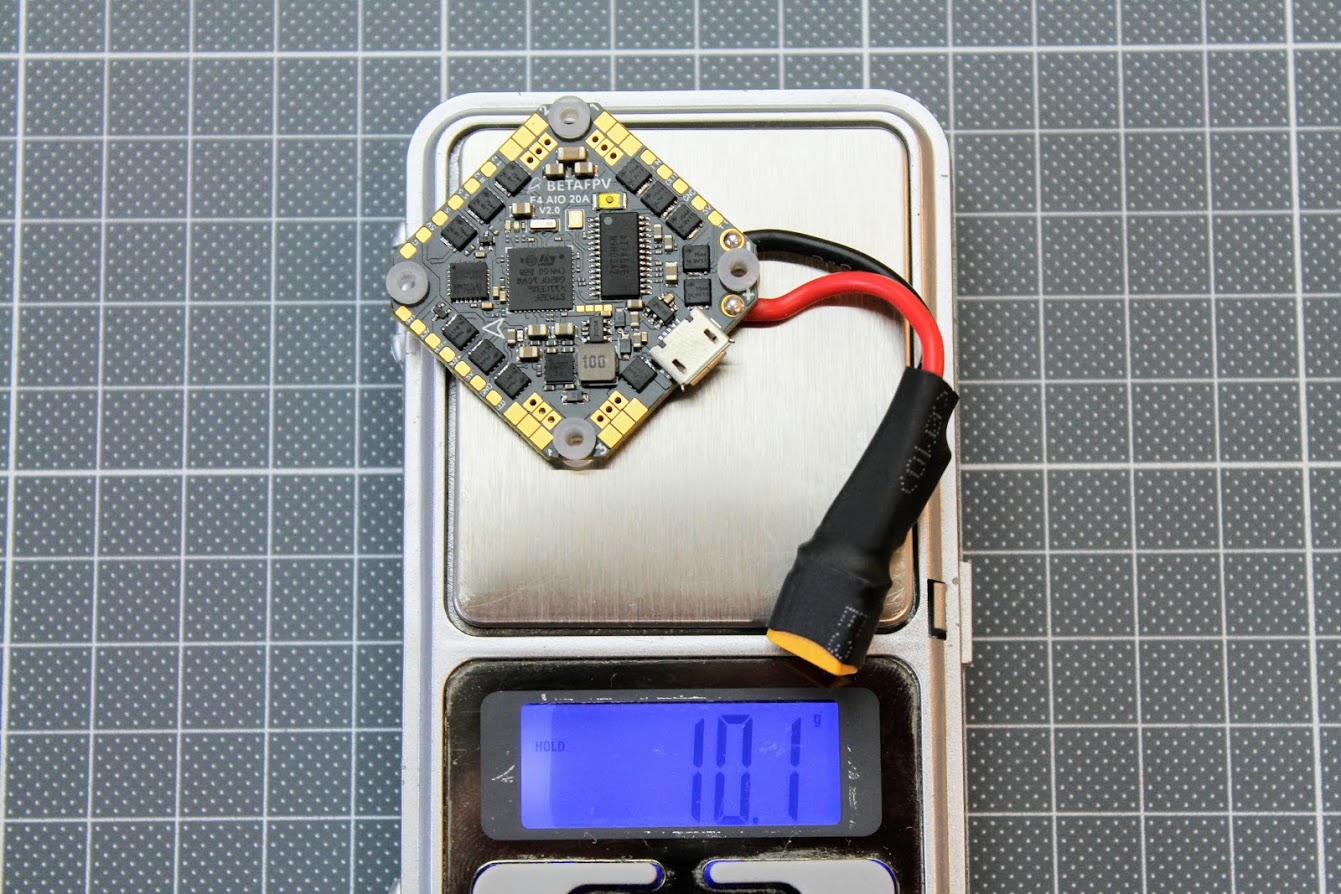
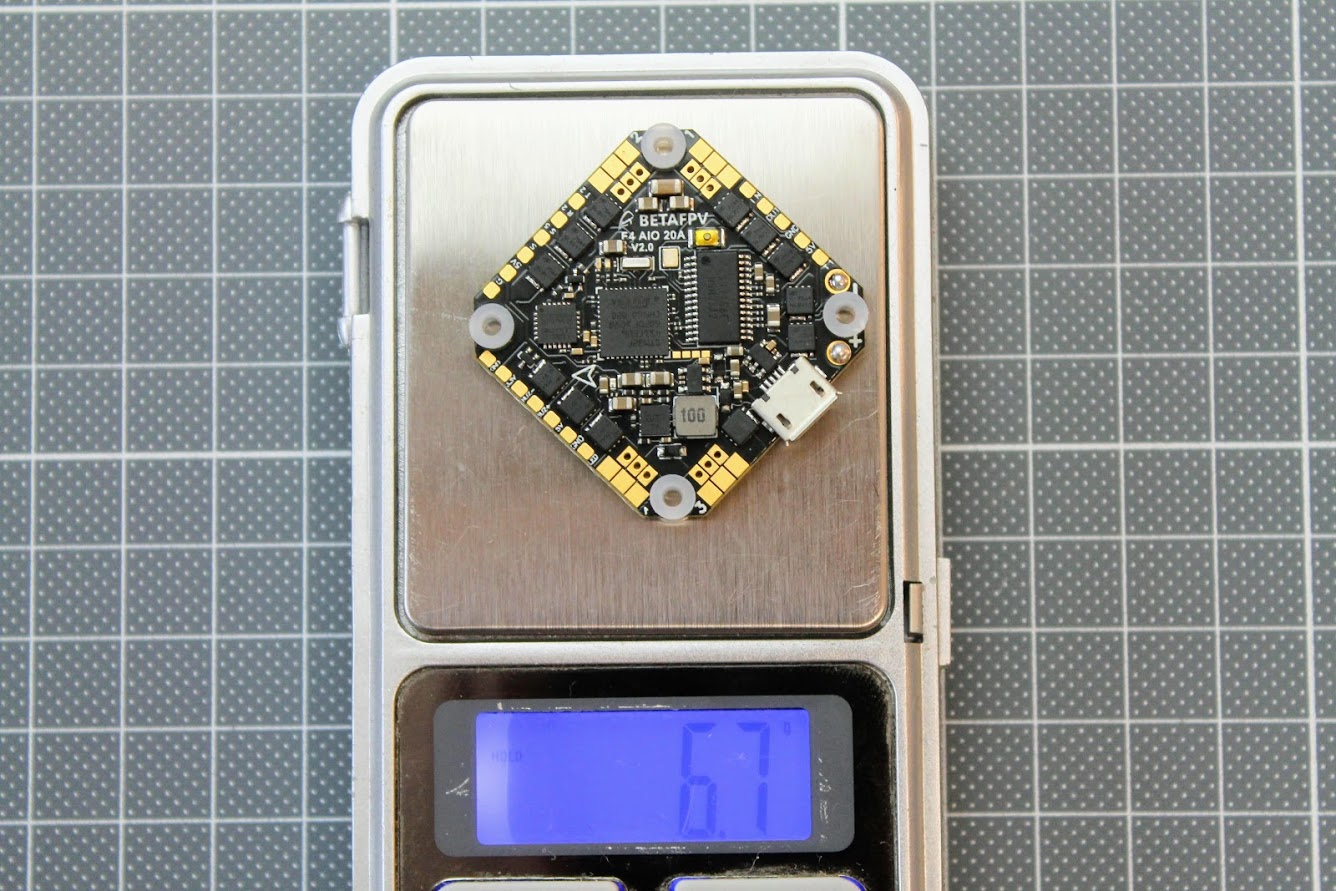
The dry weight of the BetaFPV F4 20A AIO board is about 6.7 grams.
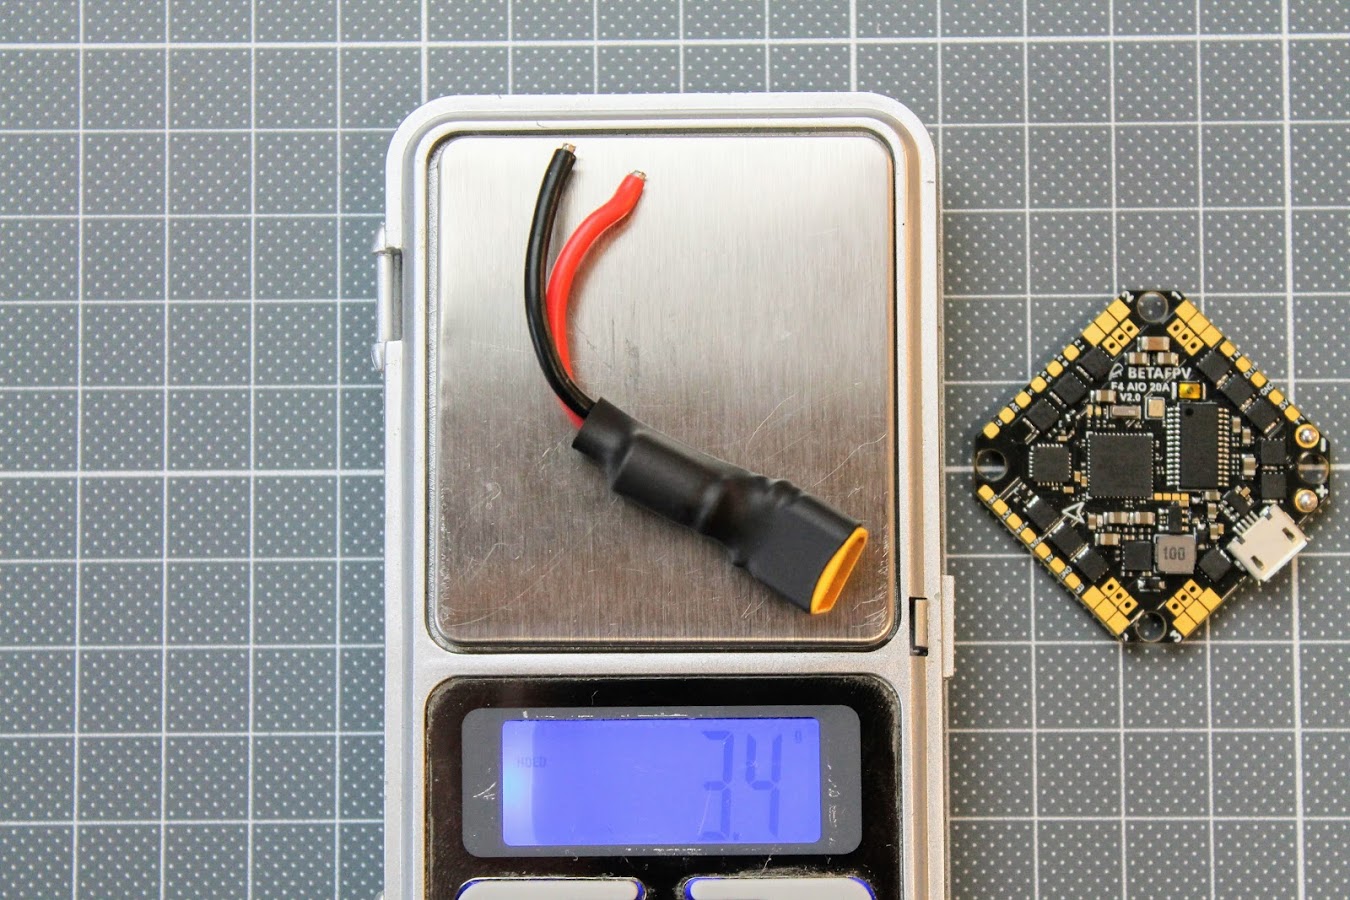
And the supplied XT30 pigtail with capacitor weights 3.4 grams.
Installation and configuration
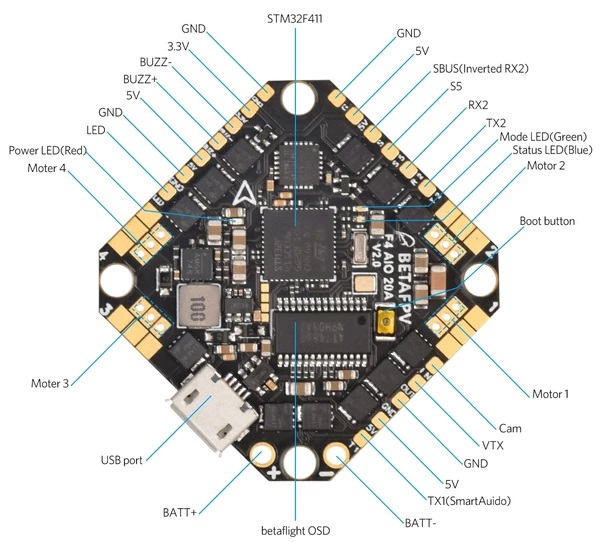
BetaFPV F4 20A FC V2 connection diagram.
BetaFPV F4 20A FC V3 connection diagram.
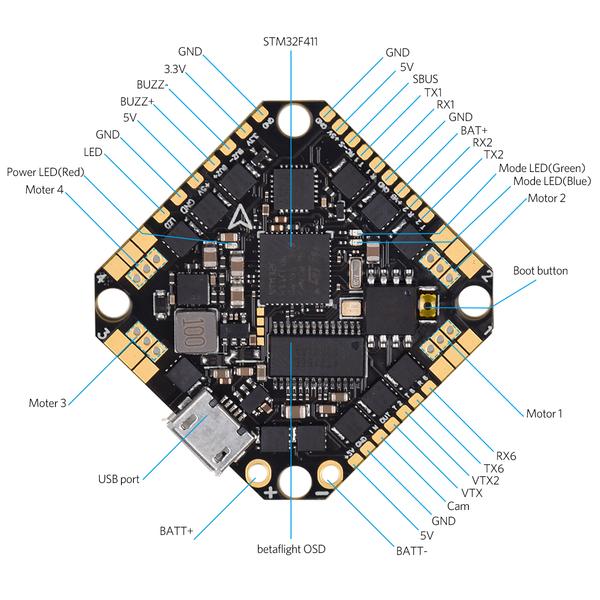
Note about the UART6 on V3 board: The TX6/RX6 ports are actual softserial UART ports and unfortunately they are not configured in factory and you will see only UART1 and UART2 in the betaflight configurator. You will need to open the CLI iwindow and type the following commands in order to set the softserial port on the BetaFPV 20A toothpick FC V3 :
resource SERIAL_TX 11 B03

resource SERIAL_RX 11 B10

save
Read more about the setting up the softserial ports here: Guide: How to set up the Softserial UART
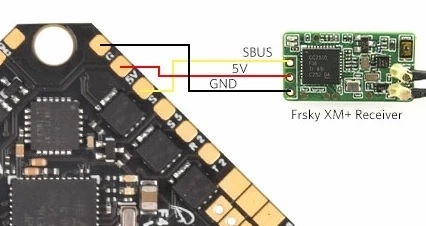
If you have a receiver with SBUS output, then you should connect the SBUS wire to the S pad on the BetaFPV board.
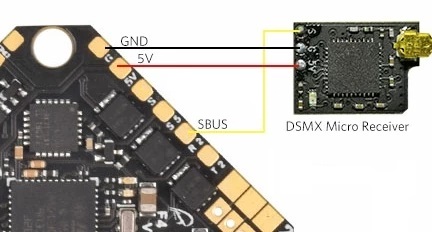
For the DSM Spectrum receivers the SBUS signal wire should be connected to the R2 (UART2) pad.
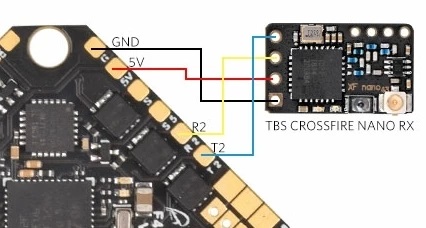
If you want to connect the TBS Crossfire Nano receiver, then you should connect signal and telemetry wires as shown below.
BetaFPV F4 20A AIO is available @
BetaFPV: https://betafpv.com/products/toothpick-f4-20a-aio-brushless-flight-controller
Disclaimer: This item was supplied by BetaFPV for a fair and unbiased review. BetaFPV never asked for a positive review and never infuenced my opinion in any way. I’m trying my best to stay uninfluenced and give only my own opinion. All affiliate links if there are any help me purchase items for future reviews.
2019-10-28 – Article created
2020-01-24 – Updated with V3 version info
2020-09-11 – Fixed Spektrum DSMX receiver connection diagram.
Related Posts
-
 Review: MEPS Space SZ F7 Mini FC
MEPS (Mepsking) is a new, but emerging manufacturer, making its mark in the RC
Review: MEPS Space SZ F7 Mini FC
MEPS (Mepsking) is a new, but emerging manufacturer, making its mark in the RC -
 HGLRC Thor Pro parallel charging board
HGLRC Thor Pro charger board is battery parallel charging board with protection fuses and
HGLRC Thor Pro parallel charging board
HGLRC Thor Pro charger board is battery parallel charging board with protection fuses and
Does it accept 1s or not? Some sites say 1-4s and some say 2-4s, i am so confused atm.
Hi, this board accepts 2S minimum.
Can i connect DJI AIR UNIT with BetaFPV 20A Toothpick F4 AIO FC V2
BetaFPV 20A Toothpick F4 AIO FC V2 has only one UART2 available, which also shares the SBus input, while DJI Air Unit needs one full UART and SBus. So you can connect the Air Unit, but only the SBus and no OSD as there are not enough UARTS.
V3 of this BetaFPV has UART1, UART2 and UART6, so no problem with the connection of DJI Air Unit.
So DJI is using UART6 ? on Softserail1 and Softserial2 ?
Yes, SOFTSERIAL1 on “UART6”. And only on the V3 board.
Hi, This FC 20A AIO V3 accept rx Frsky R9 M ?
Yes, it will work with R9 receivers. It has SBUS and 3 full UART ports. No problem to connect.
I’m about to do a build with this AIO and using both a Crossfire Nano & DJI Air-Unit. Any tips on the wiring for this? The photos you use in the article for the wiring the Crossfire are from the V2 of this board, not the V3. Thank you!
You can find the V3 pinout in the article. Use RX2/TX2 for Crossfire Nano and RX6/TX6 for DJI Air-Unit. V3 was made particularly for DJI Air unit support.
Actually the UART6 is softserial and you need to configure these ports in the Betaflight CLI. I’ve updated the review with this info.
Why not using UART1 for Crossfire and UART2 for DJI instead of using UART6 (softserial) ?
You are right, why not? Crsossfire to TX1/RX1 and DJI to TX2/RX2. Should work.
I connected my DSMX receiver to SBUS on the FC and selected UART1 as the serial rx, but when I type in set spektrum_sat_bind = 9 to the CLI and reboot, nothing happens. Do you know why? Thanks!
I guess you need to connect the DSMX receiver to RX pad instead of the SBUS pad. SBUS pad has additional inversion that FrSky SBUS needs.
EDIT: I see there is some confusion in the connection diagram. Looks to be erroneous. Fixed.
What if the sbus pad lifts off. Can ireprogram sbus for Frsky protocol in the clinic?
If you lift the SBUS pad, then you are doomed! F4 (F411) MCU does not have internal inversion so you need inverter to get the inverted SBUS signal. Unfortunately FPort signal is also inverted UART signal.
Another option is to get the additional SBUS inverter (https://www.google.com/search?q=sbus+inverter) let’s say from AliExpress and wire receiver SBUS output to the any UART RX pad through the additional inverter.
Another option is to solder the wire to the uninverted SBUS output on the receiver (search from “XSR receiver inversion mod”).
Another option is to get the FrSky receiver with uninverted SBUS output (rare).
Hi Montis, I’m new to building and have the v3. I’m still running analogue and I’m struggling with connecting the VTX/CAM. where do I connect the smart audio up to? Thanks Chris
Hi. To use SmartAudio you need to connect the VTX SmartAudio pin to the TX pin of any UART. You can use TX1 or TX2 or even the TX6 pad on the BetaFPV 20A Toothpick F4 AIO V3.
Look at the SmartAudio tutorial for more info: http://www.dzskam.com/guide/guide-smartaudio-vtx-control-and-how-to-set-it-up
Hello Montis,
Just got a brand new 95x v3 with the new toothpick v4 (plug and play / f405 processor). I have a caddx vista attached to it. I was not able to get the OSD working. I double checked BETAFPV’s wiring. Everything looks good. Uart 4 msp ticked, OSD and Telemetry tricked underbetaflight. OSD custom turned on and both Goggles & vista updated properly.
What I am missing ? :/
Thanks mate !
Hi,
Not sure what is wrong with your configuration. I don’t use Digital FPV, so I have no experience with it. The configuration of the BetaFPV Toothpic F405 FC should be as following: