Review: BetaFPV LiteRadio 2 radio transmitter
BetaFPV has released the small batch of their new LiteRadio 2 radio transmitters. This batch was more like pre-release beta units for testing. I have purchased one as I found it interesting to test. Mine had FrSky D16 FCC firmware built in from the factory.
LiteRadio 2 features/specifications
Real gimbals (smaller size than full sized radio)
8 channels
4 switches: 2 – two pos and 2 – three pos
Optional protocols: Bayang, Frsky D8, Frsky D16 FCC ans D16 LBT
Runs on OpenTX firmware
Can be used as USB joystick for simulators
Trainer function
Bind and setup functions
BetaFPV LiteRadio 2 radio transmitter comes with 2 pcs BetaFPV 300mAh batteries and 1S BT2.0 battery charger/tester.
![]()
BetaFPV LiteRadio 2 has real gimbals with adjustable height sticks. Stick thread is 3mm.
![]()
Radio has power button in the middle. You need to press the button for at least 2 seconds to turn the radio on and at least for 3 seconds to turn the radio off.
![]()
On the bottom side of the radio you can find the MicroUSB socket for connecting the radio to the computer and 3.5mm socket for trainer connection.
![]()
There are 4 switches located on the top side of the radio.
![]()
One three position and one two position switch on the each side.
![]()
On the back side of the transmitter you can find Setup and Bind buttons.
![]()
BetaFPV LiteRadio 2 is powered by 2S battery. There is a 2x 1S battery adapter for connecting two 2S batteries (that are supplied with the radio).
![]()
However the battery bay is too small and you need to figure out how to manage to fit the batteries inside.
![]()
Luckily there is small slot for battery leads and somehow you can fit them inside.
![]()
Fully charged BetaFPV 300mAh batteries last for about 1 hour and 15 minutes, when the LiteRadio 2 starts to flash the power button led.
BetaFPV LiteRadio 2 comes with the BT2.0 battery charger/tester. It is handy tool for checking the 1S BT2.0 battery voltage. It would be nice if the radio had internal charging circuit for charging two 1S batteries or one 2S battery internally.
![]()
Charger has two sockets for BT2.0 batteries.
![]()
The size and shape of the radio is perfect fit for thumbers. The same feel as having the game controller in hands. The pointer finger can access the switches easily.
![]()
However the LiteRadio 2 is just too small for comfortable use for pinchers and hybrid type users.
![]()
![]()
The power button has three color LED light. It is lit in GREEN while powering (starting) the radio, turns into RED if the sticks/switches check failed and turns into BLUE on normal operation.
![]()
Inside the radio
You have to unscrew the 8 screws to open the LiteRadio 2.
![]()
Mine came with one screw missing.
![]()
Inside you can find the main board, RF board, gimbals and switches.
![]()
Closer view of the left gimbal. You can see the metallic throttle tension bar. You can adjust the tension by screwing or unscrewing this bar.
![]()
Right gimbal with two springs.
![]()
Gimbals have simple potentiometers for each axis.
![]()
Closer look at the main board. On the top part of the board you can find the power supply circuit.
![]()
On the bottom part of the main board you can find the MicroUSB and trainer sockets as well as SW1 (setup) and SW2 (bind) buttons.
![]()
RF board has CC2500 RF Transceiver and CC2592 power amplifier/ range extender chips.
![]()
Below the RF board you can find the STM32F205 MCU chip. There are also SW16 bush button and JP15 socket for ribbon cable. Their purpose is unknown.
![]()
On the top of the radio case there is patch antenna attached.
![]()
RF module
![]()
![]()
Binding the receiver
In order to bind the receiver to the LiteRadio 2 you need to
- Power the transmitter on.
- Put the receiver into bind mode.
- Press the BIND button from the back of the transmitter.
![]()
The transmitter will enter the binding mode and last about 10 seconds, indicated by BLUE and RED LED flash alternately.
- Check if the receiver bonded successfully. If not, redo the steps above.
Binding procedure is really simple and I succeeded to bind the Meteor 65 from the first try.
How to switch the protocol (D16/D8 Version)
| LED Status | Protocol Version |
| Flash Once | Frsky D16 FCC |
| Flash Twice | Frsky D16 LBT |
| Flash Three Times | Frsky D8 |
Use with Simulators
In order to use this radio with PC simulators, just power the radio and connect it to the PC via micro USB cable. The LiteRadio 2 will be automatically detected as joystick device (Taranis).
Tip: if LiteRadio 2 is not recognized a joystick, then check this guide: OpenTX Radio not working in simulator issue fix
Setting up the radio
OpenTX settings are accessible only via OpenTX Companion. Only the special Companion version works with the LiteRadio 2.
Download link: https://github.com/BETAFPV/opentx/blob/LiteRadio/companion/companion-windows-2.2.4.exe
By default the LiteRadio 2 connects to the PC in USB Joystick mode. In order to connect the transmitter to the OpenTX Companion you need to Press and hold the SETUP button from the back of the transmitter. Press the power button on the transmitter. And then release both buttons. The power LED ring will not power on. Now the transmitter is in SETUP mode and you can scnnect the transmitter to the computer via a USB cable.
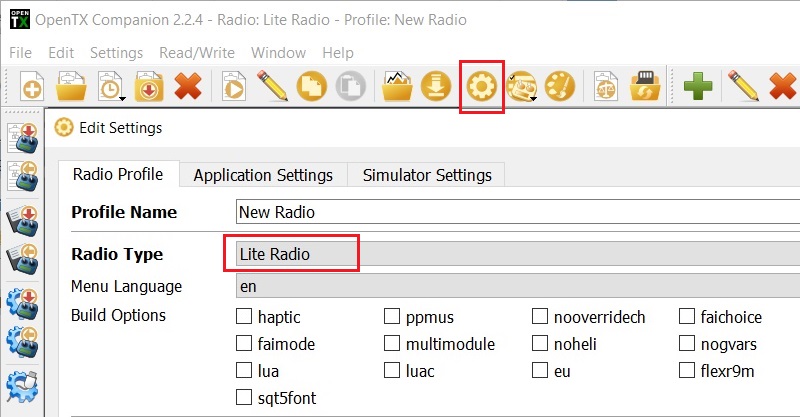
Open the OpenTX Companion software. Set the radio type to Lite Radio in the settings page.
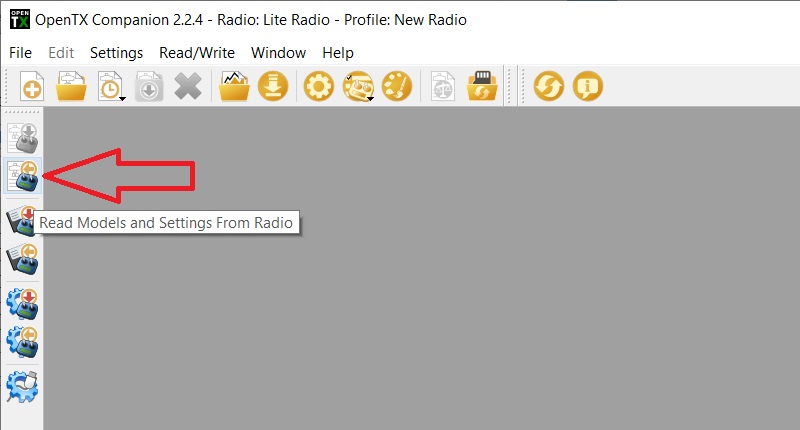
Download the all the Models and Settings from the Radio by pressing the button shown below.
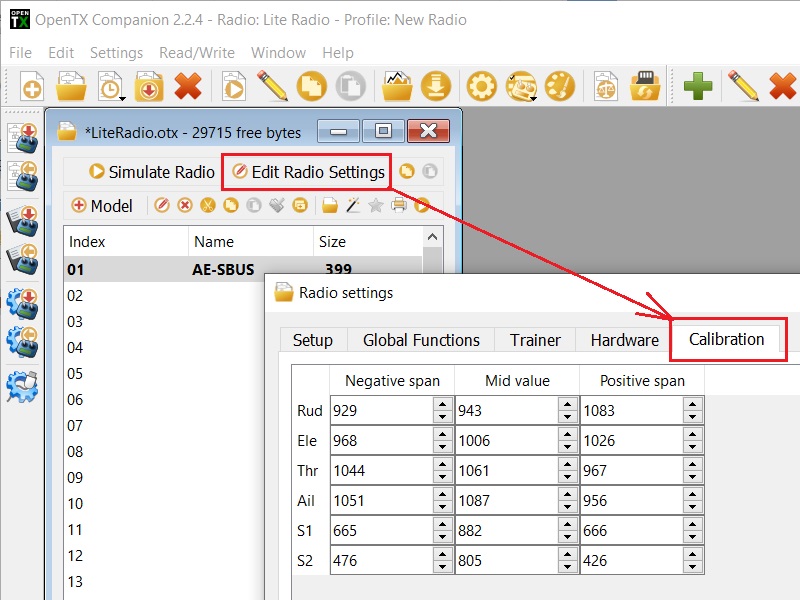
One of the most important settings that you might want to change is trim the center point (midpoint) of the Roll, Pitch and Yaw axis.
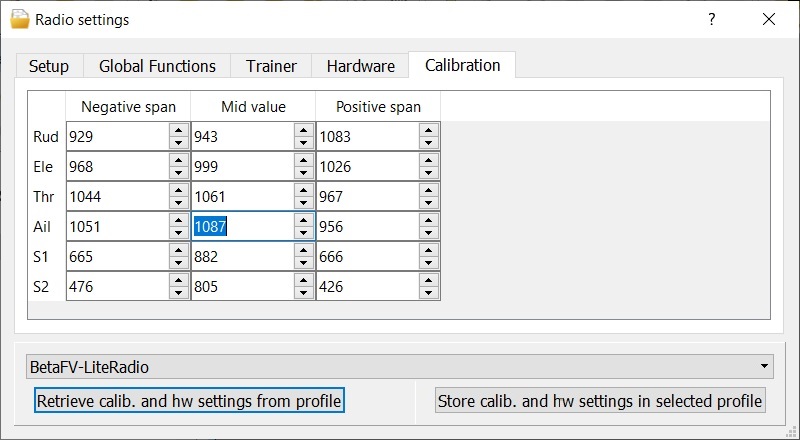
In order to calibrate the midpoint of the axis, press Edit Radio Settings button and select the Calibration tab.
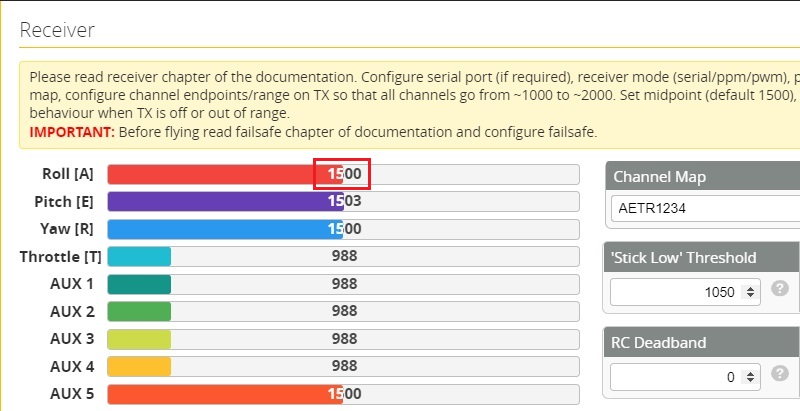
Check the midpoint value in the Betaflight Configurator Radio tab. In our case the Aileron (Roll) axis midpoint value is 1506 (should be 1500).

Calculate the calibrated Mid Value according to the equation below. Calibrated Mid Value = Original Mid Value + ( Mid Value from Betaflight Configurator – 1500) * 2
On our case it is Calibrated Mid Value = 1075 + (1506 – 1500)*2 = 1087
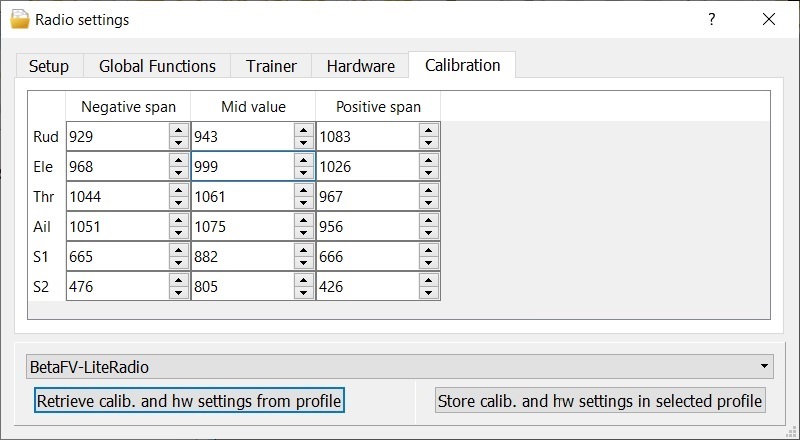
After this save the settings to the radio by pressing Write Models and Settings To Radio button.

That’s how the calibration of the midpoint is done. Now the Roll axis is perfectly centered.
Conclusion
The small size of the BetaFPV LiteRadio 2 makes it very portable. Actually it is the smallest OpenTX radio. Game pad style shape is common for gamers and is really comfortable for thumbers. The radio is just too small for pinchers and hybrid users.
The LiteRadio 2 comes with batteries and charger included, which is not a common, but great thing – you don’t need to worry about additional batteries and chargers for this radio. It would be great if the radio would have internal charging capability via micro USB connector.
The LiteRadio 2 has no LCD screen an no navigation or setup controls except BIND and SETUP buttons. This radio is made to be super simple to use. Just bind and fly. However the lack of LCD screen and ability to change the settings directly on the radio is a huge disadvantage for advanced users. Of course there is possibility to change settings via OpenTX Companion software, but is much less convenient.
The gimbals on this radio are surprisingly good. They feel like normal full sized radio gimbals, they center very well and they have almost no dead band in the middle. You can adjust the tension of the throttle axis, but no spring tension adjustments on other axis. Have in mind that there are no trim buttons on the radio, so you will have to use OpenTX Companion for adjusting the center of the gimbal axis.
A built in speaker would be nice! User is unaware that battery is depleting – nobody sees the flashing lights on the radio while wearing the FPV goggles. Haptic feature would also be great addition to the sound warnings.
There are a number of things that could be improved and there is no such thing as perfect radio. However this could be a good option for the first beginner radio or as a part of Ready To Fly quadcopter kit.
Update 2020-04-21: BetaFPV has just released the production version of this radio transmitter. Now you can select the radio protocol (Frsky D8, D16 EU or D16 FCC) by holding the bind button. Radio also can be charged by micro USB cable with built in charger! Radio also comes with one 2S battery instead of the 2 pcs of 1S batteries. Great improvements.
Update 2021-01-05: BetaFPV has LiteRadio 2 SE Radio Transmitter is available.
What was changed:
-
Built-in 1000 mAh 1S battery
-
Type-C USB Charging Connector
-
Customized LiteRadio firmware for 100mW RF Power instead of the OpenTX firmware
-
Less power consumption – 8hrs working time instead of 3hrs with 350mAh 2S Battery
Comparison of LiteRadio 2 SE and LiteRadio 2
| LiteRadio 2 SE | LiteRadio 2 | |
| System | Customized LiteRadio System | Opensource OPENTX |
| Power | Built-in 1000mAh 1S Battery | Removable 350mAh 2S Battery |
| RF Power | 100mW | 80mW |
| Working Time | 8 Hours | 3 Hours |
| Protocols | Frsky D16 FCC/D16 LBT/D8/Futaba S-FHSS, Bayang | Frsky D16 FCC/D16 LBT/D8, Bayang |
| Joystick Calibration | Yes | No (but possible with OpenTX Companion) |
| Firmware Update | Yes | No |
Fun fact: the LiteRadio 2 is the cheapest OpenTX radio on the market.
BetaFPV LiteRadio 2 can be purchased @
BetaFPV: https://betafpv.com/collections/tx/products/literadio-2-radio-transmitter
GetFPV: https://www.getfpv.com/betafpv-literadio-2-radio-transmitter-frsky-d8-d16.html
BetaFPV LiteRadio 2 SE can be purchased @
BetaFPV: https://betafpv.com/collections/tx/products/literadio-2-se-radio-transmitter
Related Posts
-
 Review: MEPS Space SZ F7 Mini FC
MEPS (Mepsking) is a new, but emerging manufacturer, making its mark in the RC
Review: MEPS Space SZ F7 Mini FC
MEPS (Mepsking) is a new, but emerging manufacturer, making its mark in the RC -
 HGLRC Thor Pro parallel charging board
HGLRC Thor Pro charger board is battery parallel charging board with protection fuses and
HGLRC Thor Pro parallel charging board
HGLRC Thor Pro charger board is battery parallel charging board with protection fuses and
Hi, which model out of Frsky D8 or Frsky D16 FCC version would be best to buy for my mini quads with inbuilt D8 spi receiver?
Hi, good question. Most build in SPI receivers can work in D8 and D16 mode. D16 mode sometimes has range and reliability issues with these receivers. Many users recommend to fly in D8 mode to solve these issues.
So my answer is better use D8 mode receiver/transmitter for the miniquads with build in SPI receivers.
Also have in mind that first batch were beta test units (mine worked without problems though), and we should wait for the final product.
Good news. The final version of the BetaFPV LiteRadio 2 has all 3 protocols (D8, D16 FCC, D16 EU) built in. You can switch them by holding BIND button.
Currently 10% off coupon STAYHOME is working.
EDIT: Oh, they are sold out already…
Great review, thanks.
My only concern with the lack of a screen — how would I switch models without plugging into a laptop?
Would I have to rebind each time?
That would be a deal breaker sadly, otherwise looks great.
Thanks for your feedback!
You can bind multiple receivers to this radio (as any other Frsky compatible radio). This means you can control any number of the quads (or other aircrafts) with just one radio. I have 2 models in my other OpenTX radio for all the quads with Frsky receivers: one for D8 and another for D16. In BetaFPV LiteRadio 2 you can switch between D8, D16 and D16 LBT with a help of Settings push buttton. So you can control almost any number of quads with LiteRadio 2.
Is it just binding to whatever models are within range, or is there a way to swtich manually?
I’m fine with either method, I only fly one at a time, but is it as simple as “once you’ve bound to a receiver, it will always bind to it?”
Like, if I bind it to a TW and a TinyHawk and a Babyhawk, will it just automatically switch to control whichever one is turned on?
You can bind any number of the receivers (quads) to this radio. And it will control any of them that is turned on at the moment. The radio does not know what receiver is or how many of them are bound to it. It is the receiver who memorizes the radio ID and keeps listening to that particular radio. And this is really convenient. The same way the other FrSky radios works. Radios with FrSky ACCESS system have much sophisticated binding and model match functions.
i actually ended up purchasing this radio and i cant get it to connect to my computer or at the very least opentx isn’t reading it. I’ve followed your instructions in the guide but no luck. any tips?
Does it connect to PC in joystick mode by powering on the radio first and then plugging the usb cable to the PC? Does it appear as Joystick in device manager?
That happens to me too. And yes I do all those steps and it works as a joystick. I use it with LiftOff. When I press ‘setup’ then ‘power’ I enter firmware flashing mode (blue ring and 3 beeps). Cannot get it to enter setup mode though (no light around power button)
BetaFPV discontinued the LiteRadio 2 and started selling LiteRadio 2 SE Radio Transmitter. Maybe you have purchased the SE version of this LiteRadio? SE version has custom BetaFPV firmware and will not work with OpenTX Companion.
Just got mine a couple of days ago. I bought it, basically to play sims and learn acro mode and eventually get a small quad with Frsky receiver (probably betafpv) but it’s been a total disappointment ??. I got it connected as a joystick and even try open TX. Connection is fine, but it is just impossible to calibrate. Z and X axis that in the radio are the throttle and yaw (left stick, cause is in mode 2) just go nuts like you are moving them non-stop. That’s on windows joystick settings, if you try to calibrate it inside two different simulators, also tries different computers and USB cables, we’ll you just can’t get It to work. It goes nuts. I’ve contacted betafpv help desk and their answer was ***”Sometimes there is such a situation that it can not be calibrated on the simulator.
We would like to know that you have drones or not?
We recommend that you calibrate directly on the ?drone”**** Sorry, but if you claim that you can use it on simulators, that’s not the answer I was hoping for. In the end you get what you pay for I guess. Too good to be true. Let’s hope I can return it.
BetaFpv has just gone silent, even though I’ve sent them video proof. Very poor Customer service. I won’t buy from BetaFpv ever again. Forget about the 30 day period warranty. If whatever you buy is defective, well tough luck. I’m glad I didn’t buy anything more expensive.
Hi Rony,
I had the same problem and I solved modifying in opentx companion the inputs weight and offset both to 50 as described in the following video: https://www.youtube.com/watch?v=HuAktw_czZg
The video is for another radio but the logic is the same.
Be very careful when you modify the configuration with opentx companion and before making any change, do a full backup of the configuration.
Hope it helps.
Kind regards,
Edoardo.
This is nothing to do with controller. Its totally compatible with any SIM.
All you need to do is to downgrade your joystick driver from Better_usb_hs to usb Input Device. That’s all.
You can check my YouTube chanal “jacking-up fpv” I have a video about it. Unfortunately it’s on Russian language, but it’s all screen video, so you will follow same steps.
I bought Beta LiteRadio 2 FrSky just view week ago…
but. i got my devices not good.
throttle stick not steady in low level. always little jumping when i see in BetaFlight.
not only that, i got problen when i turn on my LiteRadio 2, the TX always show throttle warning, then i push down hard my throttle, the warning gone and TX be normal.
how i can fix that?
Try re calibrating the sticks. See the instructions in the review.
i have the same issues, can’t calibration because the channel never stop, its just go up and down.
Can this be configured to be in MODE3? Can it be configure with channel mapping?
Possible. For changing modes from MODE2 to MODE3 you need to swap the gimbals (or swap the throttle tension bar and elevator tension spring, but it is more tricky). Then adjust the input maps in the companion software. Notice, that this radio needs special companion version. See the link in the article.
How do i bind lite radio 2 with Beta85X HD quadcopter
Supposedly your Beta85X HD has FrSky receiver (onboard) then you should switch the LiteRadio2 to the appropriate FCC D16/D8 or LBT protocol (see the instructions on protocol switching in the review) and then turn the binding mode on the quadcopter and LiteRadio2 (also see the binding instructions in the same review)
hello, you are new to this and I bought a beta65 lite starter kit, so I read it comes with bayang protocol, do you know if I can change this to frsky via software or would it be hardware? Thanks in advance
Hi, BetaFPV Beta65S Lite Whoop Starter Kit has Beta65S Lite FC board with Silverware firmware and Bayang protocol. There are two versions of LiteRadio 2 Transmitter: one for Bayang protocol and other for FrSky procotols. These two transmitters have different radio part (hardware) therefore Bayang Radio cannot be used for FrSky receivers.
Ok, thank you very much for the clarification!
I like to get feedback that drone battery is low for when flying line of site? I haven’t tried yet does the radio support audio with a set of headphones through the audio jack?
No, it does not have the audio notifications. That audio (3.5mm) jack is for trainer connection, not the headphones. In theory it should make the haptic feedback on the low RSSI. I don’t remember it doing that though…
I believe I read that the power button on the radio would flash or change in some way for low battery warning?
Yes, you’ll have flashing power button and the haptic feedback (vibration) when the battery will get low.
Hello,
My throttle has this jerky motion at some ranges. Is it possible to add a drop of Deoxit to the potentiometers to try to fix it?
Thanks,
I doubt the miracle lube will make the wanted results (see the thread: https://audiokarma.org/forums/index.php?threads/so-i-ruined-my-volume-pots-with-deoxit.683957/). I would search for “B502 60 degree potentiometer” to replace or maybe look for replacement sensors on Aliexpress ( https://www.aliexpress.com/af/Joystick-Axis-Analog-Sensor.html)
Hi, I have also v1 of that radio (rebranded by Eachine and bundled with a Tyro79)
Same problem with the potentiometers now on 2 axis … they’re crap.
I tried to clean them carefully but it helped just for 2 days max, that 30%,31%,0%,70%,33% jerk is back.
Does anybody has experience with good quality potentiometers, I’m afraid to resolder it and having same issue 2 weeks later again..
Hello Dirk,
I do have problems with the potentiometers in various axis. I added a drop of Deoxit to each of them and massaged them for awhile. Now they are freaking out again.
I would have gladly paid a few more bucks for better potentiometers. I have no further complains about the radio, it is a very good radio.
Seems to be the common issue with this radio.
I bought now a bunch of better quality potentiometer for playstation controller and will exchange them … lets see, if it wont work I’ll buy another radio … maybe a RadioMaster with Hall Gimbals …
Hi,
I tried to update my lite radio 2 (v1) and didn’t make an update before. I can’t bind the radio now but i have to. I have send an Email to Betafpv about a week ago but nothing. I just need the original Firmware. Please help me, i’m just a beginner and totally lost.??
Tank you
Try to install the special OpenTX companion (https://github.com/BETAFPV/opentx/blob/LiteRadio/companion/companion-windows-2.2.4.exe) and flashing the original firmware. This is the special and the only OpenTX version (build) made specially for this radio transmitter. Don’t try to update any other as official OpenTX does not support it.
This radio controller is very problematic, many failure reports of the gimbals after a few weeks of usage, be warned !!! to see what im talking about take a look at this https://youtu.be/mknT1po24Us
Thanks for your feedback. Yeah, those gimbal potentiometers are low grade. Don’t expect them to last long.
I have cleaned and replaced 2 pot. in my FRSKY D8 / D16 with ones from the gimbals in my Bayang version. They are not made all that great. 2 piece design that in my own opinion, needs upgrading.
before we complain too much, lets consider the price we paid.
If they replace them the price, I’m sure, will go up another $10 to $20 for all four high quality potentiometers.
I would rather give the newbies a break and replace mine myself if I cared that much.
There are issues. but they come with the price.
After 1 year using this controller without any problems, the yaw axis suddenly went crap. Leftmost value was at ~1800, midvalue was at ~1900 and rightmost value was at 2000. I managed to calibrate the midvalue using the formula (oldvalue + (betaflightvalue-1500)*2). The midvalue went back to 1500, but leftmost and rightmost are still +/-100 from that middle value. I tried the same formula to change the negative/positive span, but it doesn’t work.
Is there another formula to calibrate this? Or do I need to bruteforce them?