Specifications
- Item Name: Rumcan Thumb
- Resolution: 1080P@60FPS
- Video Format: MP4
- Gyro: Built-in
- Communication Interface: Micro USB
- Support Micro SD Card Capacity: 128G Max
- USB Power Input/Terminal Power Supply: 5.0V
- Dimension: 52mmx13mmx21mm
- Net Weight: 9.8g
Features:
- Built-in Gyro
- Mini Size and lightWeight
- Detachable Lens Protection Cover
- Adjustable Angle Bracket
- 150° FOV
- DC 5V Power Supply
- 1080P 60FPS
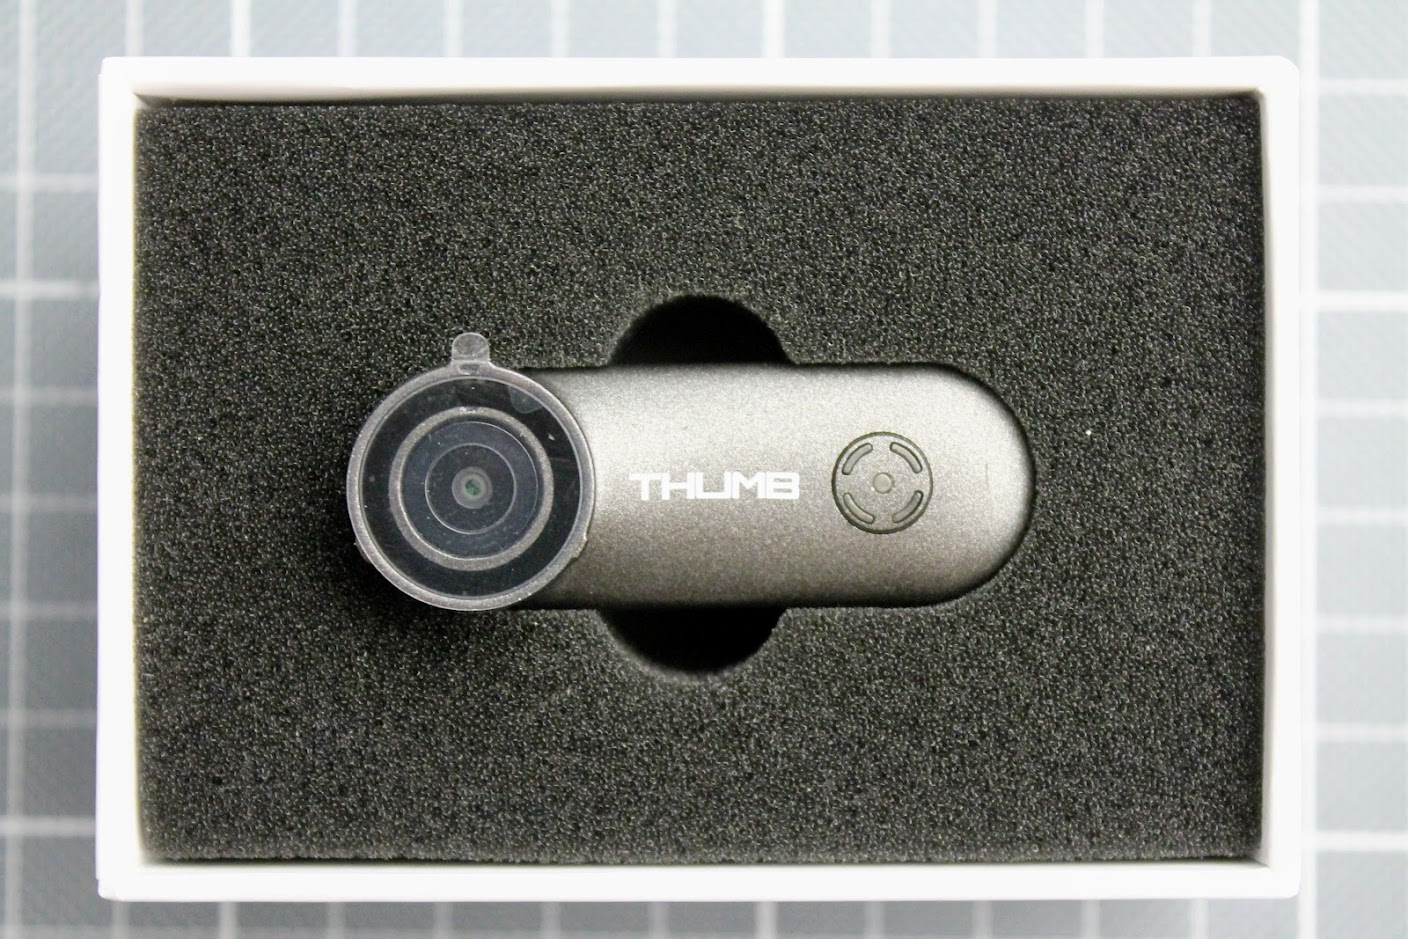
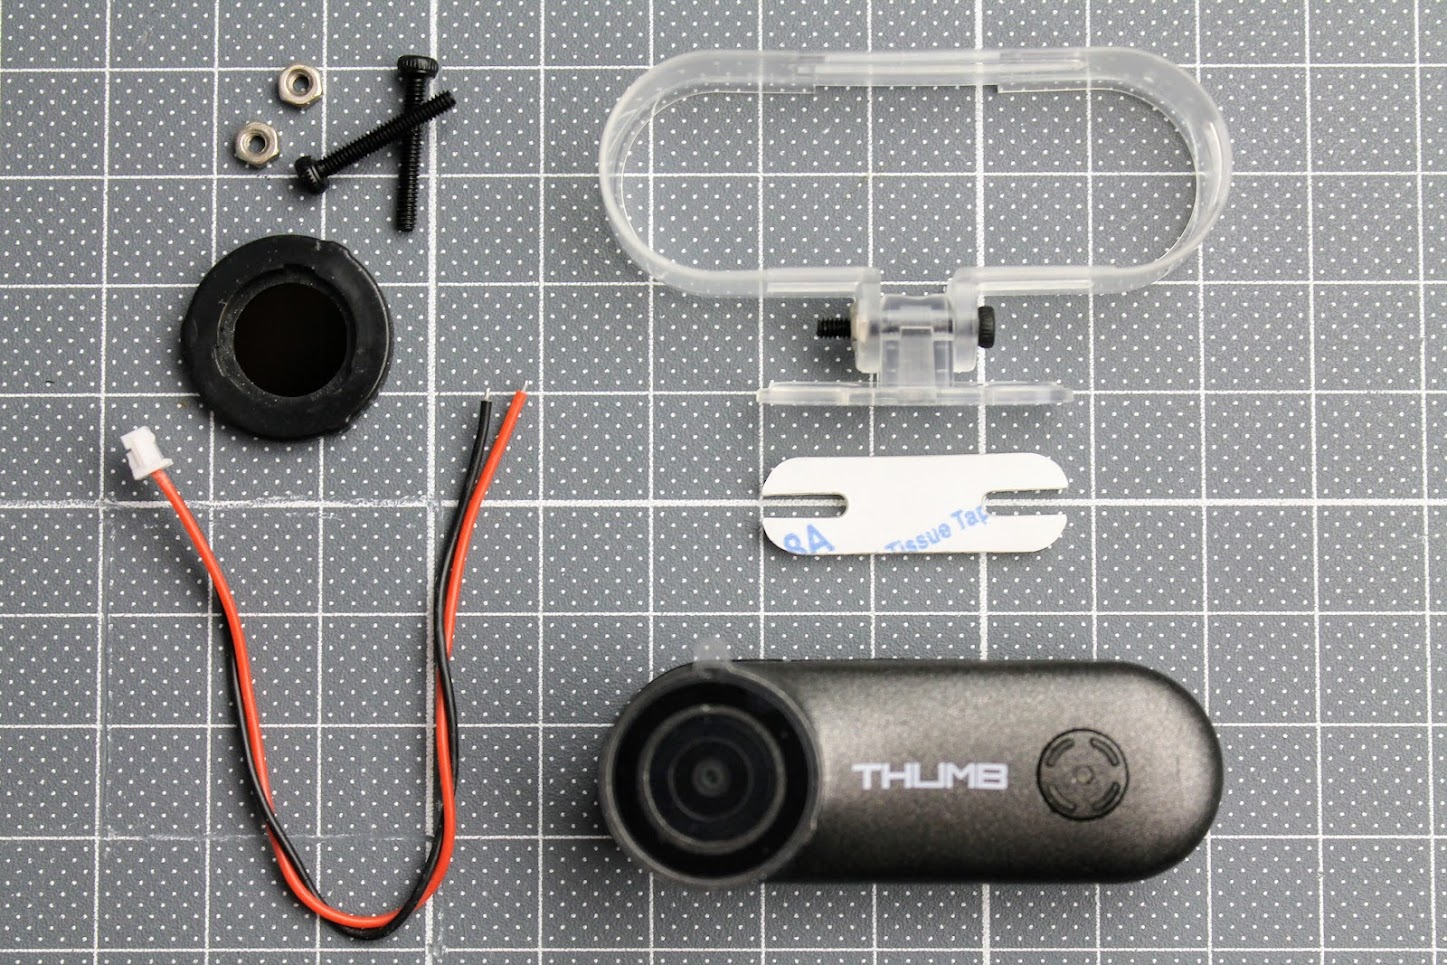
Closer look
The package contents: RunCam Thumb camera, lens protection cap, ND filter cap, power cable, camera mount with screws and double sided sticky rubber pad.
The weight of the RunCam Thumb is only 9.9 g.

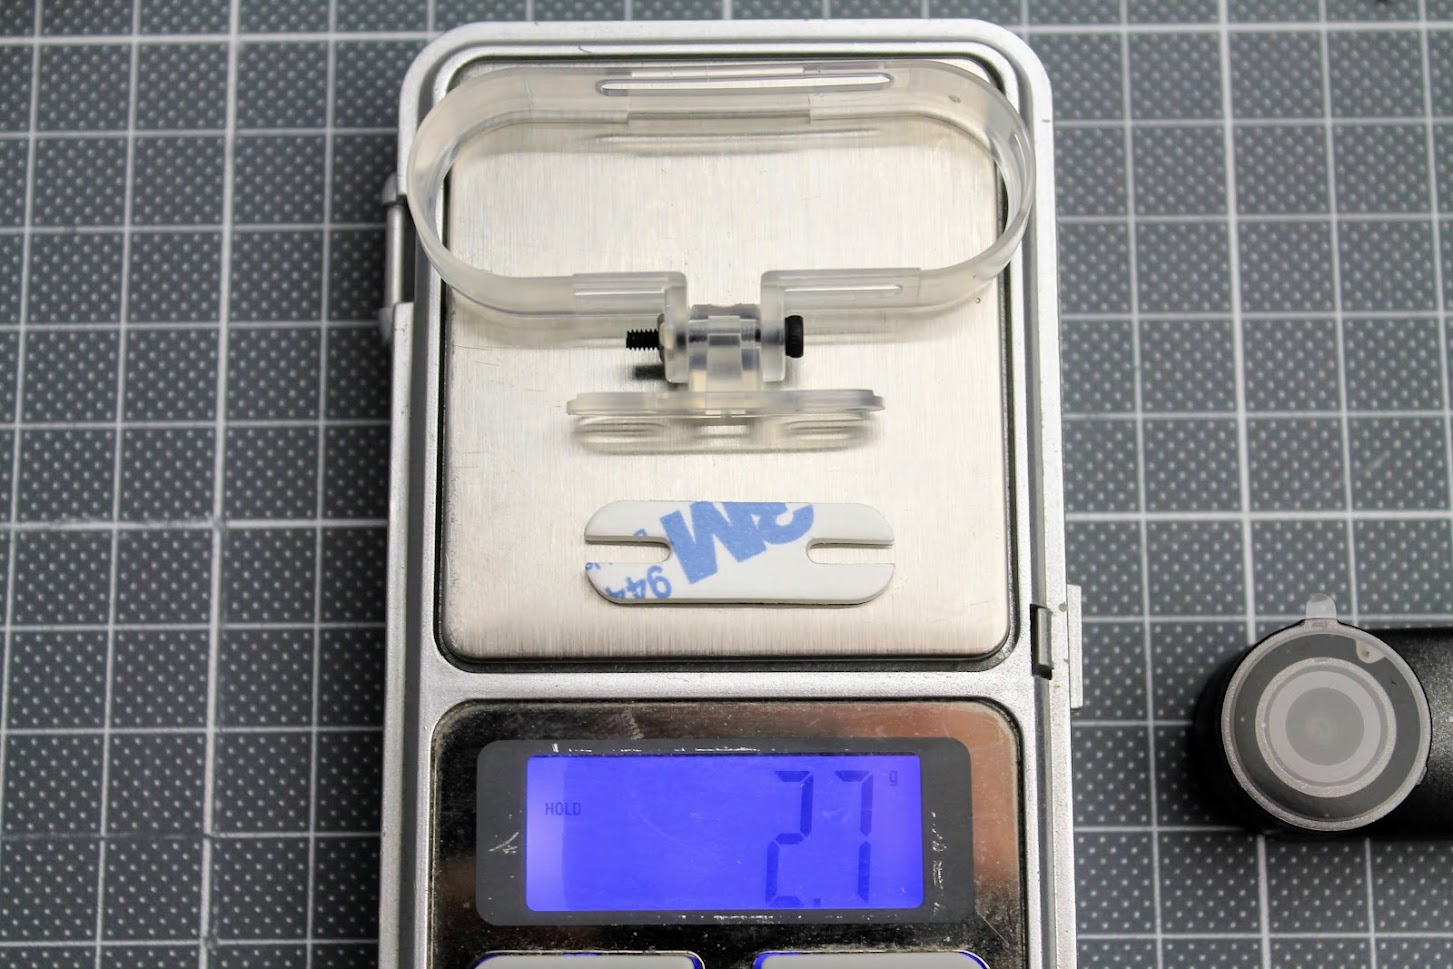
The weight of the supplied camera mount is 2.7 g.
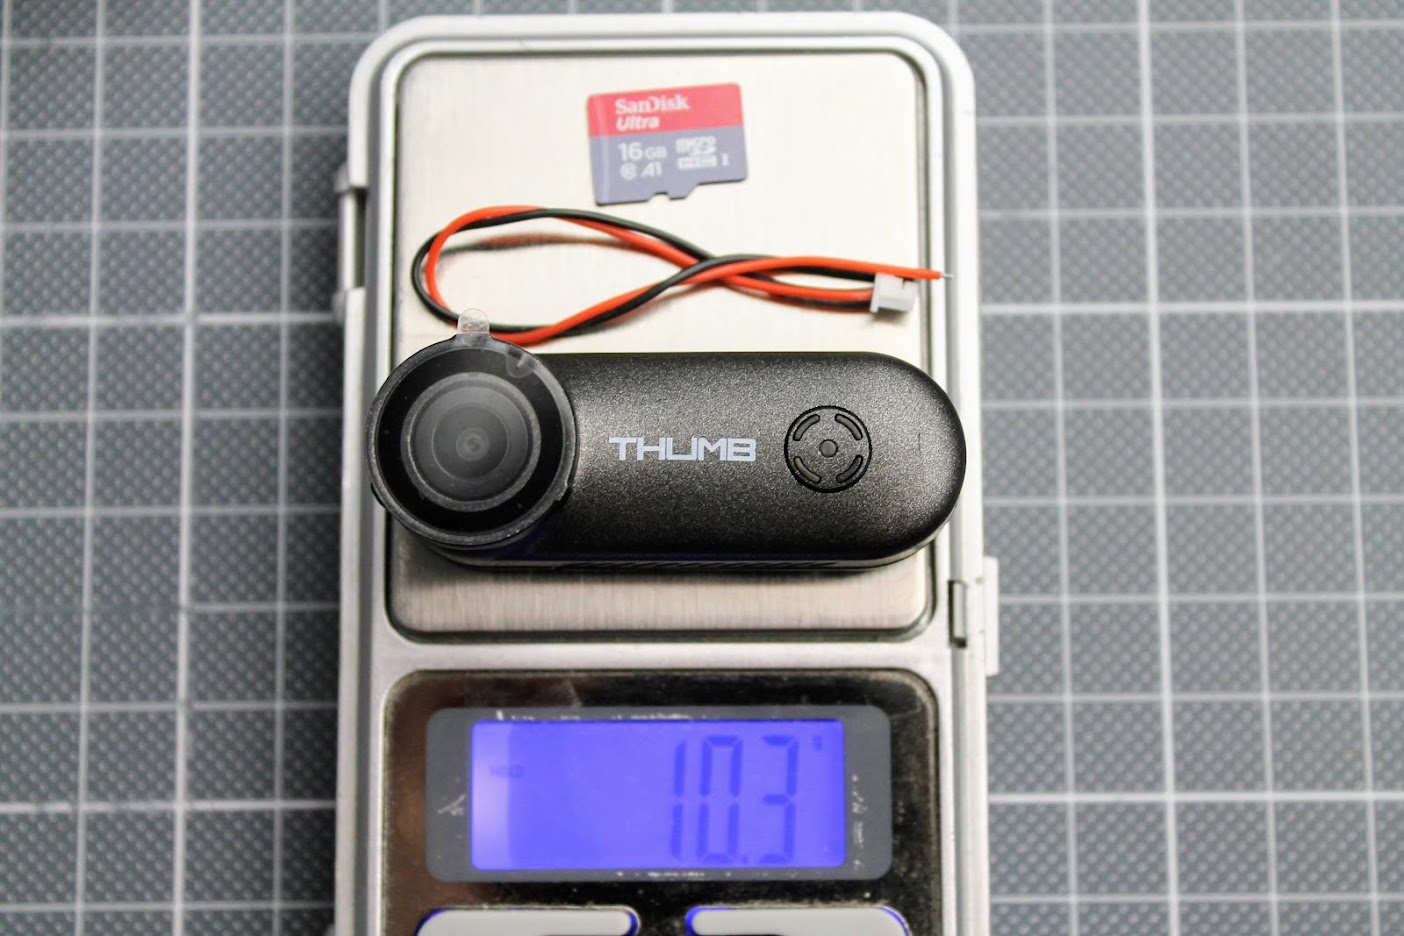
The total weight of the camera, ND filter and the power supply cable is 10.3 grams.
SD Card
The microSD card must be installed in the slot which can be accessed by removing the back cover. The recommended microSD card speed rating should be 10MB/s or faster (Speed Class 10, UHS Speed Class U1, Video Speed Class V10 or better). Refer to the chart below for SD card selection.
There is no detent or any other support for correctly inserted card, you just need to push the card until it stops, look at the example below.
The microSD card cover is somehow loose and can come off right in the middle of the flight. It is recommended to fix it with piece of tape.
Settings file
All camera settings can be accessed and changed by altering the configuration file [thumb.conf] located on the SD card.
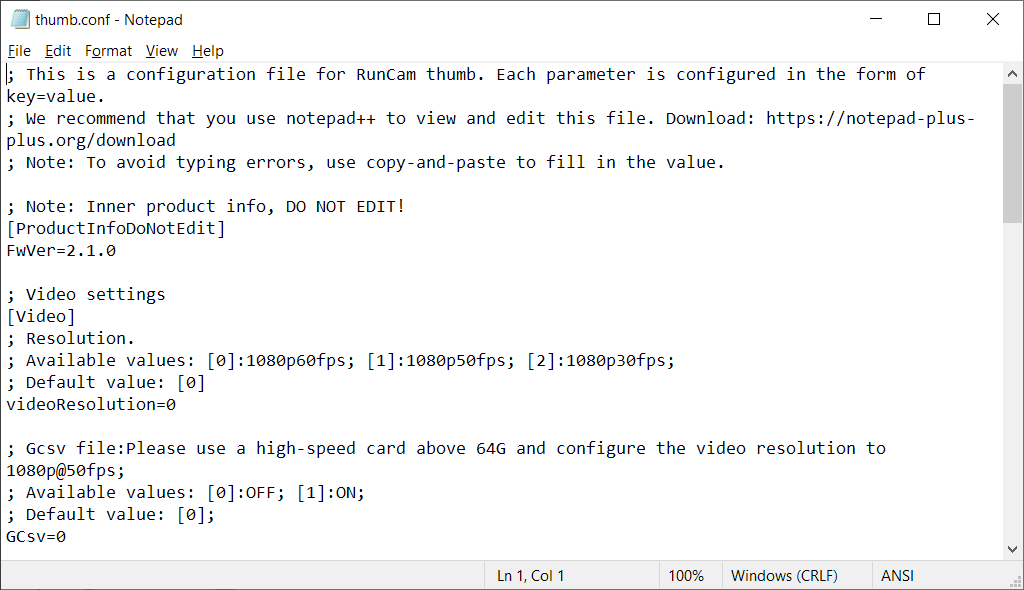
RunCam Thumb configuration file [thumb.conf] default settings are below:
; Note: Inner product info, DO NOT EDIT!
[ProductInfoDoNotEdit]
FwVer=2.1.0
; Video settings
[Video]
; Resolution.
; Available values: [0]:1080p60fps; [1]:1080p50fps; [2]:1080p30fps;
; Default value: [0]
videoResolution=0
; Gcsv file:Please use a high-speed card above 64G and configure the video resolution to 1080p@50fps;
; Available values: [0]:OFF; [1]:ON;
; Default value: [0];
GCsv=0
; Loop recording interval.
; Available values: [0]:OFF; [1]:1 minute; [2]:3 minutes; [3]:5 minutes.
; Default value: [0]
LoopRecordingInterval=0
; Auto recording switch. –
; Available values: [0]:OFF; [1]:ON.
; Default value: [0]
AutoRecording=0
; General settings
; Note: Brightness and exposure control settings are usually set to only one or the other.
[General]
; Exposure .
; Available values: [0:Lower]<—->[6:default]<—->[12:Higher]
; Default value: [6]
Exposure=6
; Brightness.
; Available values: [0:Lower]<—->[5:default]<—->[10:Higher]
; Default value: [5]
Brightness=5
; Sharpness.
; Available values: [1]:Lower, [2]:Low, [3]:default, [4]:High, [5]:Higher
; Default value: [3]
Sharpness=3
; Contrast.
; Available values: [1]:Lower, [2]:Low, [3]:default, [4]:High, [5]:Higher
; Default value: [3]
Contrast=3
; Saturation.
; Available values: [1]:Lower, [2]:Low, [3]:default, [4]:High, [5]:Higher
; Default value: [3]
Saturation=3
; White balance.
; Available values: [1]:Auto, [2]:Daylight, [3]:Cloudy, [4]:Tungsten
; Default value: [1]
WhiteBalance=1
; Power saving mode. [0]:OFF; [1]:1 minute; [3]:3 minutes – automatically turns off the camera if not recording for 1 or 3 minutes.
; Available values: [0,1,3]
; Default value: [0]
PowerSavingMode=0
My recommended best RunCam Thumb settings are:
Exposure=5, Brightness=4, Sharpness=4, Contrast=3, Saturation=5 and White balance=1.
GyroFlow stabilization
RunCam Thumb has built in gyro and can record gyro data alongside the video recordings. The gyro data is stored in the separate files with *.gcsv extension. You can stabilize the video footage with GyroFlow software.
Download Gyroflow from here: https://github.com/gyroflow/gyroflow/releases
Open (or gust drag and drop) video file and gyro motion data file into the GyroFlow software.
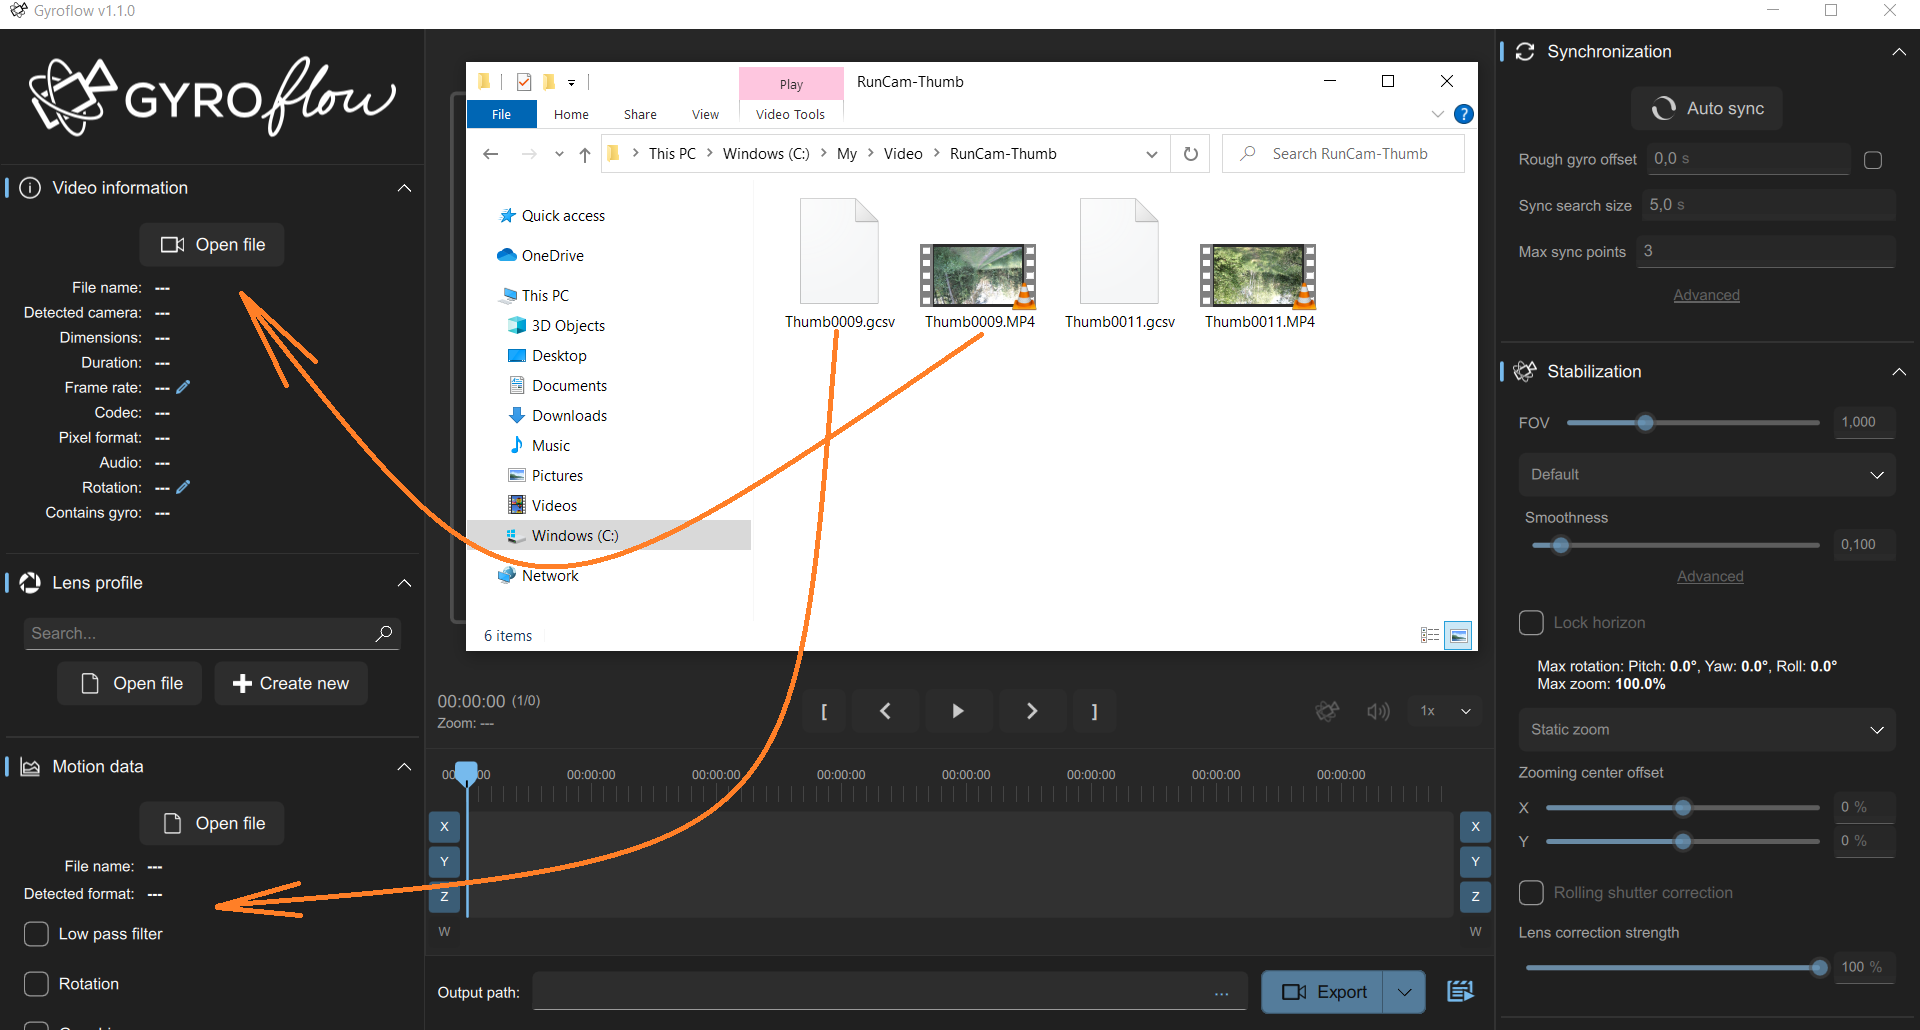
Select the RunCam Thumb lens profile for barrel distortion correction.
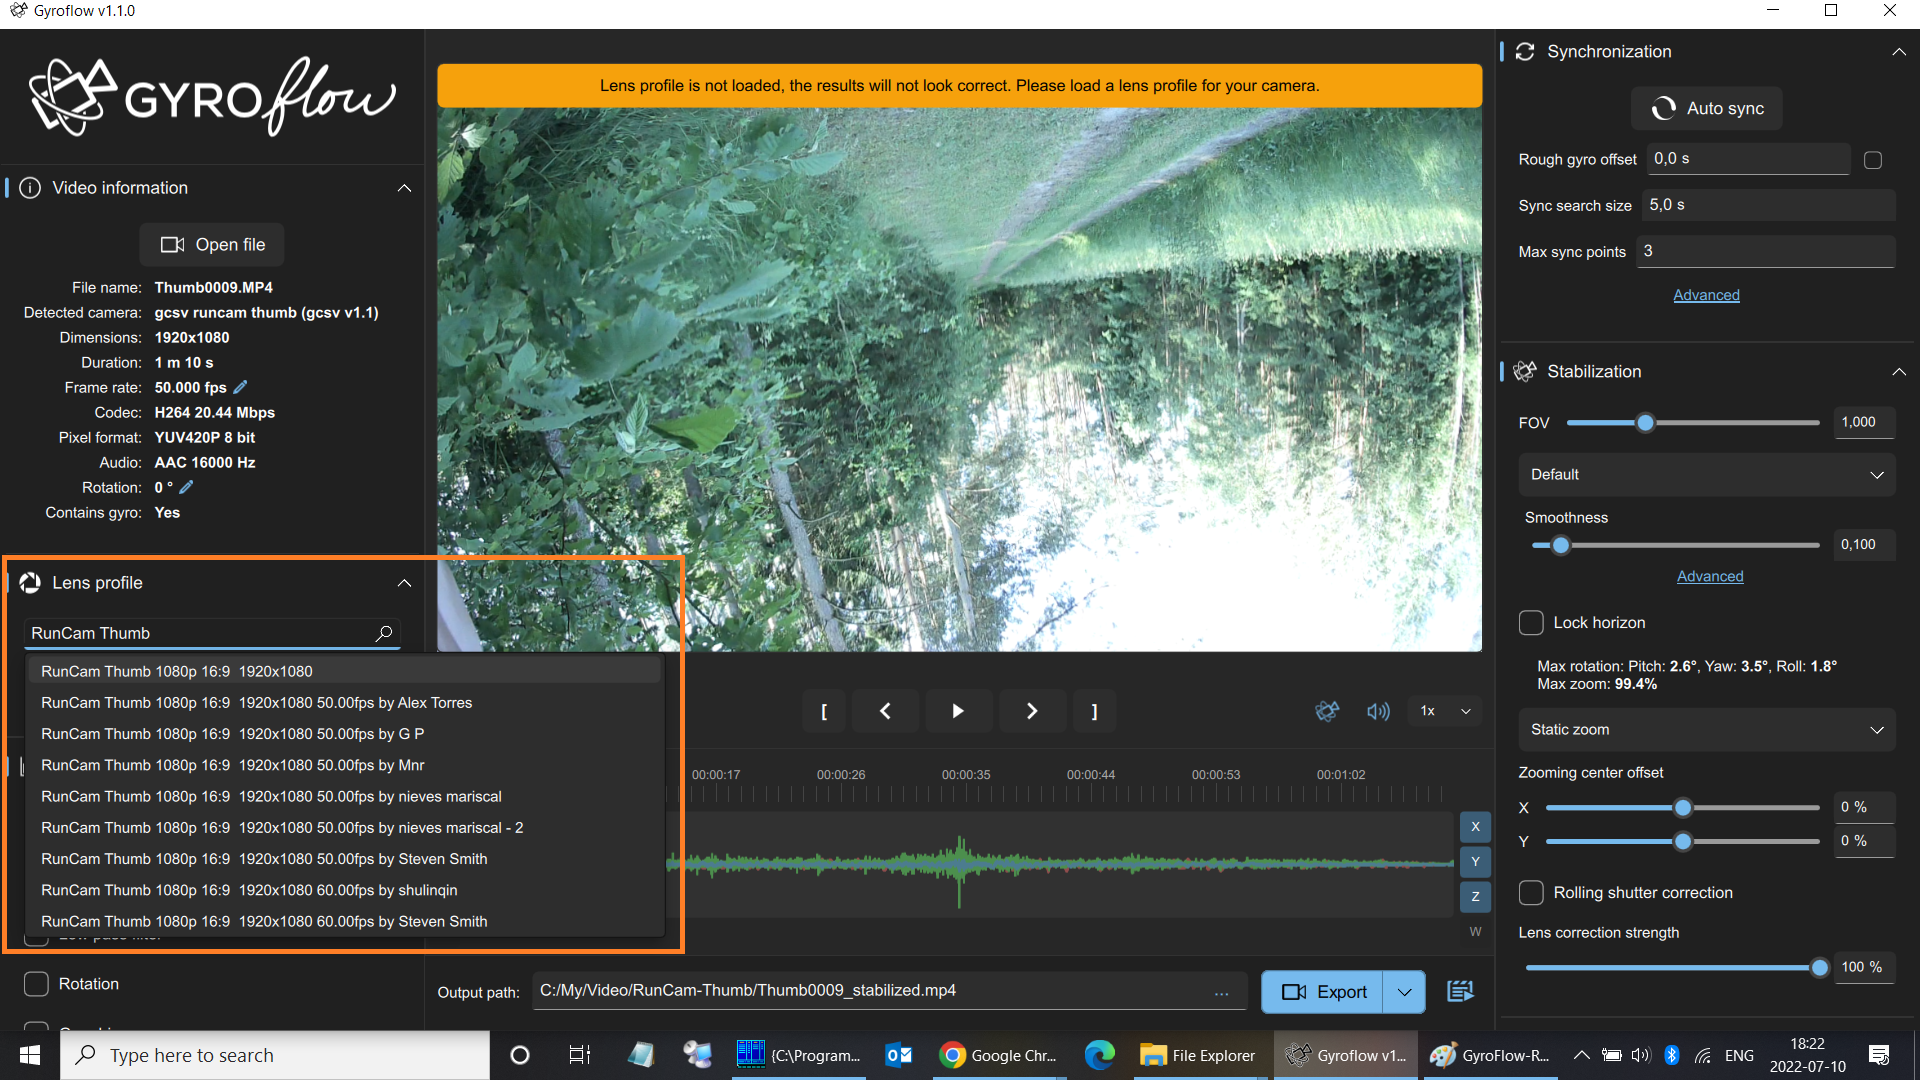
Press “Auto sync”
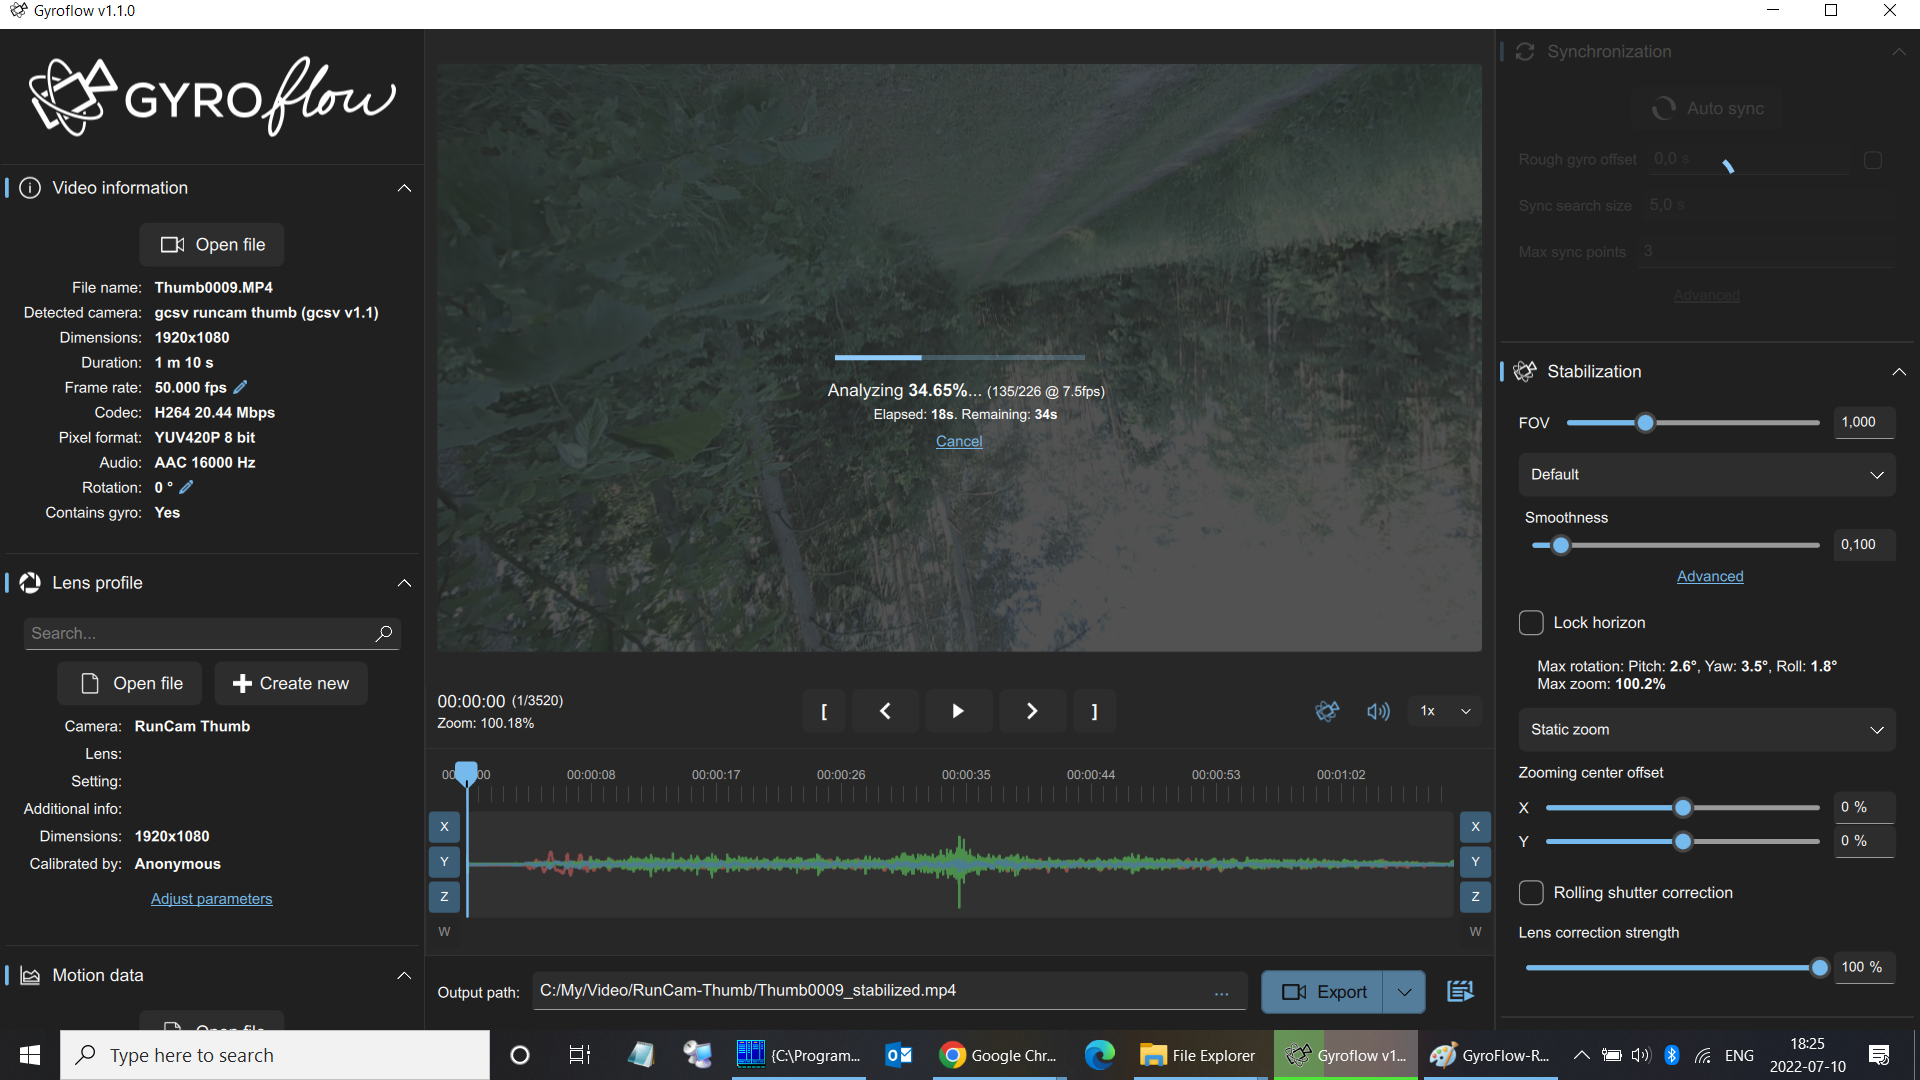
Hit the “Export” button and GyroFlow will render the stabilized video file.
Below is an example of raw video file recorded by RunCam Thumb and stabilized with GyroFlow.
RunCam Thumb can be purchased from:
Banggood: https://www.banggood.com/RunCam-Thumb-Ultra-light-HD-Camera-…-1932248.html
Disclaimer: This item was supplied by Banggood for a fair and unbiased review. Banggood never asked for a positive review and never influenced my opinion in any way. I’m trying my best to stay uninfluenced and give only my own opinion. All affiliate links if there are any help me purchase items for future reviews and tests.
]]>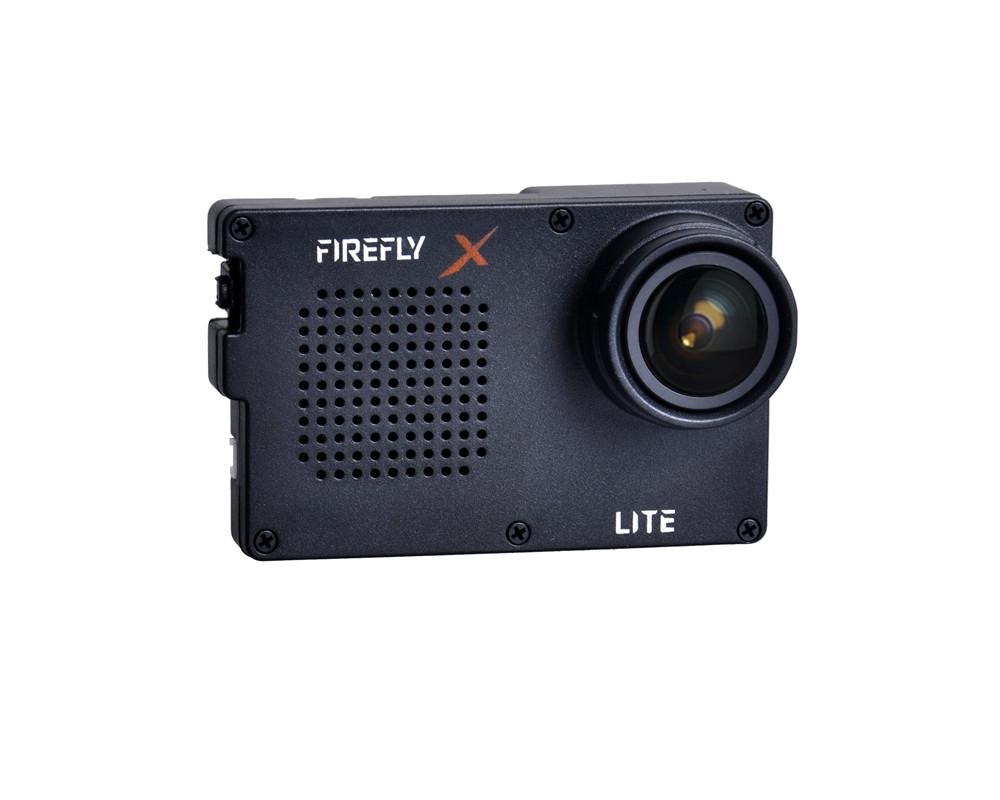
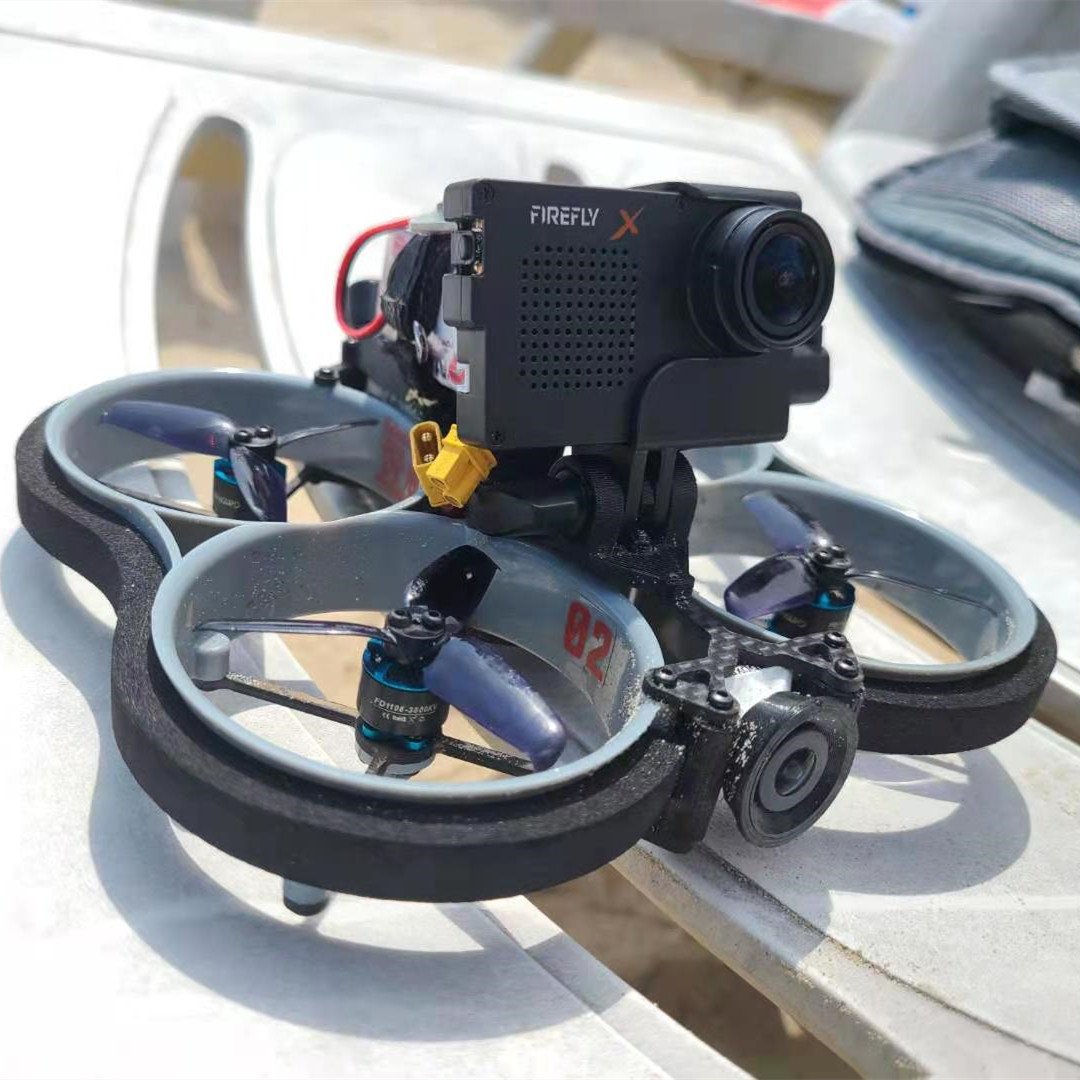
Inside the Firefly X Lite camera there are the same electronics as in the full sized Firefly X camera –? SONY IMX377 12 Mega WDR CMOS sensor with Ambarella H22S85 chipset. So the recordings quality should be similar to the?Firefly X camera. You can find a lot of examples on the YouTube.
Camera is capable of recording in 4K resolution in 60 frames per second. It also records in 2.7K/60fps, 2.5K/60fps and
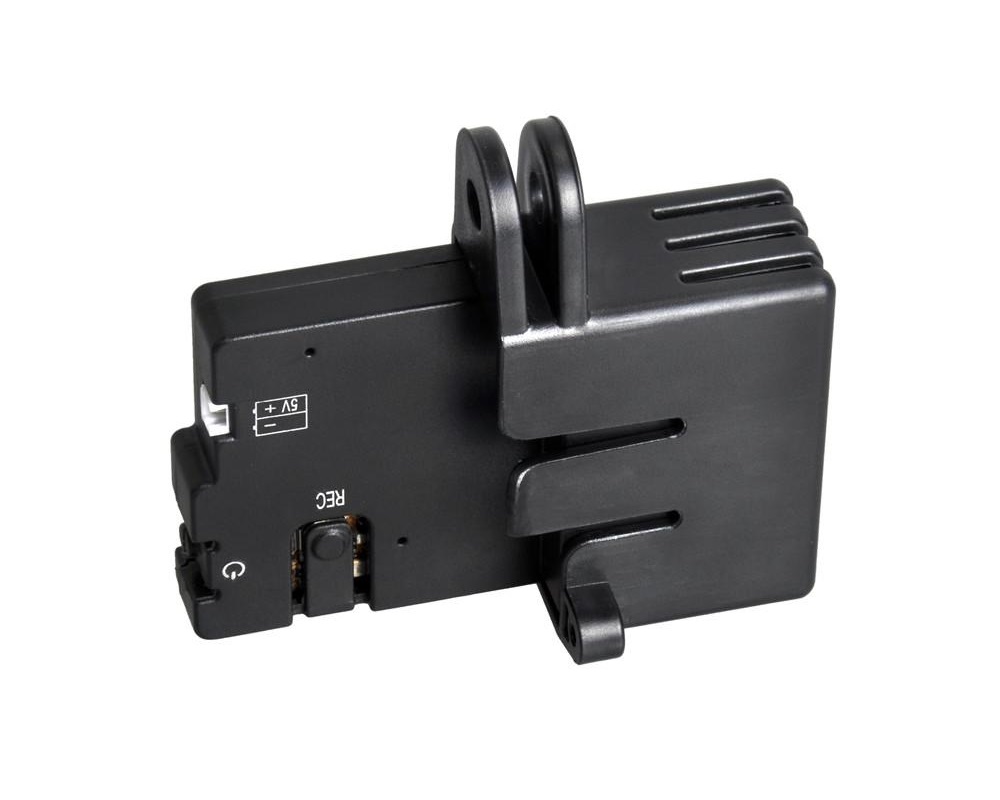
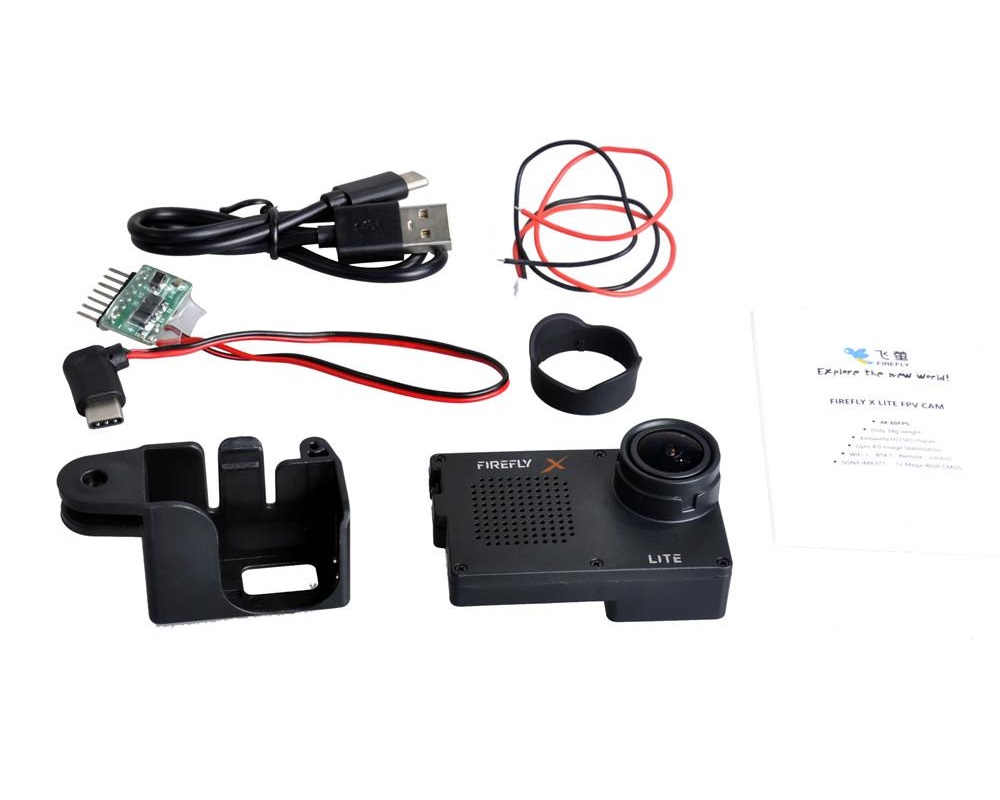
Firefly X Lite camera comes with a standard GoPro style mount.
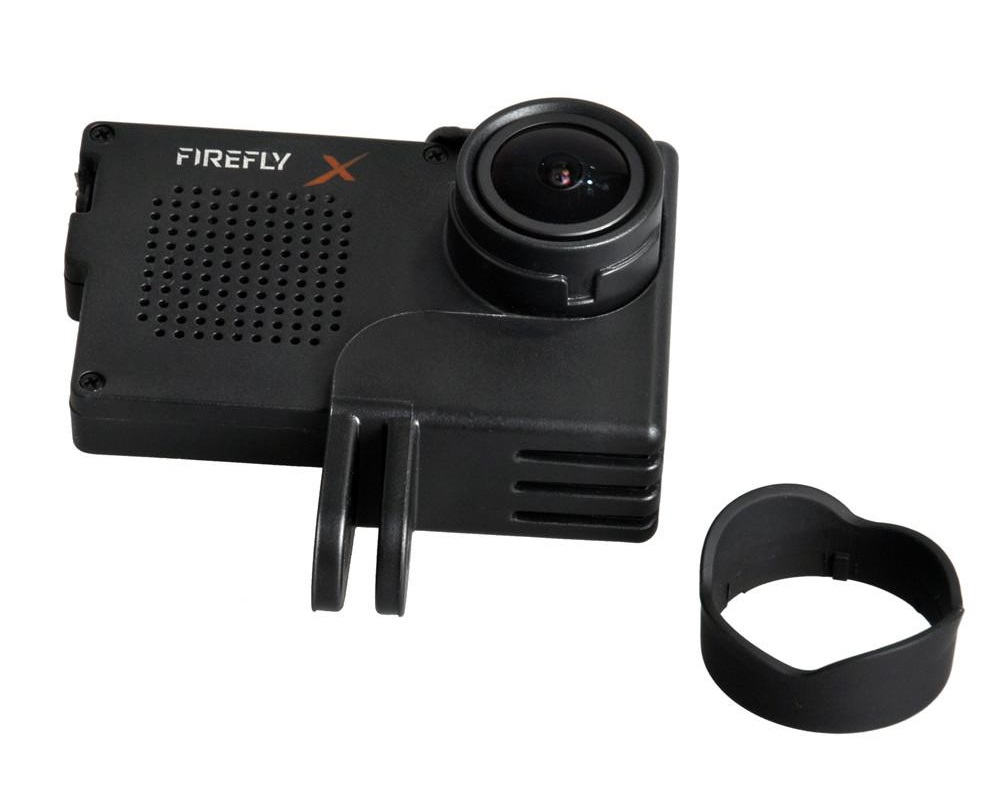
Camera can be powered on by supplied battery to USB-C type adapter or by separate 5V cable.
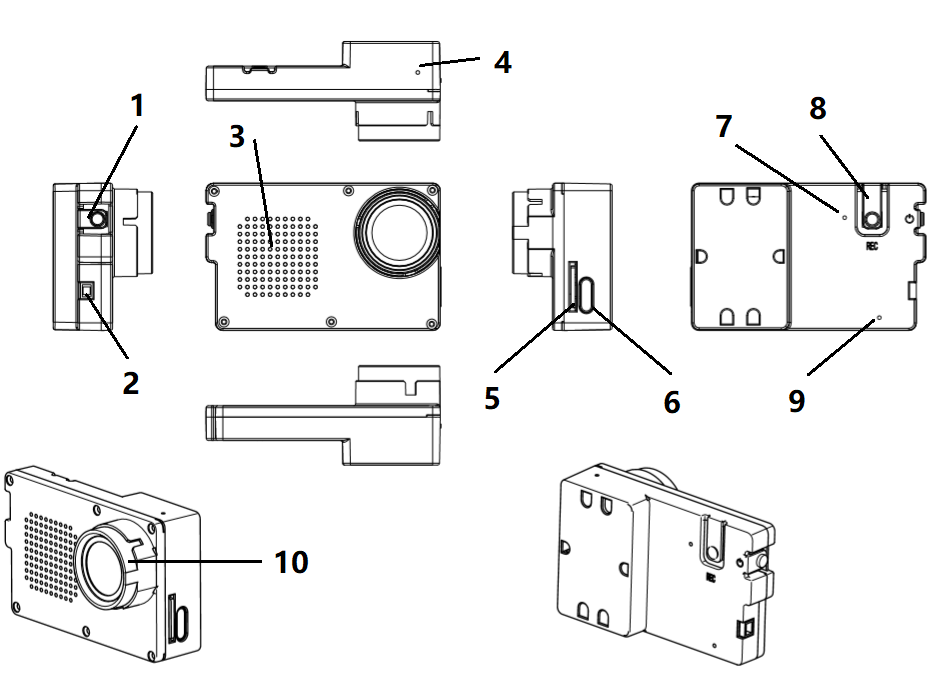
- POWER BOTTON;
- Type CUSB port;
- Video indicator (flash when recording);
- record button;
- WiFi indicator (light on when WiFi is on);
- Lens;
- 2p power port (5V IN);
- Cooling hole;
- Microphone hole;
- TF card slot;
Key Features:
- 4K 60FPS
- Only 34g weight
- Ambarella H22S85 chipset
- Gyro 4.0 Image Stabilization
- WiFi + BT4.1 Remote control
- SONY IMX377 12 Mega WDR CMOS
Button functions:

Operating instructions:
Use the 5V power supply on the drone to supply power to the camera, and then press the power button to turn on the camera, and the buzzer will ring three times quickly. When the camera is turned on, the default resolution of the camera is 4k 60 frames. If you want to switch the resolution, you can press and hold the Record Button for 3 seconds to switch. The switching?array??is: 4k 60 frame (two beeps of the buzzer) / 2.7k 60 frame ultra wide angle (three beeps of the buzzer) / 2.5k 60 frame on anti shake (four beeps of the buzzer). If the camera needs to flip 180 degrees to install, press the power button for 3 seconds after the camera is turned on, the camera will turn on the image flip function. After the camera is turned on, press the power button briefly to turn on the WiFi function, and then use the mobile phone to connect with the FIREFLY app. You can set camera time and parameters, preview and download videos.
Hawkeye Firefly X Lite Firmware update
Hawkeye Firefly X Lite?Firmware V2.0 update.
Hawkeye Firefly X Lite Firmware V2.0 upgrade instructions
https://cdn.shopify.com/s/files/1/30…tions_V2.0.pdf
Hawkeye Firefly X Lite Firmware V2.0 Download:
https://www.jianguoyun.com/p/DeLIOtUQ4rDjBxidmpQE
The updated functions in Firmware V2.0 (2021-10-12):
1, WDR enhancement function is added and opened by default;
The whole image quality has been greatly improved!
2, The synchronous output of gyro data in CSV format is added,
which can be used for computer post stabilization processing;
3, The resolution of 2.7k60/30fps 4:3 and 1920 * 1440p60/30fps
4:3 are added.
4, The four resolutions switched by pressing the key are 2.5k60fps
EIS on; 1440P 4:3; 4K30FPS Ultra; 2.7K30FPS 4:3; The last three sets
of resolutions will automatically output gyroscope data;
5, Put the Lite_ config file in the root directory
of the card to facilitate setting camera parameters with the TF card
6, If the card is inserted and there is no video recording, it will
beep twice every 6 seconds to prompt the user to start the video
recording before taking off!
7, Add the function of USB port external parameter adjustment AV
board; Subsequently, firefly cam will launch a parameter
adjustment AV board, which can connect FPV glasses for intuitive
viewfinder and parameter adjustment.
8, By default, the dual file function is enabled. When recording,
two videos with the same content will be generated, A and B. the B
video file is very small, which is used to watch on the Firefly app to
increase the video playback fluency.
Hawkeye Firefly X Lite Firmware V3.0 update
Hawkeye Firefly X Lite Firmware V3.0 Download:
https://www.jianguoyun.com/p/DYUZ1IEQ4rDjBxj5ipgE
Available @
Makerfire:?https://bit.ly/Makerfire-Firefly-X-Lite-4K-Camera
XT-Xinte:?https://bit.ly/XT-Xinte-Firefly-X-Lite-4K-Camera
Aliexpress:?https://bit.ly/Aliexpress-Firefly-X-Lite-4K-Camera
Specifications:
Resolution: 4K 60 fps;?2.7K 60 fps;?2.5K 60fps;?2.7k60/30fps with 4:3 and 1920*1440p60/30fps?4:3 (Default 4k60FPS, can be switched )
Lens Diameter: 17.5MM (Compatible with GoPro ND filters)
Image flipping function: Yes
RC and AV OUT: YES
Kind of MicroSD card supported: U3(Note: Low speed sd card will cause unstable)
Maximum size of MicroSD card supported: 512G
Camera size: 61×38×26 MM
Weight: 34g
Compressed format: H.264
Video format : MP4
Diaphragm: F=2.8,7G1IR LENS
Angle: Diagonal 150 degrees
Working Voltage: 5V
Power supply: 1A
WiFi distance: 10M
Waterproof: No
Six axis Gyro video stabilization: Yes
EdgeTX – alternative to OpenTX
While the new firmware for OpenTX compatible radios was released almost three weeks ago, I thought it is really worth mentioning it. EdgeTX is a forked project from OpenTX firmware. While the development of the mainstream OpenTX has stagnated a bit, enthusiast developers decided not to wait forever for many long waited features that community is waiting for (OpenTX, where is the touchscreen support?). Here is what the EdgeTX devs say:
“…In bringing you EdgeTX, our key goals for this first release were to:
- enable use of the touchscreen interface for color radios that support it
- allow use of high bit rate CRSF without having to modify your hardware if using transmitters like X9D+ and X7 via OneBit sampling mode
In bringing you EdgeTX, our main goal for this first release was to give to the community a usable touchscreen interface for color radios with touchscreens. Additionally, we wanted to establish a solid foundation for future features for the most commonly used radios.”
Link: https://github.com/EdgeTX/edgetx/releases/tag/v2.4.0
![]()
FatShark Scout HD goggles
Release of the FatShark Scout HD digital FPV goggles is probably the biggest news of the past week. These are the first FatShark DIgital FPV goggles and they are affordable starting goggles for the digital world of the FPV.
Available @ GetFPV:?https://www.getfpv.com/fat-shark-scout-hd-fpv-goggles-w-integrated-digital-receiver.html
Banggood:?https://www.banggood.com/Fat-Shark-Scout-HD-PVT-FPV-Goggles-…-1881764.html
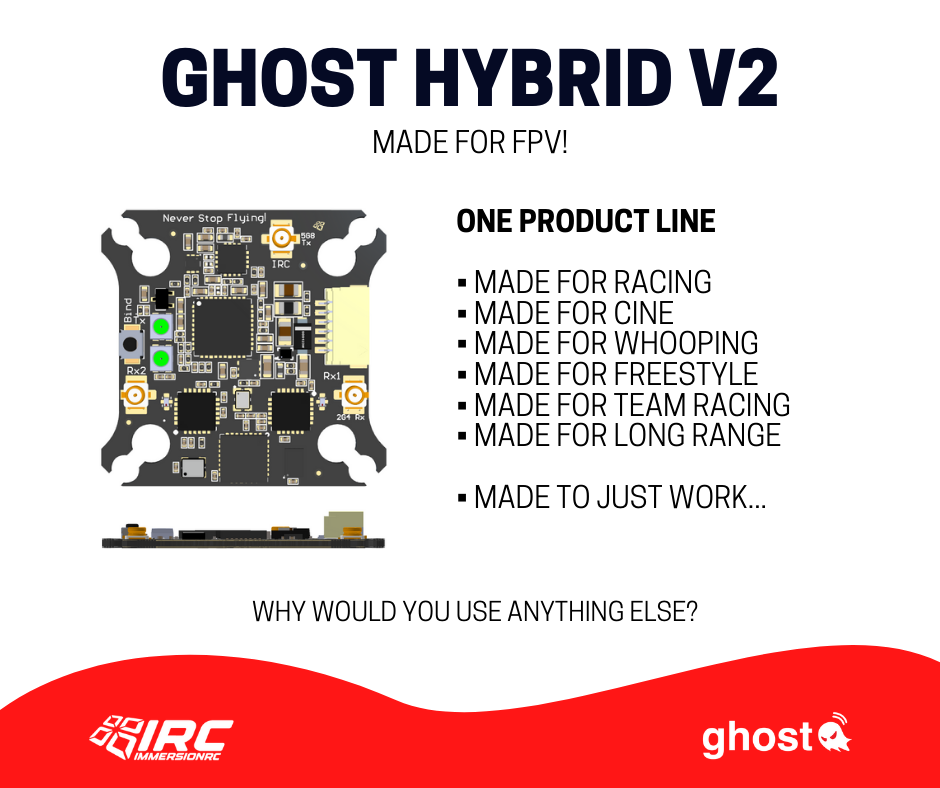
ImmersionRC Ghost Hybrid V2
Available @ Pyrodrone:?https://pyrodrone.com/…/immersion-rc-tramp-ghost-hybrid-v2-uno?https://pyrodrone.com/…/immersion-rc-tramp-ghost-hybrid-v2-duo-5-8ghz-vtx-2-4ghz-rx
Holybro FETtec Mini AIO 15A
Holybro FETtec Mini AIO 15A is the first AIO FC in toothpick style with KISS firmware on board. ESC’s are capable up to?15A, supports 2-4s batteries has Graphical OSD with full KISS tuning.

Available @ Holybro: http://www.holybro.com/product/holybro-fettec-mini-aio-15a
Features
FC:
- KISS FC firmware
- F3 Processor (STM32F303CCT6 @ 72MHz (MPU6000))
- Supply voltage 6-18V (2S-4S Lipo voltage)
- Dedicated onboard 5V BEC (max 1A)
ESC:
- Active current limiting @ 15A
- Input voltage: 2S-4S
- High quality 30V MOSFETs
- STM32G071 @ 64MHz
- 128 kHz Motor PWM
- Automatic input signal detection
- Dshot 300-2400
- PWM
- OneShot42/125
OSD:
- Graphic OSD (STM32)
- Full KISS Tuning
- Filter (PIDs, Rates, Settings)
- LED control (RGB LED, Racewire)
- VTX
- Live data graphs (Voltage, motor rpm, current, motor temp, gyro values, link quality)
- KISS GPS support + live map
- Custom graphic pilot logo
- Stick overlay
- Custom layout
The FETtec Mini AIO 15A works with KISS/FETtec FC firmware version 1.3RC45Y or later !
Dimensions
Size: 29 x 29 mm
Mounting: 25,5 x 25,5 mm
Weight: 3.6 g
Dalprop?Cyclone T3028
Dalprop now has 3 inch props with T-mount. Cyclone T3018 and T3028 3-bladed propellers.
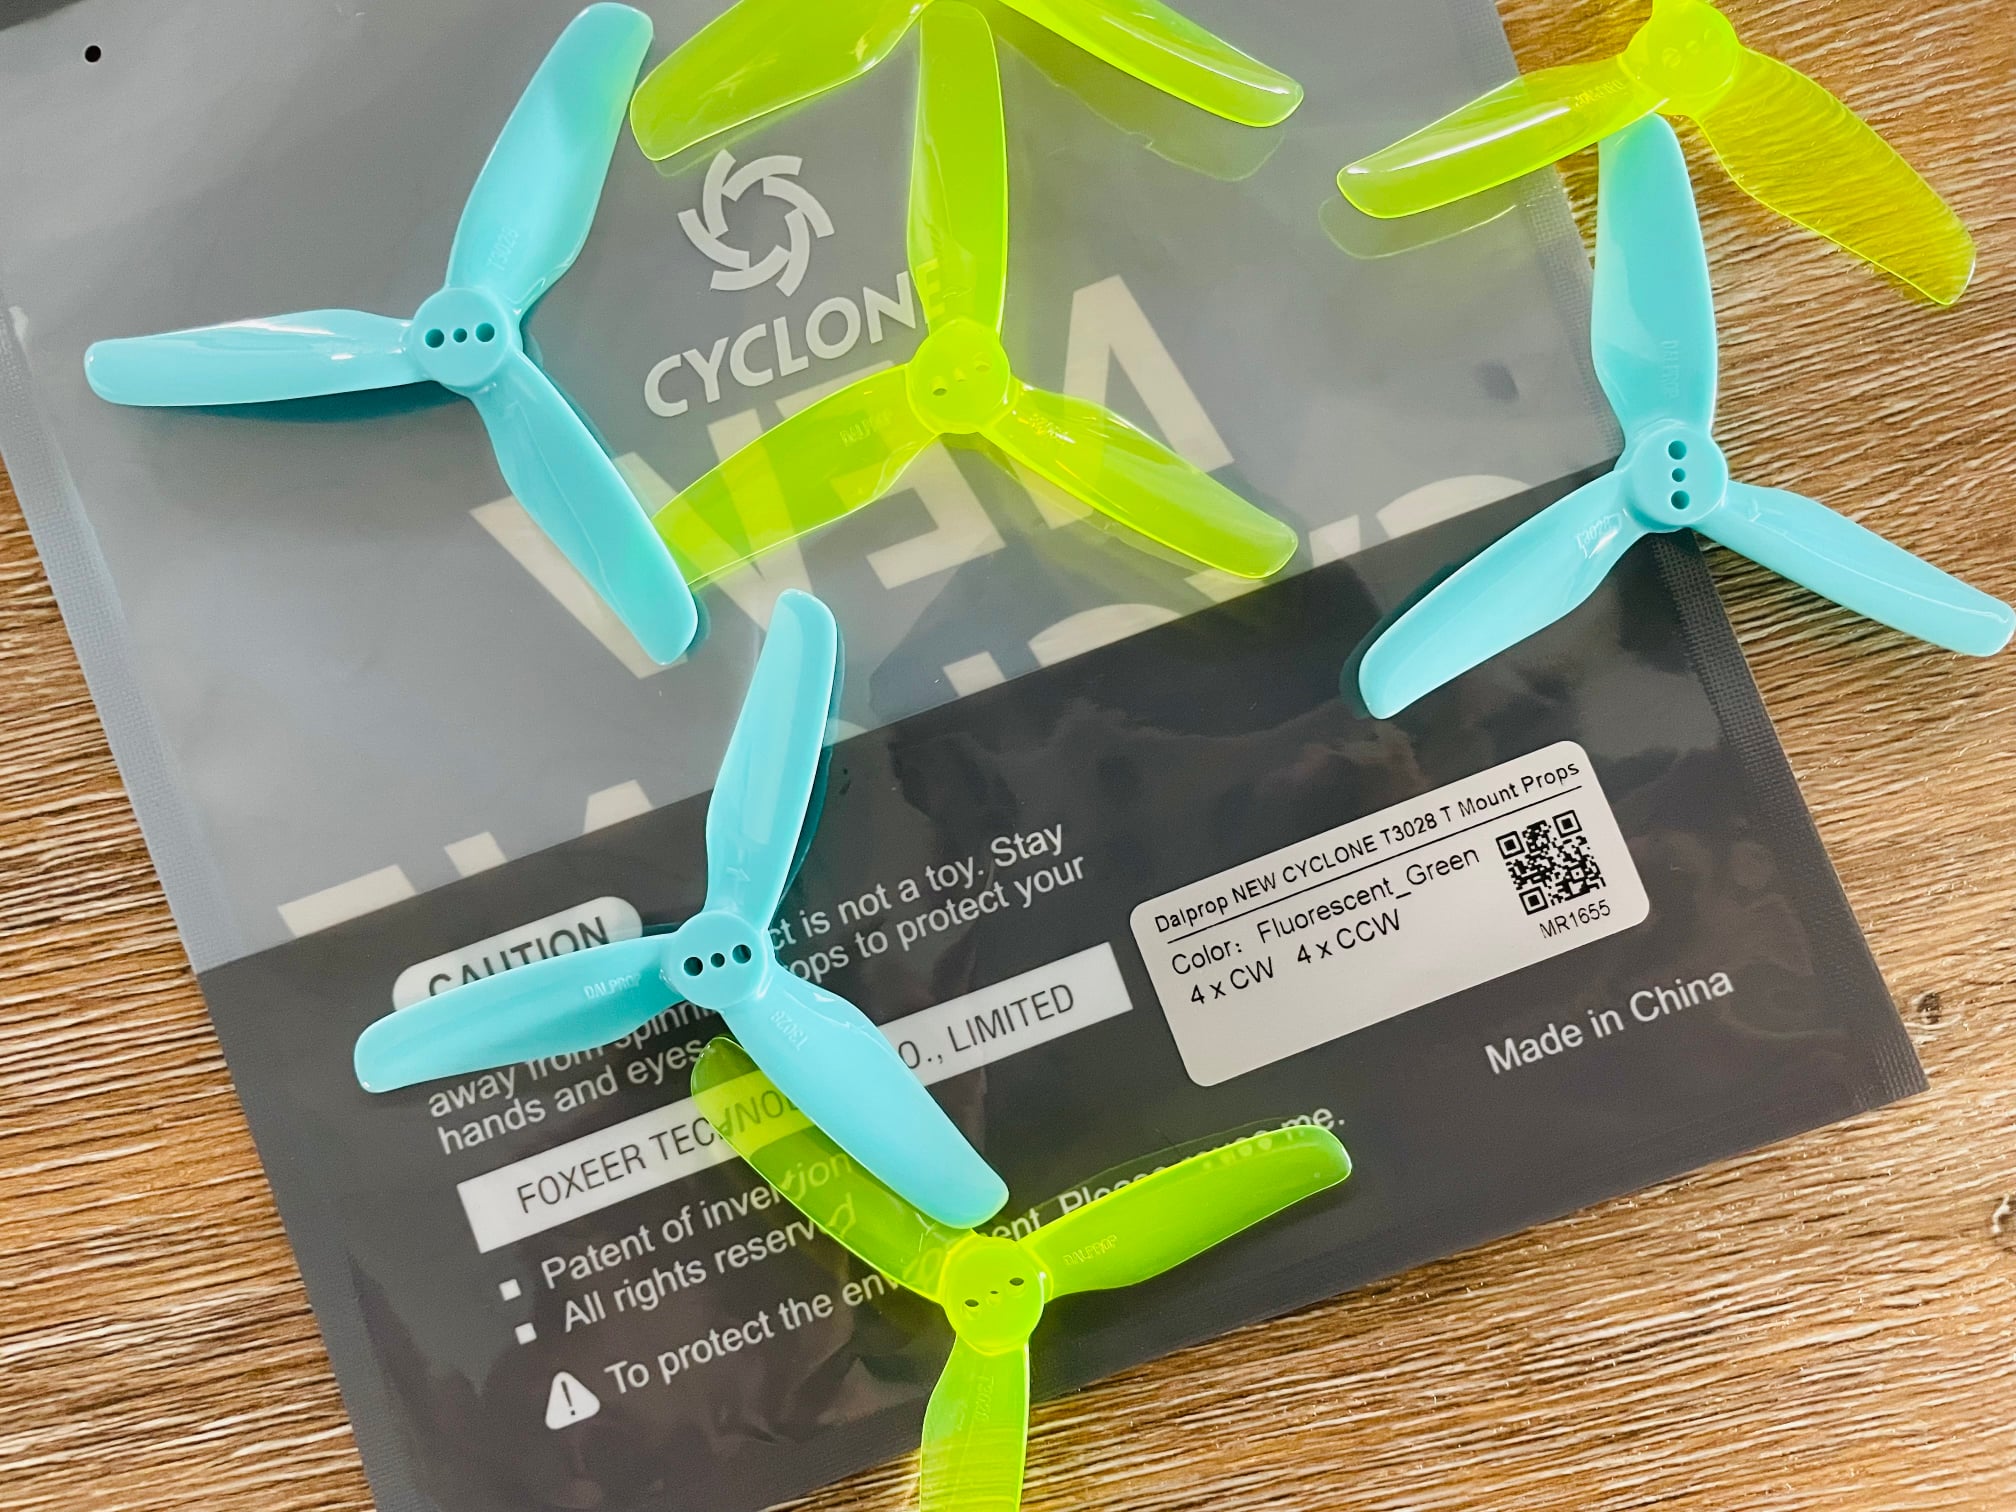
Available @ Foxeer:?https://www.foxeer.com/search?keywords=Dalprop+New+Cyclone
Aliexpress:?https://s.click.aliexpress.com/e/_97e27M
]]>
FatShark Scout HD goggles does not have any AV or HDMI input. You cannot use them for analog FPV as they are designed to work only with Shark Byte digital FPV system.
Scout HD goggles have Firmware update port. Rumors say, that a?firmware update with brightness, contrast, and hue adjustments will be added in the future.
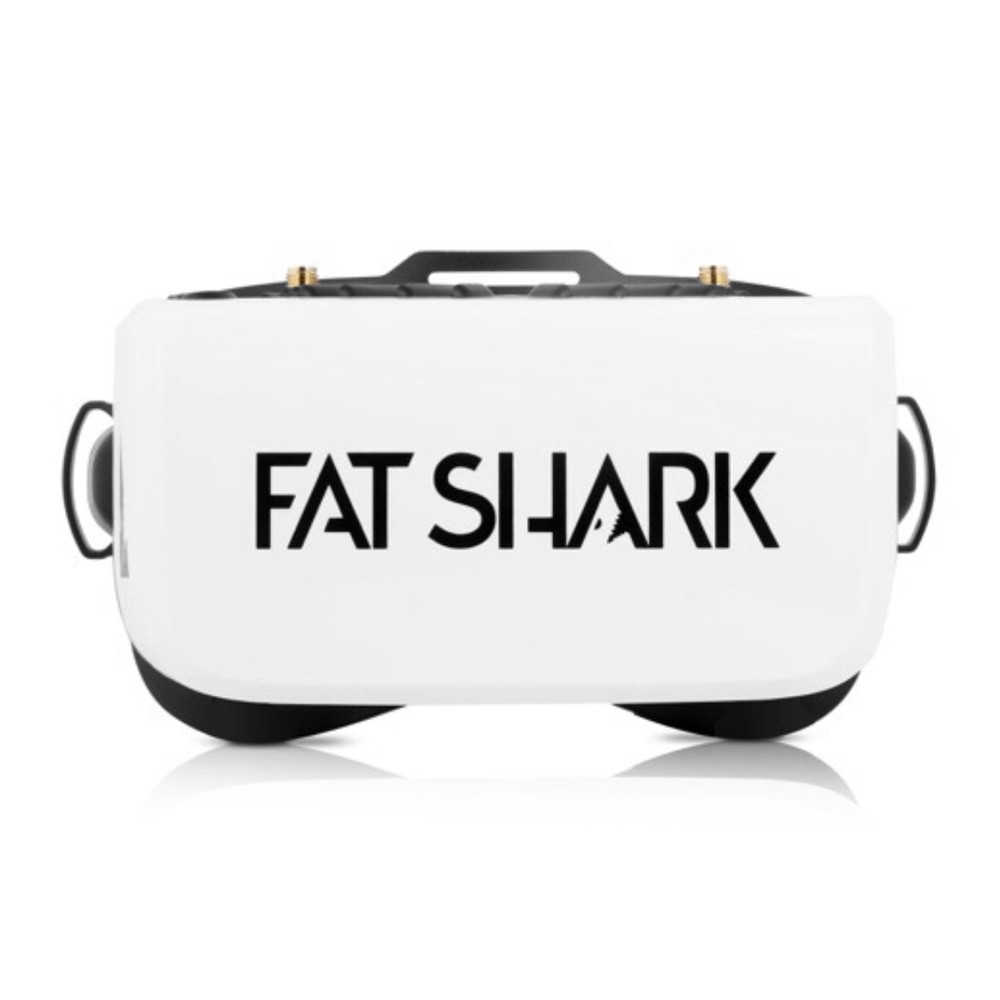
FatShark Scout HD are the cheapest ready to use digital FPV goggles on the market currently.

FatShark Scout HD are compatible with Shark Byte Digital FPV video transmitters. There are 3 transmitters available currently:?https://www.getfpv.com/catalogsearch/result/?q=SharkByte
 |
 |
Released on 2021-08
Available @?GetFPV:?https://www.getfpv.com/fat-shark-scout-hd-fpv-goggles-w-integrated-digital-receiver.html
Banggood:?https://www.banggood.com/Fat-Shark-Scout-HD-PVT-FPV-Goggles-…-1881764.html
Features
- Ergonomically molded headset w/ adjustable headband
- Shark Byte Tx upgrade port
- 44 degrees diagonal FOV
- 3-Button OSD Navigation
- Integrated digital receiver
- Anti-fog fan
Specifications
- Power Supply: 5.1mm Barrel Connector, 8-16V (2s – 4s) Center Pin Positive
- Interpapillary Distance (IPD): 55 to 76 mm (fixed)
- Operating Frequencies: 5.725-5.850GHz
- FOV (field of view): 44 degrees diagonal
- Interface: Shark Byte Tx upgrade port
- Display: 3.5 inch TFT (1920 X 1080)
- Controls: 3 button OSD navigation
- Dimensions: 170 x 120 x 90mm
- Upgradeable via SD card
- Charging Port: USB-C
- Storage: MicroSD
- Weight: 336.5 g
Specifications
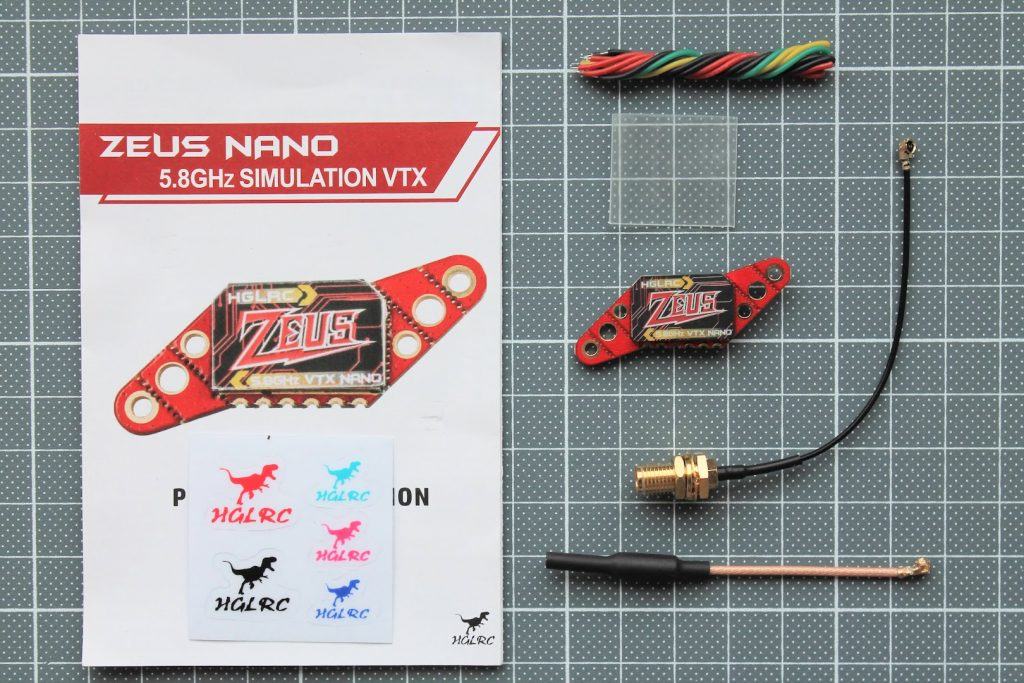
Model: Zeus Nano VTX
Built-in Microphone
Input voltage: DC 5V
PIT@75mA
25mW@180mA/16dBm
100mW@280mA/21.5dBm
200mW@330mA/24.5dBm
350mW@400mA/27.5dBm
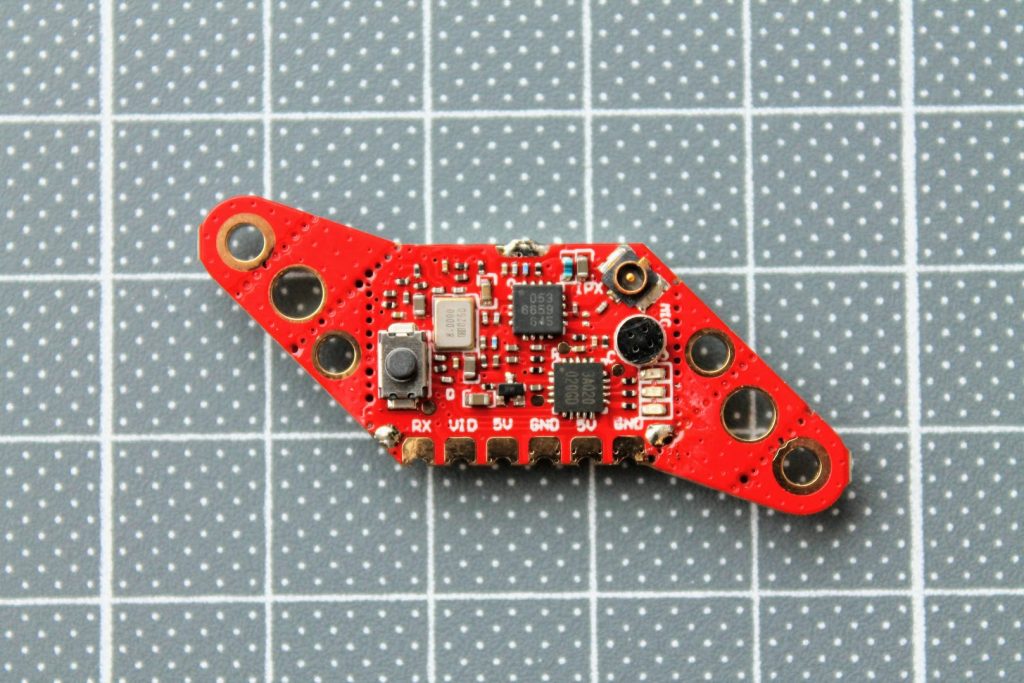
Antenna interface: ipex
Output power: PIT/25/100/200/350mW
Standard 40 channels. A/B/E/F/R frequency group
Installing Hole: 16X16/25.5X25.5mm.M2/20X20mm.M3
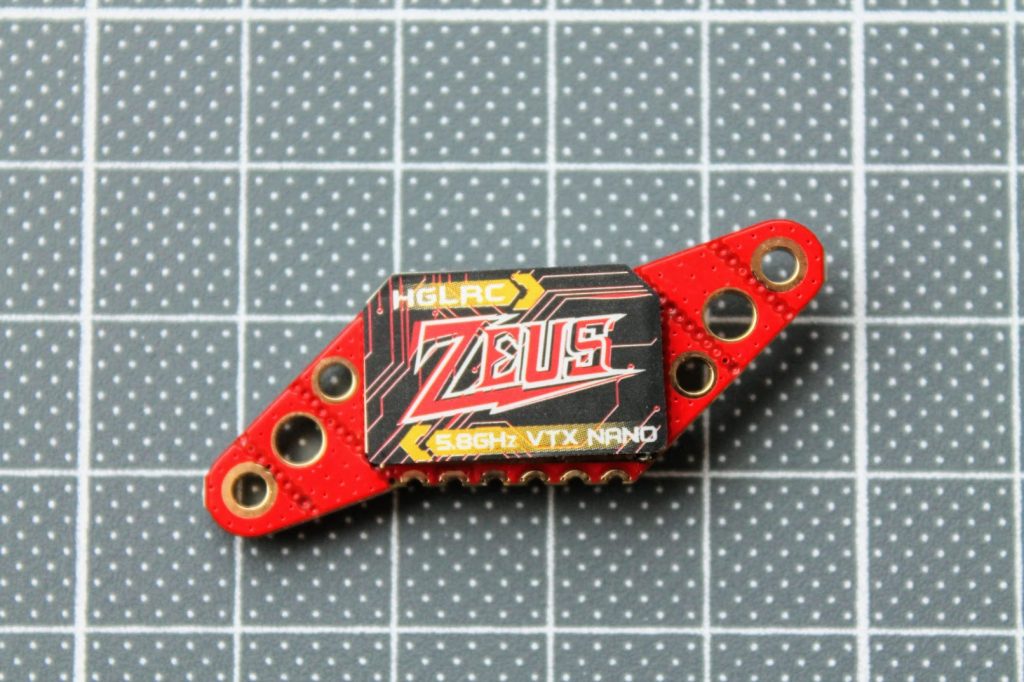
Size: 18.6mm x 13.6mm x 6mm
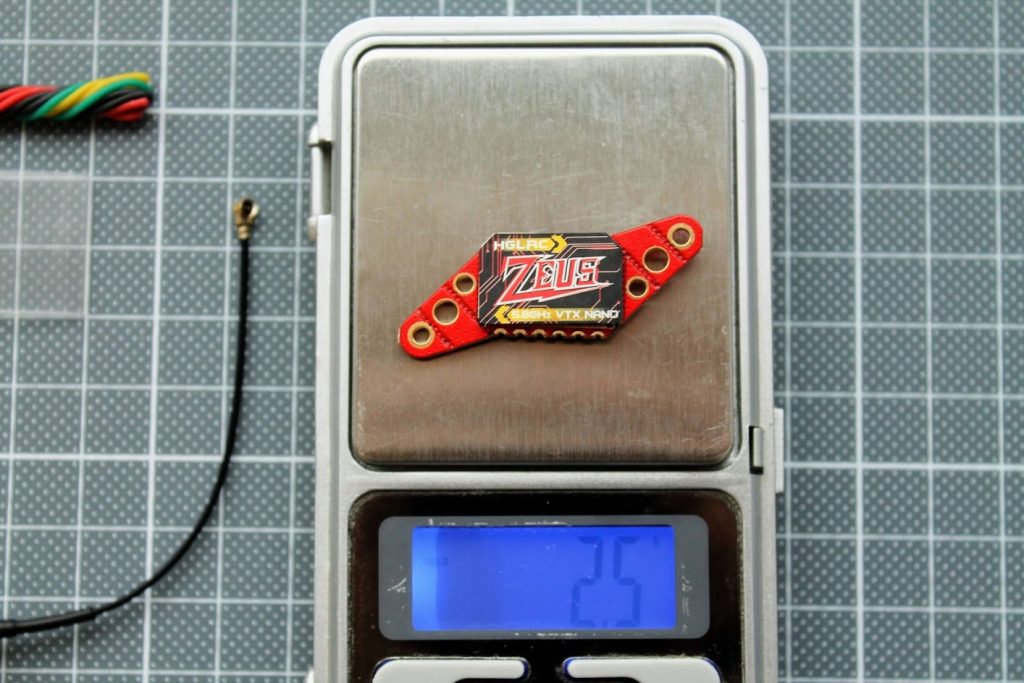
Weight: 2.4g
Closer look
Zeus Nano VTX has breakable side tabs for various mounts. There is also protective metal casing on the front side of the VTX.
On the bac of the VTX you can find the push button for setting the channels, bands and power output level. There is also
The weight of the Zeus Nano VTX is 2.5 grams.
HGLRC Zeus Nano VTX pinout and connection schemes.

RF power measurements
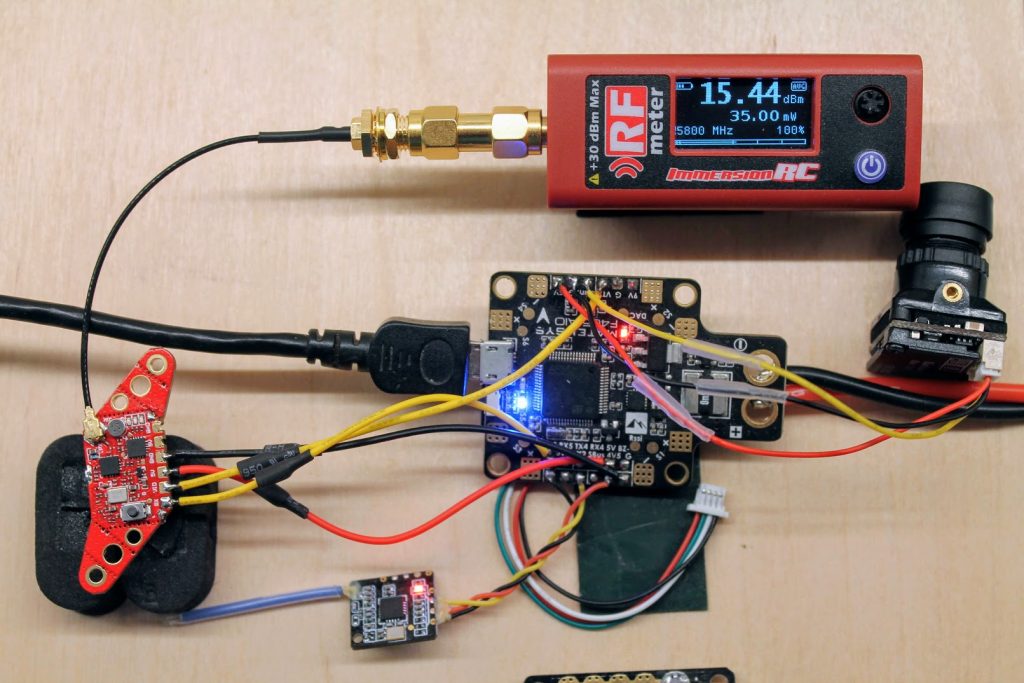
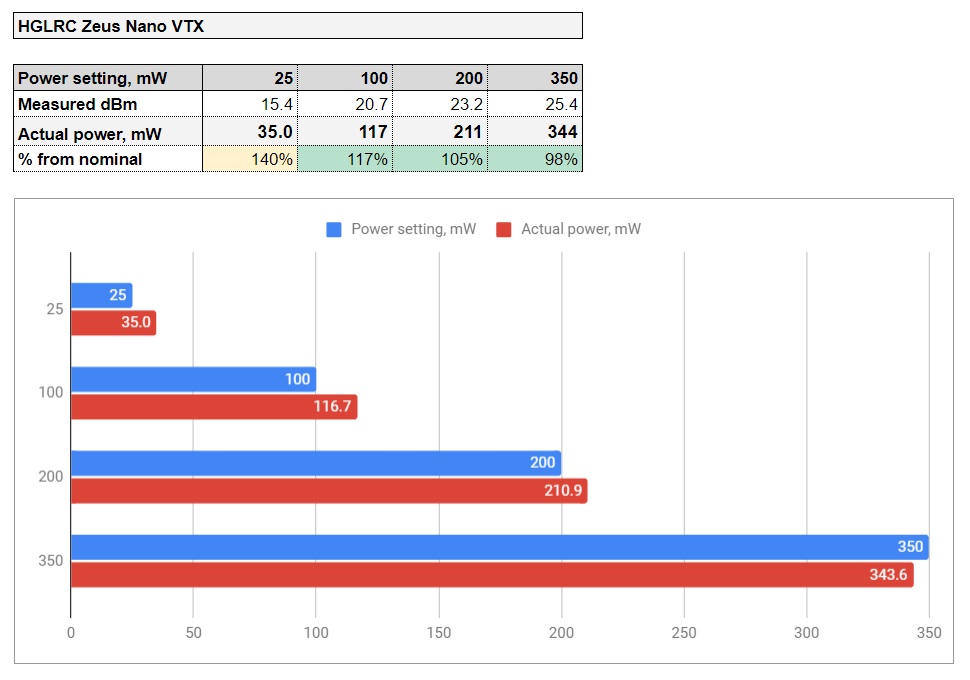
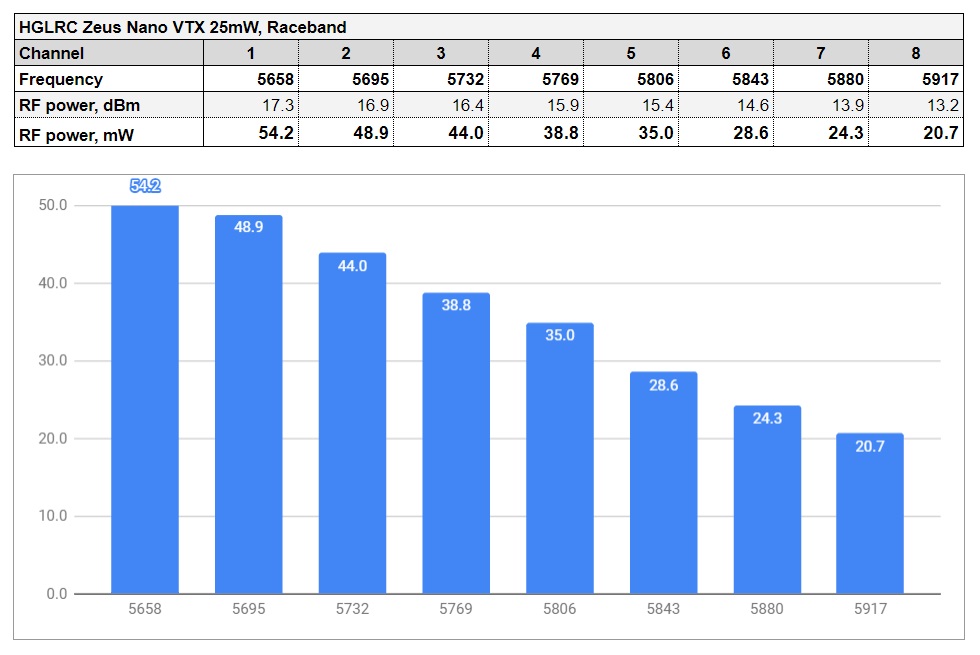
Power output test on?25mW?setting. RF power meter shows 35mW.
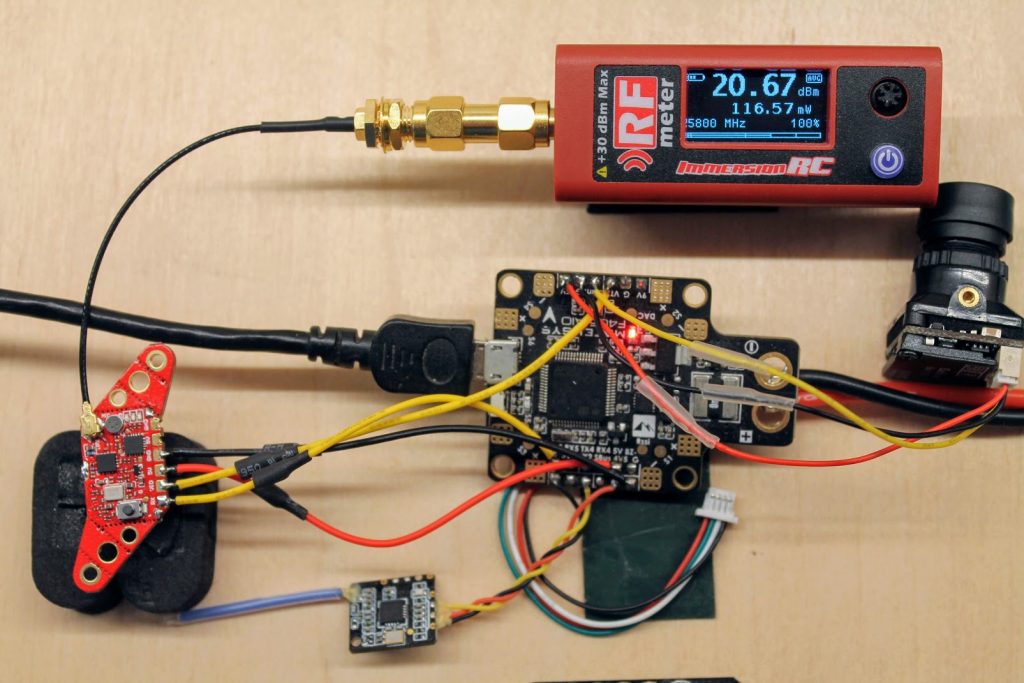
On?100mW?setting RF power meter shows?116 mW.
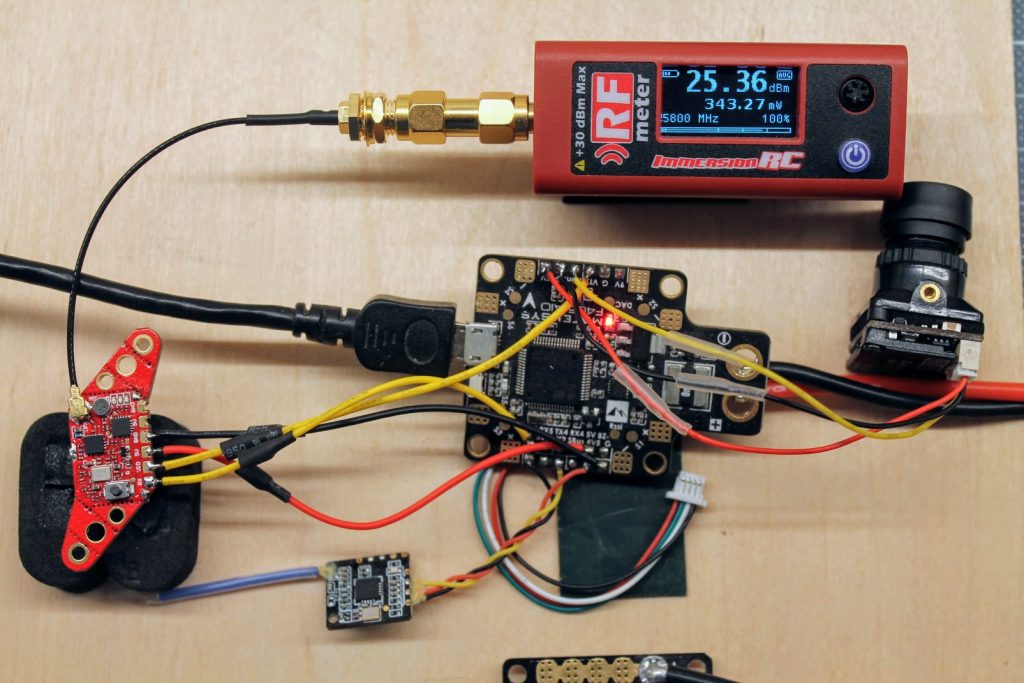
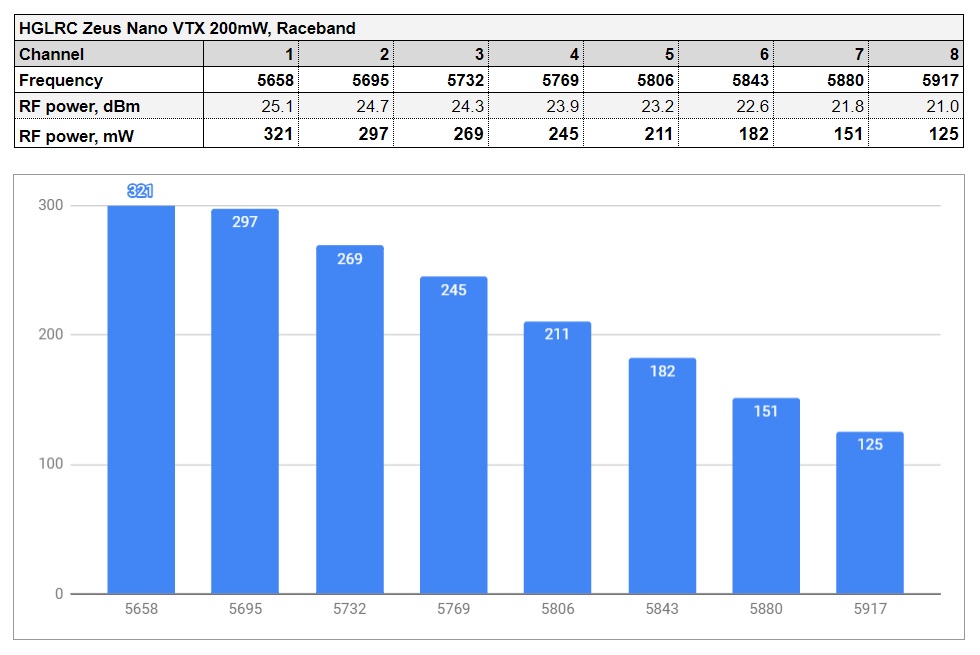
On?200mW?setting RF power meter shows?211 mW

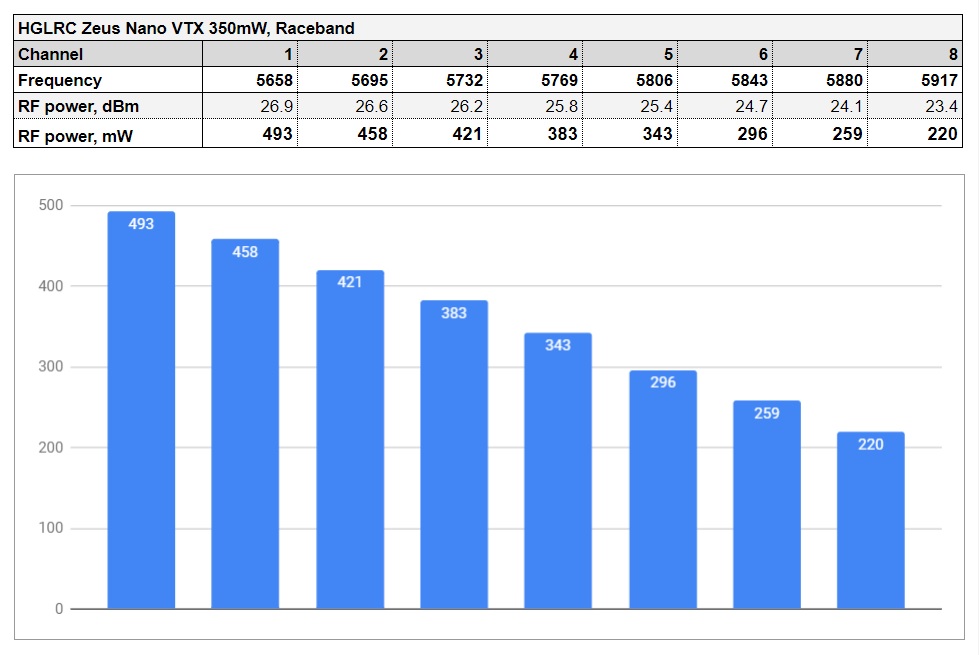
And on 350mW?setting RF power meter shows?343mW. Almost on spot, despite the fact it does heat up.
On 350mW power level setting and no active cooling the VTX heats up and the power output drops down to 1mW.
Below are the RF power outputs for all power levels. Measured at?Raceband,?Channel 5.
Power output vs frequency for?25mW?power level on?Raceband.
Power output vs frequency for?100mW?power level on?Raceband.

Power output vs frequency for?200mW?power level on?Raceband.
Power output vs frequency for?350mW?power level on?Raceband.
Betaflight VTX Tables
If you are using (or planing to use) the Betaflight versions 4.x? and want to control the VTX by Betaflight OSD, then you should set up the VTX Tables.
Read more on setting up the VTX tables here:?VTX Tables and how to set them up
Open Betaflight Configurator, connect to the flight controller, select “Video Transmitter” tab. Load the VTX table from the file by clicking on the “Load from file”.
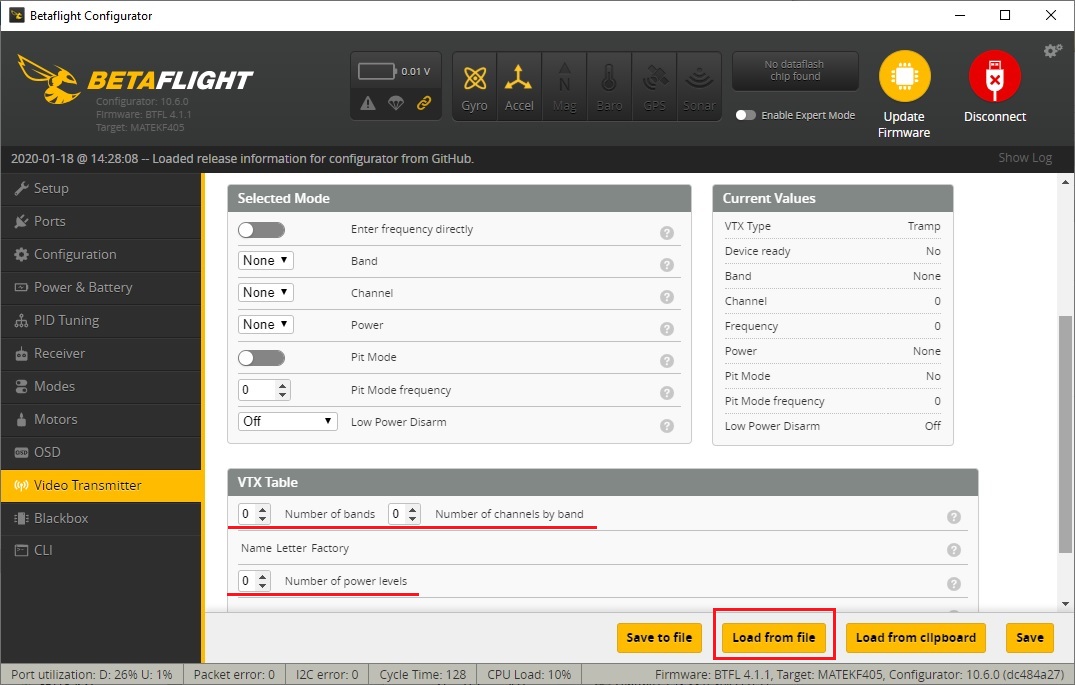
Select the VTX table file. There can be separate VTX table files for?US?and?EU?region as there are different range of the allowed frequencies to use. (Hint: European table has only the?3 channels?on?Raceband).
HGLRC Zeus Nano?VTX Table file:?https://drive.google.com/file/d/1r6O1PC8CZZMefmyf0BdWRY-i9JlX2xFz/view?usp=sharing
Once VTX Table is loaded from the file, don’t forget to hit the [Save] button.
Conclusions
HGLRC Zeus Nano VTX is really small, has one of the kind boomerang shape and multiple mount options (16×16, 20×20 and whoop mount). It can be installed almost into any stack of any frame you build. The side tabs can be even broken off to minimize the footprint and fit into any spot.
RF output tests showed that Zeus Nano VTX really delivers the declared power levels.? On 25mW setting it outputs 35mW, on 100mW – 117mW, on 200mW – 211mW and on 350mW setting it reached solid 343mW output.?I have to say that HGLRC Zeus Nano VTX has performed the best so far in the RF output tests.
I give another thumbs up for adding the microphone on board. This allows to hear the motor sounds for those audiophile pilots (me including).
I need to notice that this VTX, being so small, heats up pretty much and when it overheats it drops the power output down to 1mW. So have in mind that this VTX has to be installed in the place with enough of the airflow. Also use pit mode and lower power levels, while powering this VTX on the bench.
Overall I’m very happy with this VTX and this is one of my favorite Nano sized VTX.
Available @?Banggood:?https://www.banggood.com/HGLRC-Zeus-nano-VTX-…-1773780.html
Disclaimer: This item was supplied by HGLRC for a fair and unbiased review. HGLRC never asked for a positive review and never influenced my opinion in any way. I’m trying my best to stay uninfluenced and give only my own opinion. All affiliate links if there are any help me purchase items for future reviews and tests.
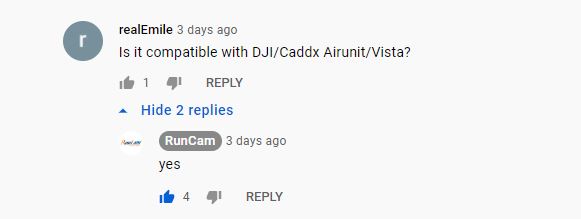
]]>So as far as we know, RunCam has no license to produce the digital FPV cameras for DJI FPV system, but as long as DJI uses standard MIPI interface, RunCam MIPI camera should work.?
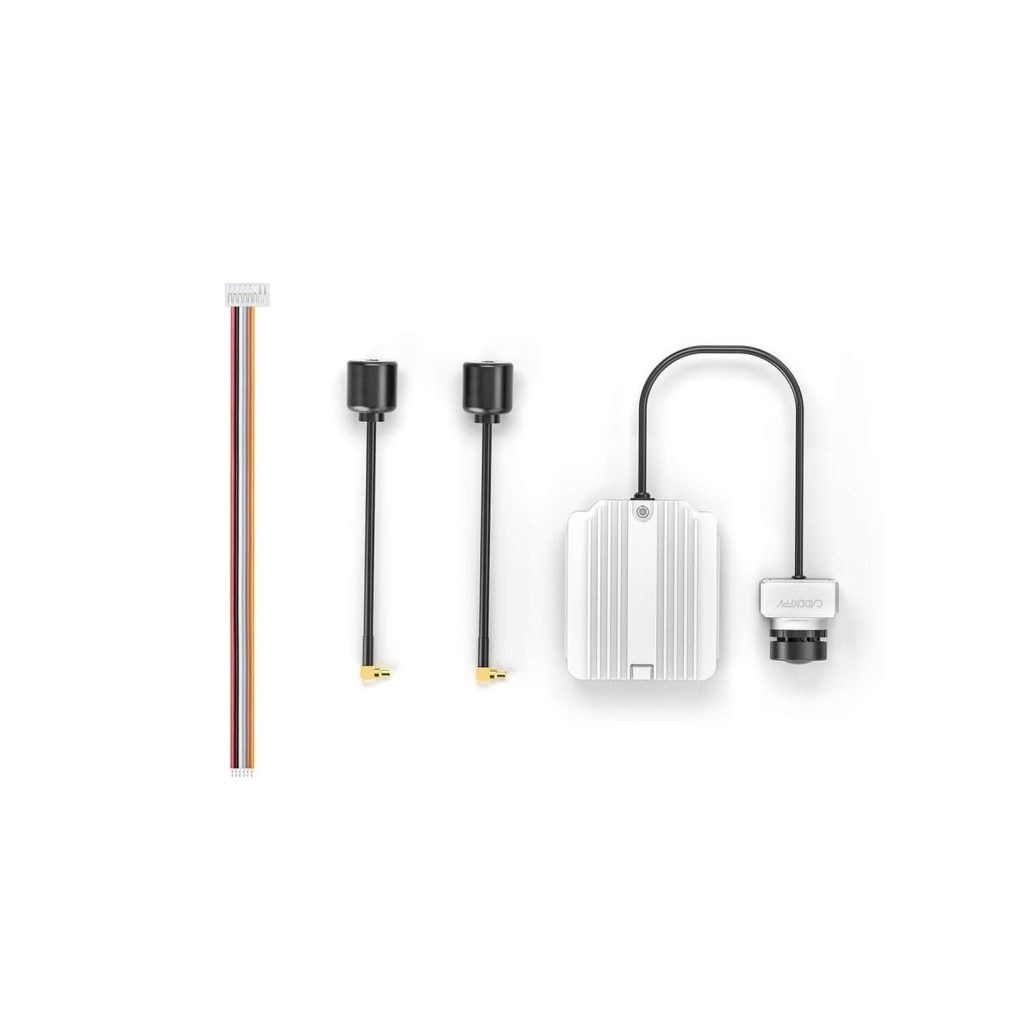
RunCam?has finally obtained the license for producing the products compatible with?DJI Digital FPV system. RunCam has even Air unit, called RunCam Link. See the full list of the RunCam digital products here:?https://shop.runcam.com/digital-fpv-system-categorie/
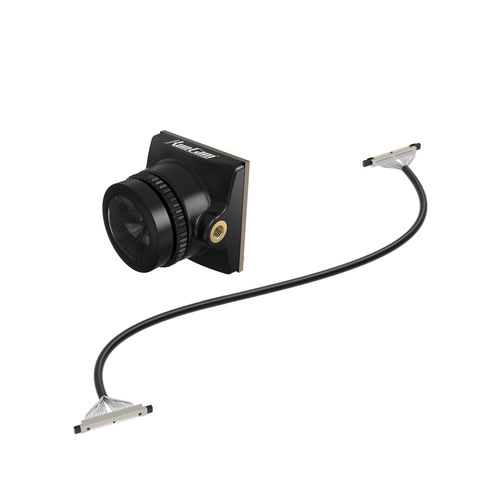
By default RunCam MIPI camera comes with the?firmware for Digital (DJI) VTX capable of outputting the?1280*720@60fps with a low 32ms latency. This camera can also be used with?special firmware for IoT appliances or?Raspberry Pi?with a OpenHD system (you should send email at run@runcam.com for the firmware).?RunCam MIPI is compatible with any digital HD system that provides standard MIPI interface.
It turns out that RunCam revised the specifications and changed their mind – RunCam MIPI camera does not work with OpenHD, HDZero or other HD systems except the DJI Digital System.?RunCam MIPI FPV camera is also not compatible with FatShark Shark Byte system.
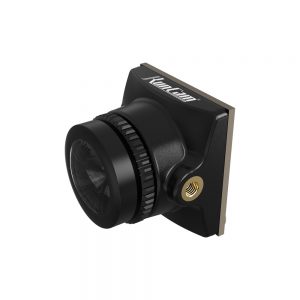
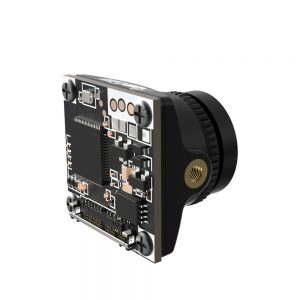
RunCam MIPI camera has 1.8mm lens with?160°?diagonal field of and 16:9 aspect ratio only.
Sample footage from RunCam MIPI camera:
RunCam answer on the MIPI camera compatibility with the DJI Air and Caddx Vista systems:
Available for preorder:
@ RunCam: https://shop.runcam.com/runcam-mipi/
Expected release date:?15th Jun 2021
Specifications:
Designed for HD digital systems (DJI Air/Caddx Vista)
2MP CMOS Sensor
Micro size with 6G High Quality Lens
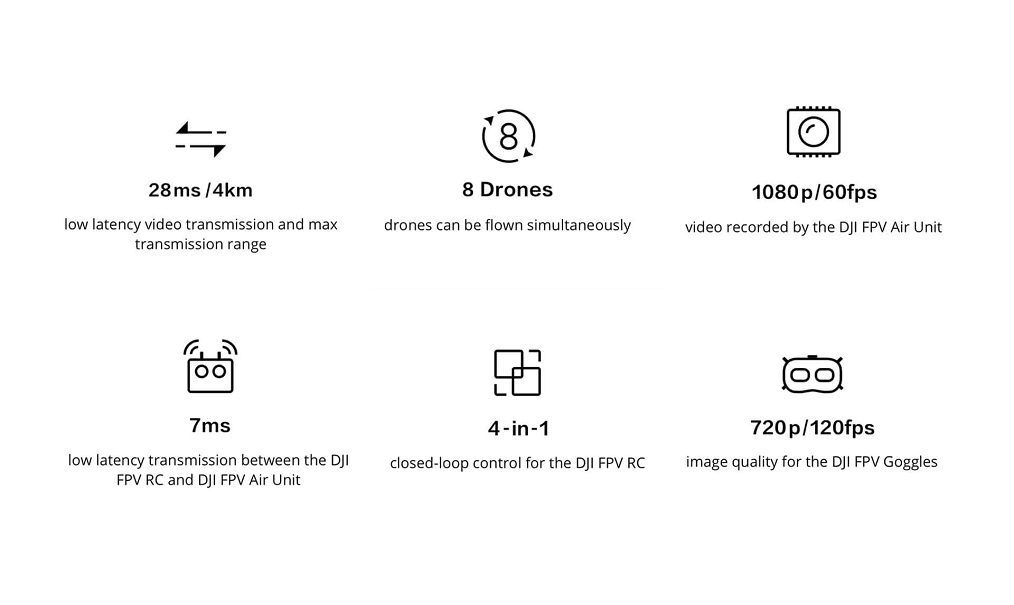
1280*720@60fps (Default) or 1920*1080@60fps?(Custom) video formats
Changeable 1.8mm lens with D:160° H:133° V:75° field of view
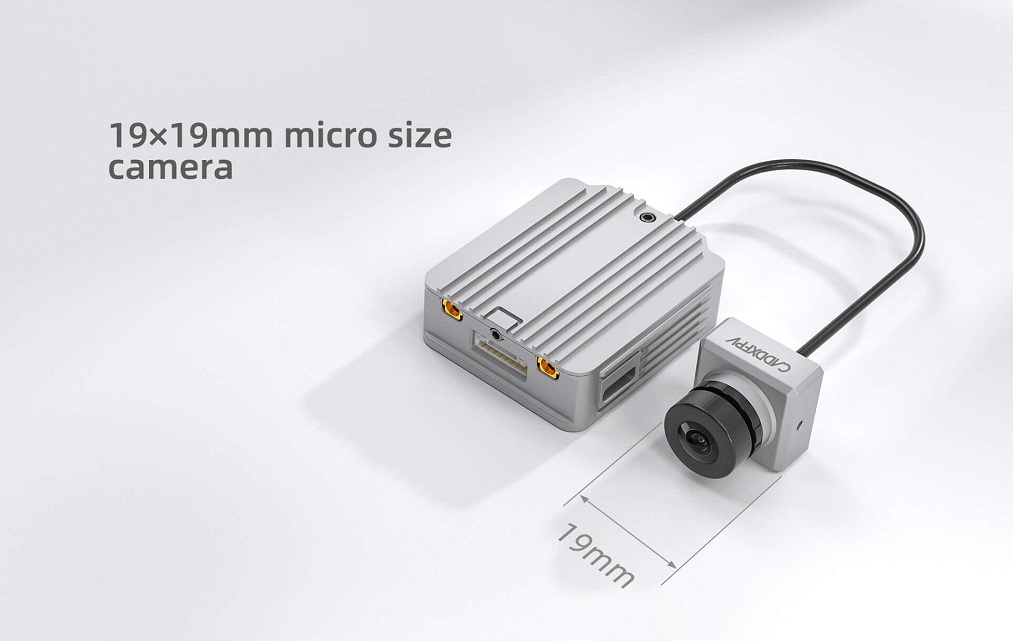
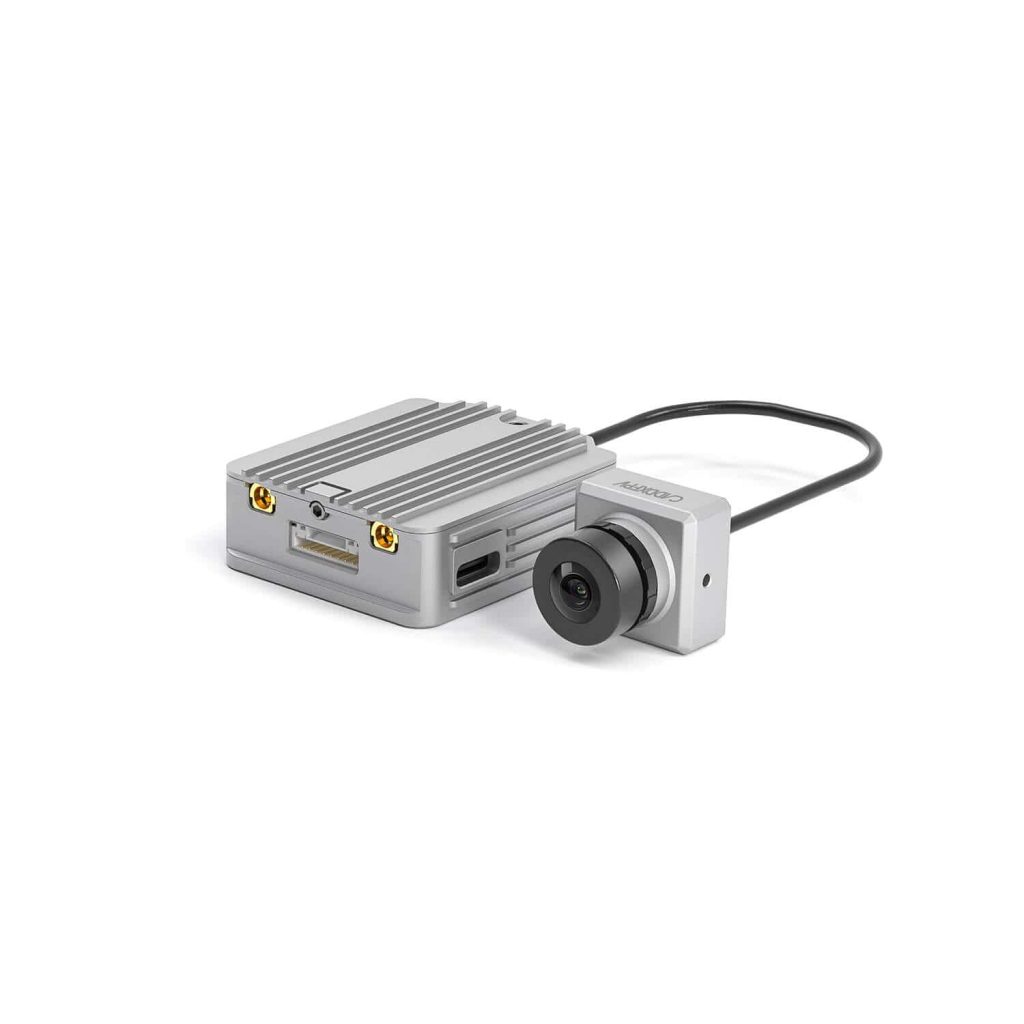
4 lane MIPI CSI interface and 26 Position 0.30mm Pitch plug
450mA@3.3V input voltage
Size: 19*19*17mm
Weight of 6.5 grams.
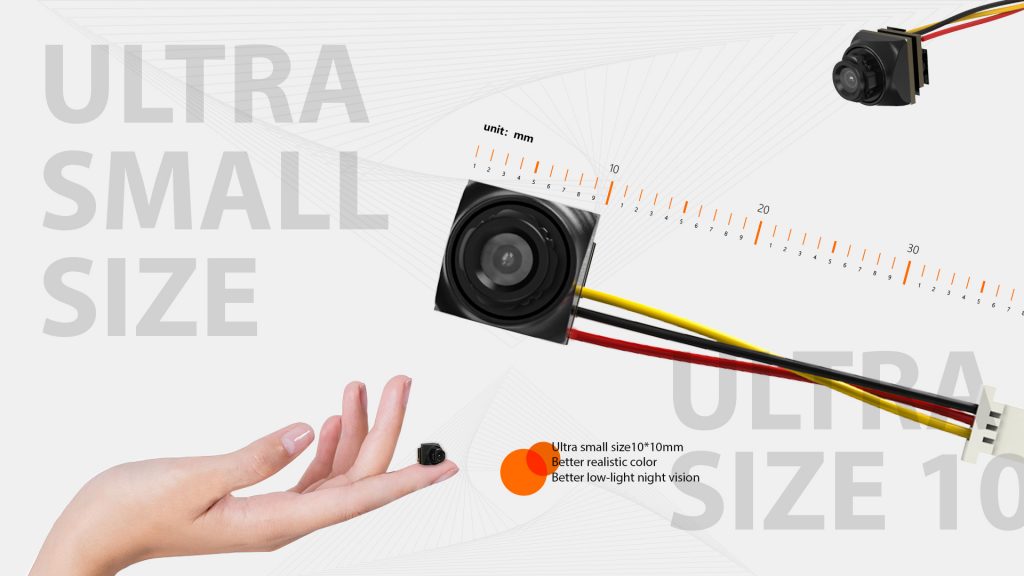
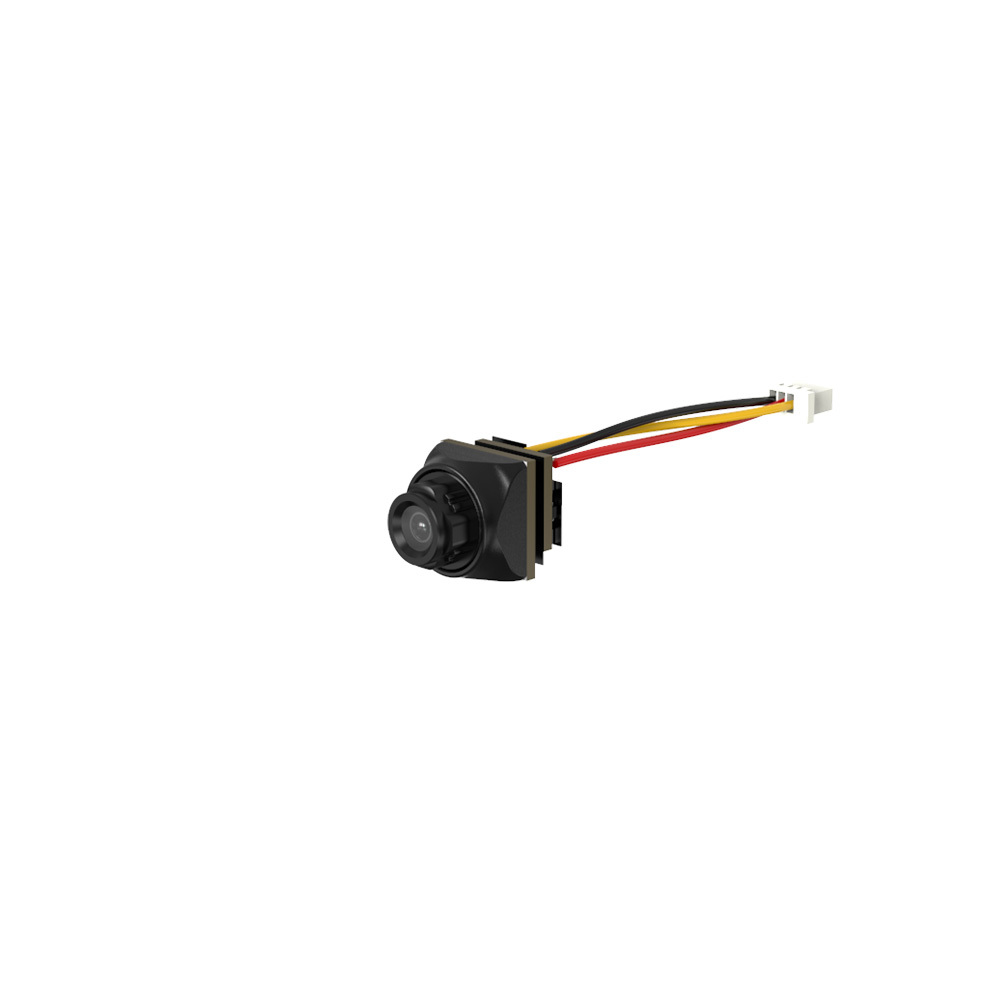
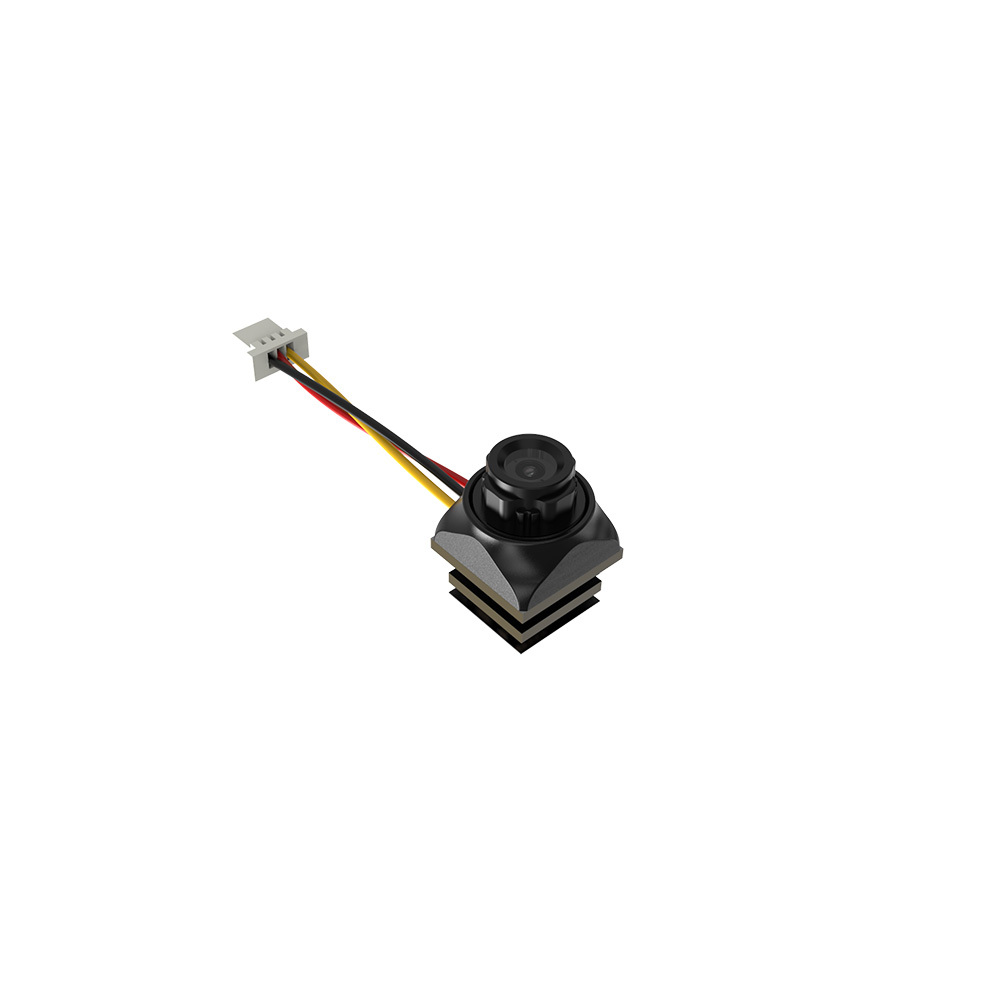
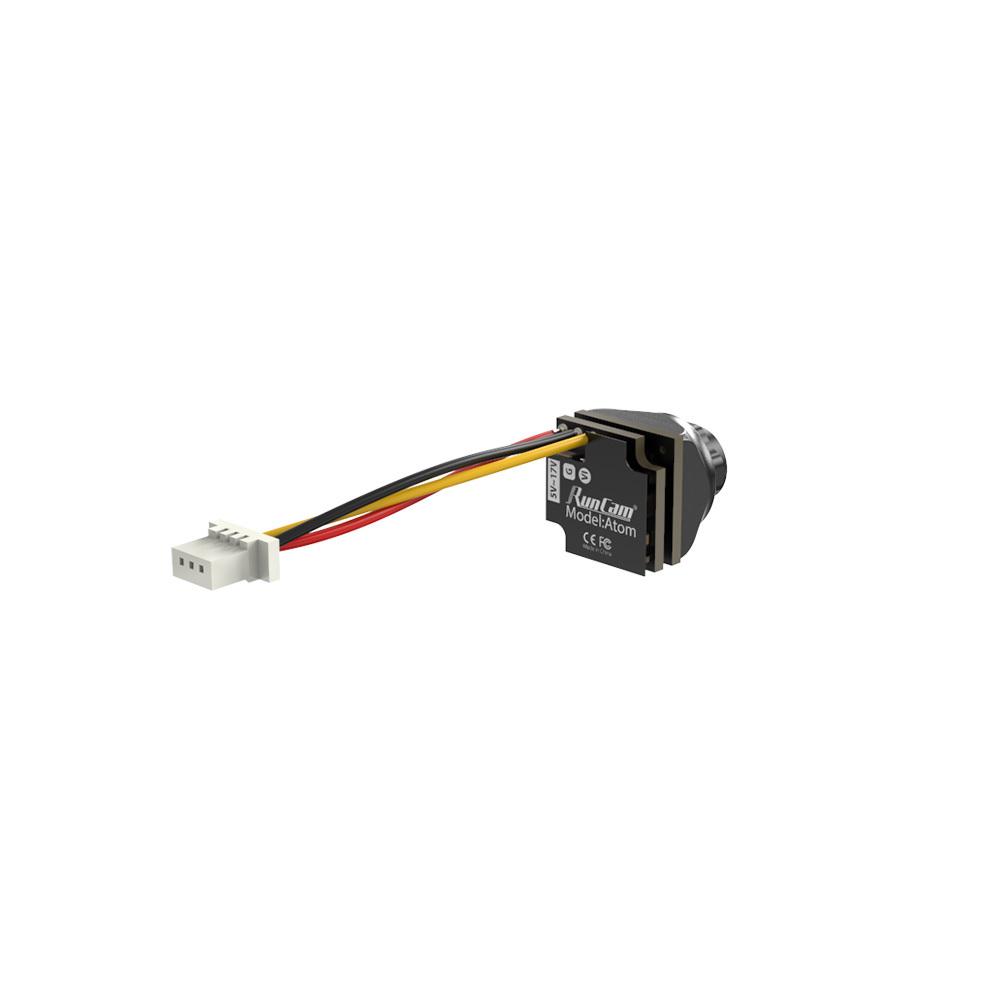
This camera is the first 10mmx10mm sized camera and this size category probably should be called atom size. This camera is targeted for whoop and small toothpick categories. Now we need the new camera mounting options for this new ultra small size fpv camera.
Specifications:
Model: RunCam Atom
Image Sensor: 1/3″ CMOS
Horizontal Resolution: 800TVL
Lens: FOV 130° (M8)
Signal System: NTSC
S/N Ratio: >50dB
Electronic Shutter Speed: Auto
Auto Gain Control (AGC): Auto
Min. Illumination: 0.01Lux@1.2F
D-WDR: Auto
Day/Night: Color
Power: DC 5-17V
Current: 130mA@5V, 40mA@17V
Housing Material: ABS
Net Weight: 1.7g
Dimensions: L10mm*W10mm*H12.5mm
Available @
]]>Caddx Air Unit Micro in fact is the same DJI Air Unit, just the camera in this combo is changed to Caddx Nebula.
The Caddx Air Unit VTX module is just the same as DJI Air Unit module, the dimensions are the same the electronics are the same as so specifications just match.
Specifications:
Weight
Air Unit (Camera included): 41.6 g
Antenna: 3.9 g (MMCX elbow each)
Dimensions
Air Unit: 44 × 37.8 × 14.4 mm
Camera: 20.7×19×19mm (DJI Camera was: 27.4 × 21.1 × 20.1 mm)
Coaxial Cable: 100 mm
Operating Frequency: 5.725-5.850 GHz
Transmitter Power (EIRP): FCC/SRRC: <30 dBm; CE: <14 dBm
Min. Latency (end-to-end)
Low Latency Mode (720p/120fps): <28 ms
High-Quality Mode (720p/60fps): <40 ms
Max transmission Distance
FCC.SRRC: 4km
CE (EU): 0.7km
Video Format: MP4(Video H.264, Audio: AAC-LC)
I/O Interface: USB-C, MMCX, 3-in-1port, microSD card slot
Supported Flight: BetaFlight Control System
Operating Temperature Range: 0° to 40°C(32° to 104°F)
Input Power: 7.4-17.6V
Camera
Sensor:1/3.2”CMOS;
Effective Pixels:4M
Lens: 2.1mm,f/2.1
Shutter:Rolling shutter
ISO:100-25600
FOV: 150°(D);122°(H);93°(V)

Available @
Makerfire (coupon MKFCaddx8 save 8% OFF): https://shop.makerfire.com/collections/new-arrival/products/caddx-air-unit-hd-digital-video-transmittion
Banggood: https://www.banggood.com/Caddx-Air-Unit-HD-Digital-Video-Transmission-Micro-Version-…-1841857.html
GetFPV: https://www.getfpv.com/caddx-air-unit-micro-version-for-dji-digital-hd-fpv-system.html
]]>
According to the FCC ID website data the 2.4GHz link is declared to be rated up to 1W. This is some serious RF power. Let’s wait and see what it will be used for (maybe extra long range FPV video link?).
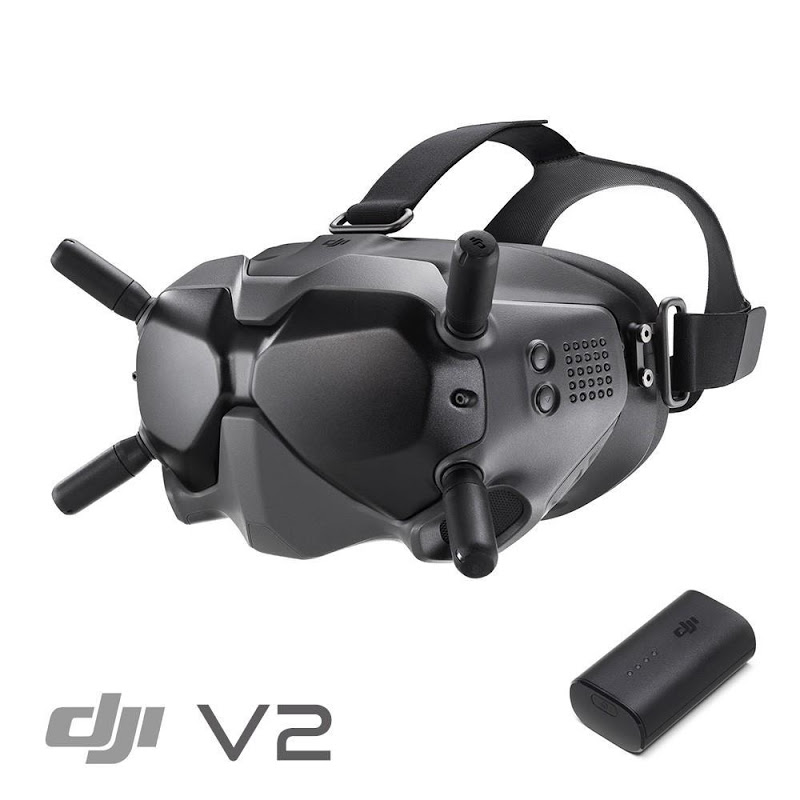
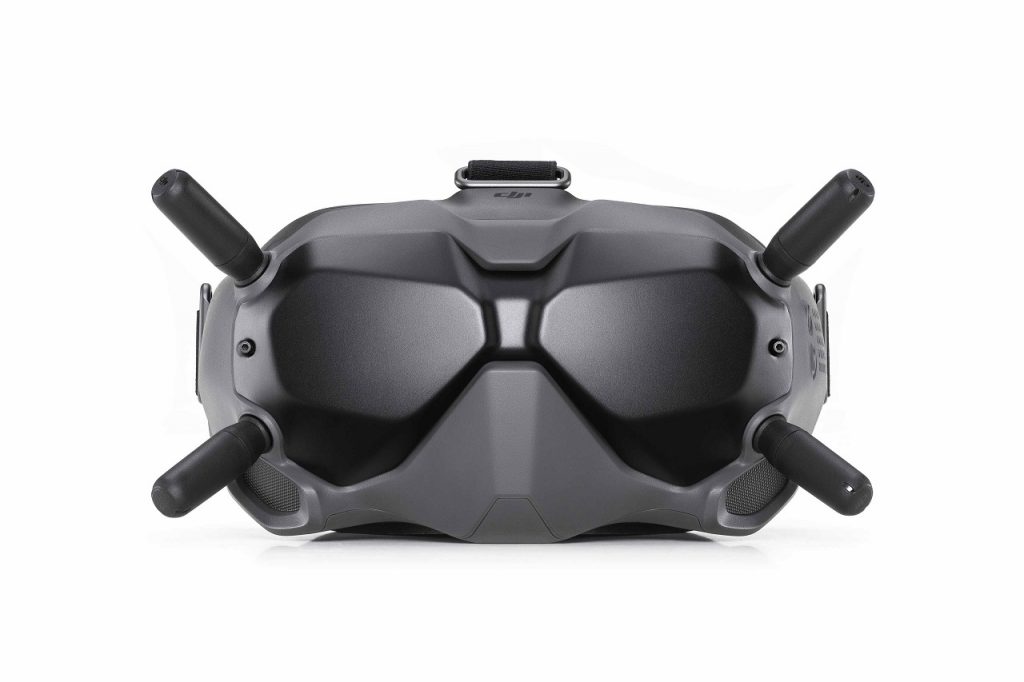
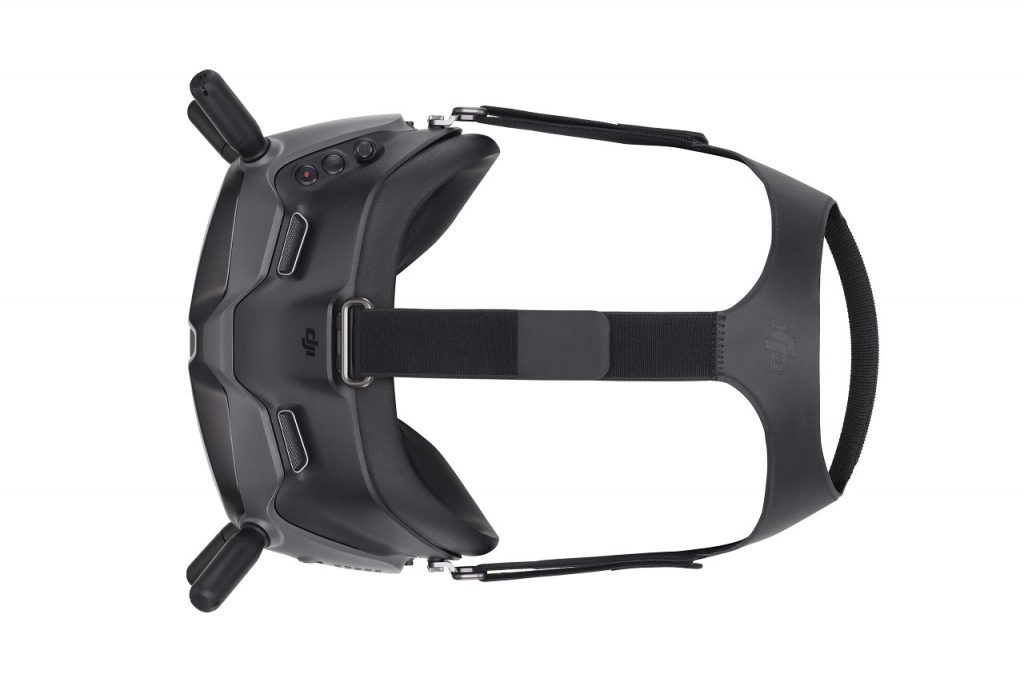
Visually the V2 goggles look exactly the same as V1 as the goggles use the same mold as V1. This is also a good news as any accessory (like patch antennas) that you use or can buy for the V1 version should also fit the V2 version.
It has been confirmed that 1200mW mod also works with the DJI FPV Goggles V2.
Estimated release date: 23rd of January
Makerfire (coupon code: Montis) : https://shop.makerfire.com/products/dji-v2-fpv-goggles
Specification:
Brand: DJI FPV Goggles V2
Weight: Approx. 420 g (headband and antennas included)
Dimensions: 202×126×110 mm (antennas included), 184×122×110 mm (antennas excluded)
Screen Size: 2-inch × 2
Screen Resolution (Single Screen): 1440 × 810
Screen Renew Rate: 144 Hz
Communication Frequency: 2.400 – 2.4835 GHz*; 5.725-5.850 GHz
*Only supports 5.8Ghz when used with DJI FPV Air Unit
Transmitter Power (EIRP): 2.400 – 2.4835 GHz
FCC/MIC: ≤28.5 dBm; CE: ≤20 dBm; SRRC: ≤20 dBm; MIC: ≤20 dBm
5.725-5.850 GHz
FCC/MIC: ≤31.5 dBm; CE: ≤14 dBm; SRRC: ≤19 dBm
Live View Mode: Low-Latency Mode (810p 120fps); High-Quality Mode (810p 60fps)
Video Format: MP4 (Video format: H.264)
Supported Video Play Format: MP4, MOV, MKV (Video format: H.264; Audio format: AAC-LC, AAC-HE, AC-3, MP3)
Operating Temperature: 32° to 104° F (0° to 40° C)
FOV: Adjustable from 30° to 54°. Adjustable image size from 50%-100%
Interpupillar Distance Range: 58 -70 mm
Supported Storage Card: microSD cards with storage capacities of up to 256GB.
DJI FPV Goggles Battery
Capacity: 1800 mAh
Voltage: 9 V (Max.)
Type: LiPo 2S
Charging Temperature: 0℃ to 45℃
Energy: 18 Wh
Max Charging Power: 10 W
Battery Life: Approx. 110 minutes (measured in an environment of 25°C at maximum brightness level)
*Only supports 5.8Ghz when used with DJI FPV Air Unit
Tips:
Avoid exposing the inside of the goggles to direct sunlight.
Compatibility:
DJI FPV Air Unit
DJI FPV Remote Controller
Package Included:
1x DJI FPV Goggles V2 (inc. foam padding)
1x DJI FPV Goggles Battery
1x DJI FPV Goggles Power Cable (USB-C)
4x DJI FPV Goggles Antenna (Dual Band)
1x Headband
1x USB-C cable
1x Sleeve
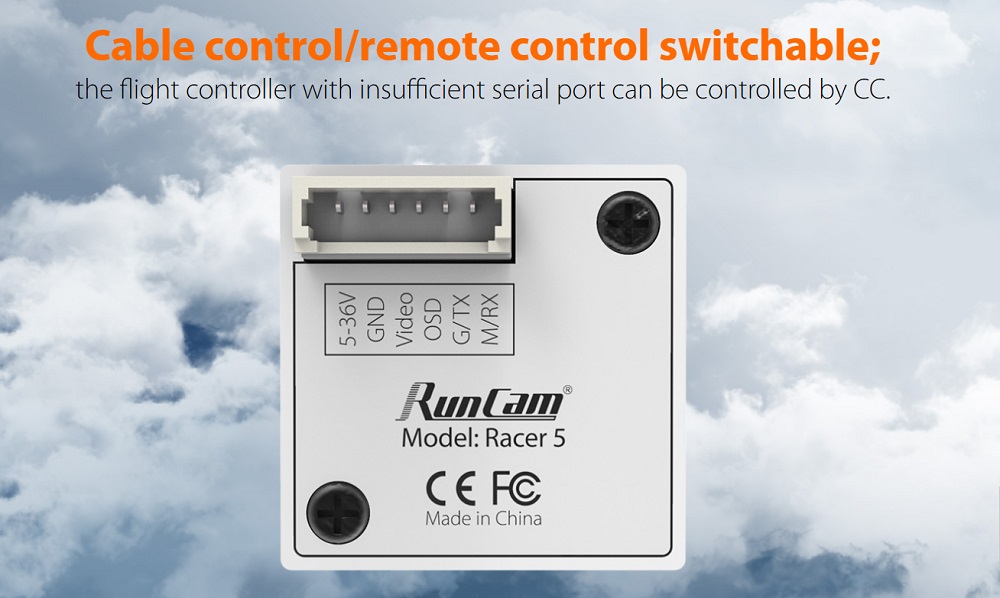
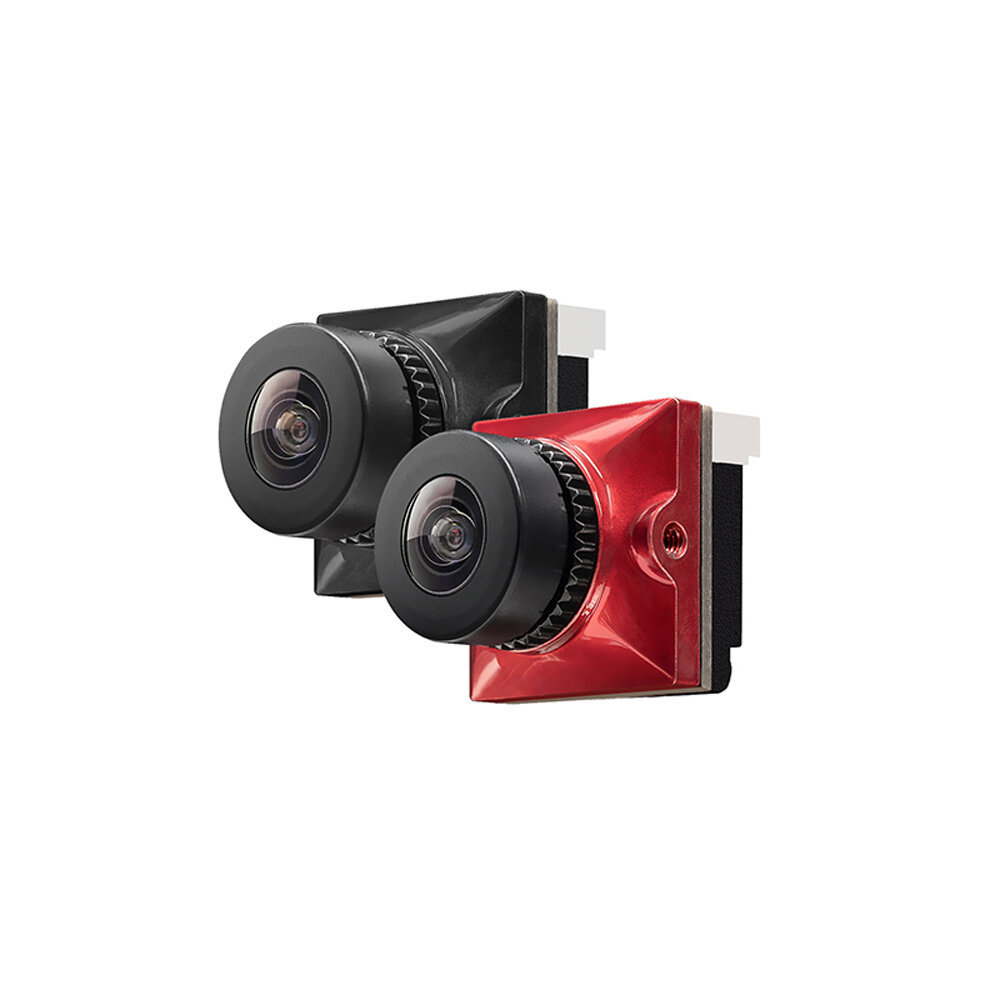
RunCam Racer 5
The newest Racer 5 is fully analog FPV camera as opposite to the Racer 4 that was digital/analog and made a stir in the community as Caddx accused in the copying their digital FPV camera technology.
RunCam Racer 5 has the 1000TVL CMOS sensor and is available in two lens options: 1.8mm lens with 160° FOV or 2.1mm with 145° FOV.
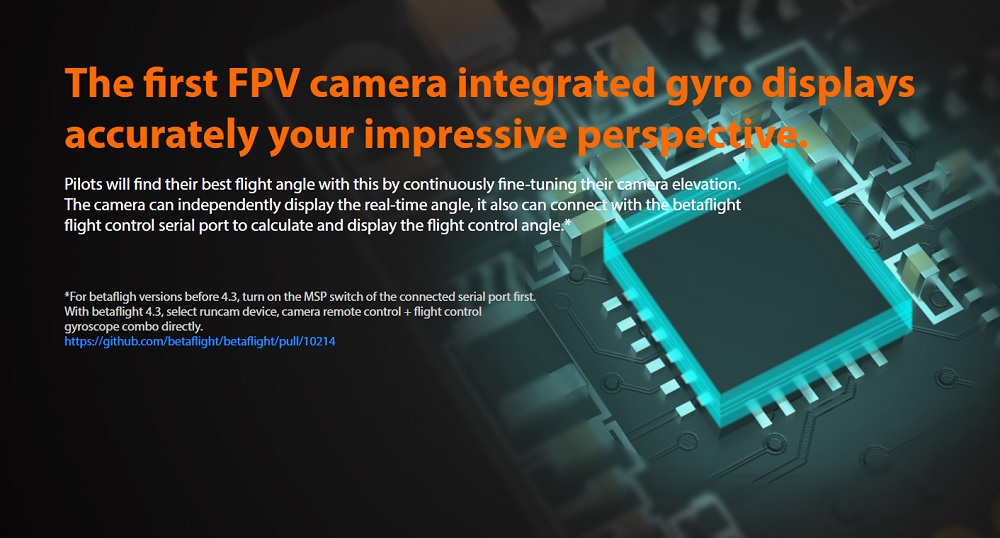
RunCam Racer 5 is the first camera that has gyro built in. FPV pilots now can easily set the camera angle by looking at the angle value in the OSD.

Available @
Banggood: https://www.banggood.com/Runcam-Racer-5-1000TVL-…-FPV-Camera-for-FPV-Racing-RC-Drone-p-1787265.html
Makerfire: https://shop.makerfire.com/collections/new-arrival/products/runcam-racer-5-camera
RunCam Racer 5 User Manual: https://www.runcam.com/download/Racer5/Racer5-Manual-OSD.pdf
Model: RunCam Racer 5
Image Sensor: Super WDR CMOS Sensor
Horizontal Resolution: 1000TVL
Lens: 1.8mm FOV 160° / 2.1mm FOV 145°
Screen Format: 4:3 / Widescreen Switchable
Signal System: NTSC / PAL Switchable
Mirror/Flip: Available
Integrated OSD: Yes
Built-in gyro: Yes
One Touch Scene Setting: Personal / Lightrax
S/N Ratio: >50dB
Electronic Shutter Speed: Auto
Min. Illumination: 0.01Lux@1.2F
WDR: Super WDR
Day/Night: Color
Menu Control: Cable Control / Remote Control
Power: DC 5-36V
Current: 110mA@5V / 40mA@12V
Housing Material: ABS
Net Weight: 6.1g
Dimensions: L19mm*W19mm*H21mm
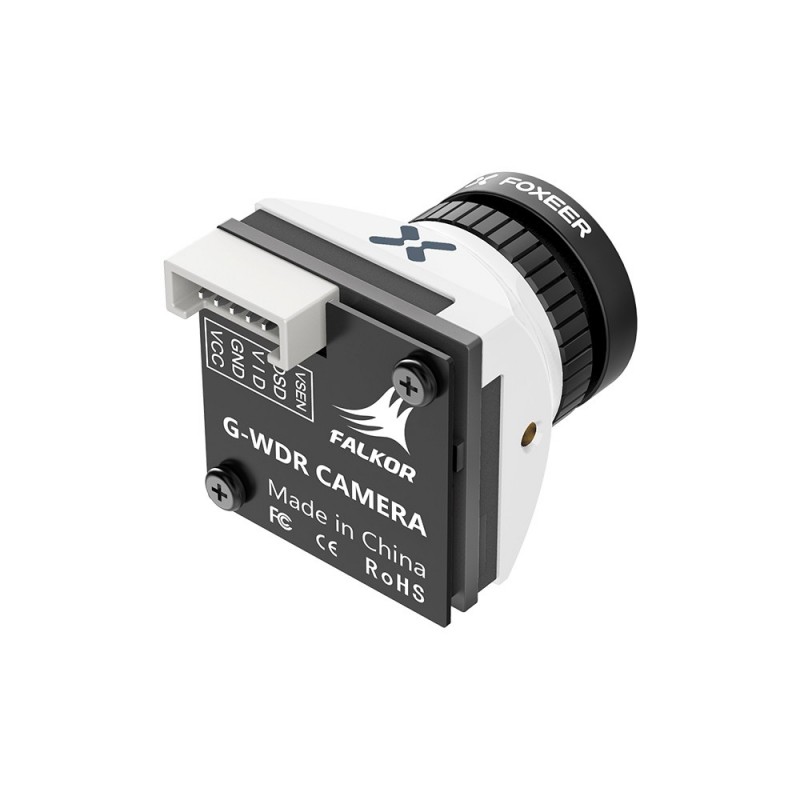
Foxeer Falkor 3
Foxeer has released the third generation of the Falkor camera. Falkor 3 has a little bit improved latency (6ms) over the older Flakor 2 and the low light performance was improved also. Falkor 3 has 0.0001 Lux min illumination versus 0.001 Lux on the older Falkor 2. New Falkor has bigger M12 1.7mm lens versus the M8 1.8mm lens on the older Falkors.
Available @
Surveilzone: http://www.surveilzone.com/Foxeer-Falkor-3-Micro-6ms-Latency-00001Lux-WDR-FPV-Camera-g-2371
Foxeer: https://www.foxeer.com/foxeer-falkor-3-micro-6ms-latency-starlight-wdr-fpv-camera-g-313
Falkor 3 User Manual: https://download.foxeer.com/Foxeer_FALKOR_3_Manual.pdf
Sensor Type: Sony 1/3″ CMOS Sensor
Scale: 4:3(Default)/16:9 Switchable
Tv System: PAL(Default)/NTSC Switchable
Resolution: 1200TVL
Lens:M12 1.7mm
FOV: 4:3 FOV-H: 138° FOV-D: 172°
16:9 FOV-H: 138° FOV-D: 158°
Shutter Speed: PAL 1/25~1/10000 sec; NTSC 1/30~1/10000 sec
Video Output: CVBS Analog Signal
Minimum Illumination: 0.0001Lux
White Balance: Auto
DNR: 3DNR
WDR: 100dB
DAY/NIGHT EXT/Auto/Color/B&W
Flight OSD Voltage/Cam Title/Time
Input Voltage 4.6V~20V
Language ENGLISH /中文/ PYCCKNN / ESPANOL / ITALIANO /FRANCAIS/POLSKIM/ PORTUGUES / 日本語 / EAAHNIKA
Working Temperature -10°~50°C RH90% MAX
Working Humidity 20~80%
Storage Temperature -20°~70°C
Consumption 95mA±15% @ DC12V
Dimension: 19*19
Weight: 8.8g(Exclude cable)
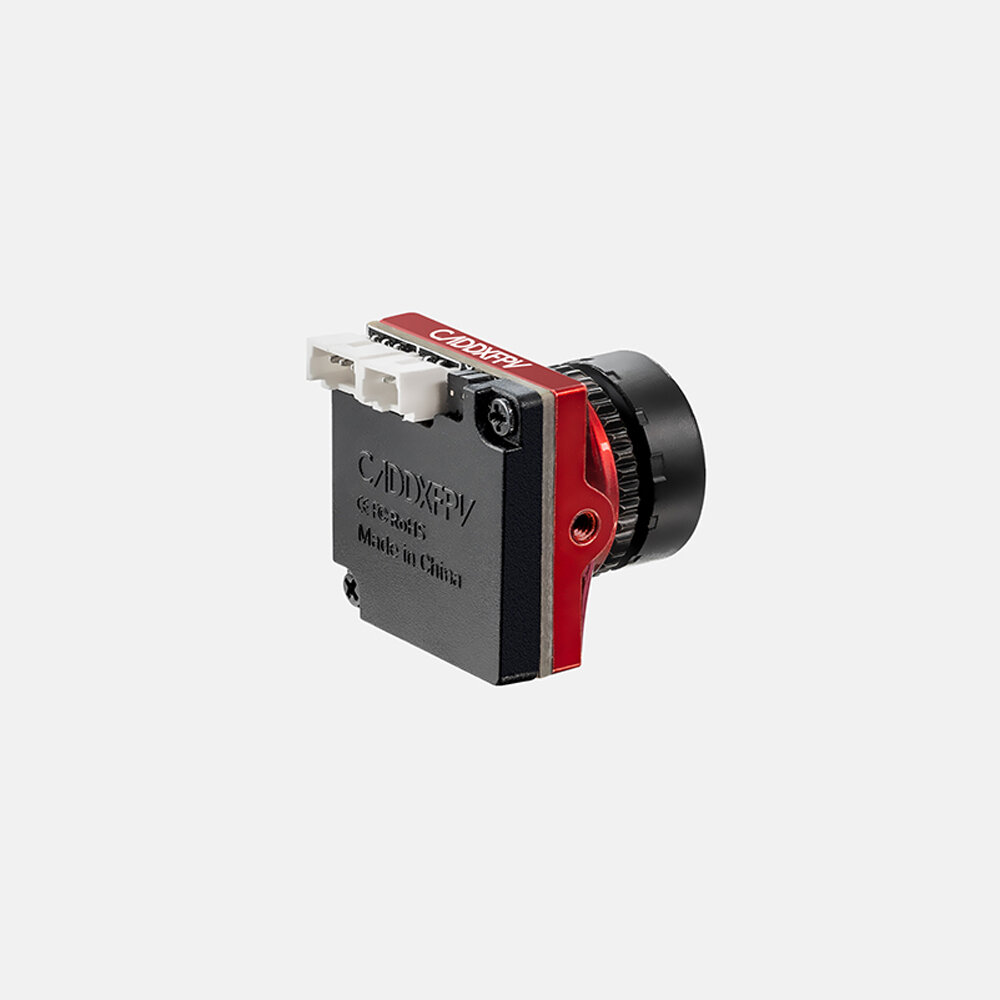
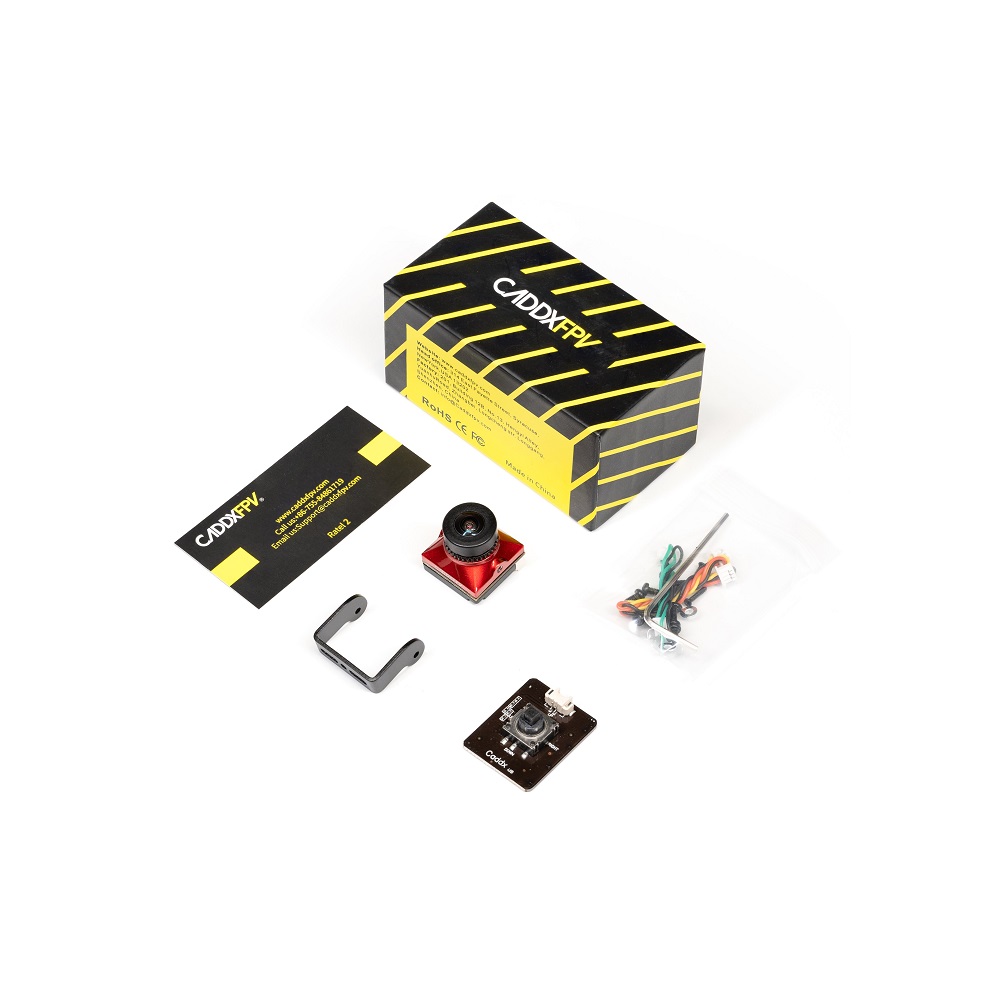
Caddx Ratel 2
Caddx has upgraded its best Ratel FPV camera. The Ratel 2 has the same 1/1.8″ sensor, but the Caddx has upgraded the firmware ad the colors now look more natural and vibrant.
New Caddx Ratel 2 has the same lens as on the DJI Air Unit camera. This lens has wider 165° field of view and has no annoying lens glare.
Caddx Ratel 2 now has metal case and is lighter. The weight is 5.9 grams.
Available @
Banggood: https://www.banggood.com/Caddx-Ratel-…-FPV-Camera-For-RC-Drone-p-1779714.html
Makerfire: https://shop.makerfire.com/collections/new-arrival/products/caddx-ratel-fpv-camera
Caddx Ratel 2 User Manual:
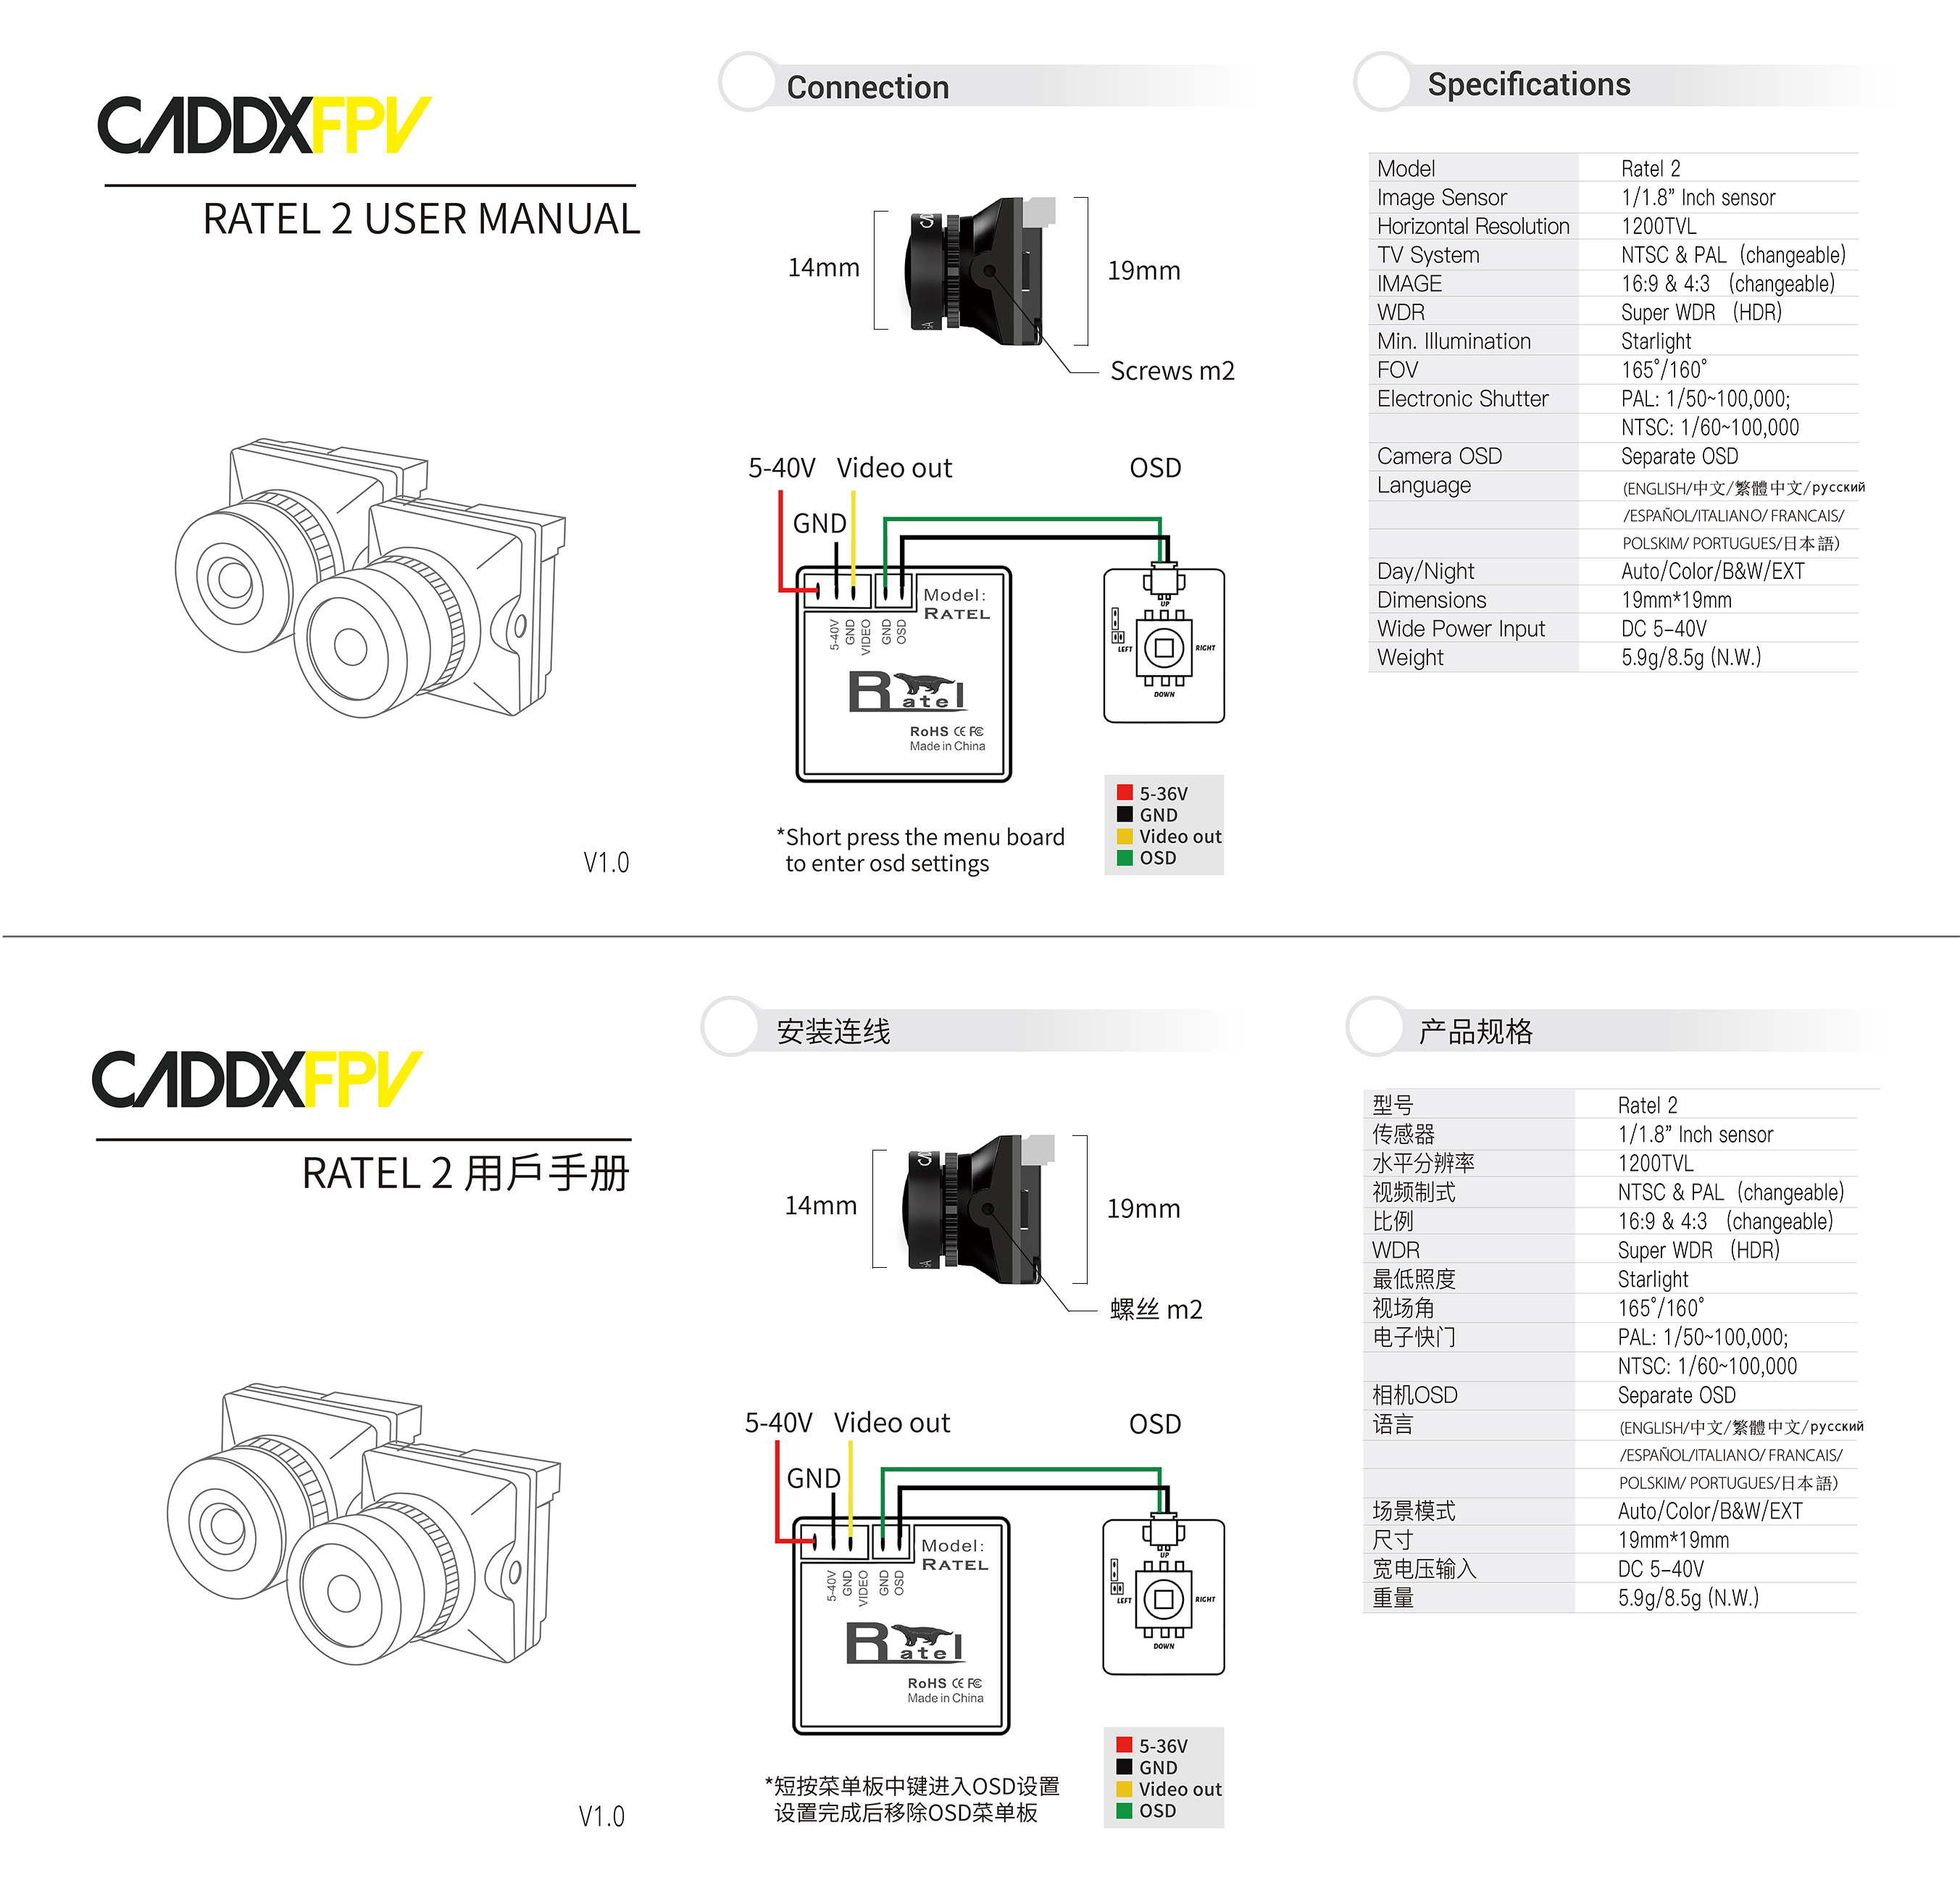
Specifications:
Name: Caddx Ratel 2
Sensor: 1/1.8′‘ Inch Starlight
Resolution: 1200TVL
FOV: 165°
Lens: 2.1mm
TV System: NTSC & PAL (switchable)
Image: 4:3 & 16:9 (switchable)
WDR: Super WDR
DNR: 3DNR
Min. Illumination: 0.0001LUX
Video Output: CVBS
Day/Night: Auto/Color/B&W/EXT
Shutter Speed: PAL:1/50~100,000; NTSC: 1/60~100,000
Wide Power Input: 5-40V
Working Temperature: -20℃ ~ +60 ℃
Weight: 5.9g
Dimension: 19*19*20mm
]]>