Closer look
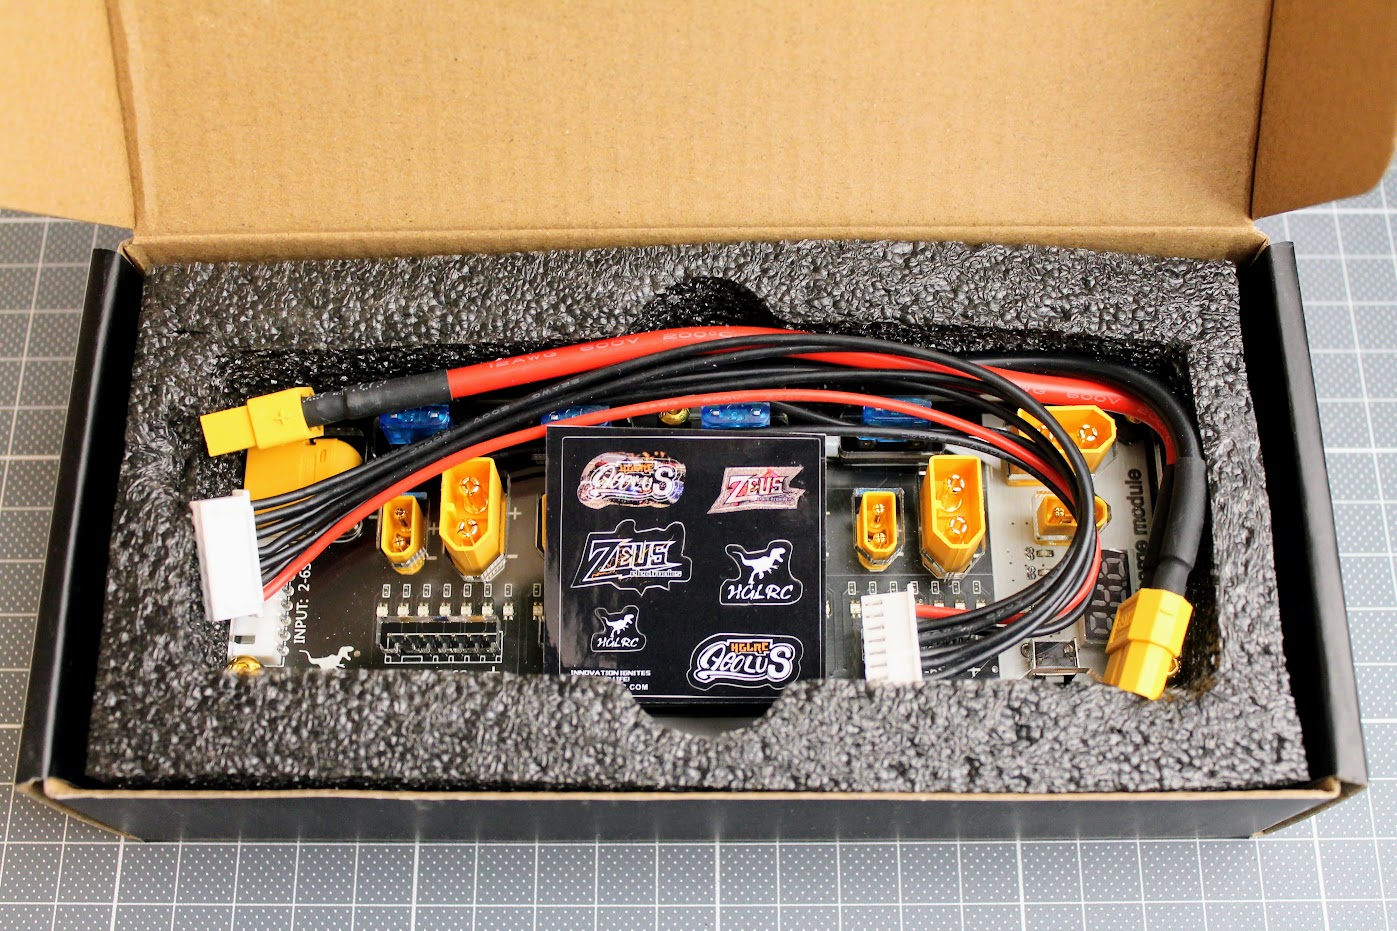
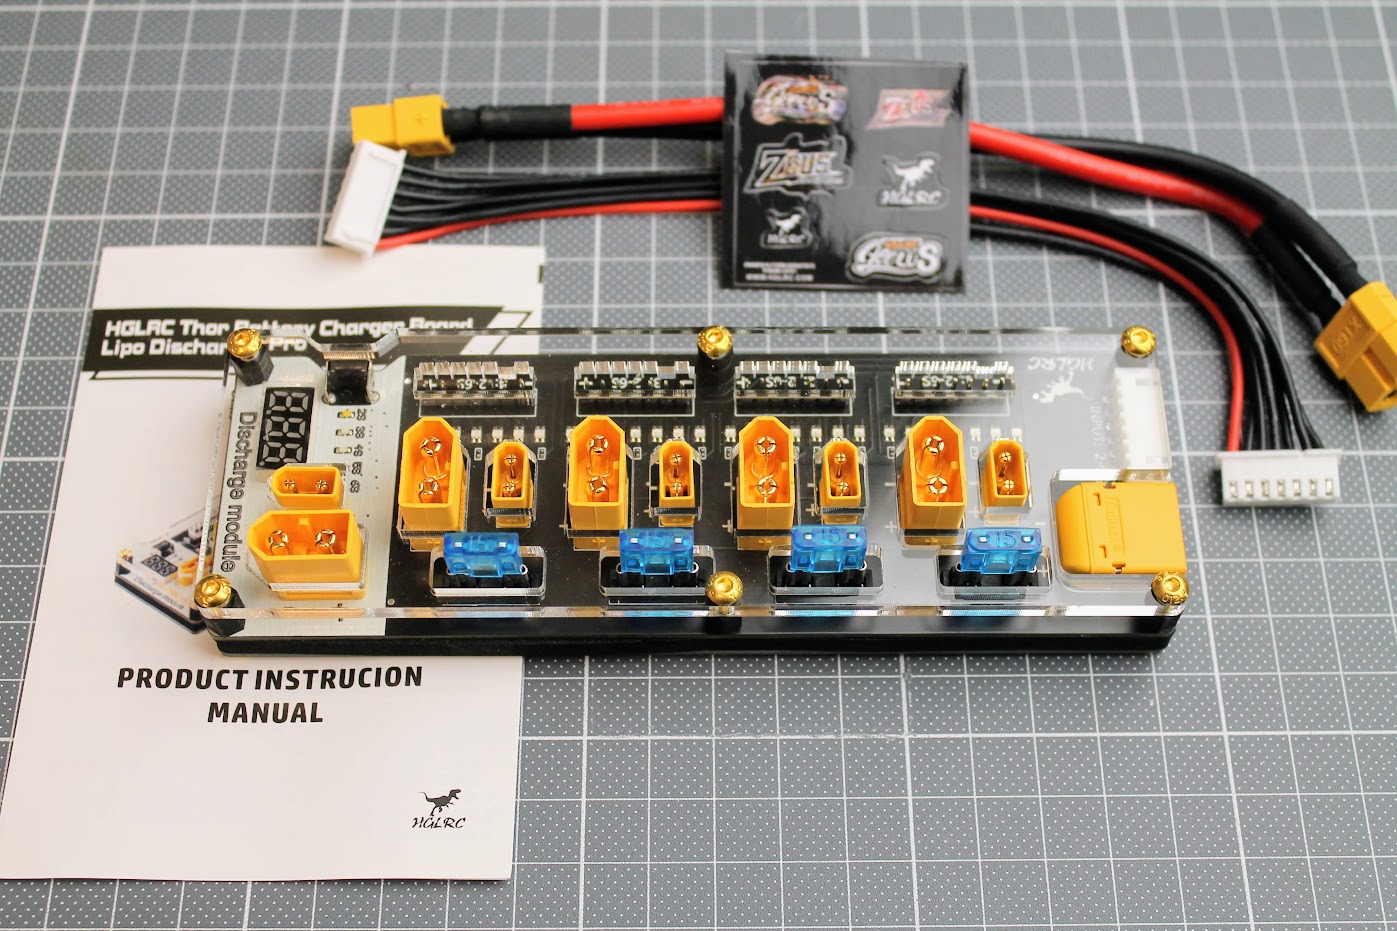
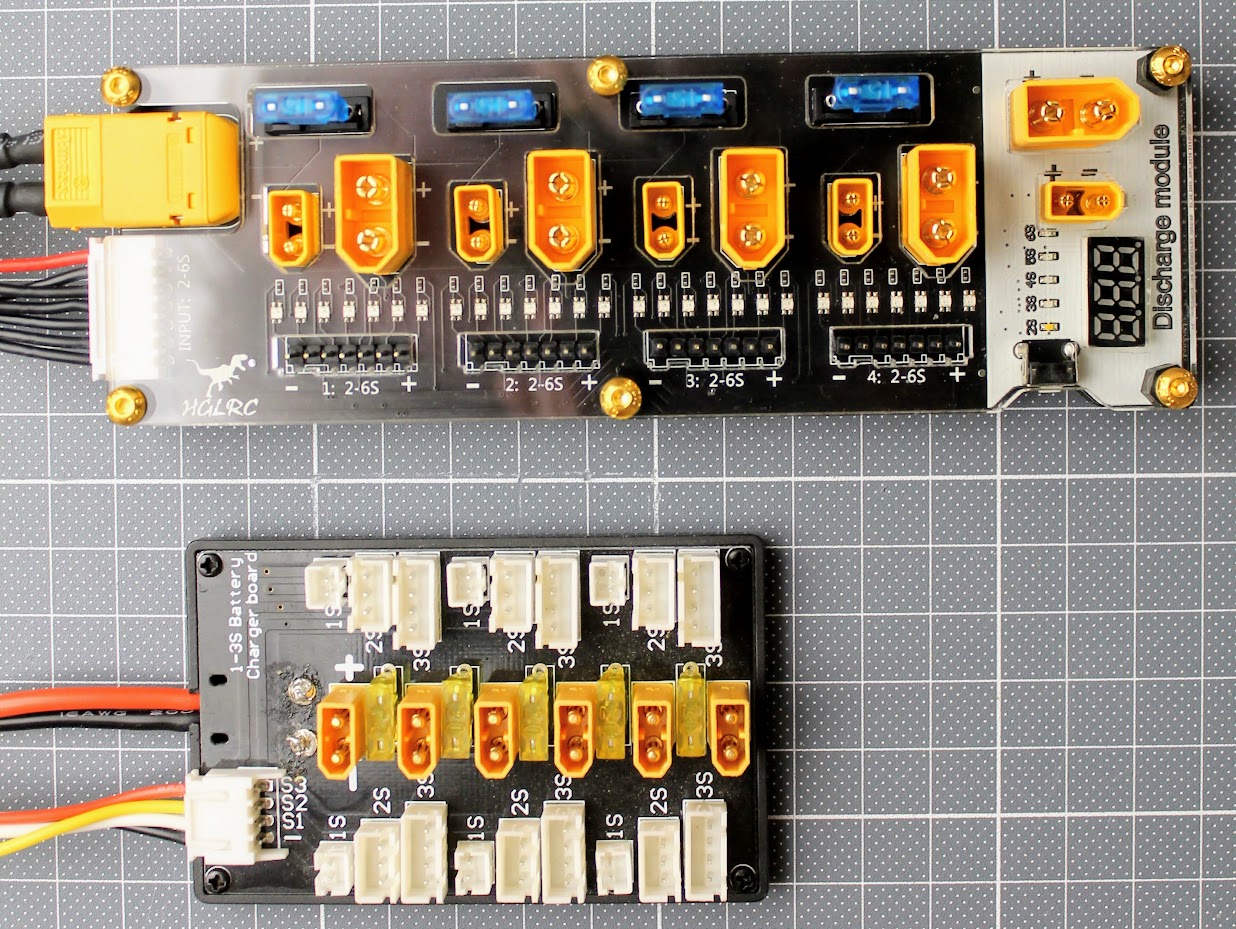
Inside the box you’ll find the HGLRC Thor Pro charger board, XT60 and 6S balance lead connection to charger cables and instruction manual.
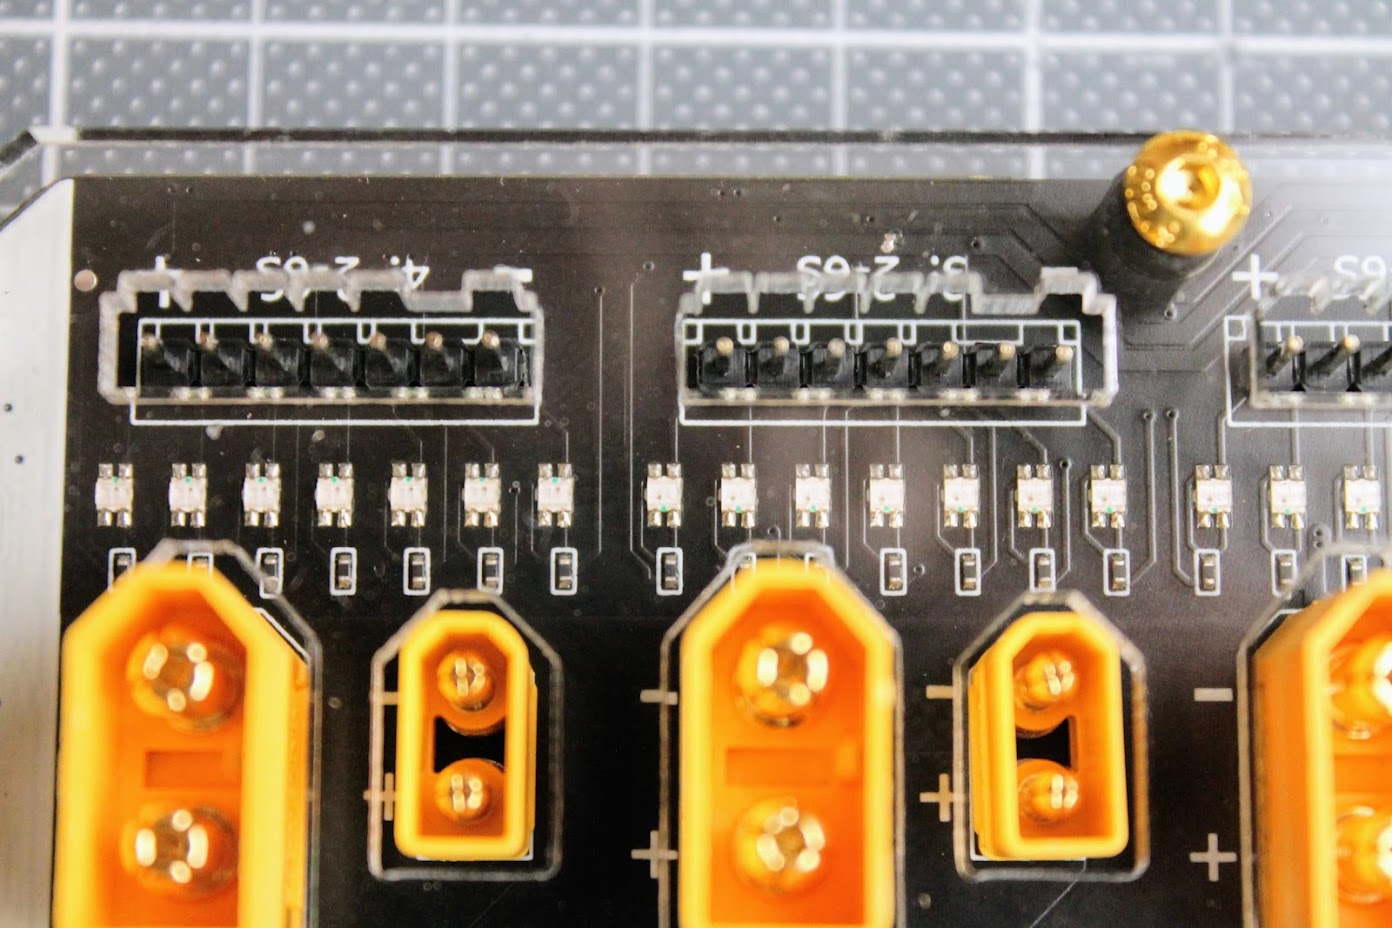
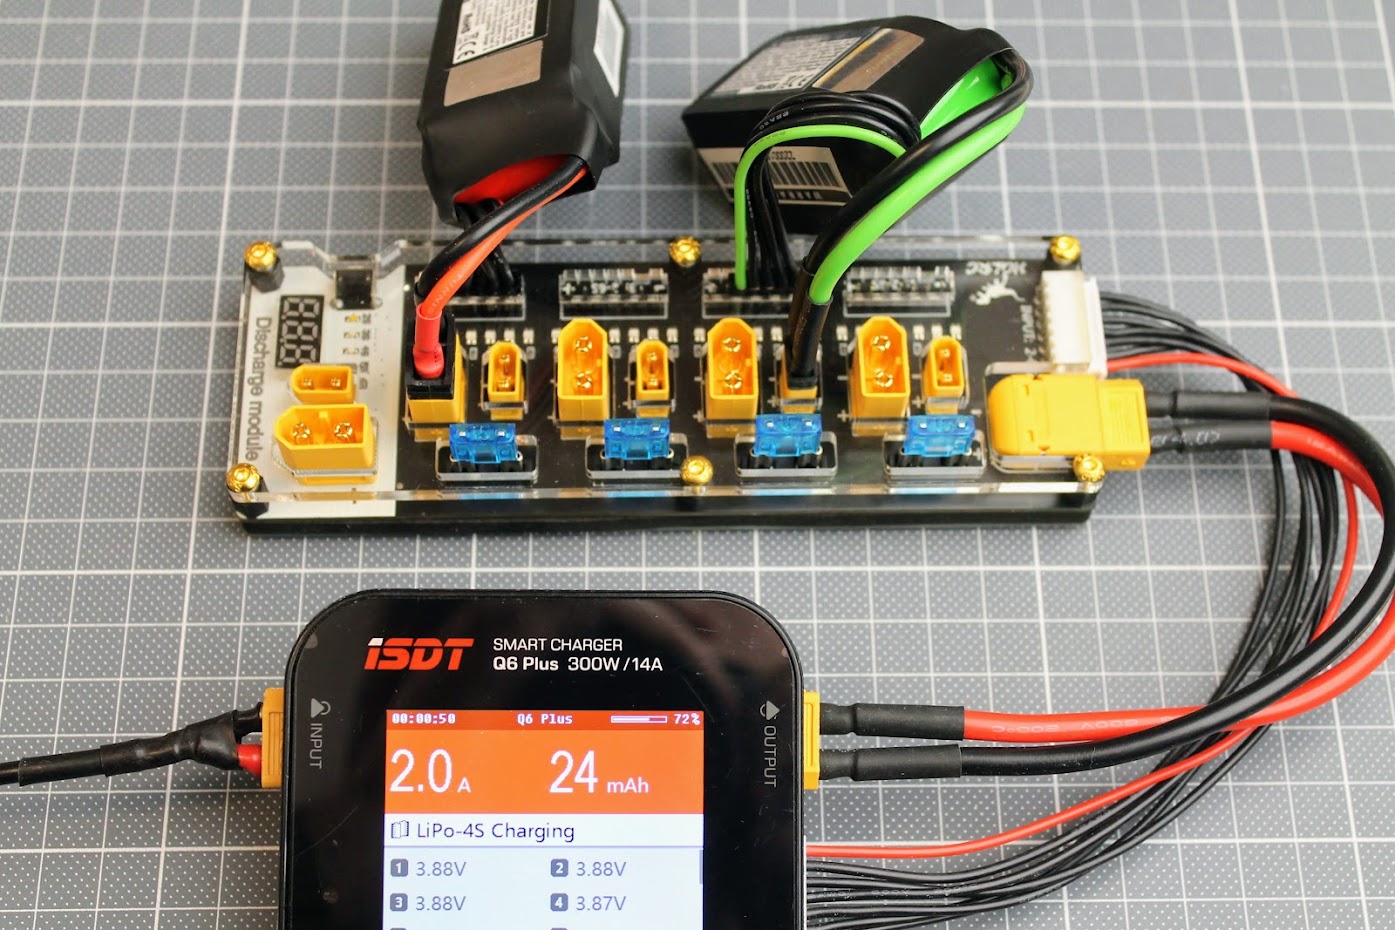
HGLRC Thor Pro charger board can charge 4 batteries in parallel with up to 40A of combined current.
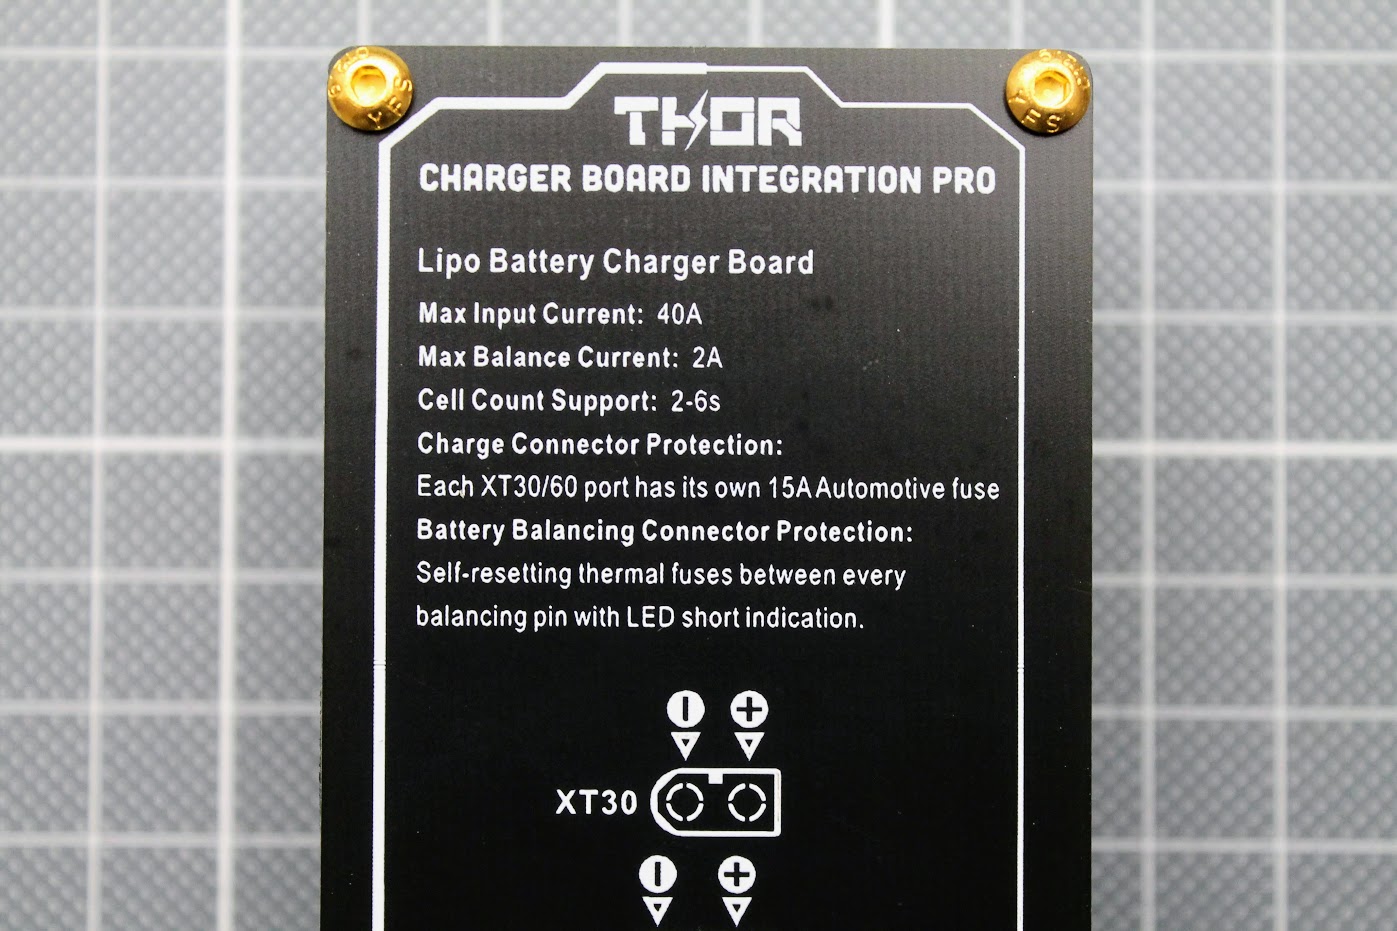
Charger board has 15A automotive fuses for protecting the batteries from short circuit. These fuses have dedicated slots and are replaceable.
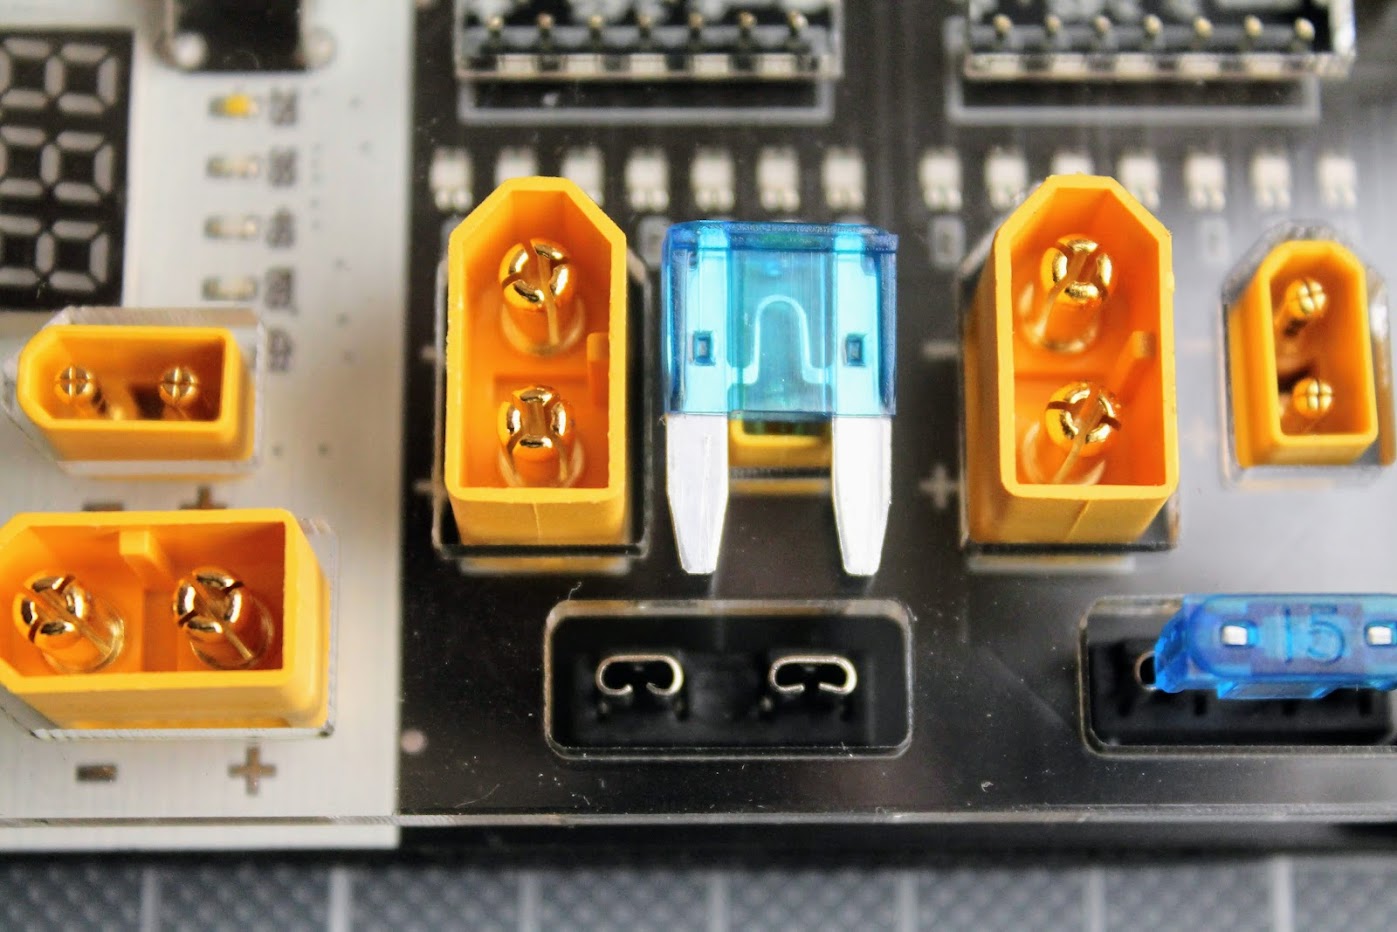
Charger board balance ports also have resettable thermal fuses for each individual cell. LED lights up when the thermal fuse takes the protection from overcurrent or short.
Compared to my old 2S-3S charging board this HGLRC Thor Pro charging board is a huge improvement in safety and featurewise.
Charging
Caution! You should only use the batteries with the same cell count and the battery voltages should not differ more than 0.1V per cell. Never leave the batteries unattended while they are charging or discharging!
HGLRC Thor charger board has 4 XT30 and XT60 ports for up to 4 batteries connected in parallel. When charging the batteries in parallel you should have in mind that total charging current is divided between the count of the batteries, meaning if you provide 10A of charging current to the board with 4 batteries, it will provide the 10A/4=2.5A for each of the battery. So if you want to charge multiple batteries in parallel, you should multiply the charging current by the number of the batteries. I usually charge from 1C to 2C current rating for each battery.
Discharging
This is very handy feature. There are often some lipo batteries left charged after the flying session. Lipo batteries don’t like to be left fully charged for a long period of time. They may puff, damage or degrade if left charged even for a few days. So it is recommended to discharge the li-po batteries to the storage voltage (3.7-3.8V) to keep them healthy.
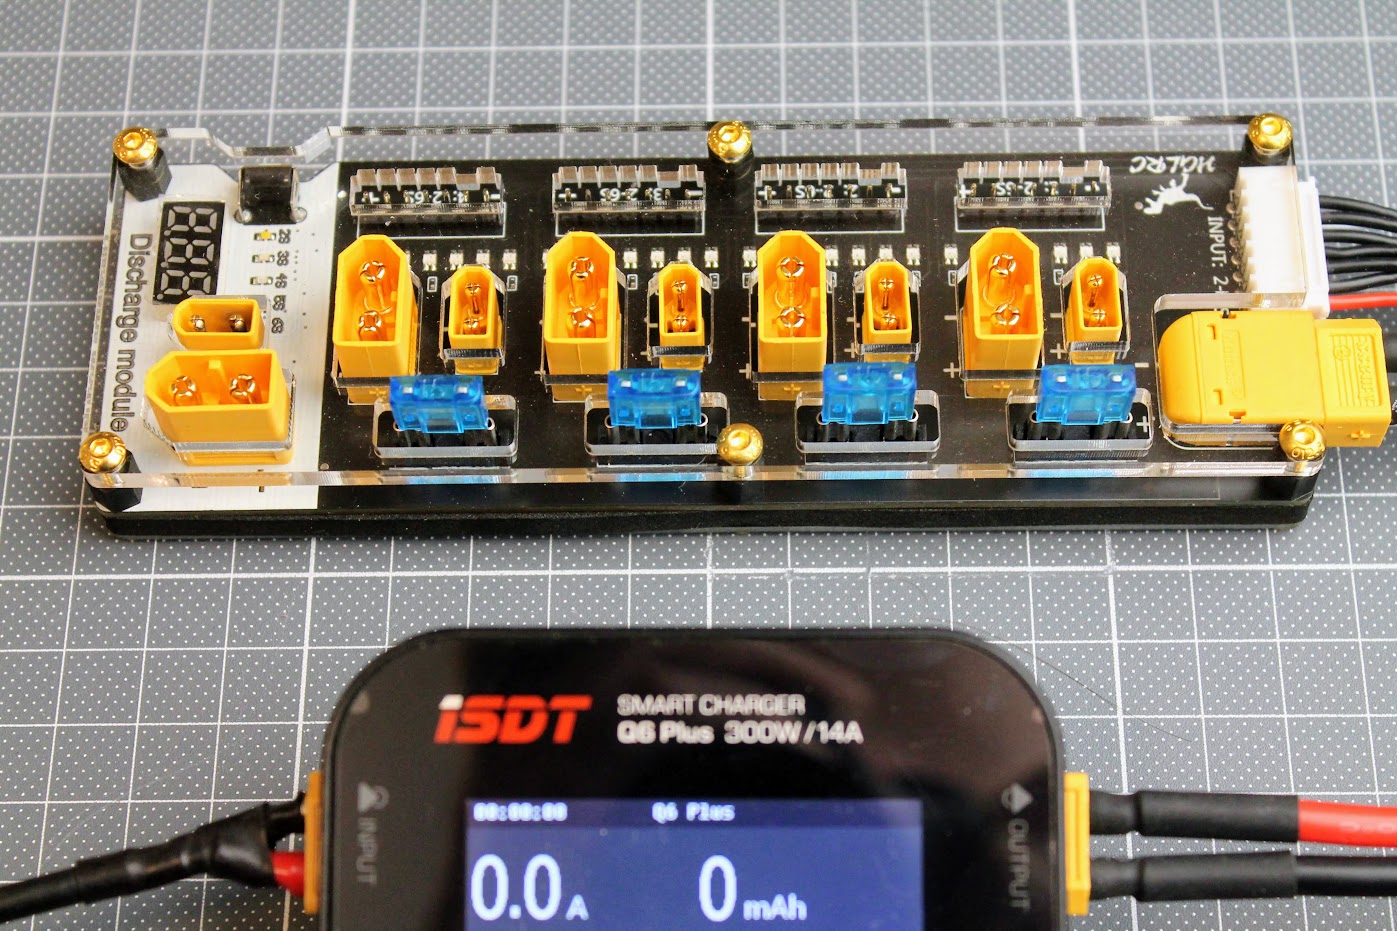
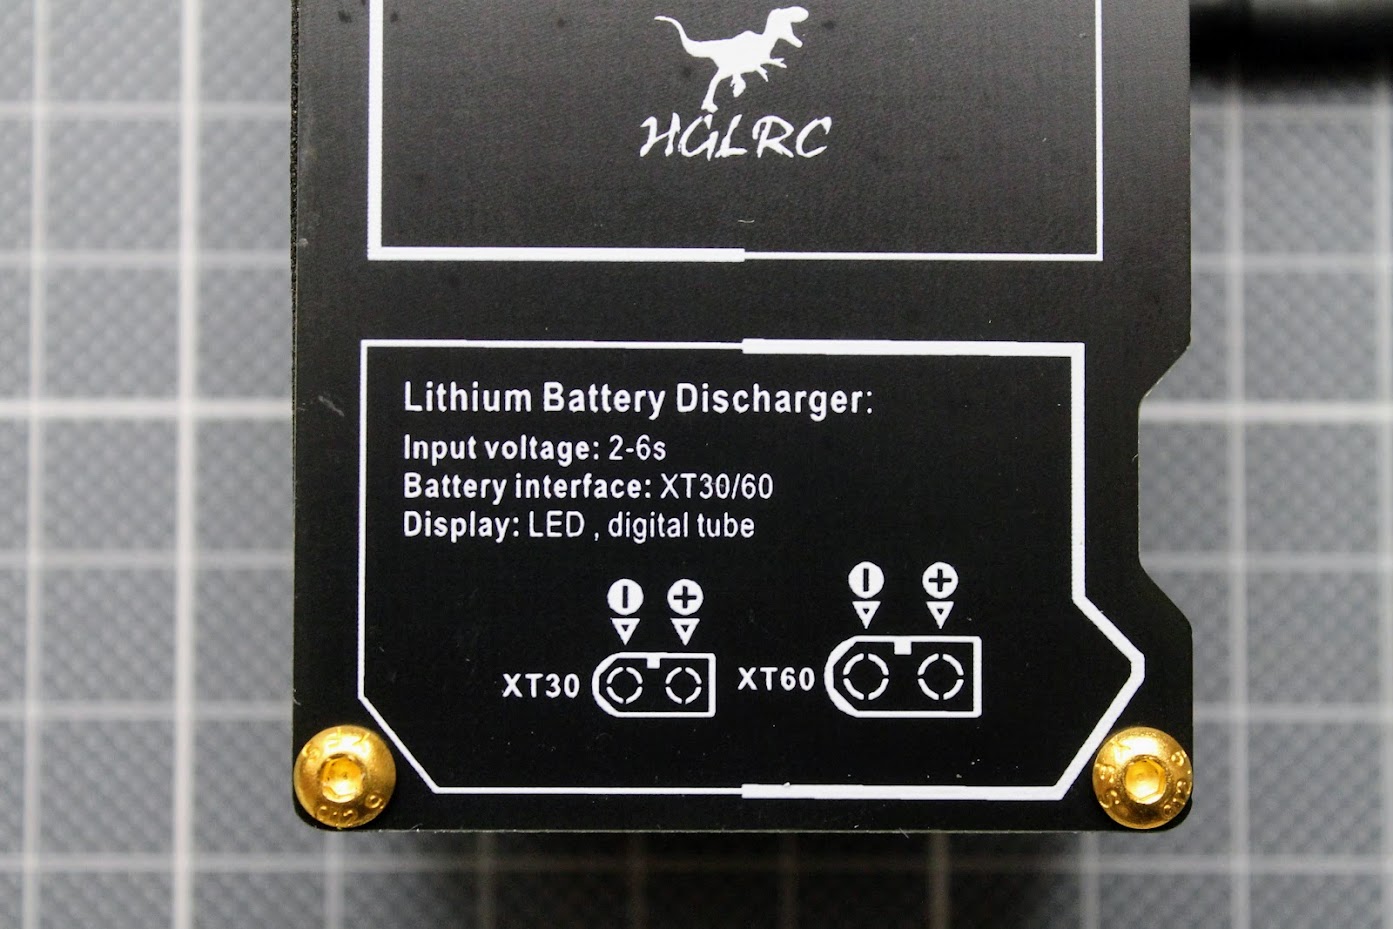
The bottom part of the charger board is actually the discharger. It has XT30 and XT60 ports, battery voltage display, cell count LED indicators and the push button for the cell count selection.
Right after the battery is plugged in the 7 segment display will show the total battery voltage. And the discharge process will start automatically.
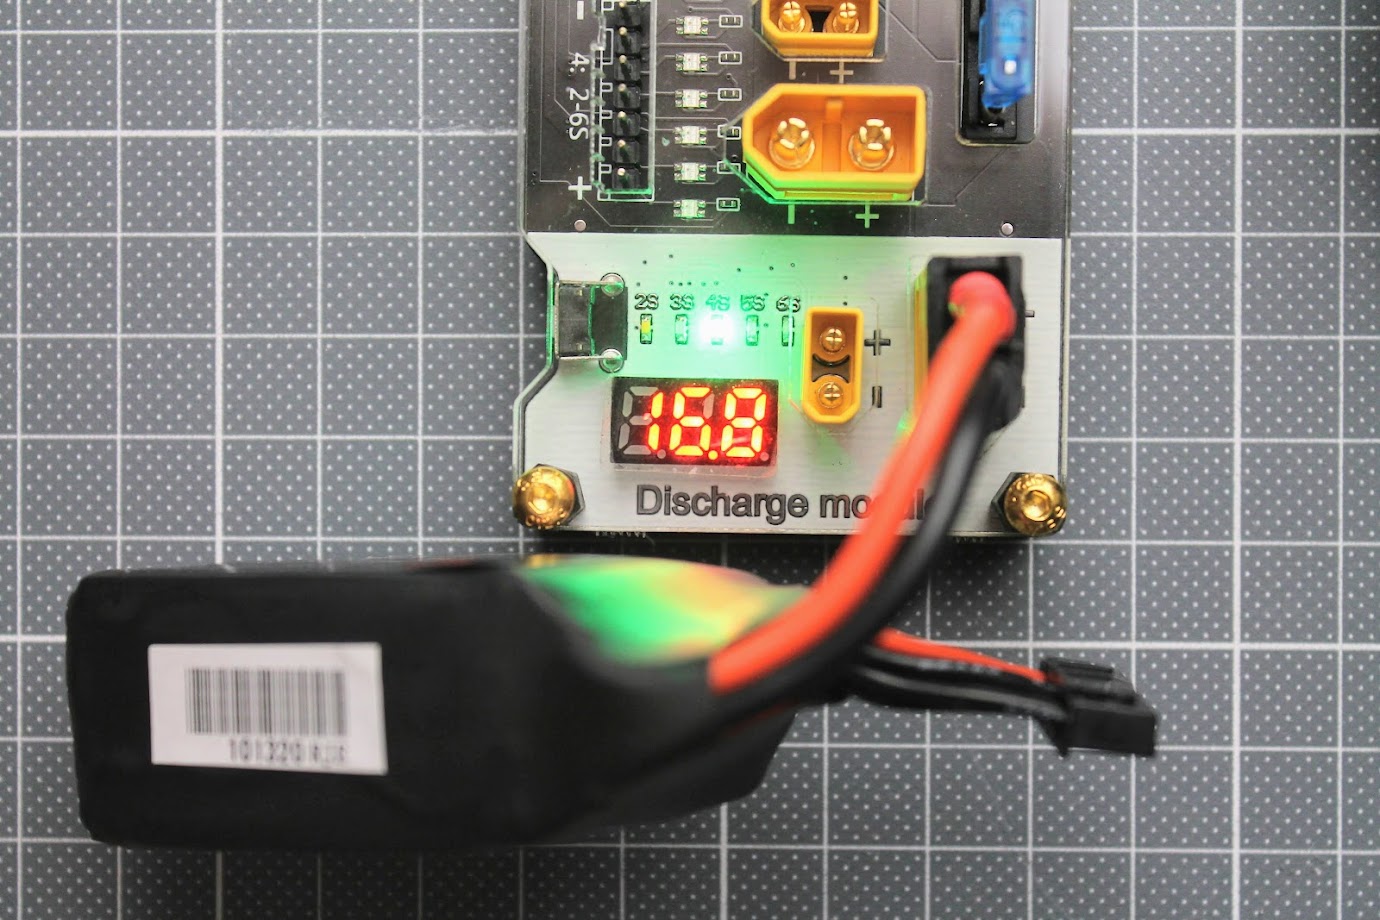
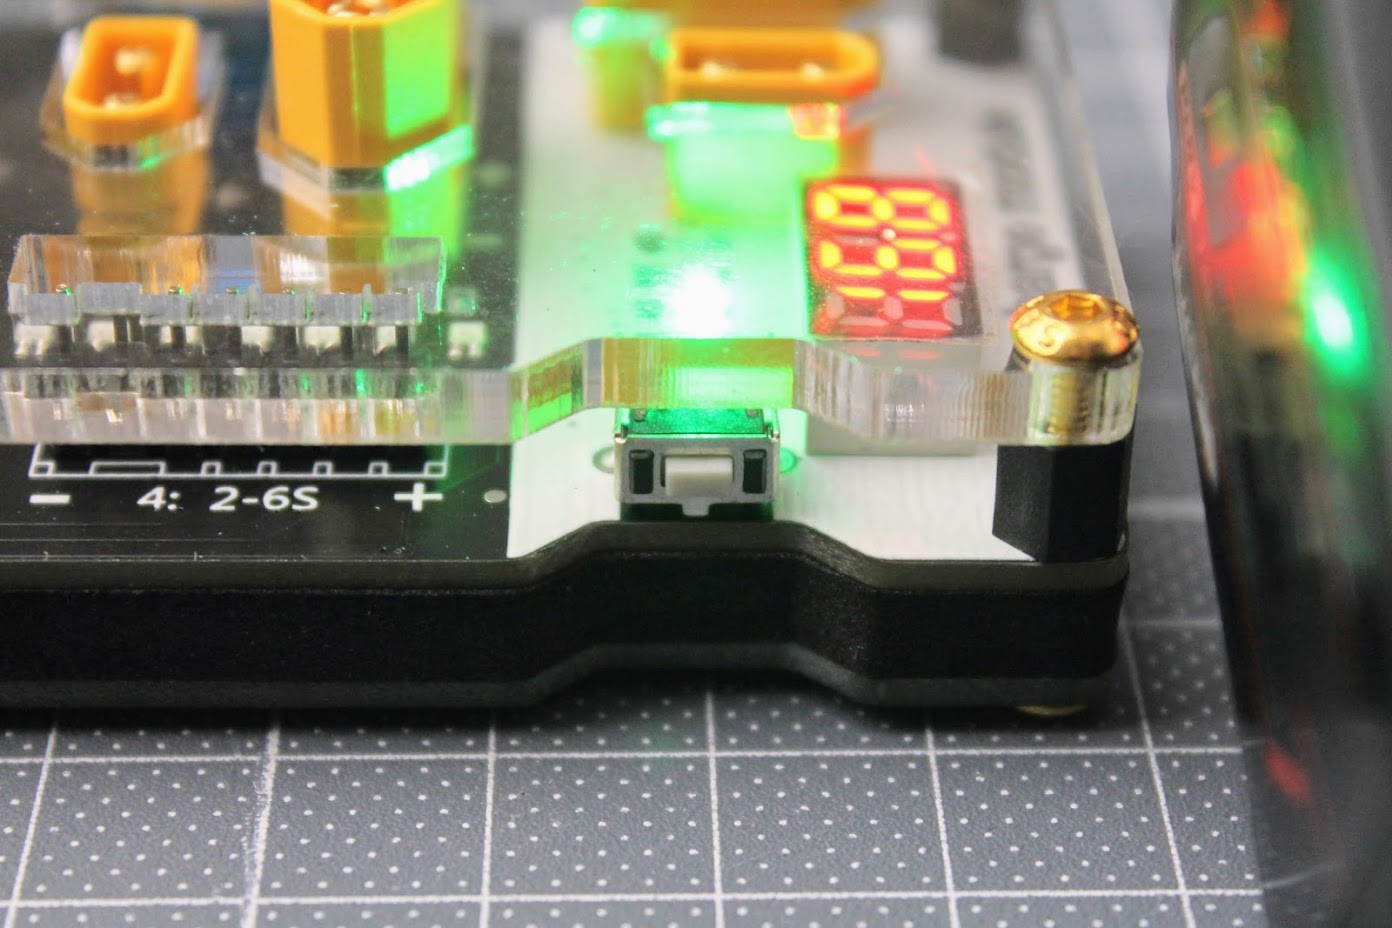
Each time the battery is plugged in you need to select the cell count of the battery by pressing the pushbutton on the side of the board. Otherwise it will discharge to the default 2S setting.
I wish it could detect the cell count or could remember the last setting rather than always use the 2S discharge setting.
I have tried to measure the discharge current with my power meter, but the current was too low for this meter to register.
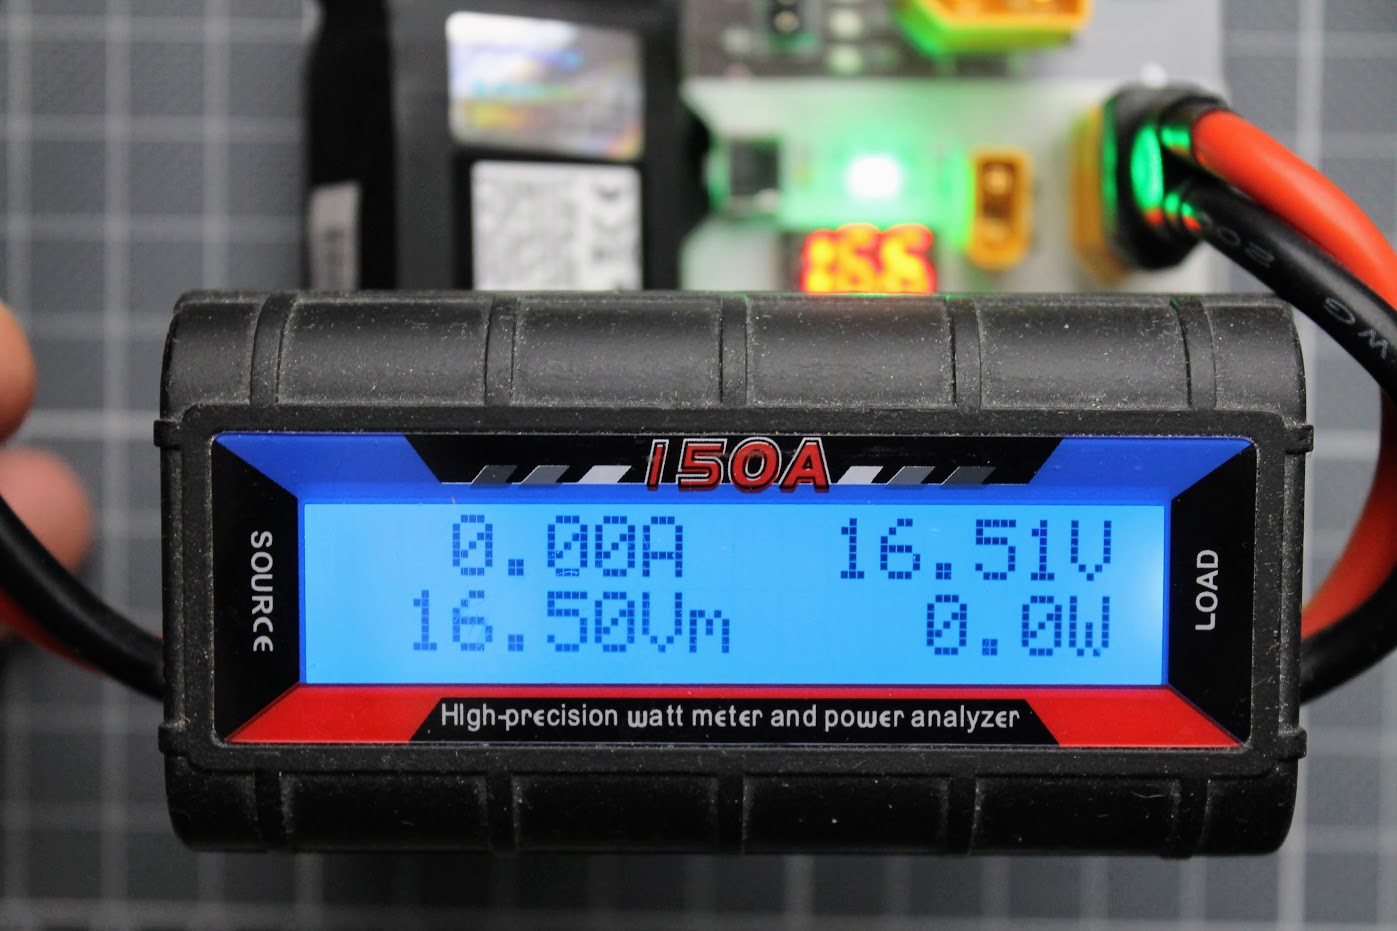
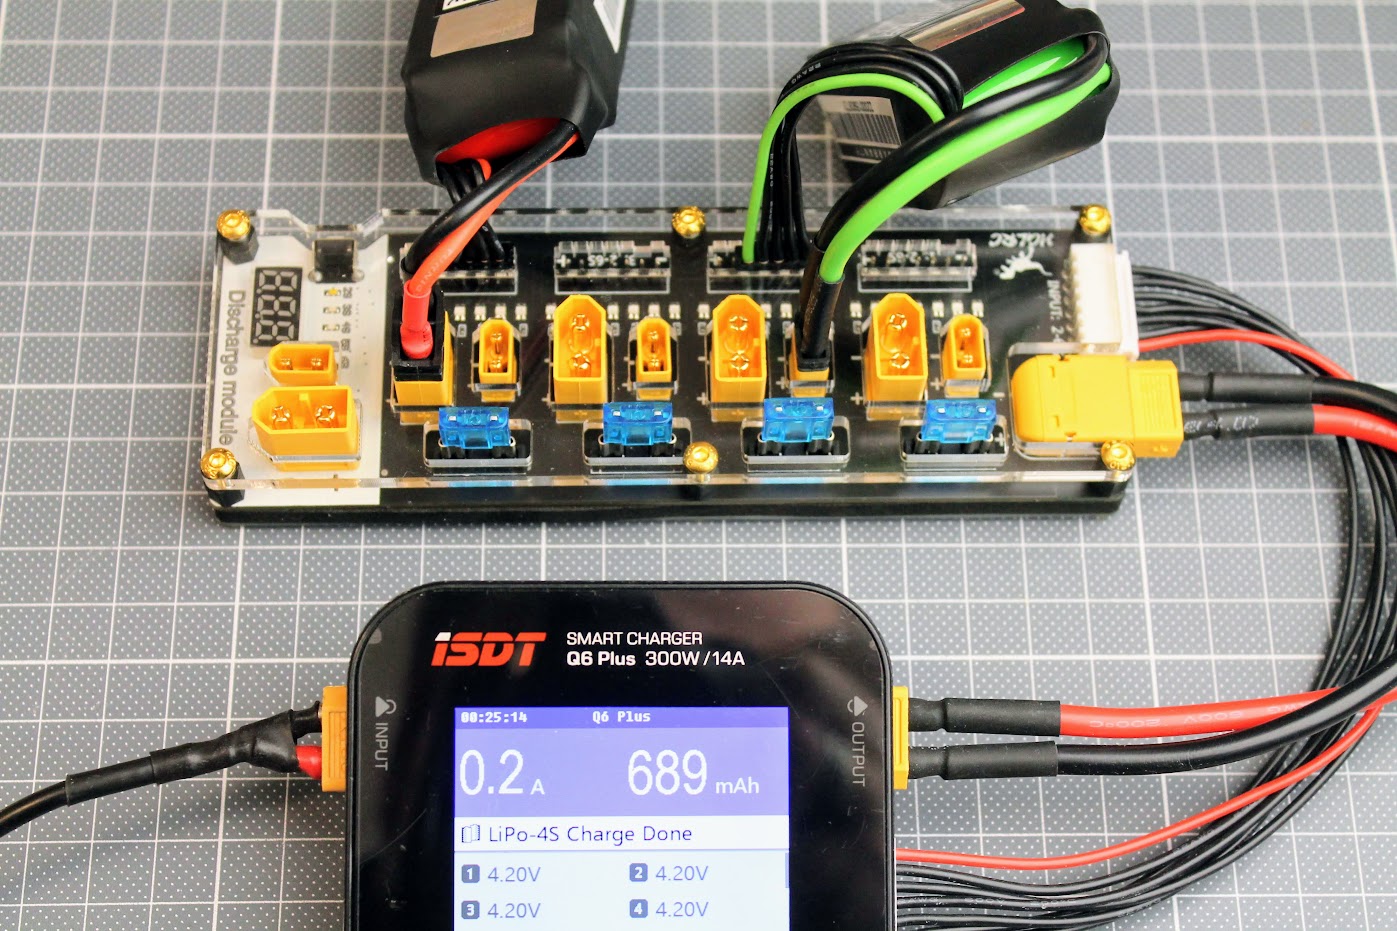
So I’ve used the multimeter to measure the discharge current and it was about 45mA (0.045A) on 4S battery. It took about 7 hours to discharge the 4S 500mAh battery to the storage voltage. The discharge current is too small and the discharge process takes too much time.
The final voltage of the battery was 15.2V (or 3.8V per cell) after the process finished so the board discharged the battery to the correct voltage.
Final thoughts
HGLRC Thor Pro battery charger board is really well manufactured parallel charging board. It can safely charge up to 4 batteries simultaneously, connected in parallel. XT30 and XT60 ports fits all the 2S-6S batteries I have (except obviously the 1S ones). Multiple fuses makes this charger much safer to use. I feel much more confident in parallel charging with this HGLRC Thor Pro charger board.
The discharge feature is pretty much useless as it only discharges at very slow rate (only 0.045A) and it takes hours to discharge the battery to the storage voltage. The discharger still might be useful as battery voltage checker device. You may plug the discharged battery briefly in the discharger port and check the voltage.
You can always use the parallel charger board to parallel discharge your batteries. If your charger is capable of high discharge current (like ToolkitRC M6D) or you use a special discharger (like ISDT Smart Discharger) you can discharge up to 4 batteries simultaneously with this HGLRC Thor Pro charger board.
Available @
HGLRC: https://www.hglrc.com/products/hglrc-thor-lipo-battery-balance-charger-board-pro
Aliexpress: https://www.aliexpress.com/item/1005002966733248.html
Disclaimer: This item was supplied by HGLRC for a fair and unbiased review. HGLRC never asked for a positive review and never influenced my opinion in any way. I’m trying my best to stay uninfluenced and give only my own opinion. All affiliate links if there are any help me purchase items for future reviews and tests.
]]>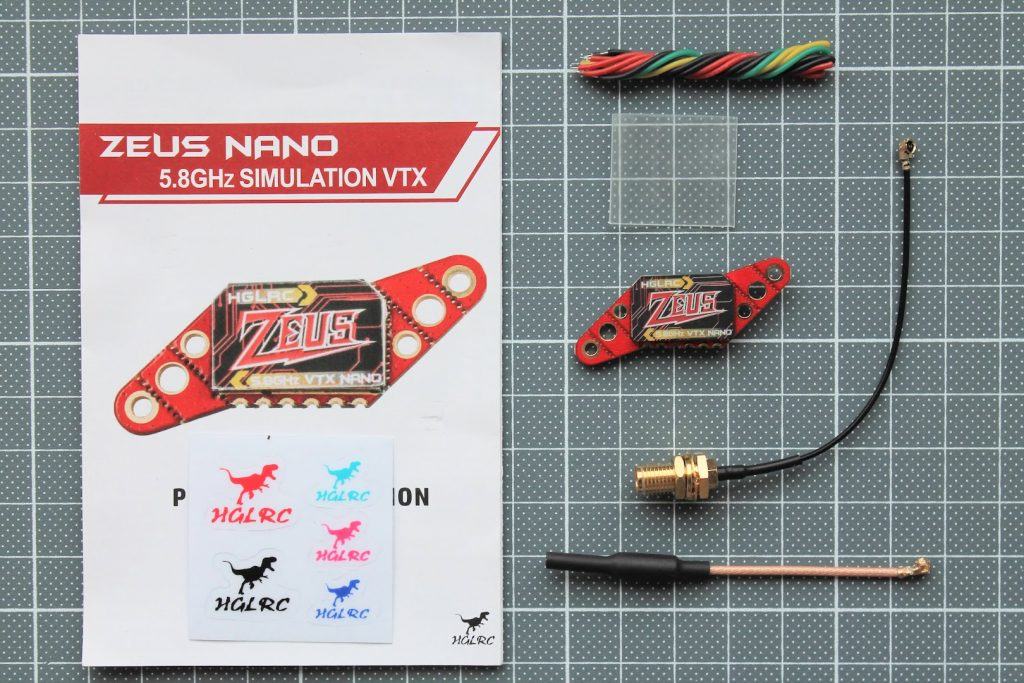
Specifications
Model: Zeus Nano VTX
Built-in Microphone
Input voltage: DC 5V
PIT@75mA
25mW@180mA/16dBm
100mW@280mA/21.5dBm
200mW@330mA/24.5dBm
350mW@400mA/27.5dBm
Antenna interface: ipex
Output power: PIT/25/100/200/350mW
Standard 40 channels. A/B/E/F/R frequency group
Installing Hole: 16X16/25.5X25.5mm.M2/20X20mm.M3
Size: 18.6mm x 13.6mm x 6mm
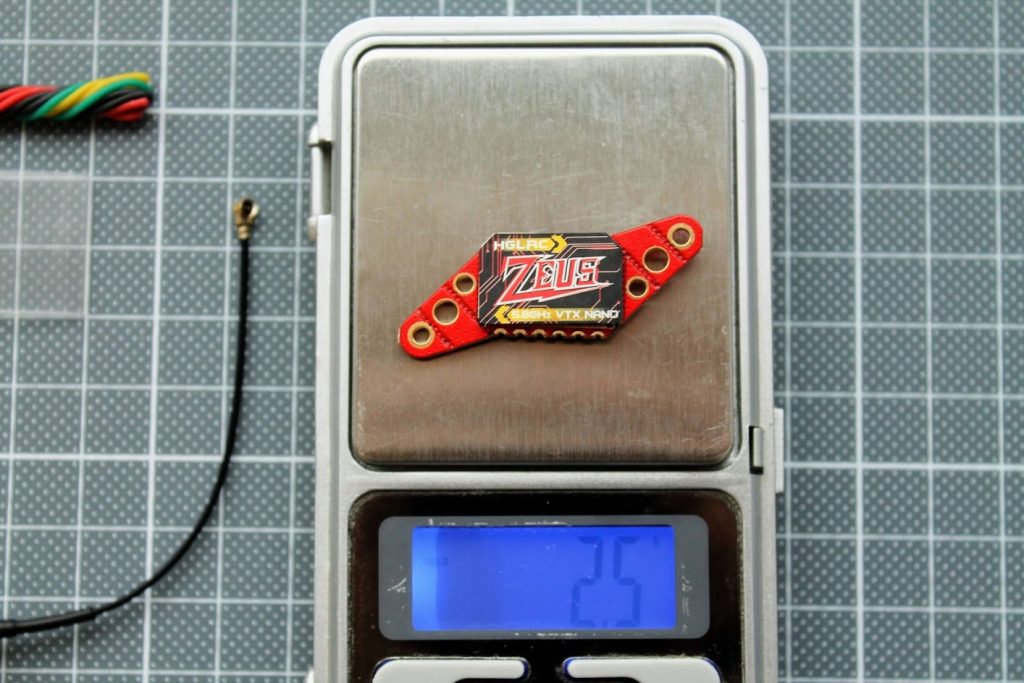
Weight: 2.4g
Closer look
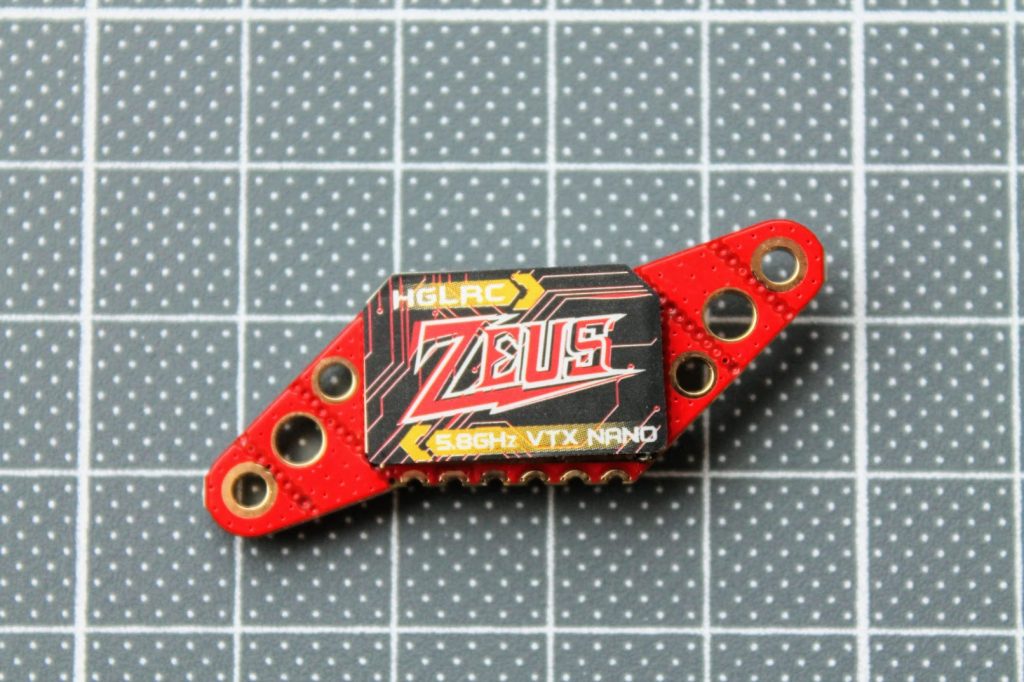
Zeus Nano VTX has breakable side tabs for various mounts. There is also protective metal casing on the front side of the VTX.
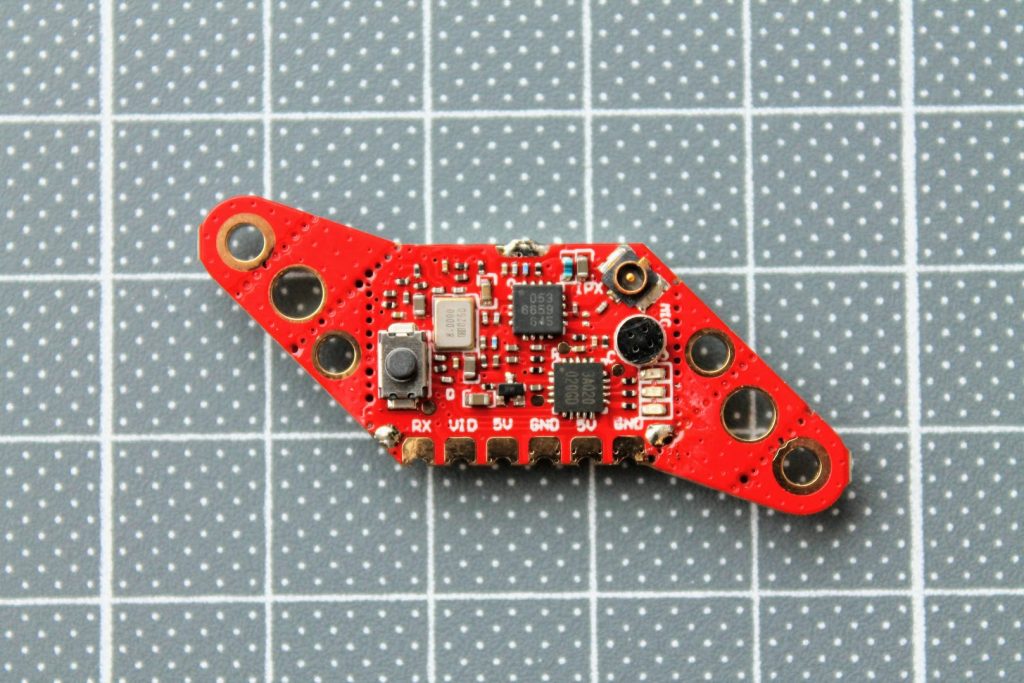
On the bac of the VTX you can find the push button for setting the channels, bands and power output level. There is also
The weight of the Zeus Nano VTX is 2.5 grams.
HGLRC Zeus Nano VTX pinout and connection schemes.

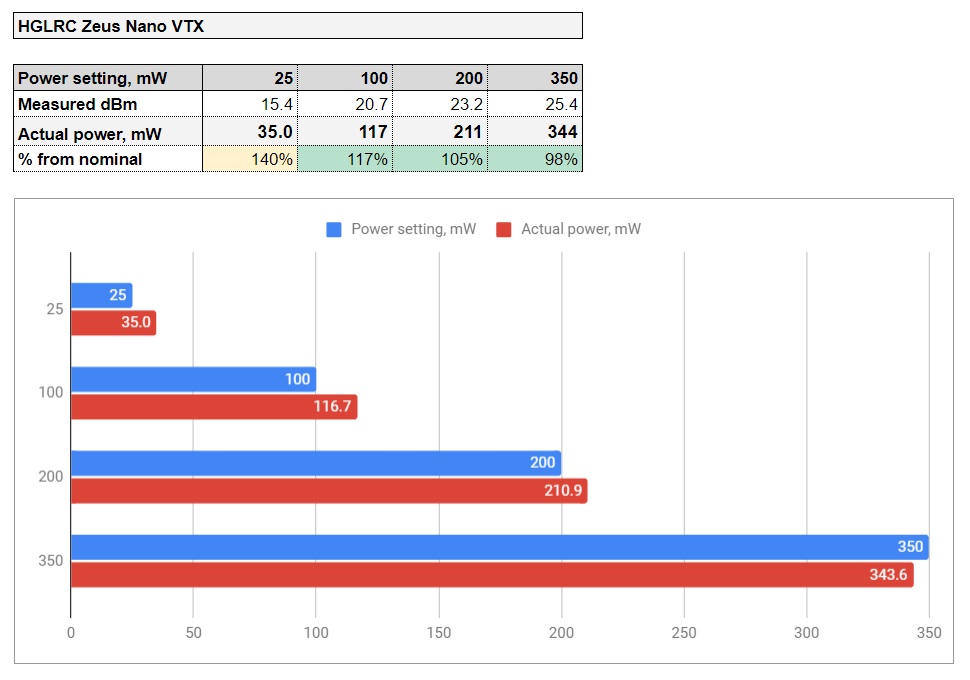
RF power measurements
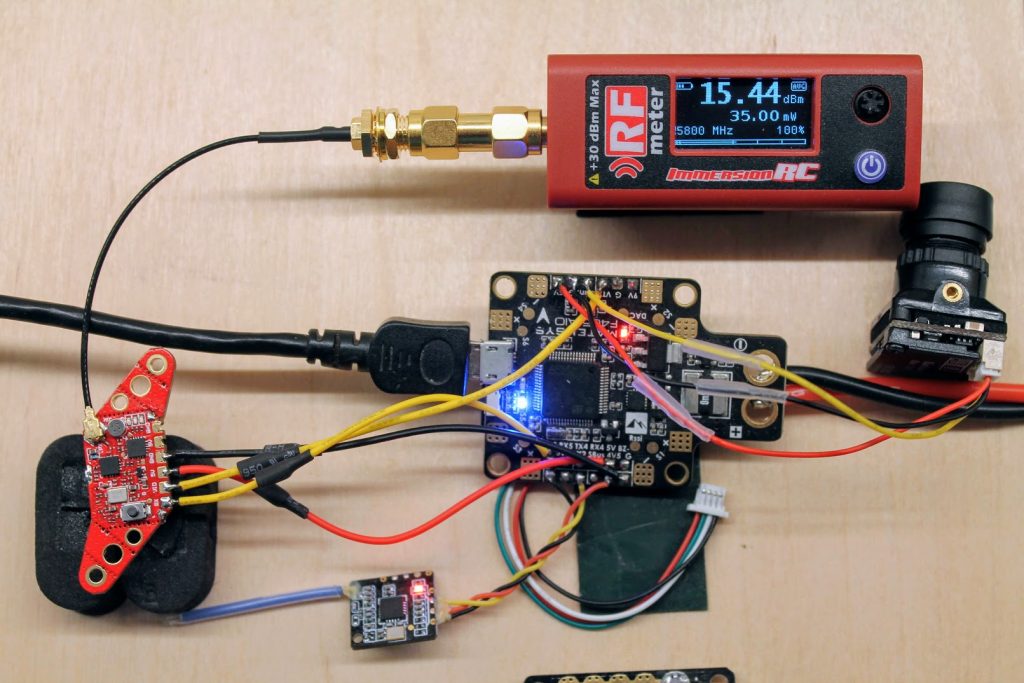
Power output test on?25mW?setting. RF power meter shows 35mW.
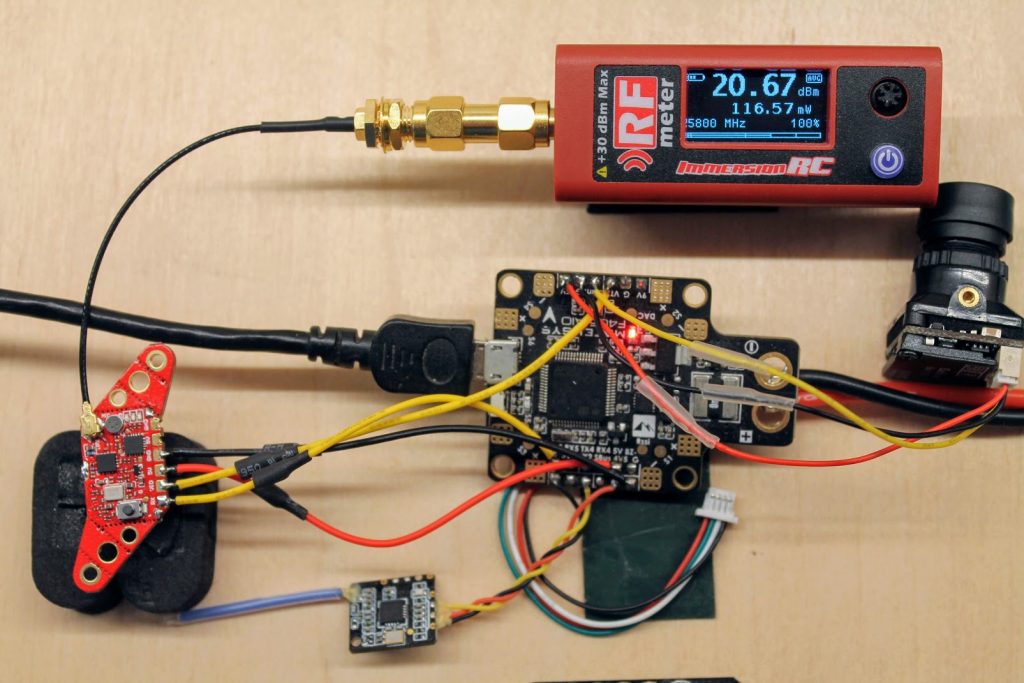
On?100mW?setting RF power meter shows?116 mW.
On?200mW?setting RF power meter shows?211 mW

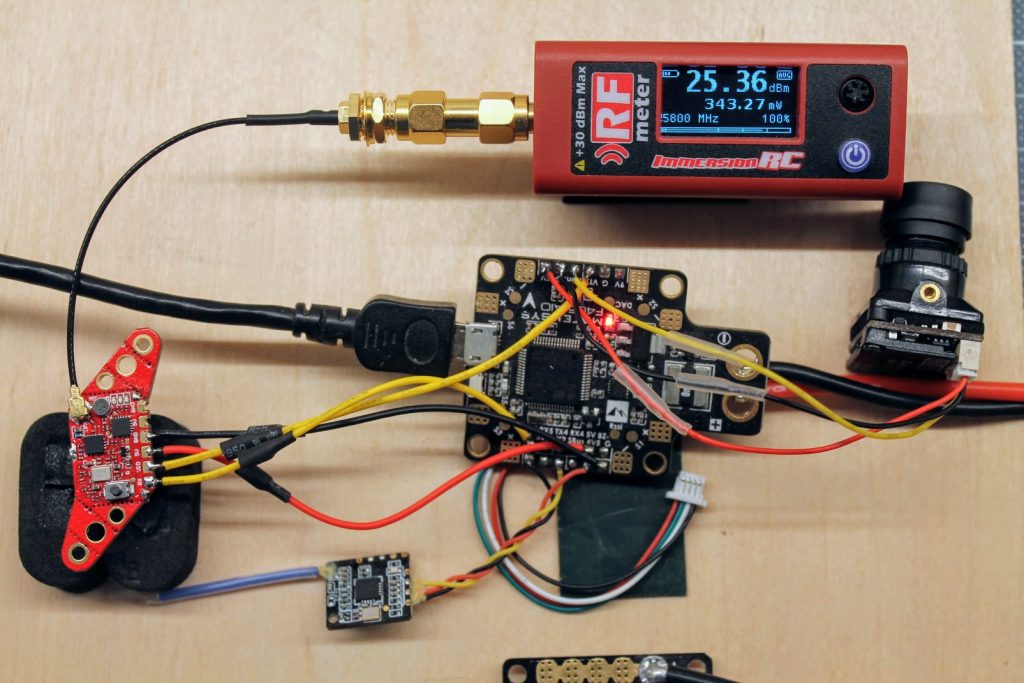
And on 350mW?setting RF power meter shows?343mW. Almost on spot, despite the fact it does heat up.
On 350mW power level setting and no active cooling the VTX heats up and the power output drops down to 1mW.
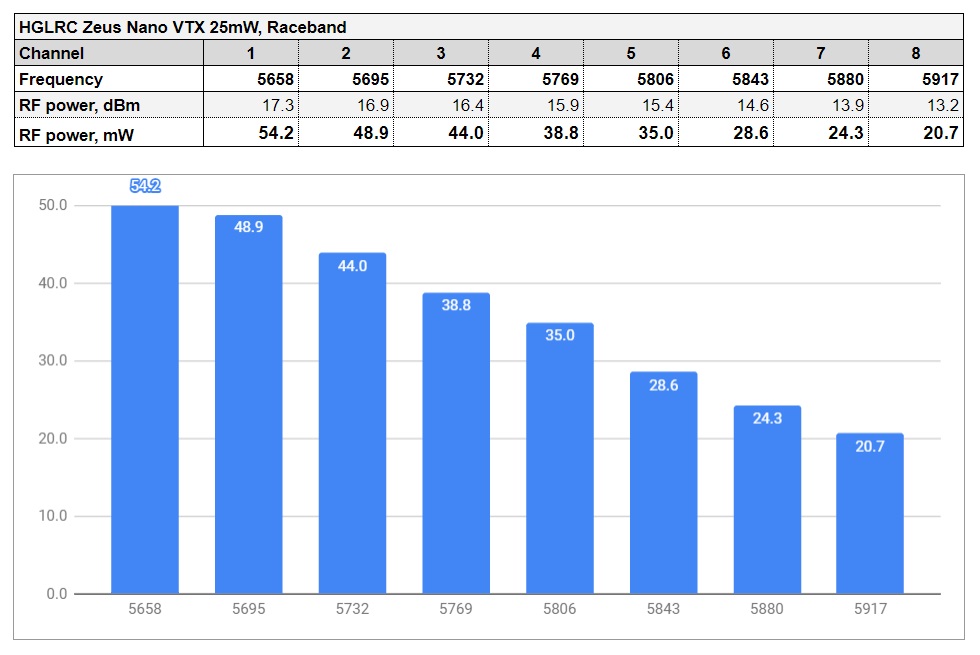
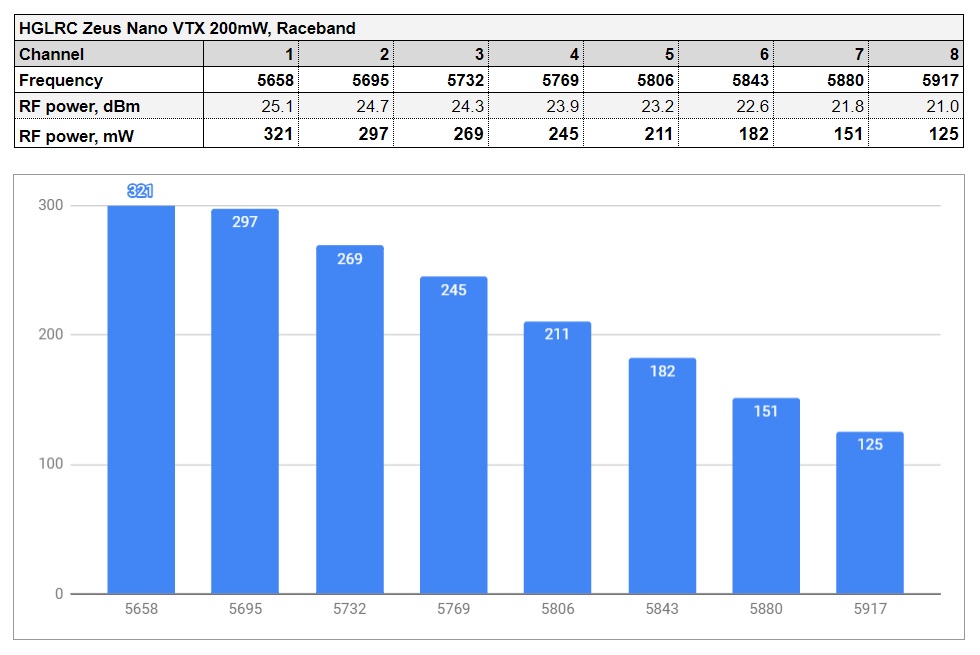
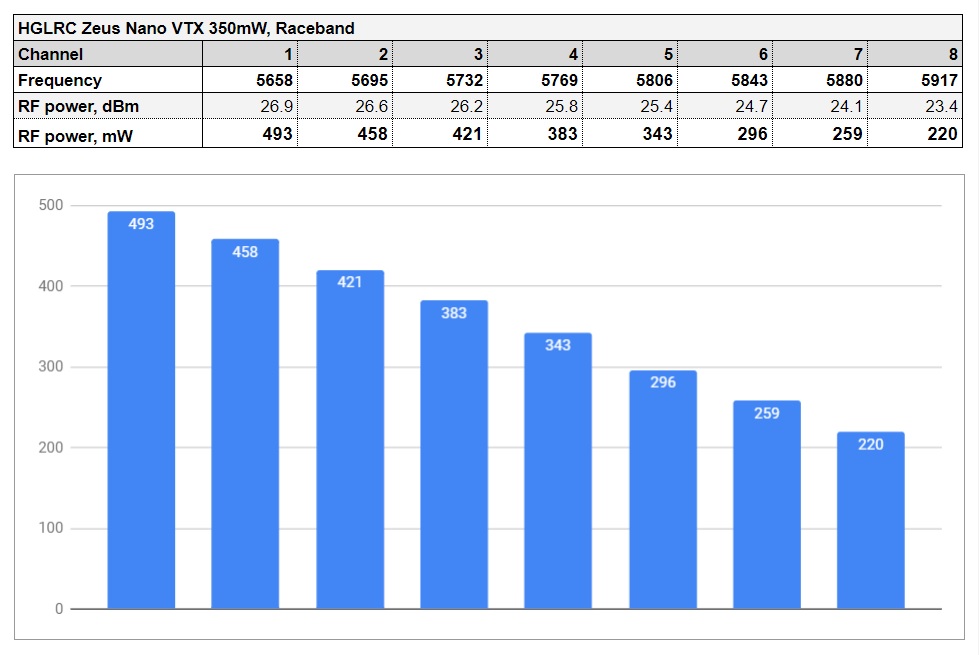
Below are the RF power outputs for all power levels. Measured at?Raceband,?Channel 5.
Power output vs frequency for?25mW?power level on?Raceband.
Power output vs frequency for?100mW?power level on?Raceband.

Power output vs frequency for?200mW?power level on?Raceband.
Power output vs frequency for?350mW?power level on?Raceband.
Betaflight VTX Tables
If you are using (or planing to use) the Betaflight versions 4.x? and want to control the VTX by Betaflight OSD, then you should set up the VTX Tables.
Read more on setting up the VTX tables here:?VTX Tables and how to set them up
Open Betaflight Configurator, connect to the flight controller, select “Video Transmitter” tab. Load the VTX table from the file by clicking on the “Load from file”.
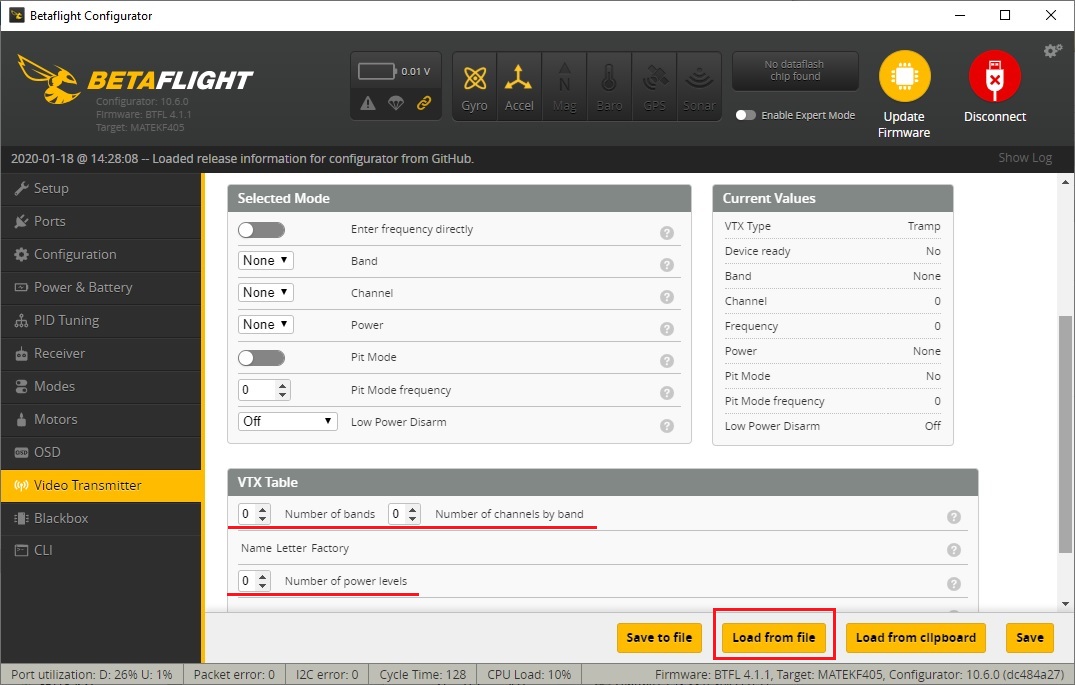
Select the VTX table file. There can be separate VTX table files for?US?and?EU?region as there are different range of the allowed frequencies to use. (Hint: European table has only the?3 channels?on?Raceband).
HGLRC Zeus Nano?VTX Table file:?https://drive.google.com/file/d/1r6O1PC8CZZMefmyf0BdWRY-i9JlX2xFz/view?usp=sharing
Once VTX Table is loaded from the file, don’t forget to hit the [Save] button.
Conclusions
HGLRC Zeus Nano VTX is really small, has one of the kind boomerang shape and multiple mount options (16×16, 20×20 and whoop mount). It can be installed almost into any stack of any frame you build. The side tabs can be even broken off to minimize the footprint and fit into any spot.
RF output tests showed that Zeus Nano VTX really delivers the declared power levels.? On 25mW setting it outputs 35mW, on 100mW – 117mW, on 200mW – 211mW and on 350mW setting it reached solid 343mW output.?I have to say that HGLRC Zeus Nano VTX has performed the best so far in the RF output tests.
I give another thumbs up for adding the microphone on board. This allows to hear the motor sounds for those audiophile pilots (me including).
I need to notice that this VTX, being so small, heats up pretty much and when it overheats it drops the power output down to 1mW. So have in mind that this VTX has to be installed in the place with enough of the airflow. Also use pit mode and lower power levels, while powering this VTX on the bench.
Overall I’m very happy with this VTX and this is one of my favorite Nano sized VTX.
Available @?Banggood:?https://www.banggood.com/HGLRC-Zeus-nano-VTX-…-1773780.html
Disclaimer: This item was supplied by HGLRC for a fair and unbiased review. HGLRC never asked for a positive review and never influenced my opinion in any way. I’m trying my best to stay uninfluenced and give only my own opinion. All affiliate links if there are any help me purchase items for future reviews and tests.
]]>Chinese National Holiday
HorusRC is having Chinese National Holiday sale with 50% off on some items.
FrSky XSRF4O 30x30mm Flight Controller with integrated R-XSR receiver is only $24.99! (http://bit.ly/HorusRC-FrSky-XSRF4O)
FrSky RXSRF3OM 20x20mm Flight Controller with integrated R-XSR receiver is only $19.99 (http://bit.ly/HorusRC-FrSky-RXSRF3OM)
Other sale items: http://bit.ly/HorusRC-Sale

HGLRC is offering the free LED control board with LED strips set & Straps for orders over $60
And the free shipping with LED control board with LED strips set & cap for orders over $119
http://bit.ly/HGLRC-New-Arrivals

AKK is running the sale for up to 30%. Valid from Oct 1 – Oct 6.
Orders during this period may get an extra lucky bag (only 50pcs) and will be shipped on Oct 7th,2020. Good luck!
https://www.akktek.com/products/vtx.html

Makerfire clearance sale from Sept 15 to Oct 15:
https://shop.makerfire.com/collections/clearance-sale
![]()
RunCam Racer 4 digital FPV Camera
Followup of the digital RunCam drama. Gal Kremer got his hands on the new RunCam Racer 4 camera and showed the actual footage recorded with DJI Air unit. So we know that RunCam Racer 4 actually works with the DJI system and even DJI can’t do anything about it.
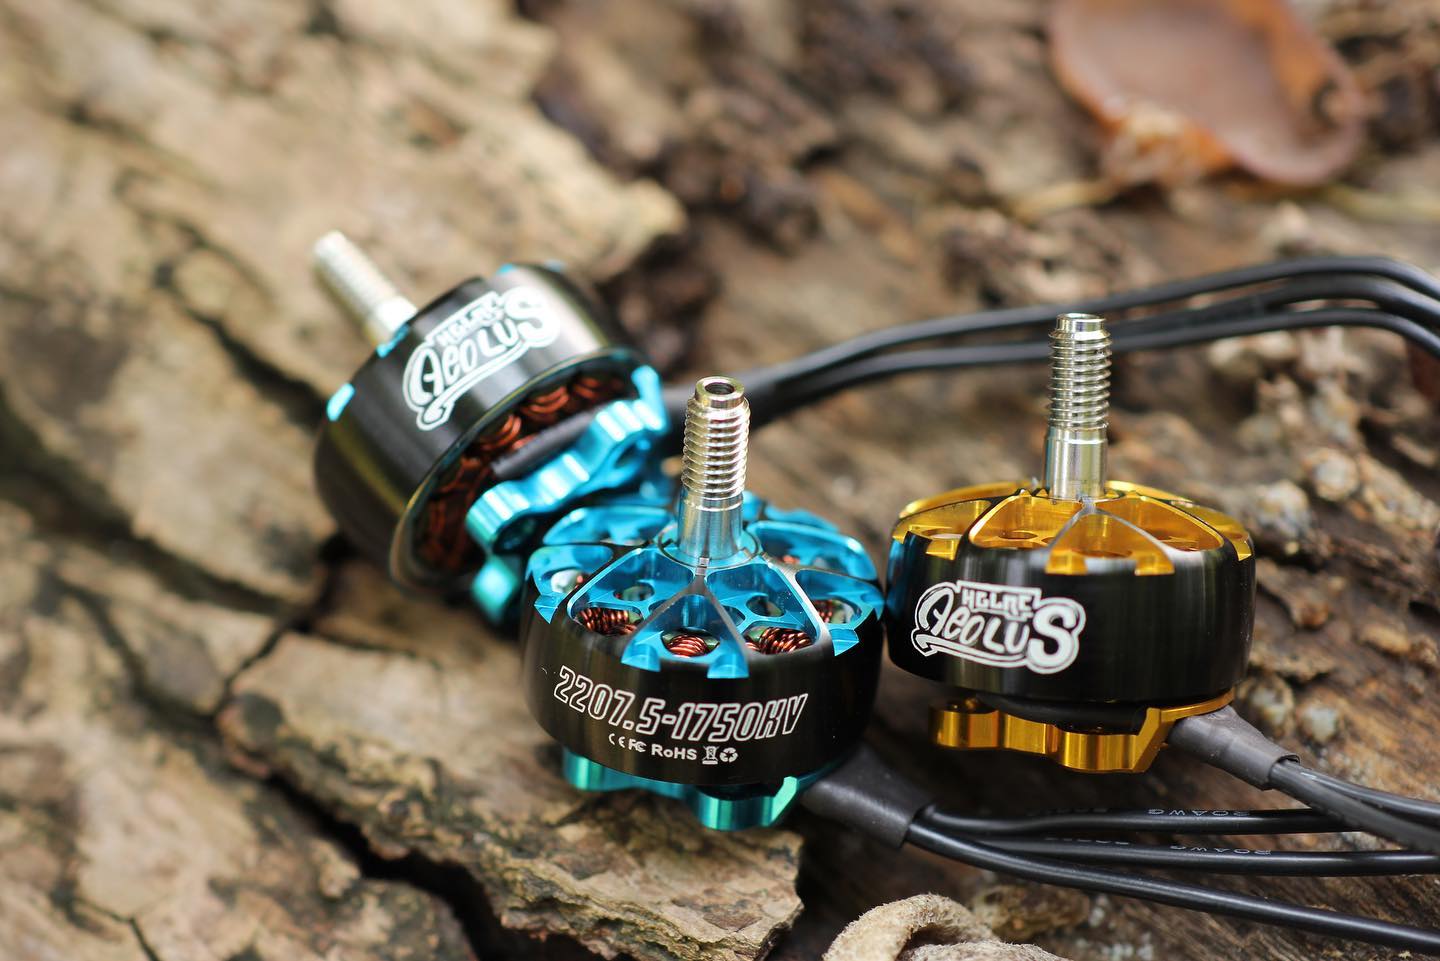
HGLRC AEOLUS 2207.5 motors
HGLRC announced the new AEOLUS 2207.5 motors with 1750KV, 1900KV and 2550KV options.
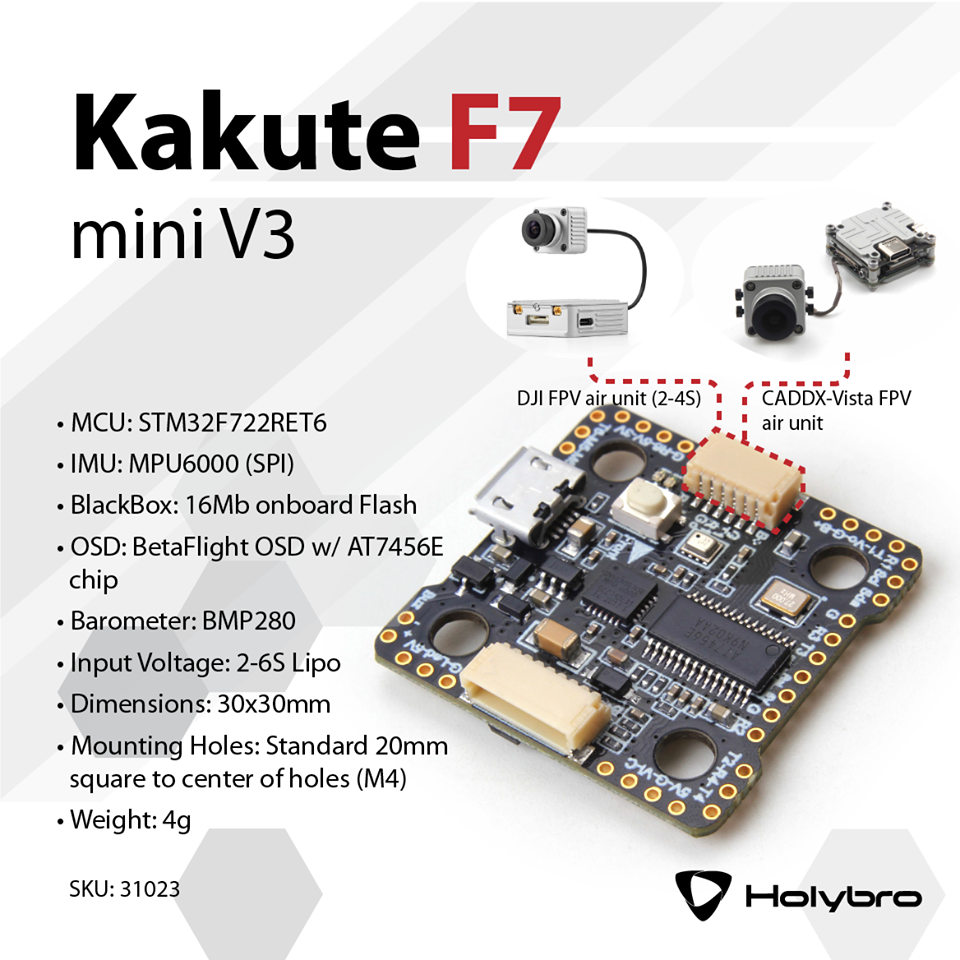
Kakute F7 mini V3 FC
Holybro released upgraded Kakute F7 mini V3. Redesigned layout, added port for connecting DJI Air or Caddx Vista digital unit. One of the best user manual’s in the market.
Kakute F7 mini V3 FC User Manual: http://www.holybro.com/manual/Holybro_KakuteF7_Mini_V3_Manual_v1.0.pdf
Available @ Banggood: https://www.banggood.com/Upgrade-20x20mm-Holybro-KAKUTE-F7-Mini-V3-…-1449223.html
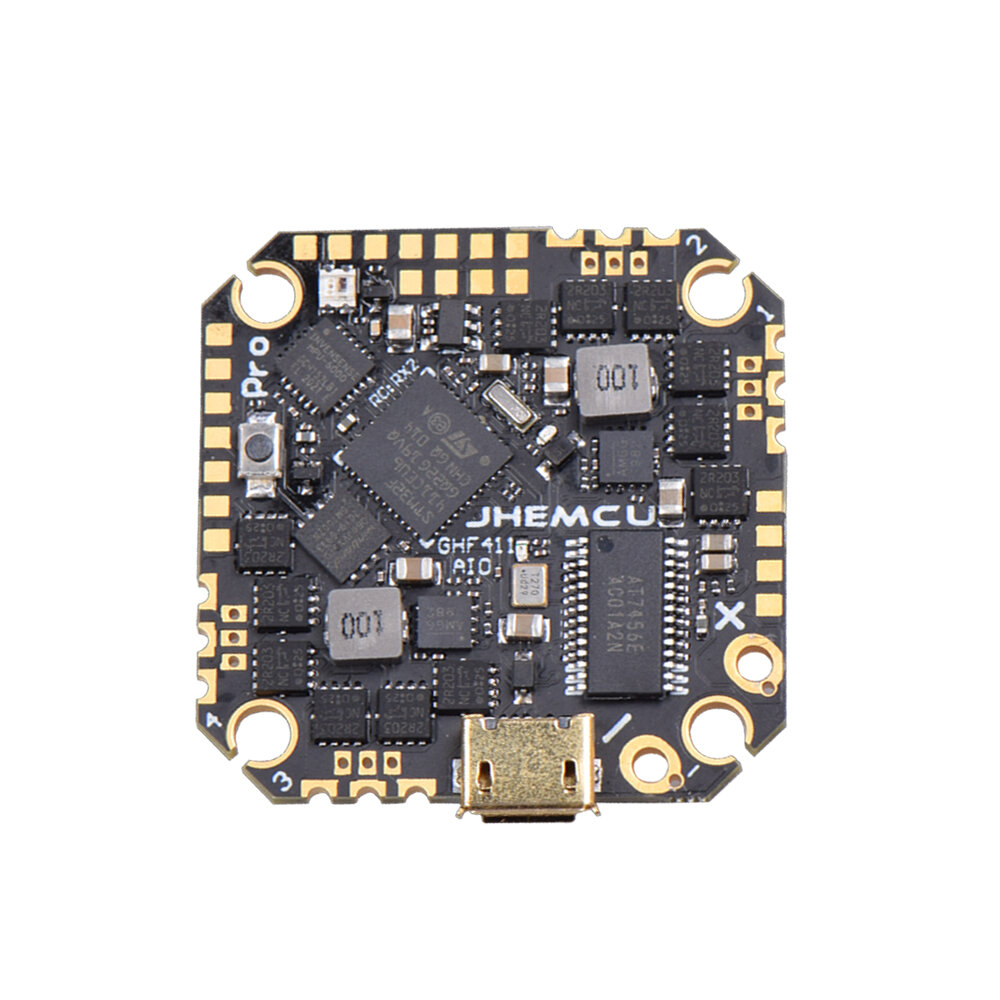
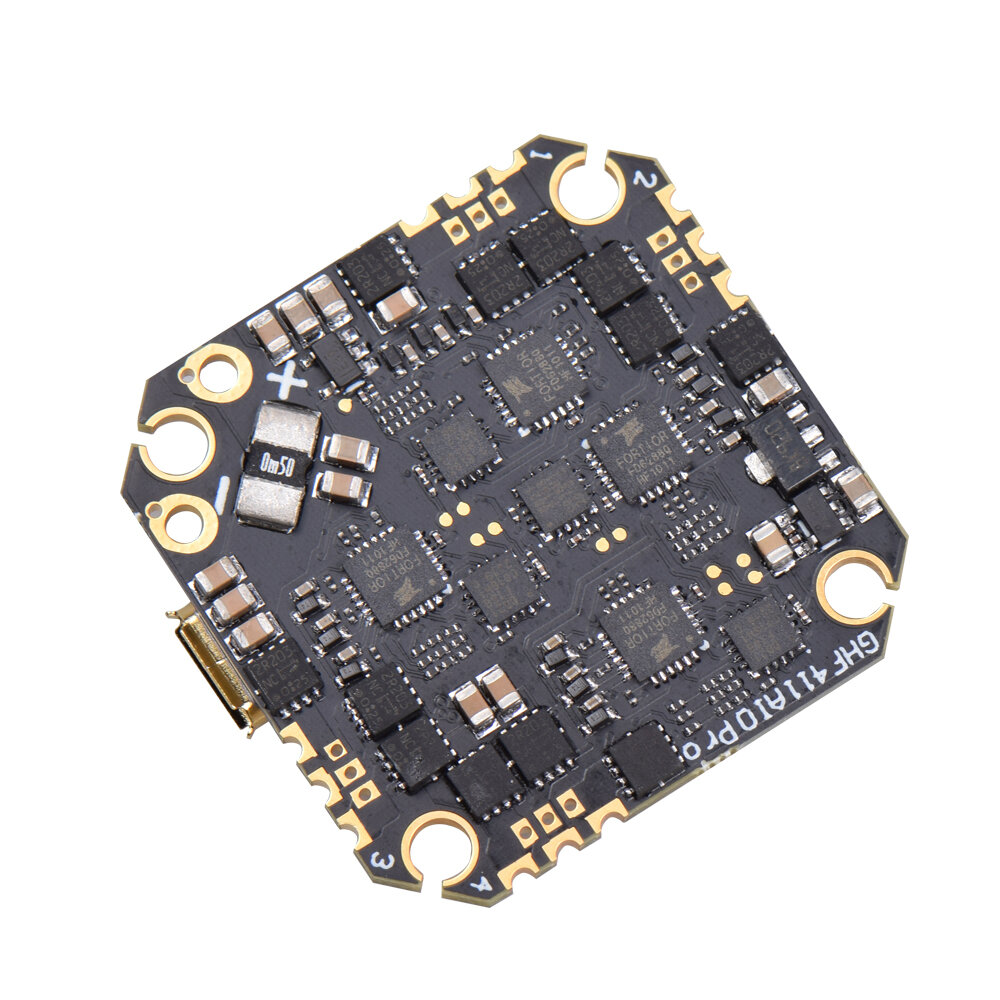
JHEMCU GHF411 Pro 35A ESC AIO
JHEMCU released updated GHF411 Pro AIO board with, redesigned layout, larger motor pads, added DJI Air unit support, 5V and 9V BEC, added blackbox, 2-6S battery input and 35A ESC. Killer specs for unbelievably low price (~ 34$).
Available @ Banggood: https://www.banggood.com/Upgrade-25_5x25_5mm-JHEMCU-GHF411AIO-Pro-F4-…-1652742.html
 |
 |
HQProp 76mm 6 blades cinewhoop prop
HQProp posted a photo of the upcoming 6 bladed 3 inch propeller for cinewhoops. This prop should make less noise than props with less blades.
https://www.banggood.com/HQProp-Duct-75MMX6-75mm-3-Pitch-6-Blades-…-1740462.html
Source: Facebook, web
]]>
Specifications
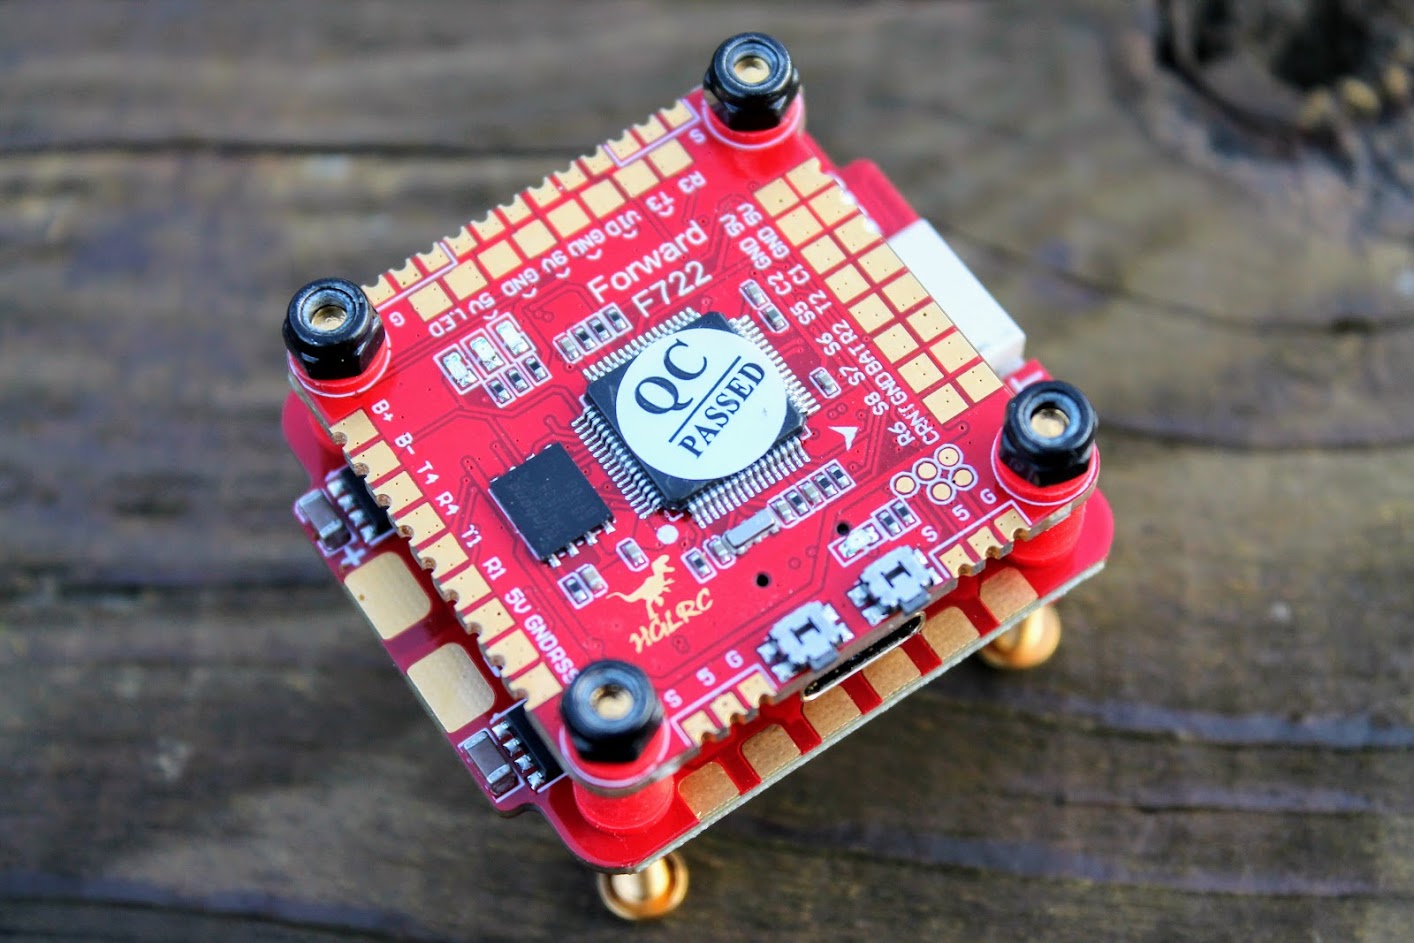
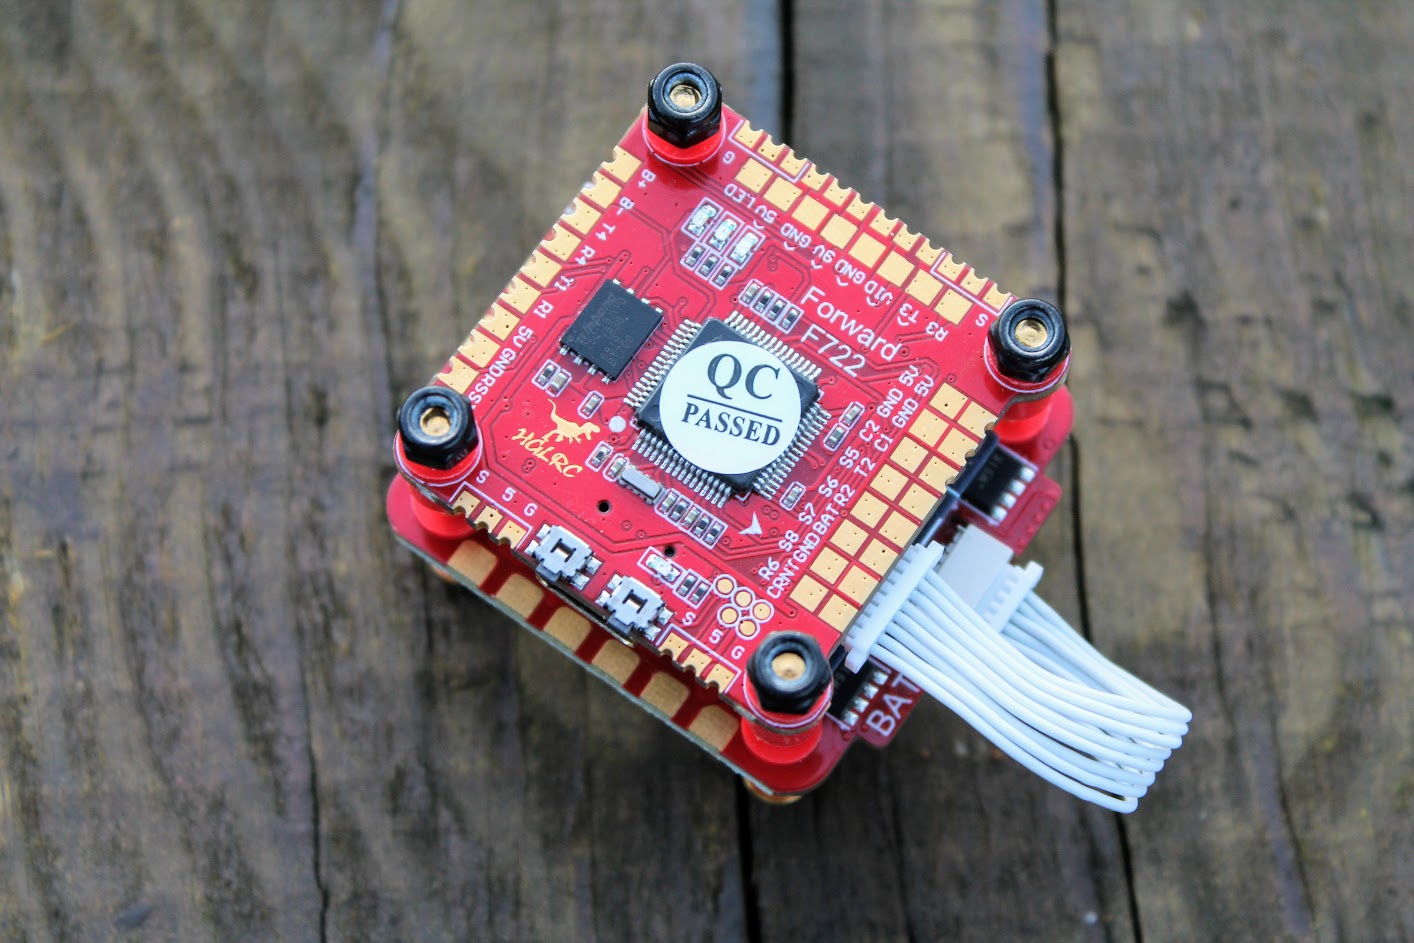
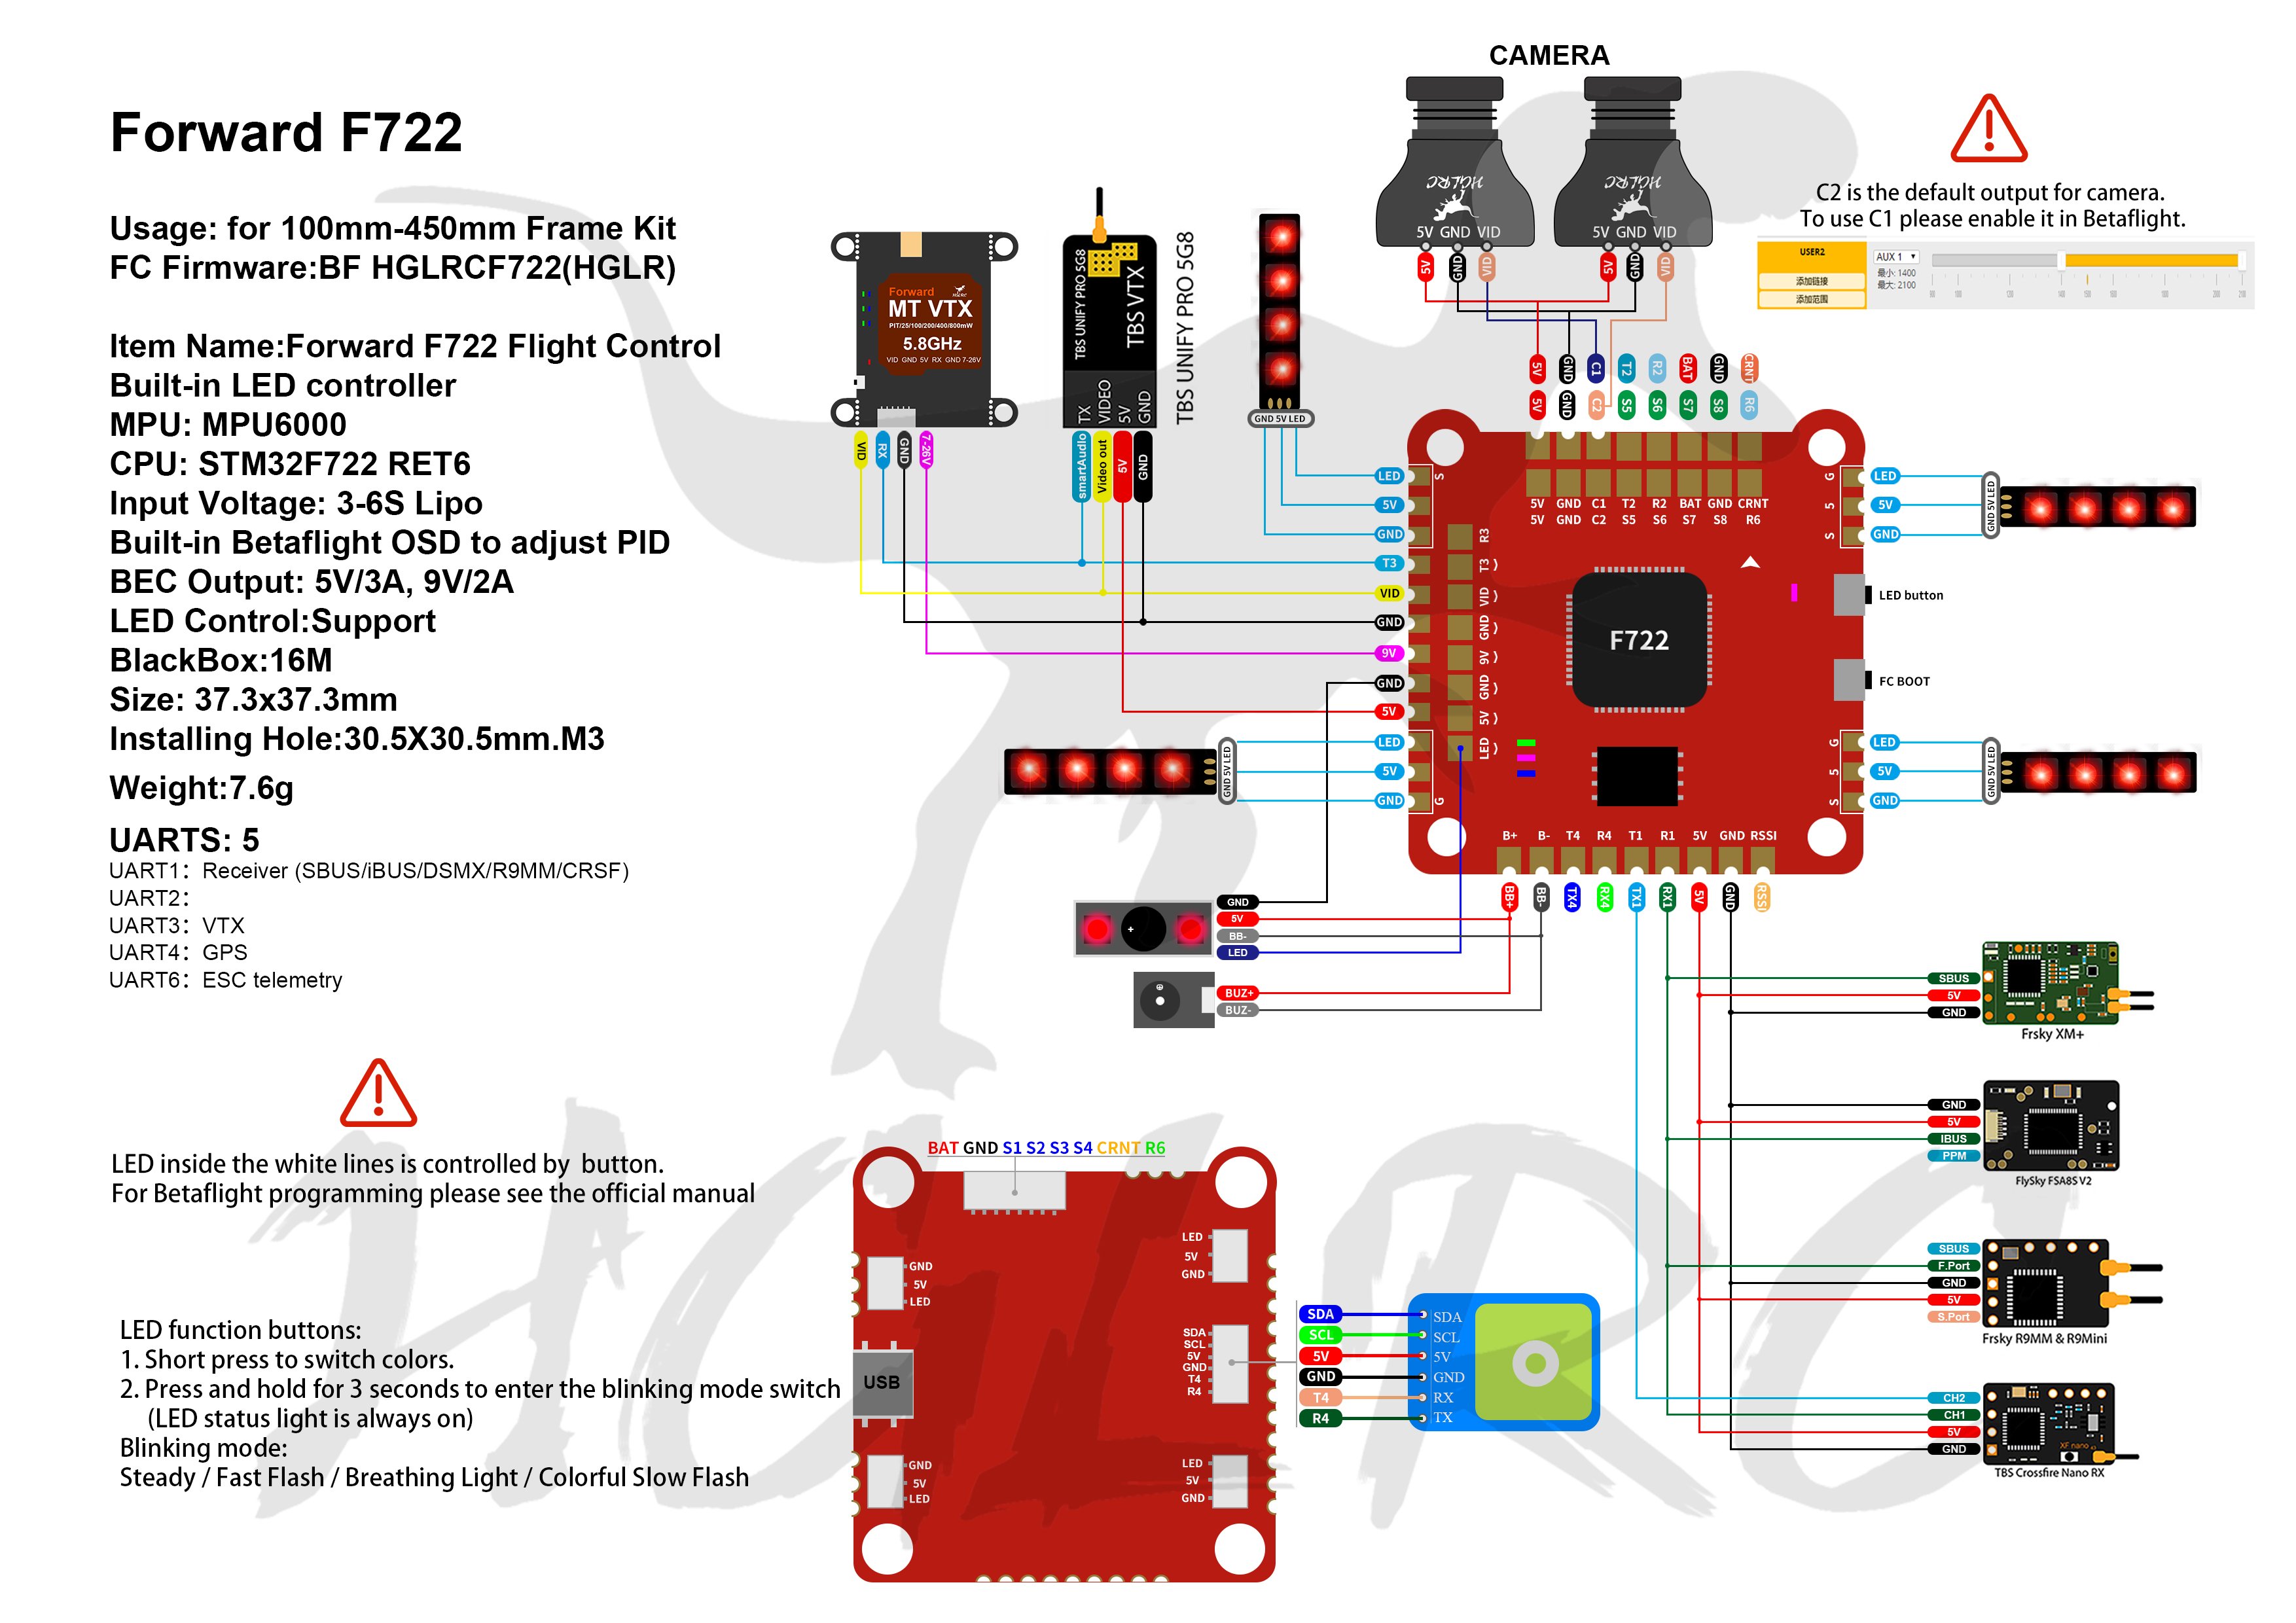
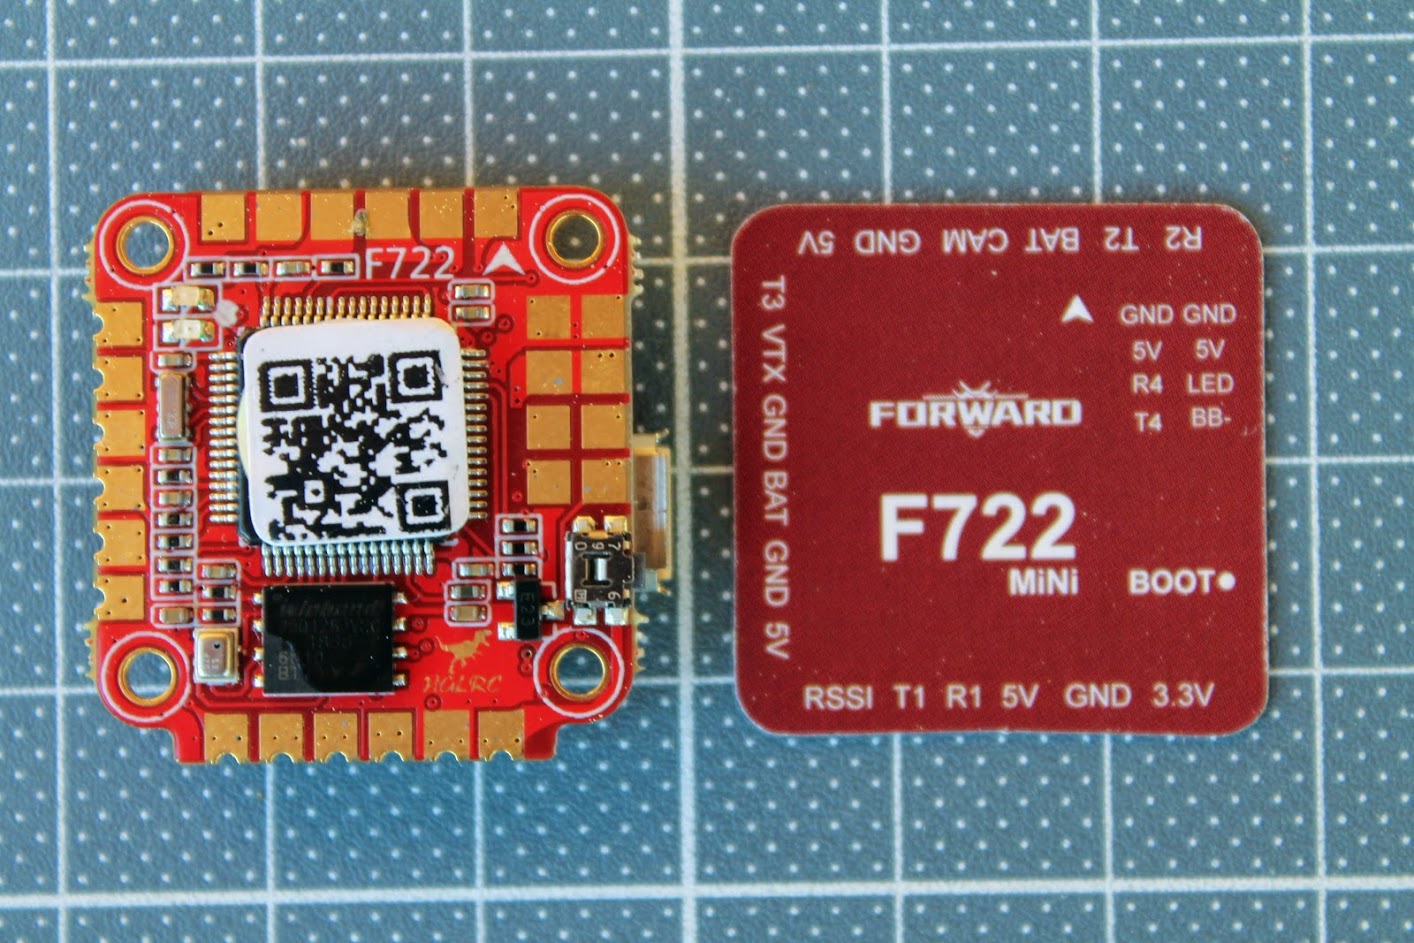
F722 Flight Controller
MPU: MPU6000 (SPI)
CPU: STM32F722 RET6
Input Voltage:3-6S Lipo
BEC Output: 5V/3A, 9V/2A
Weight: 7.6g
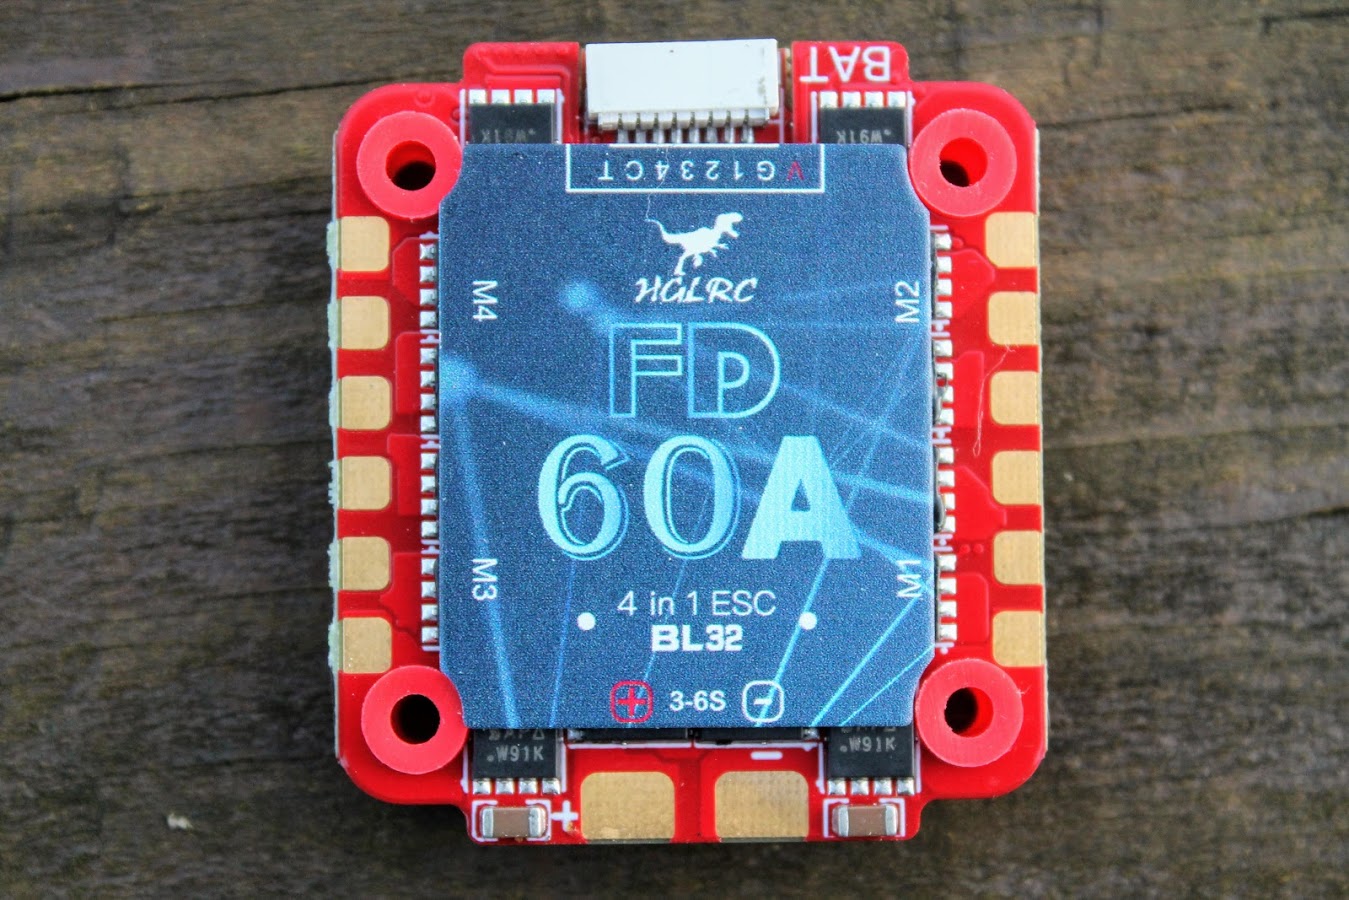
60A BLHeli_32 3-6S 4in1 ESC
CPU: STM32F051
Input Voltage: 3-6S Lipo
Steady Current: 60A
Peak Current: 65A(10 Sec)
Weight: 18g
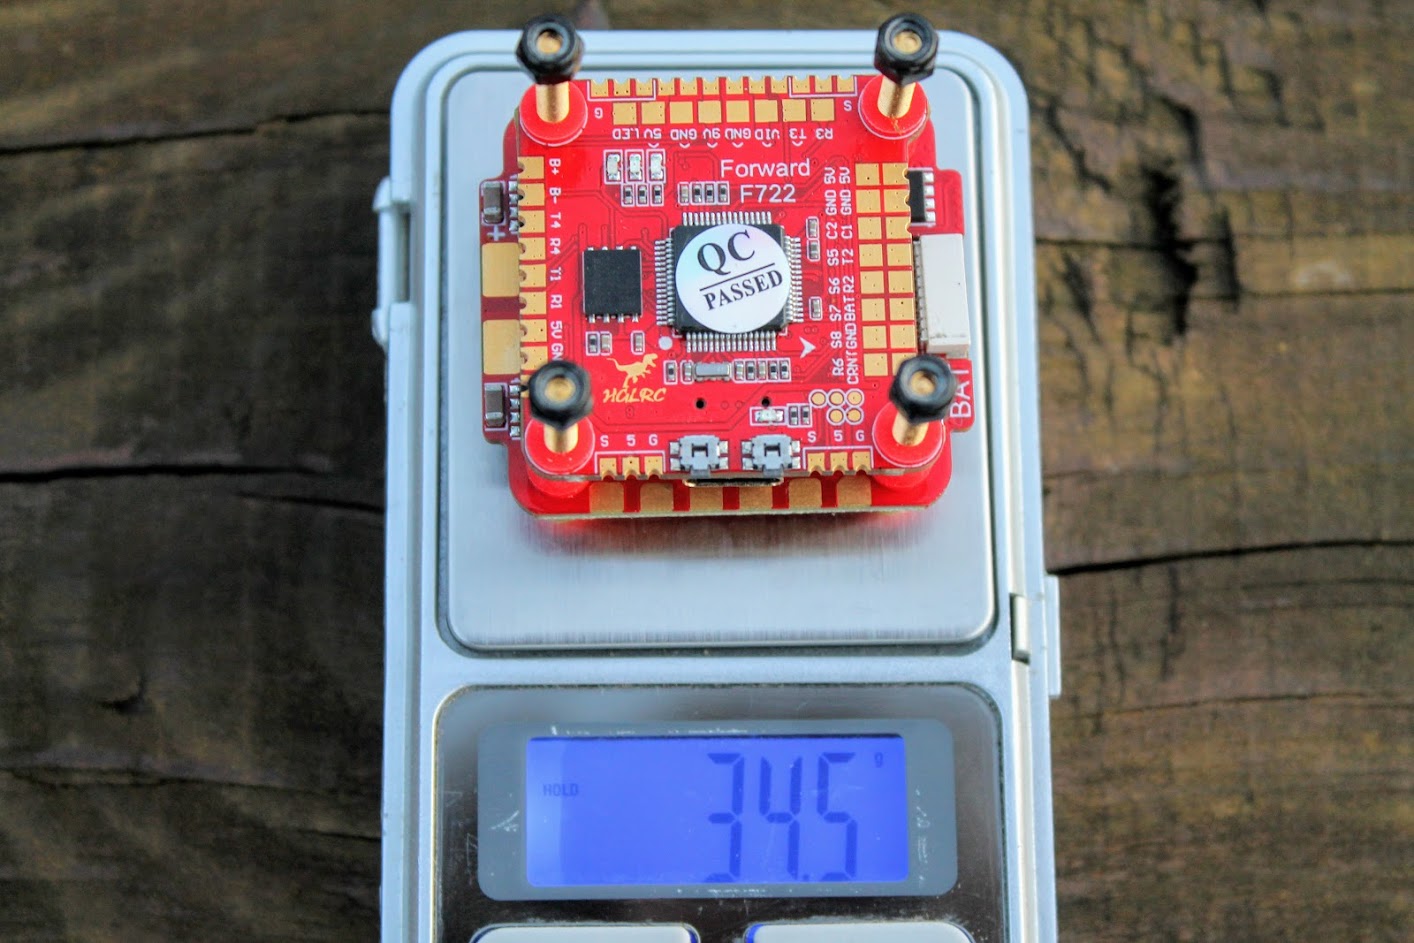
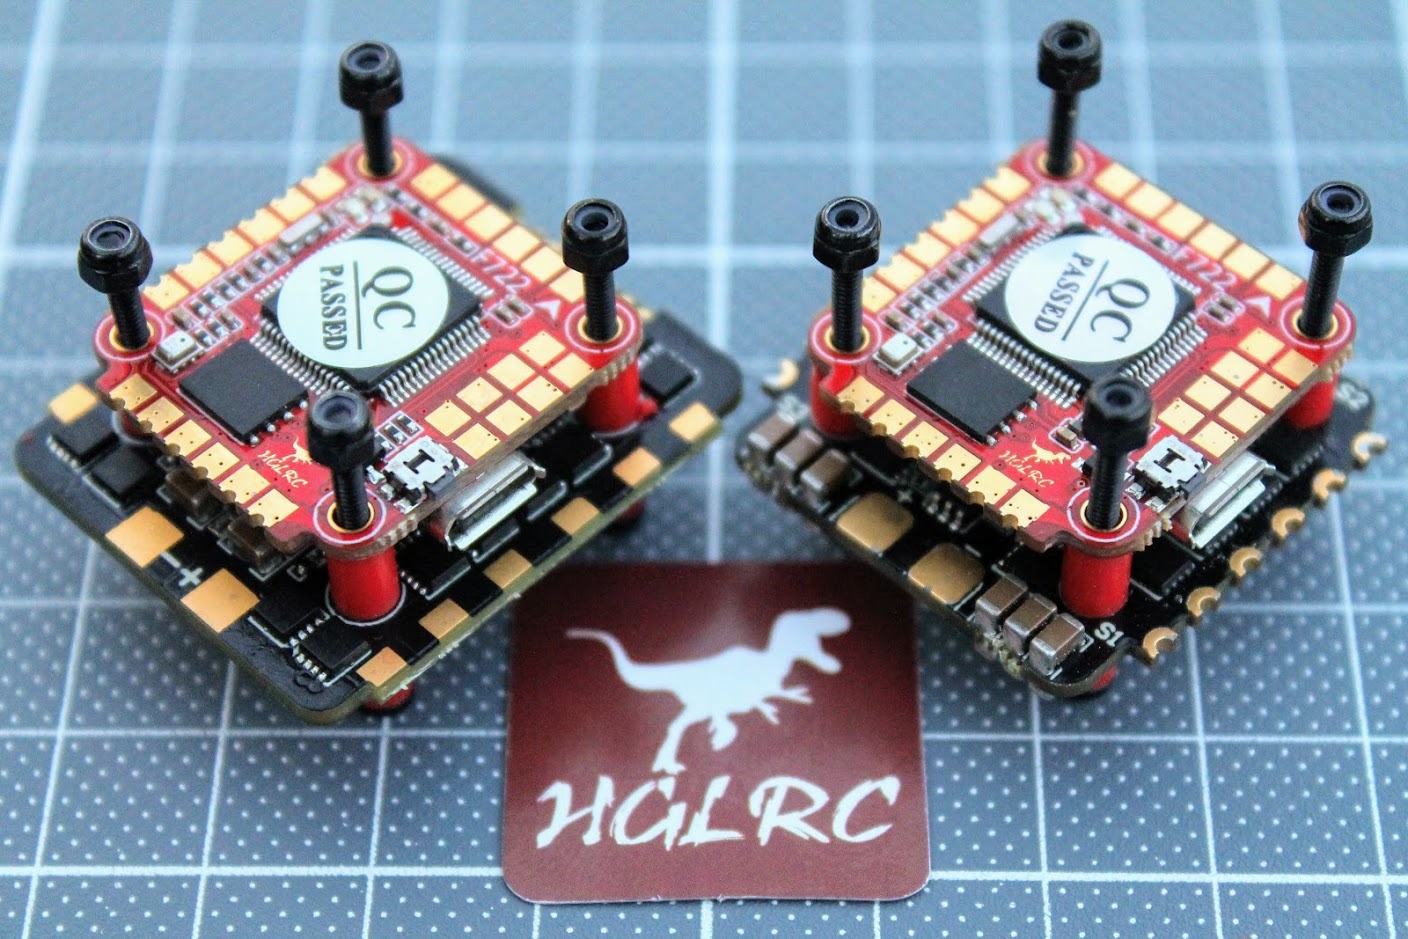
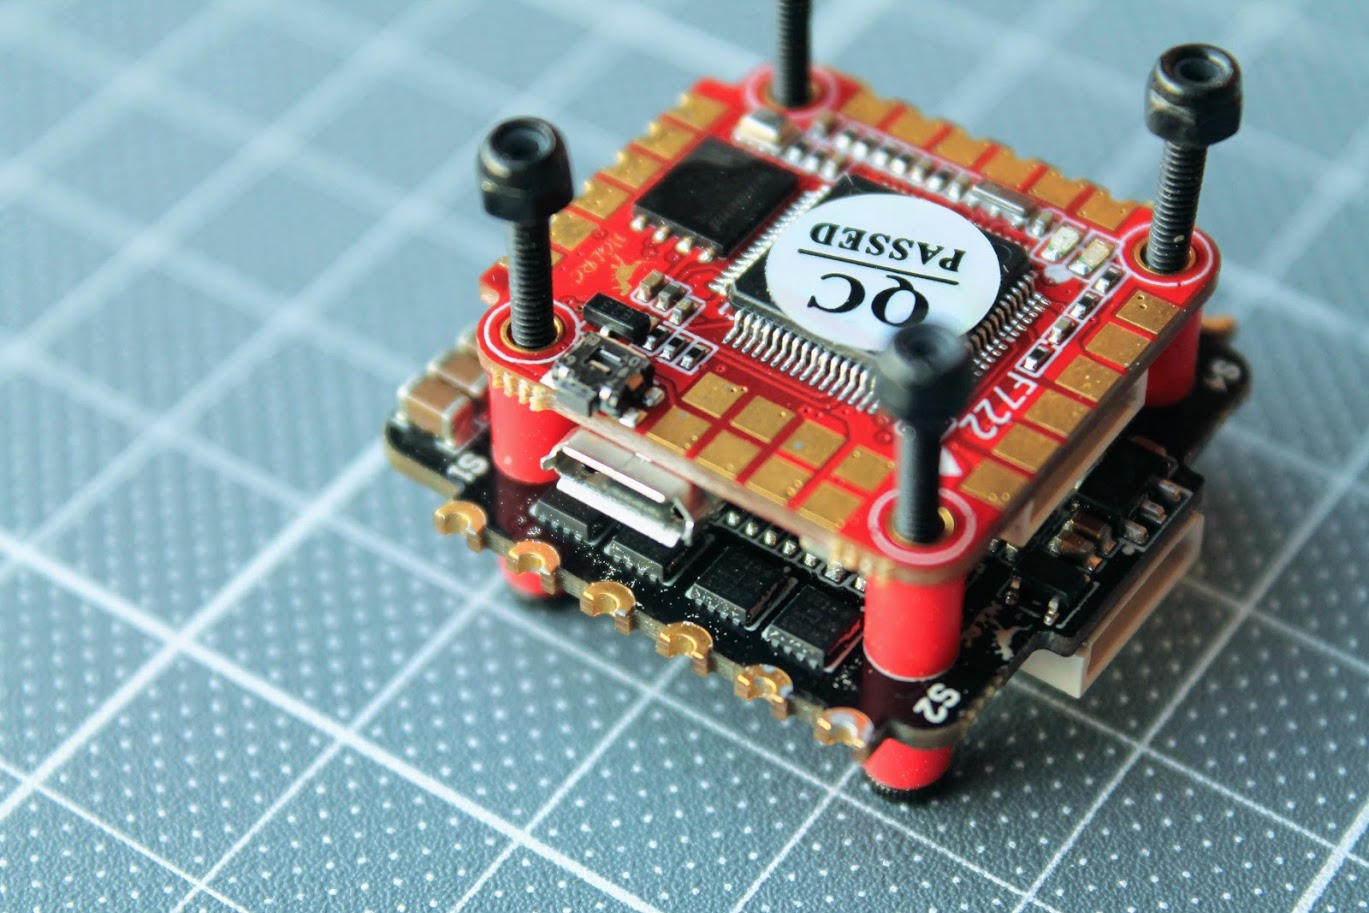
Total stack weight: 32.7g or 34.5g with supplied longer screws.
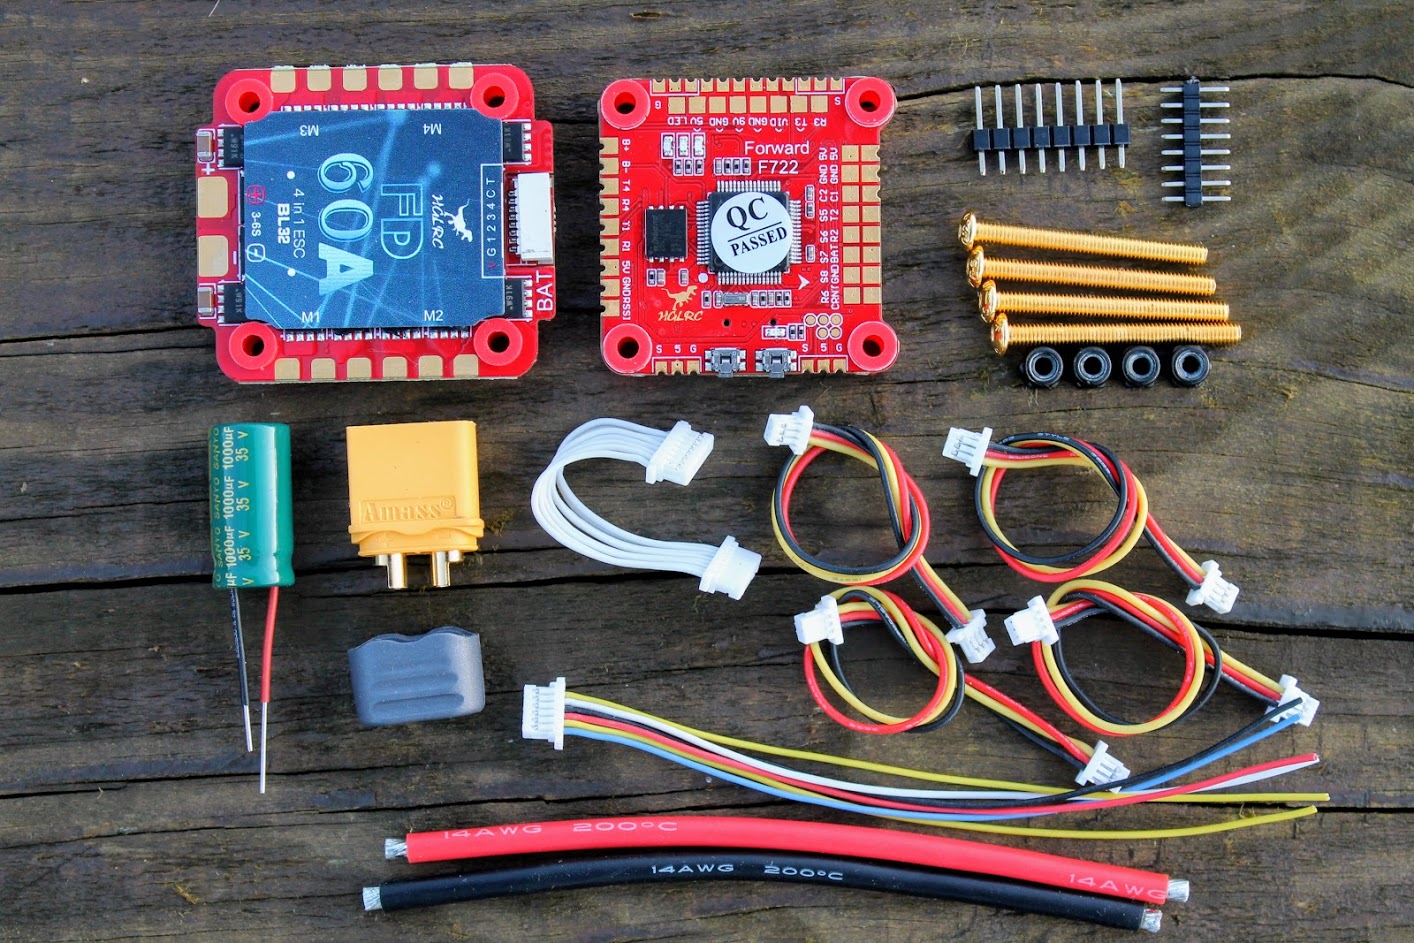
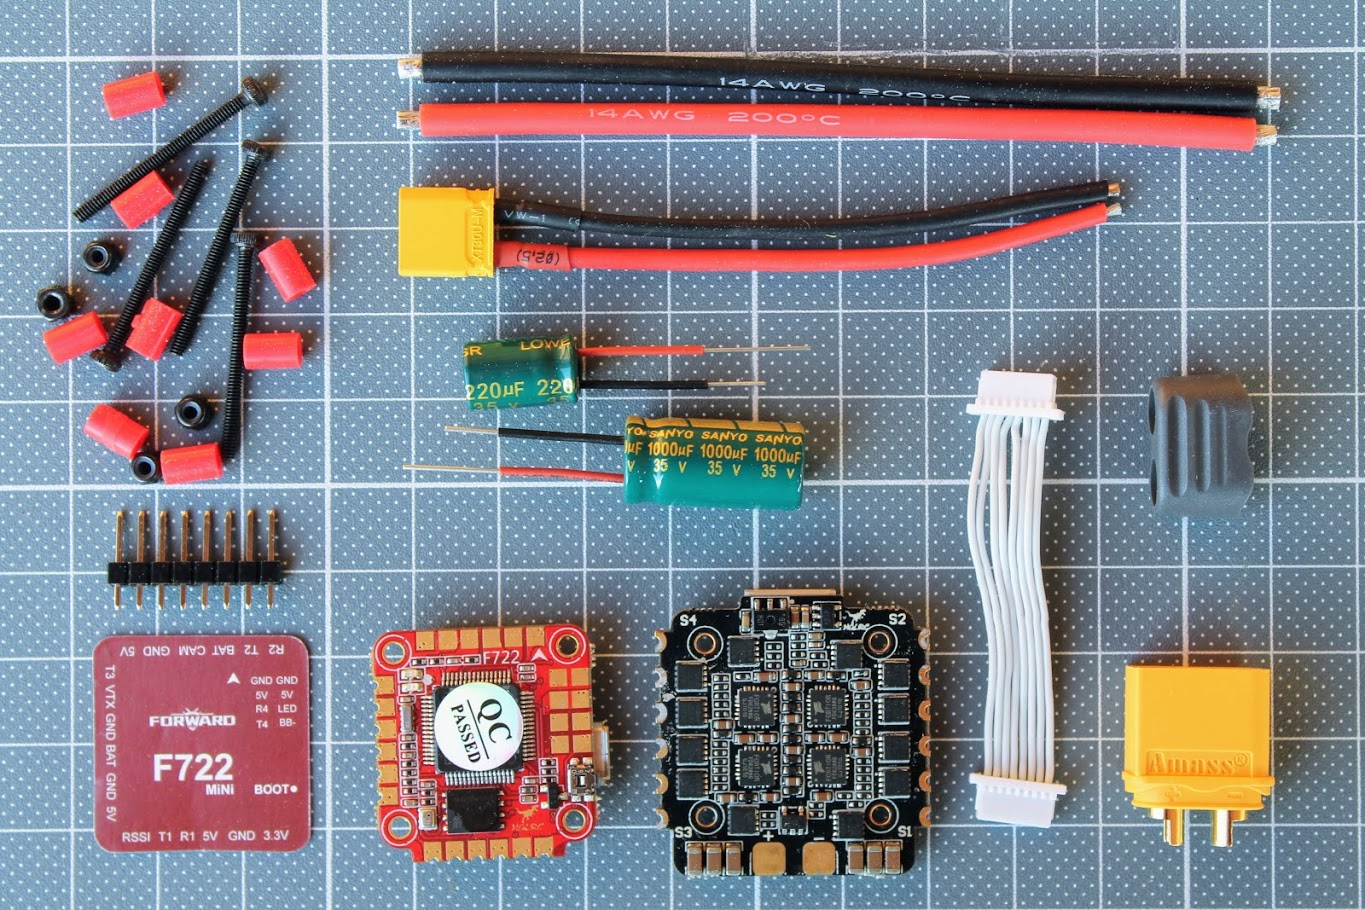
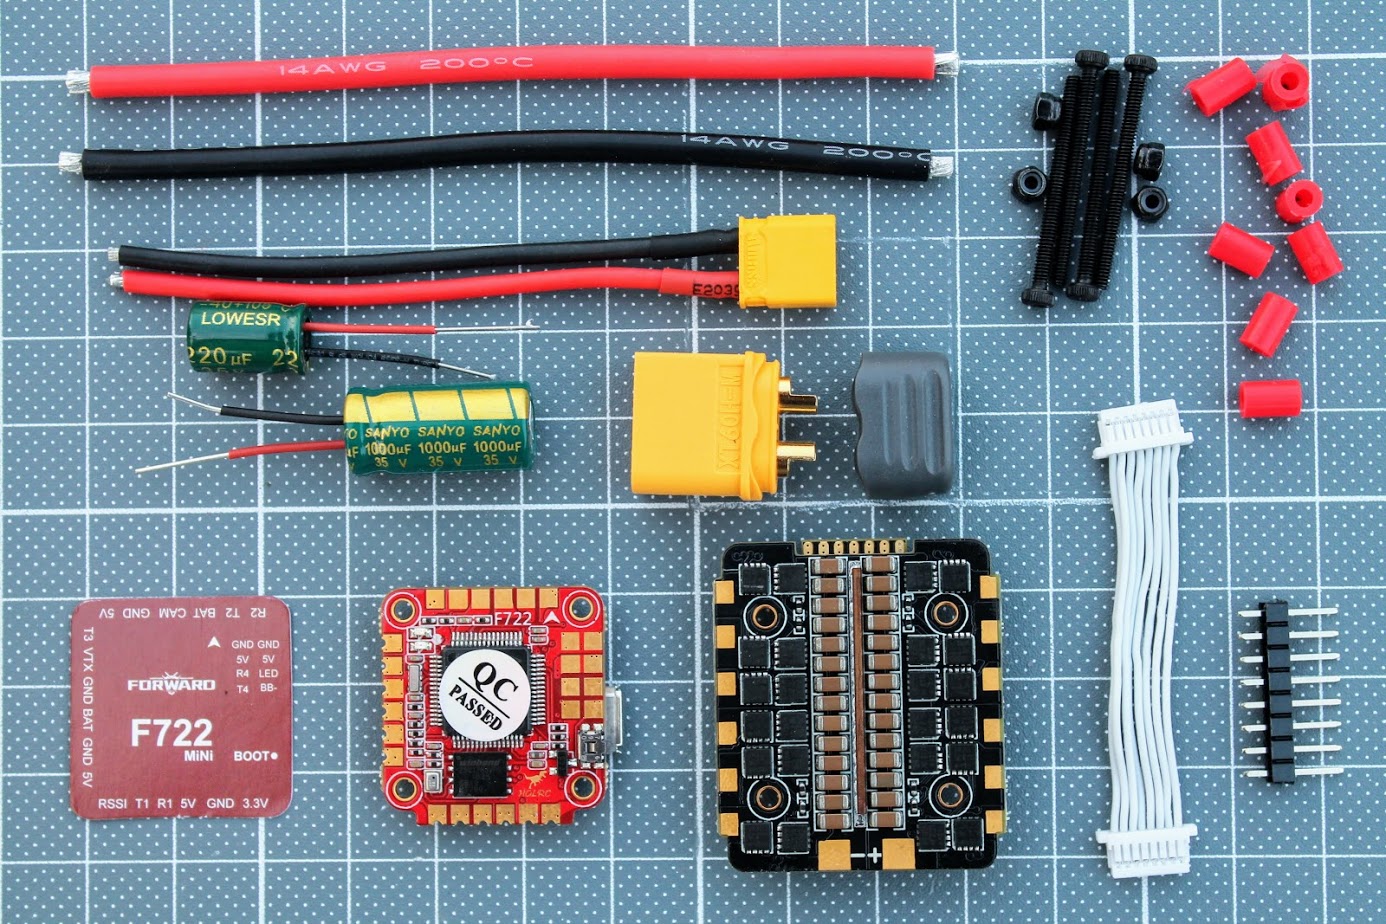
Package contents
Package contains HGLRC F722 FC, FD60A 4in1 ESC, 4 cables for LED strips, cable for connecting FC and ESC, cable for GPS, Low ESR capacitor, silicone cable and XT60 connector, silicon rubber standoffs and 4 screws with lock nuts.
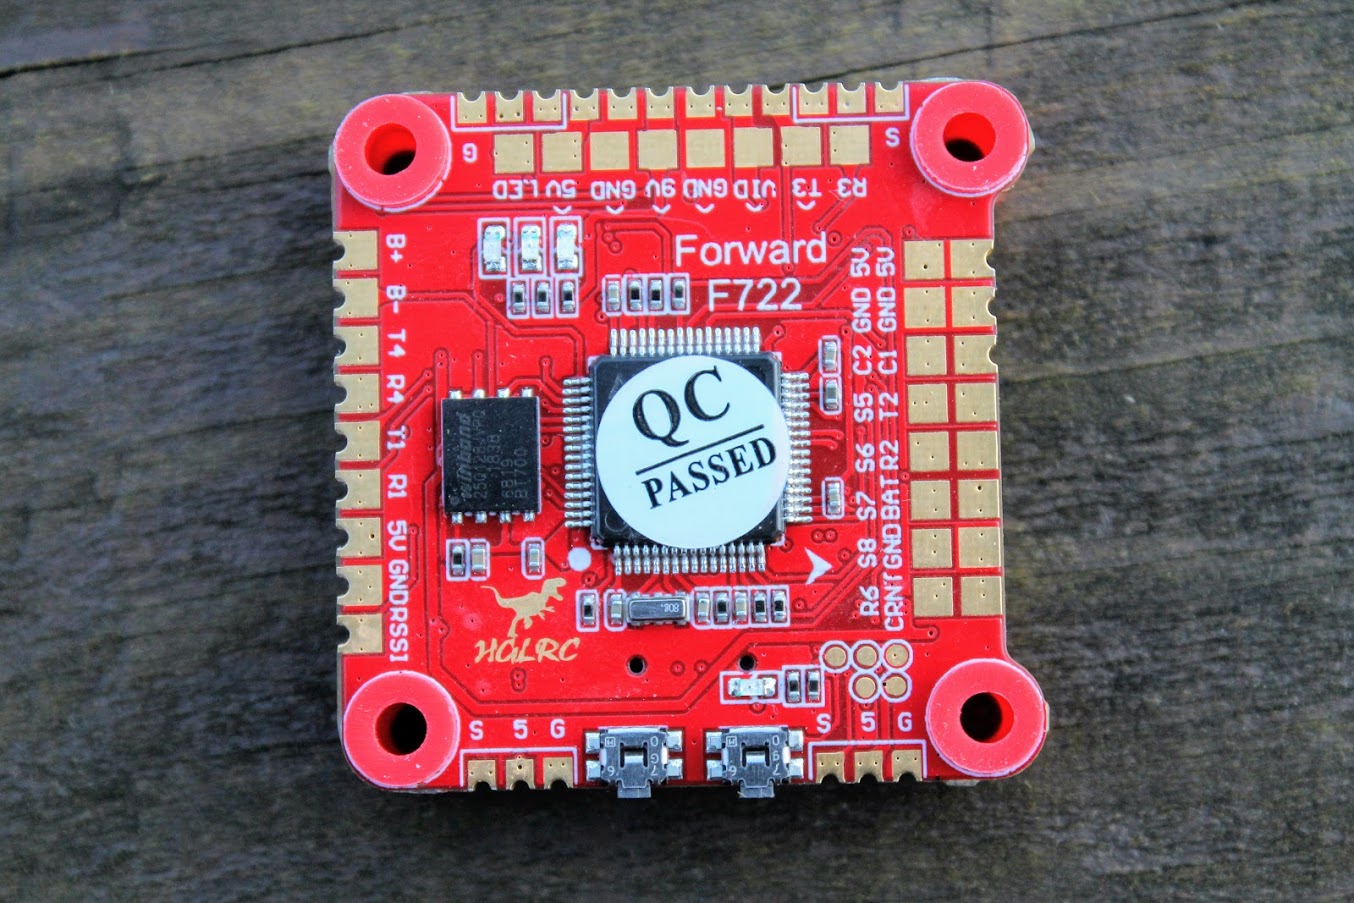
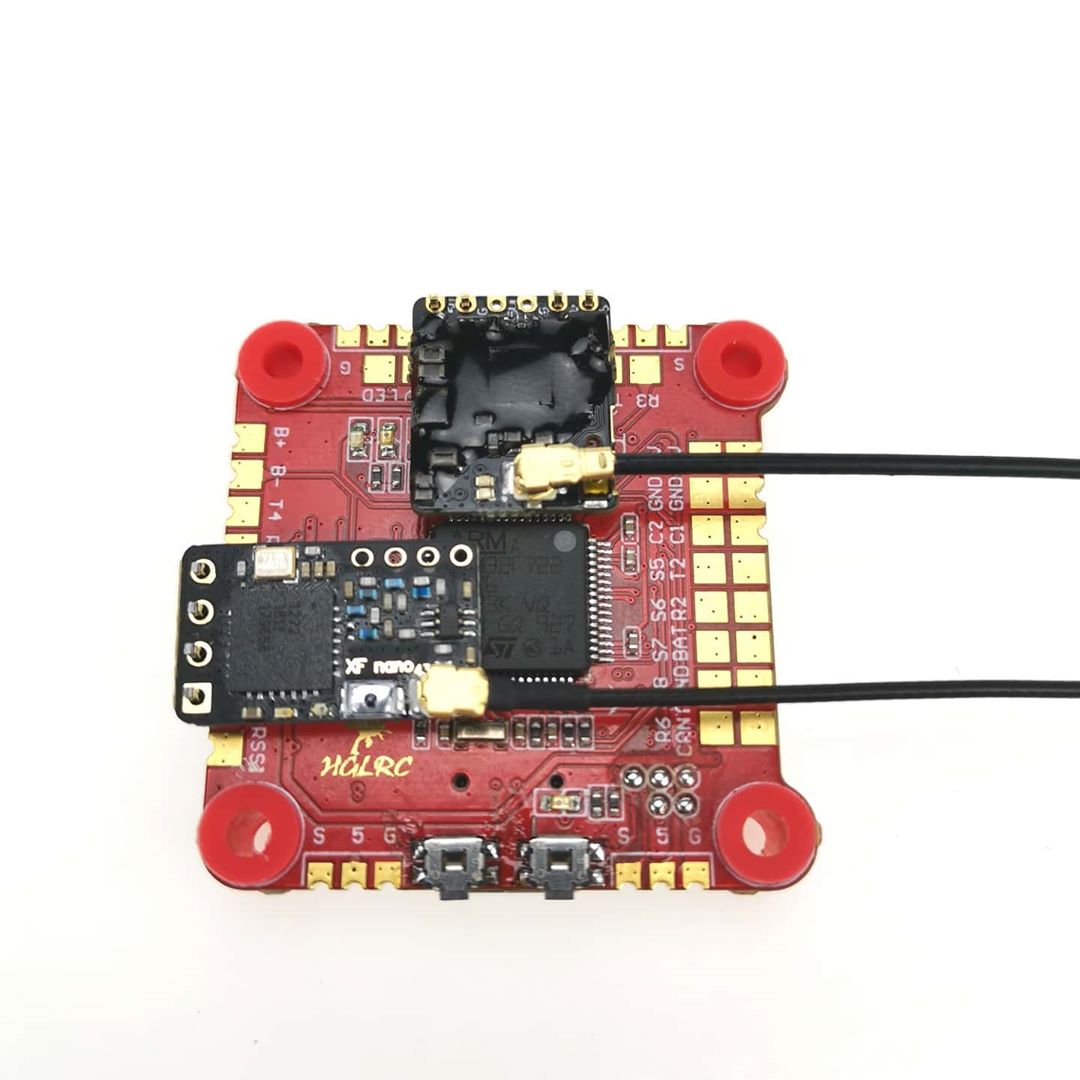
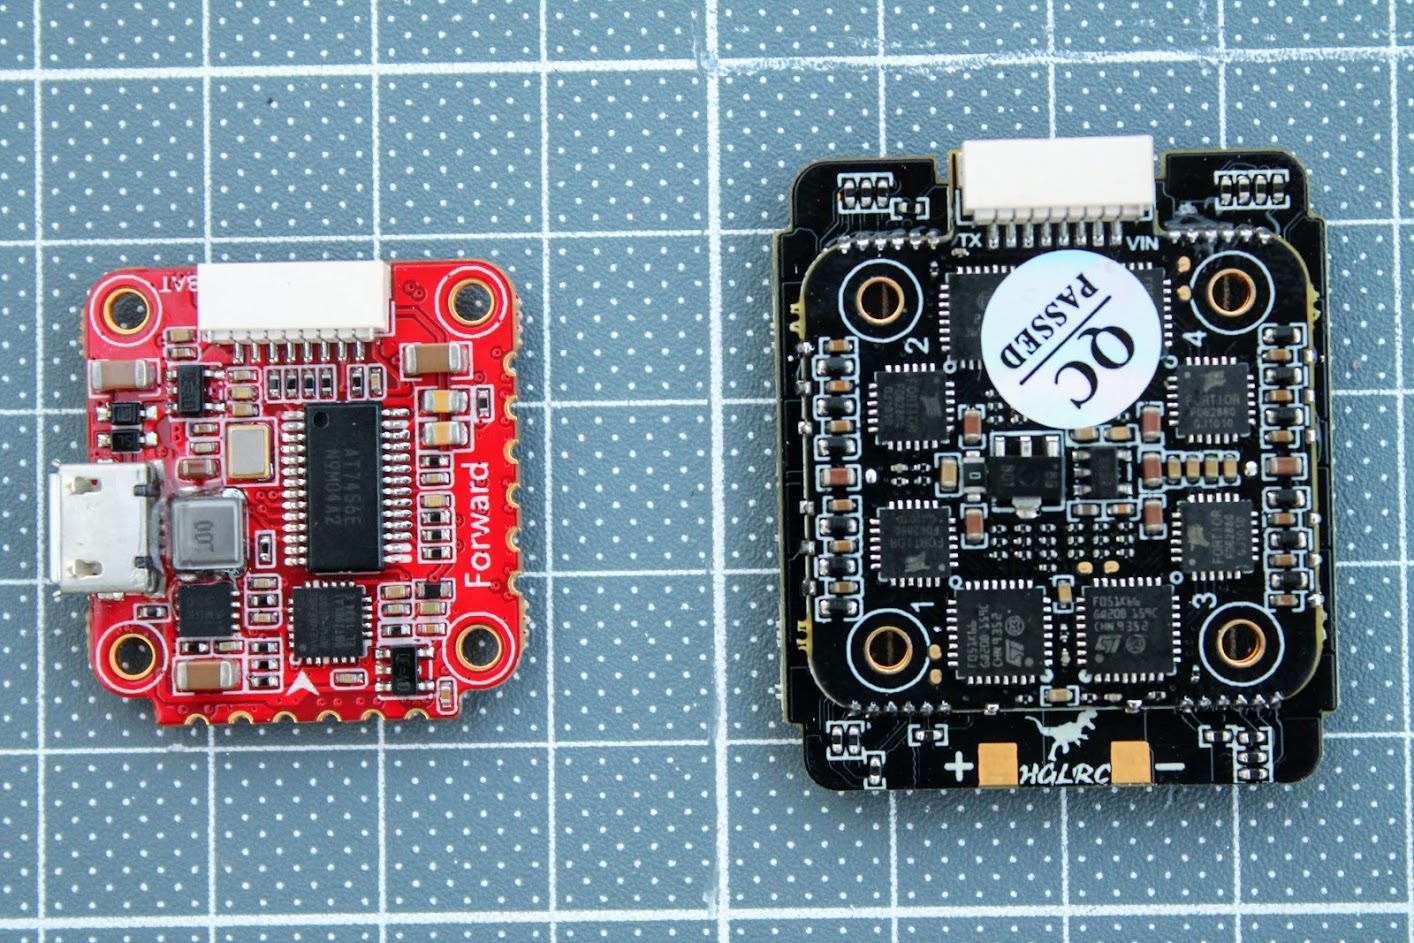
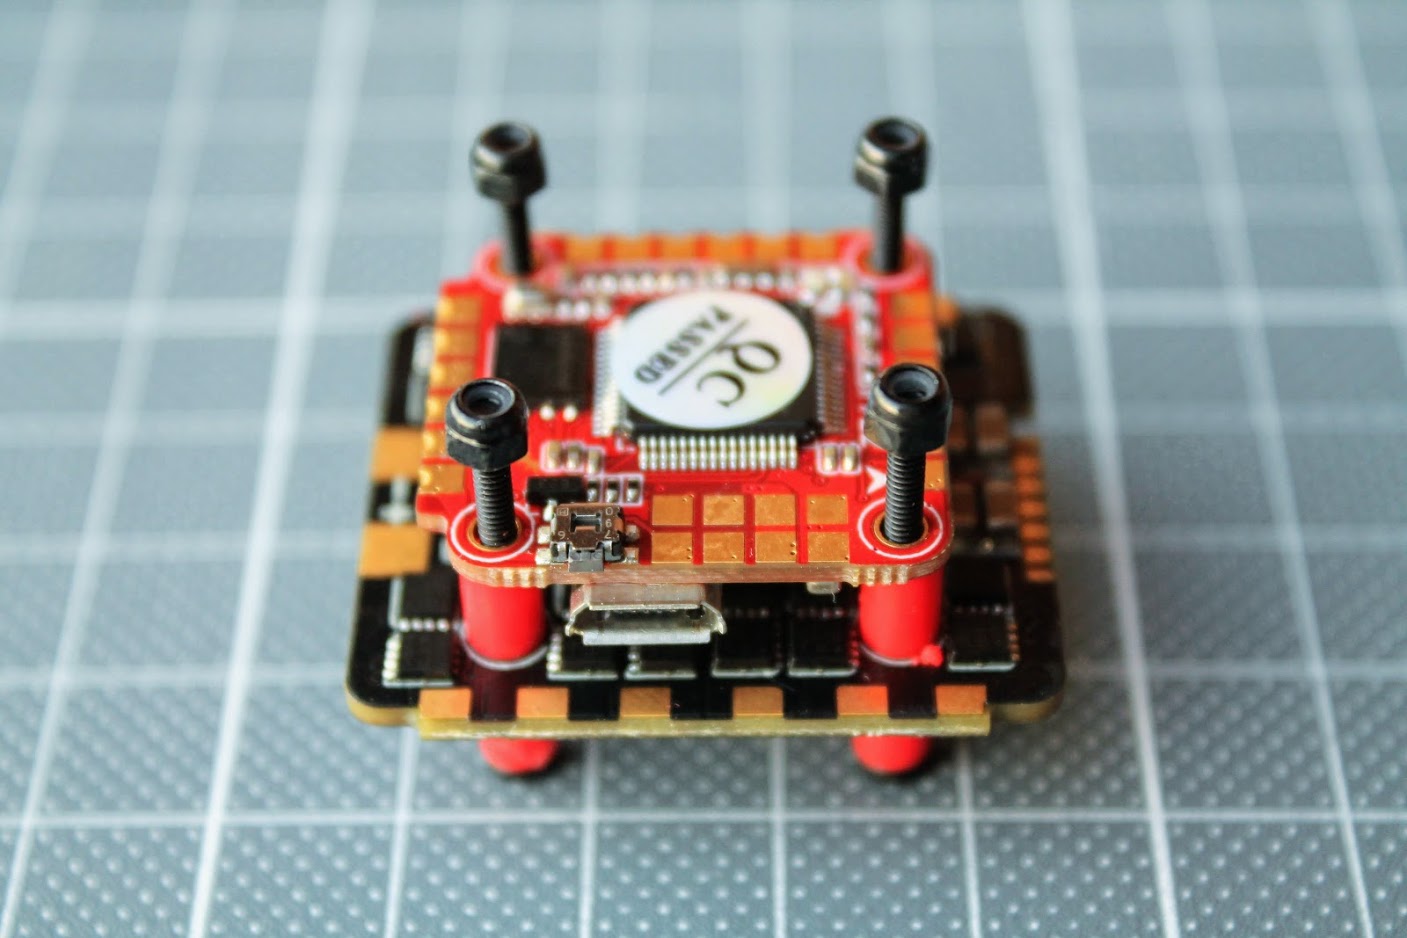
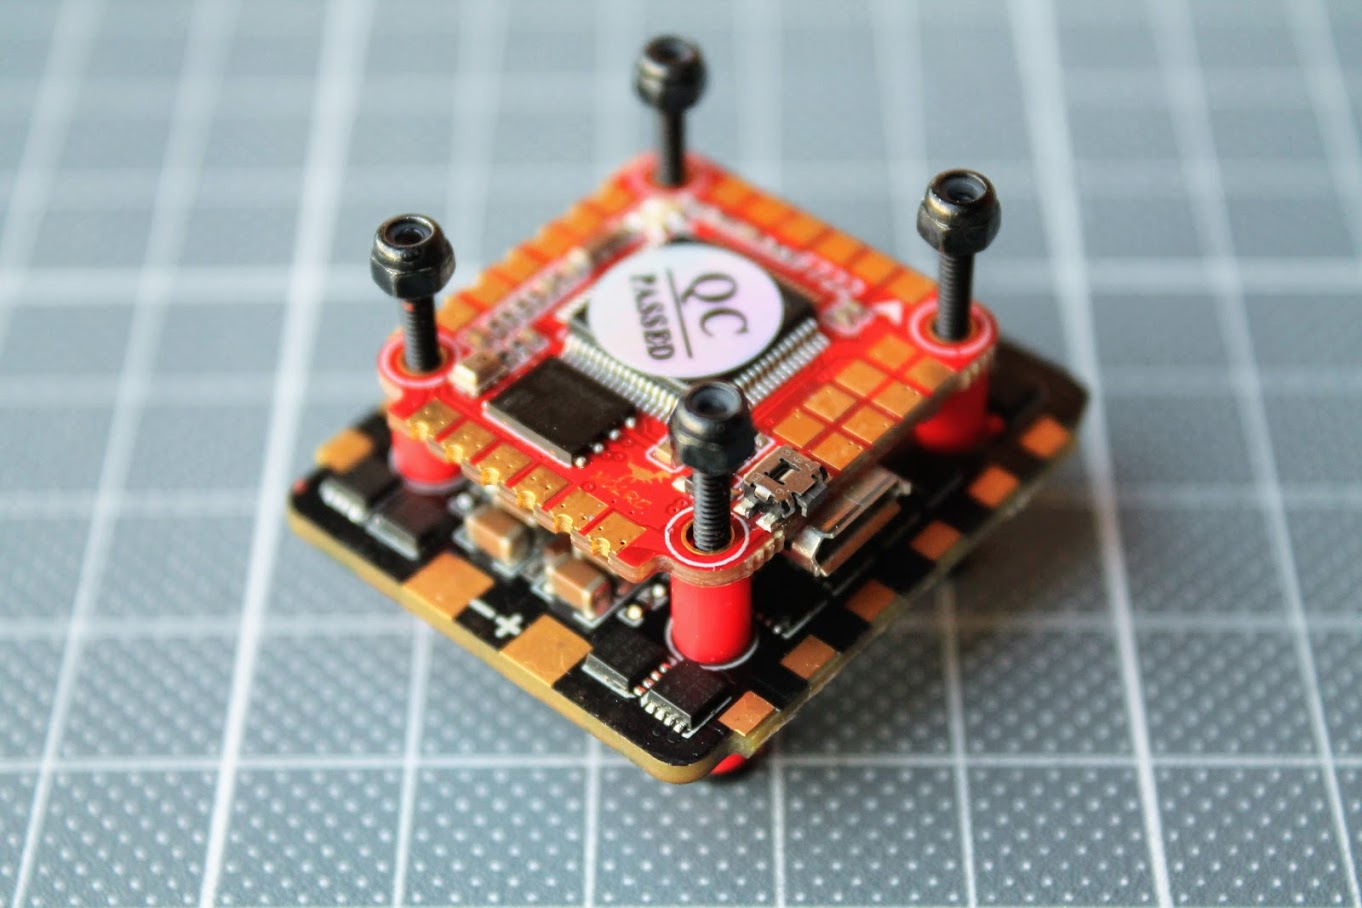
FC
Top side of the HGLRC Zeus F722 FC.
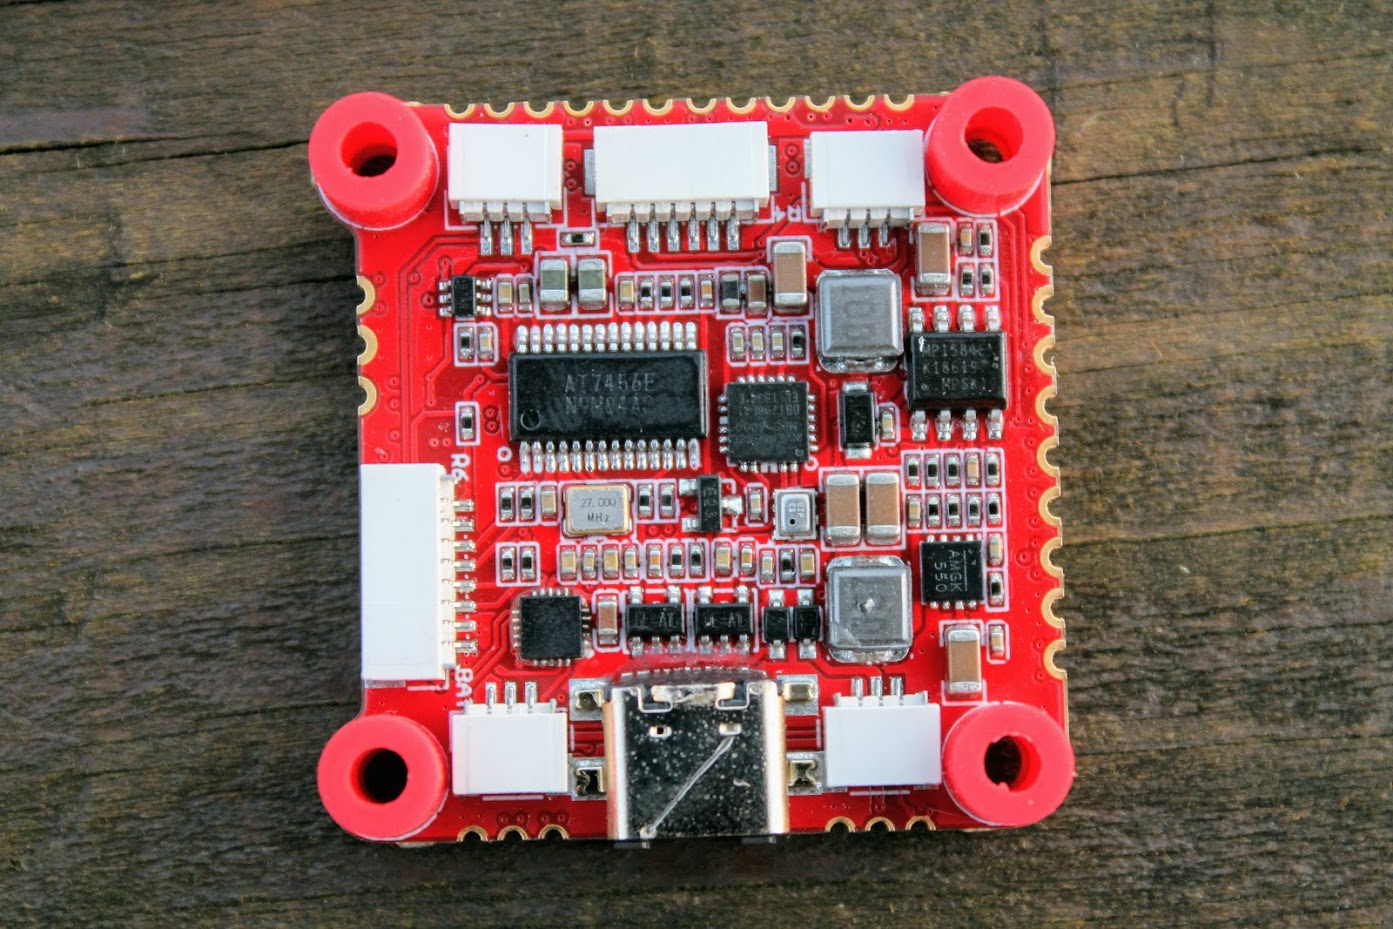
Bottom side of the HGLRC F722 FC.
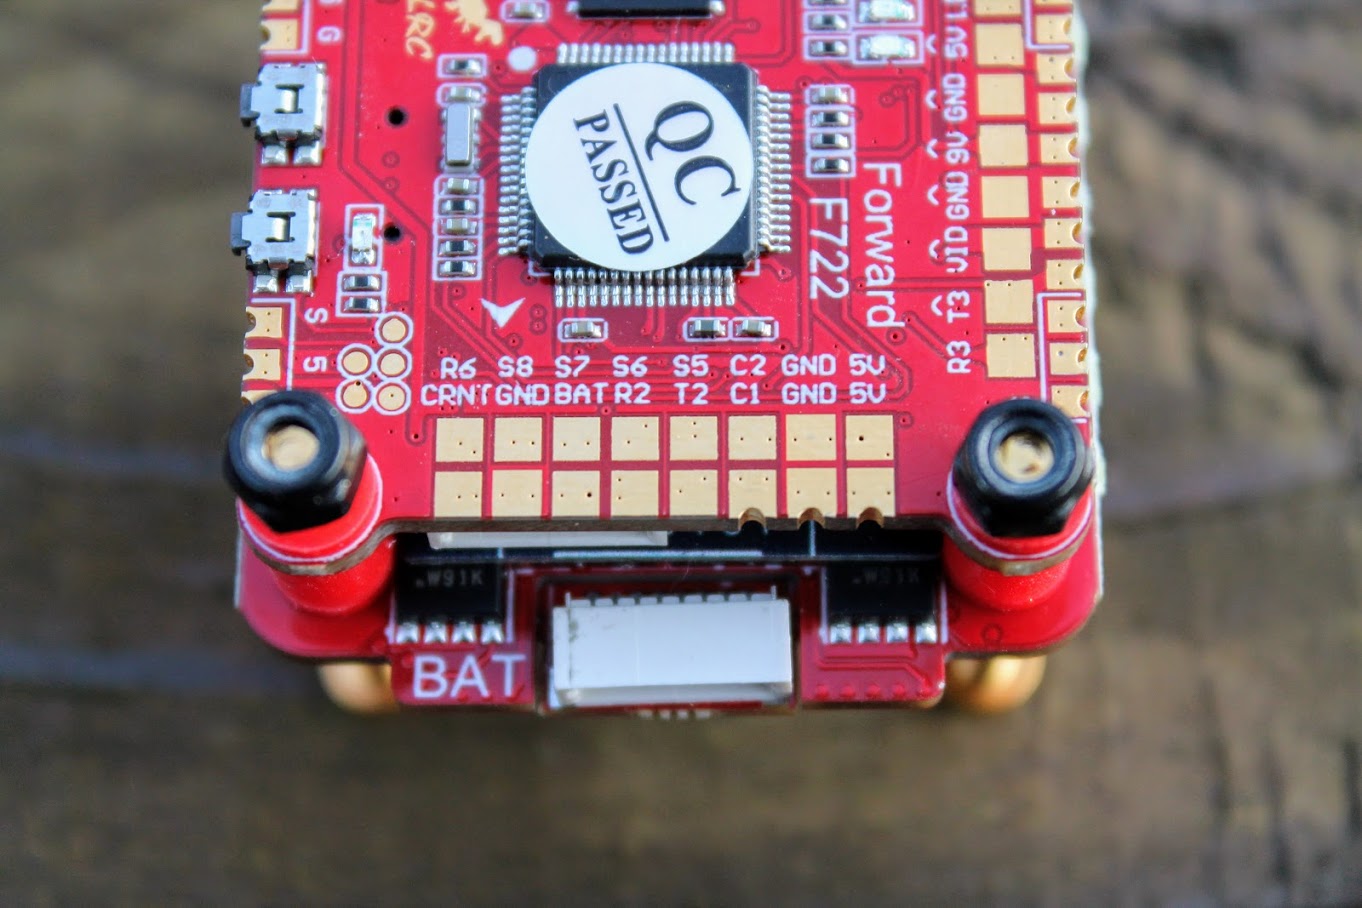
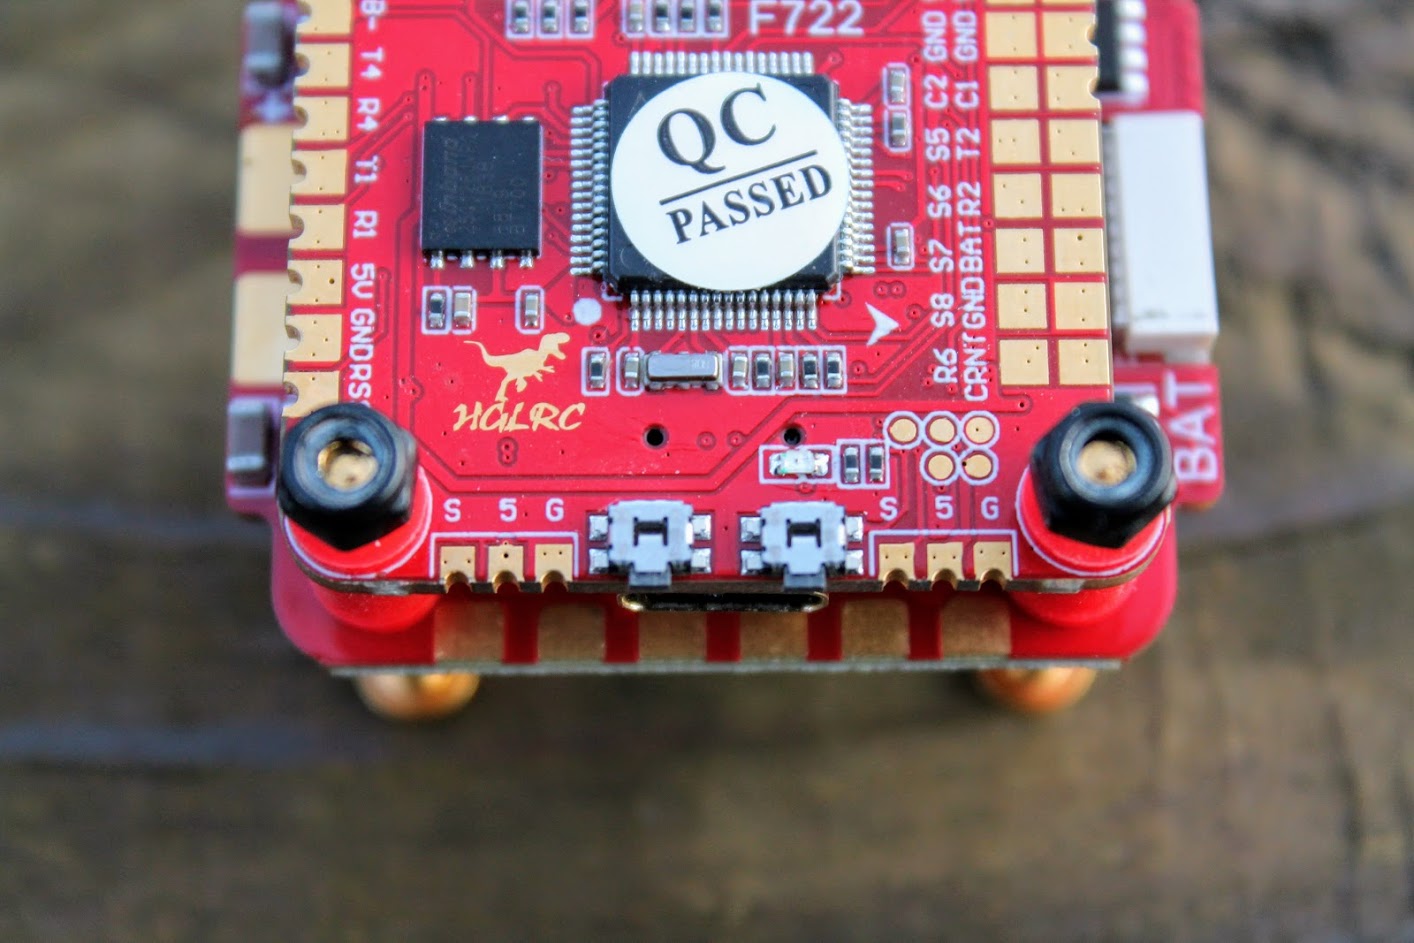
On the right side of the HGLRC F722 FC you can find the pads for RX2, TX2 (UART 2), Current sensor and battery voltage pads, RX6 input, 4 PWM (S5, S6, S7, S8) outputs for motors or servos. Board has 2 FPV camera inputs. The C2 (camera two) input is active by default. you need to set up the USER function in the BetaFlight configurator to be able to switch between two cameras.
On the top side you can find RX3, TX3 (UART 3) pads, Video output to the VTX, 9V and 5V pads. There are Betaflight controllable LED pad and two “S 5V G” FC controllable LED pads. There are also pads for connecting to the ESCs in case you will not use the connector for this.
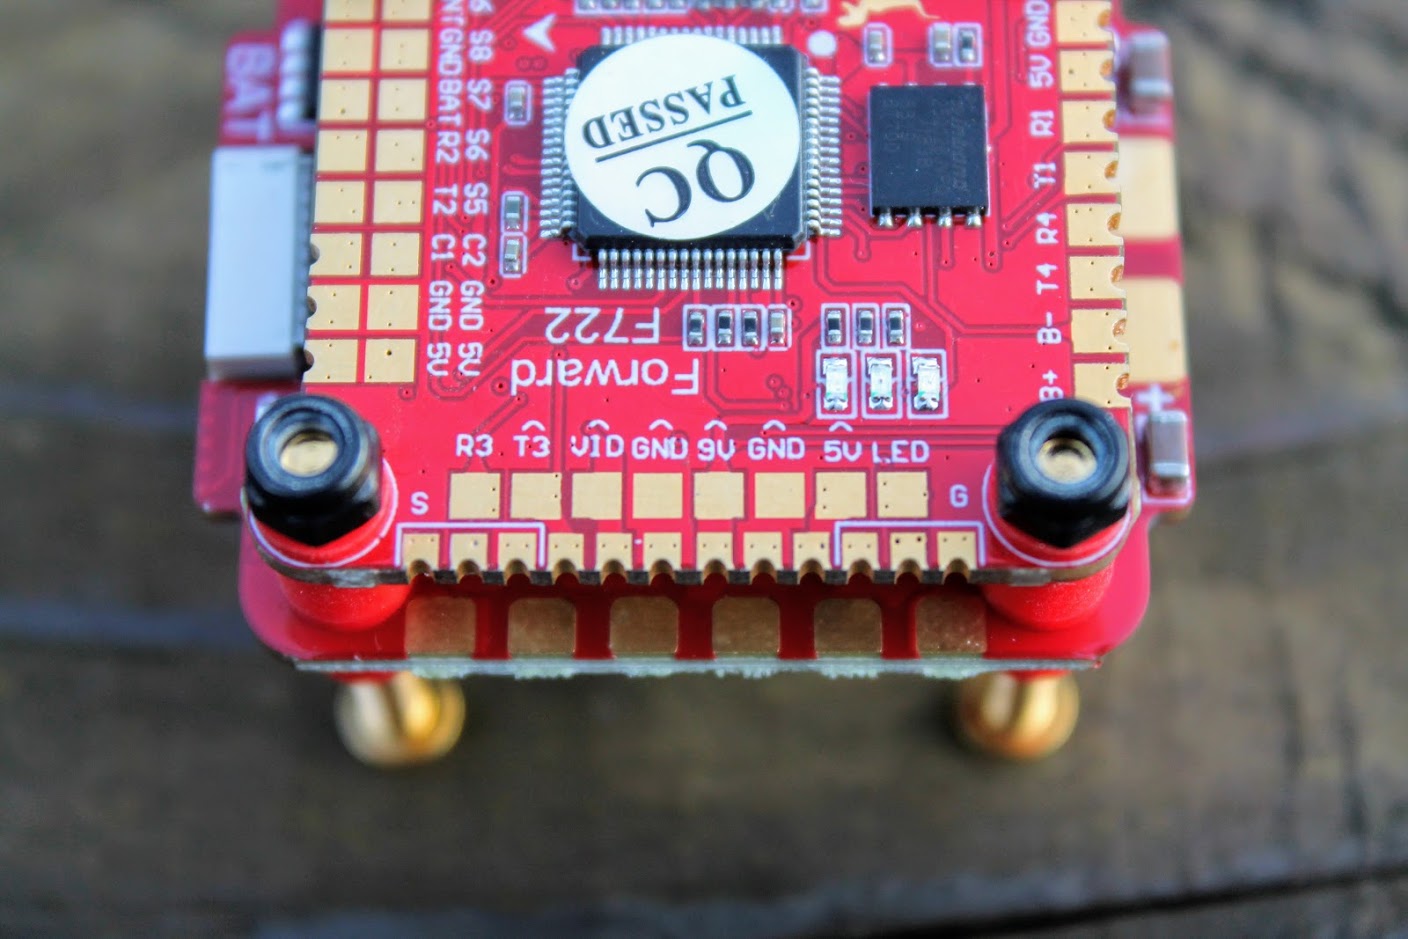
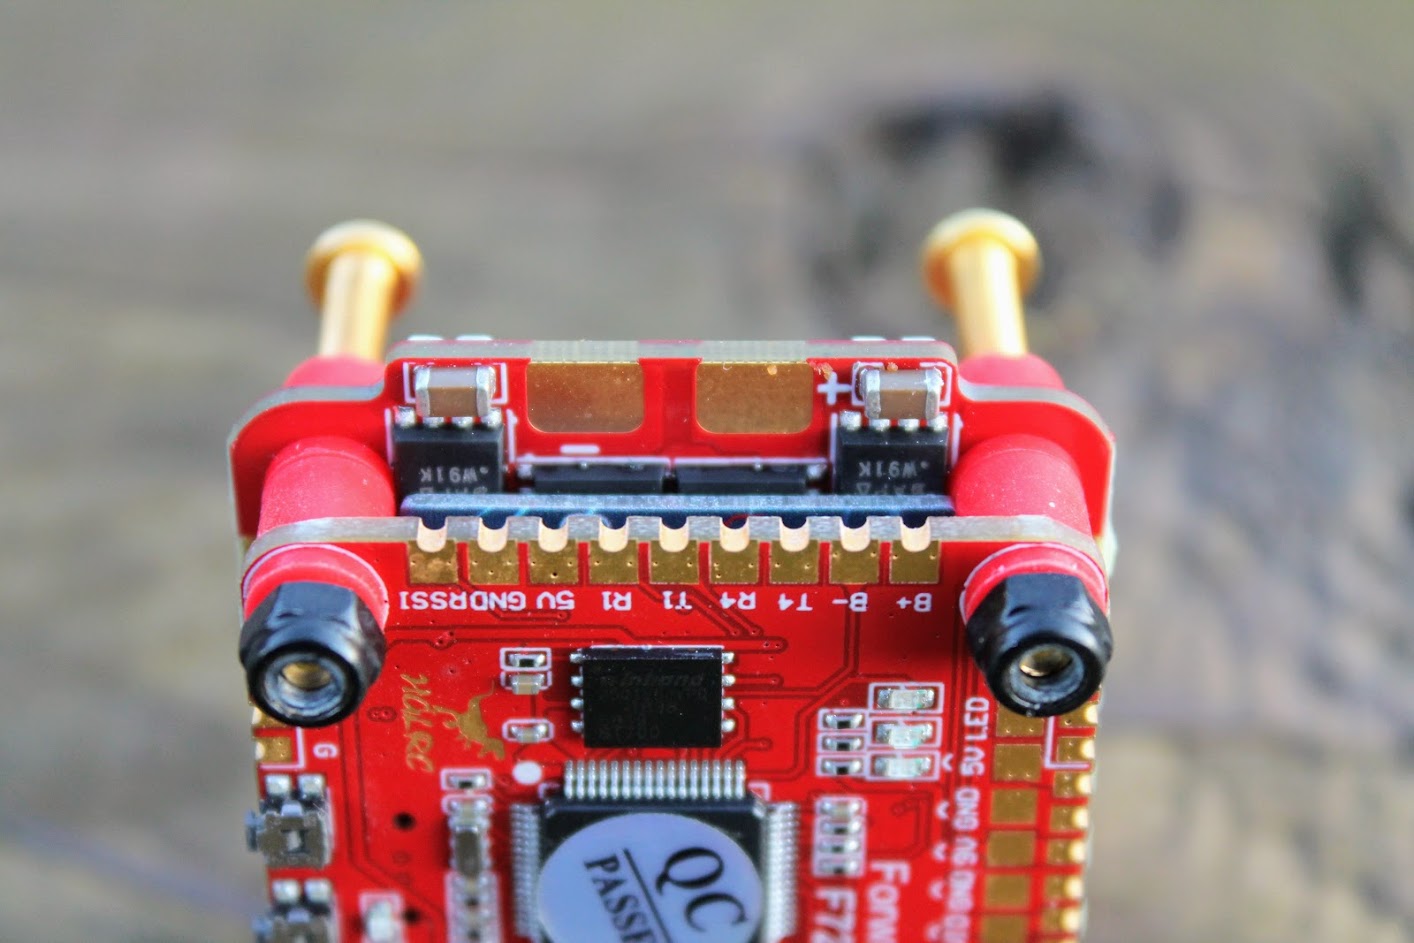
And on the left side there are RX4/TX4 (UART4), RX1/TX1 (UART1) pads. Also the pads for buzzer (B+, B-) and RSSI input with 5V and GND.
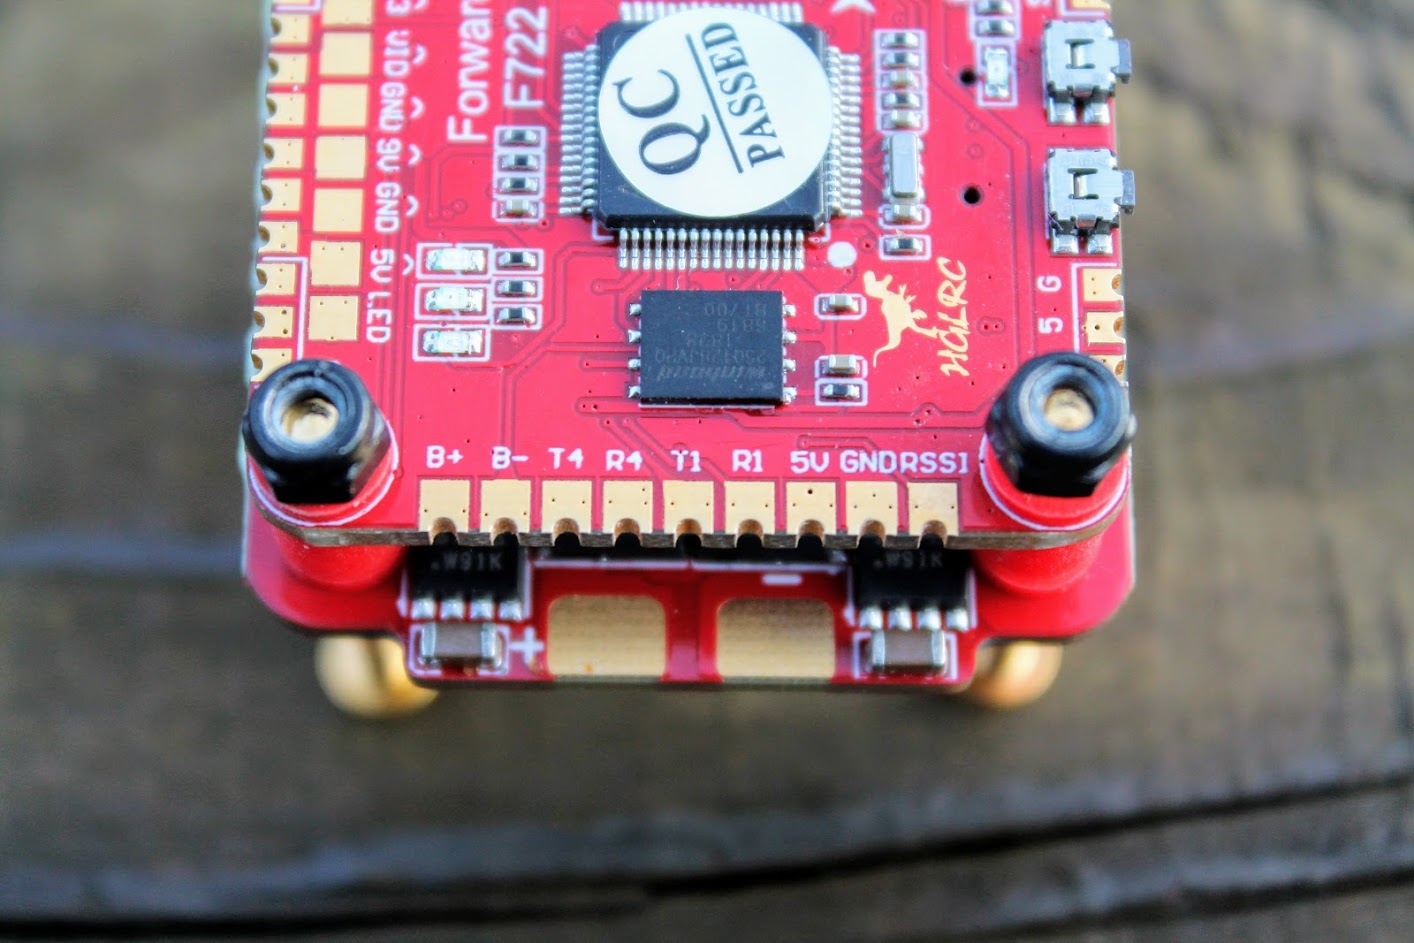
Two push buttons are located on the bottom edge of the FC. One is for booting in the ESC into the DFU mode and another for controlling the LED lights. “S 5 G” pads are for soldering the wires to controllable LED lights.
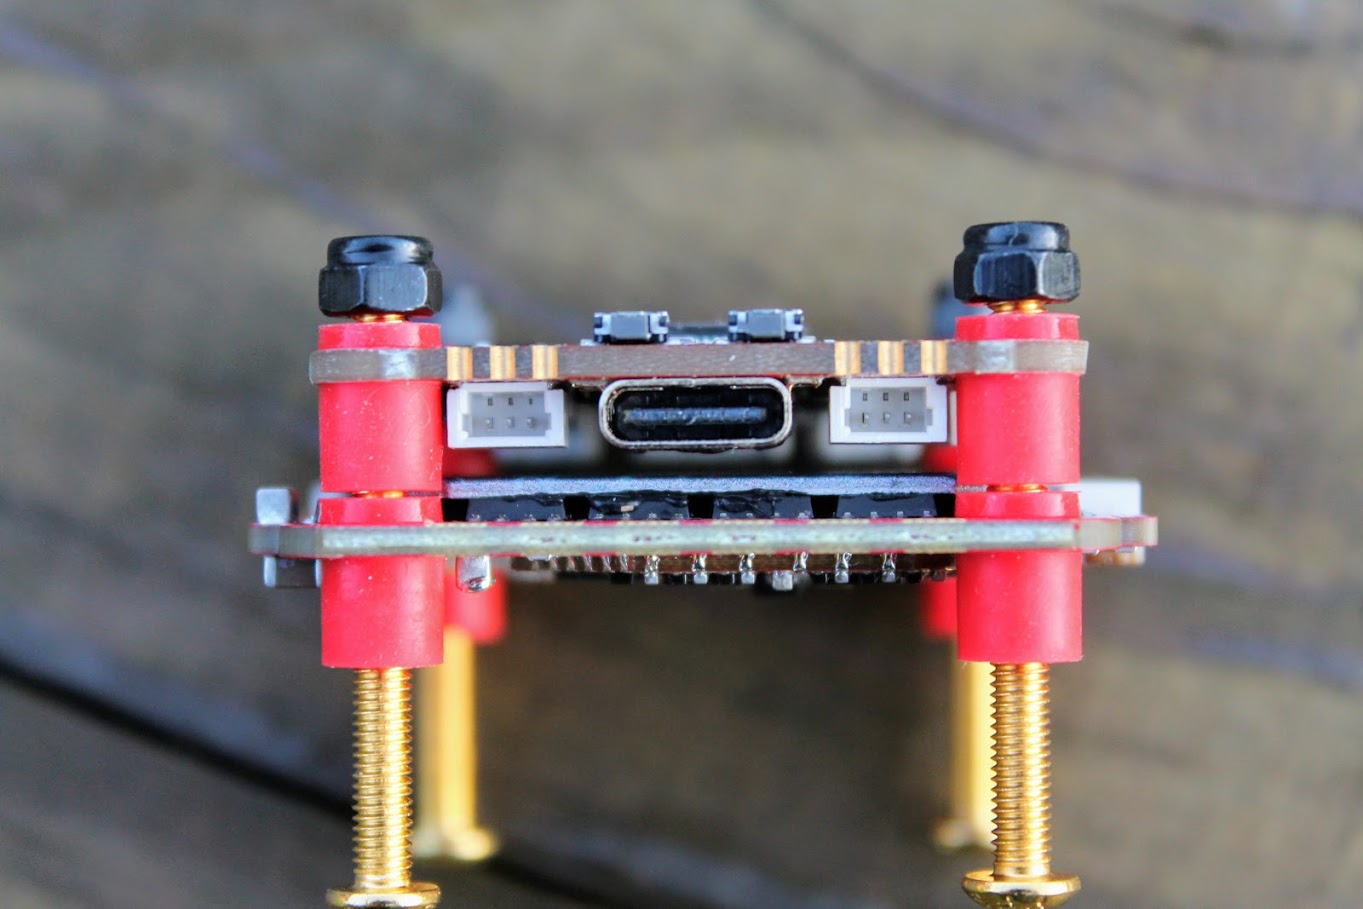
HGLRC Zeus F722 FC has USB-C type connector. Also two 3pin SH1.0 connectors for controllable LEDs.
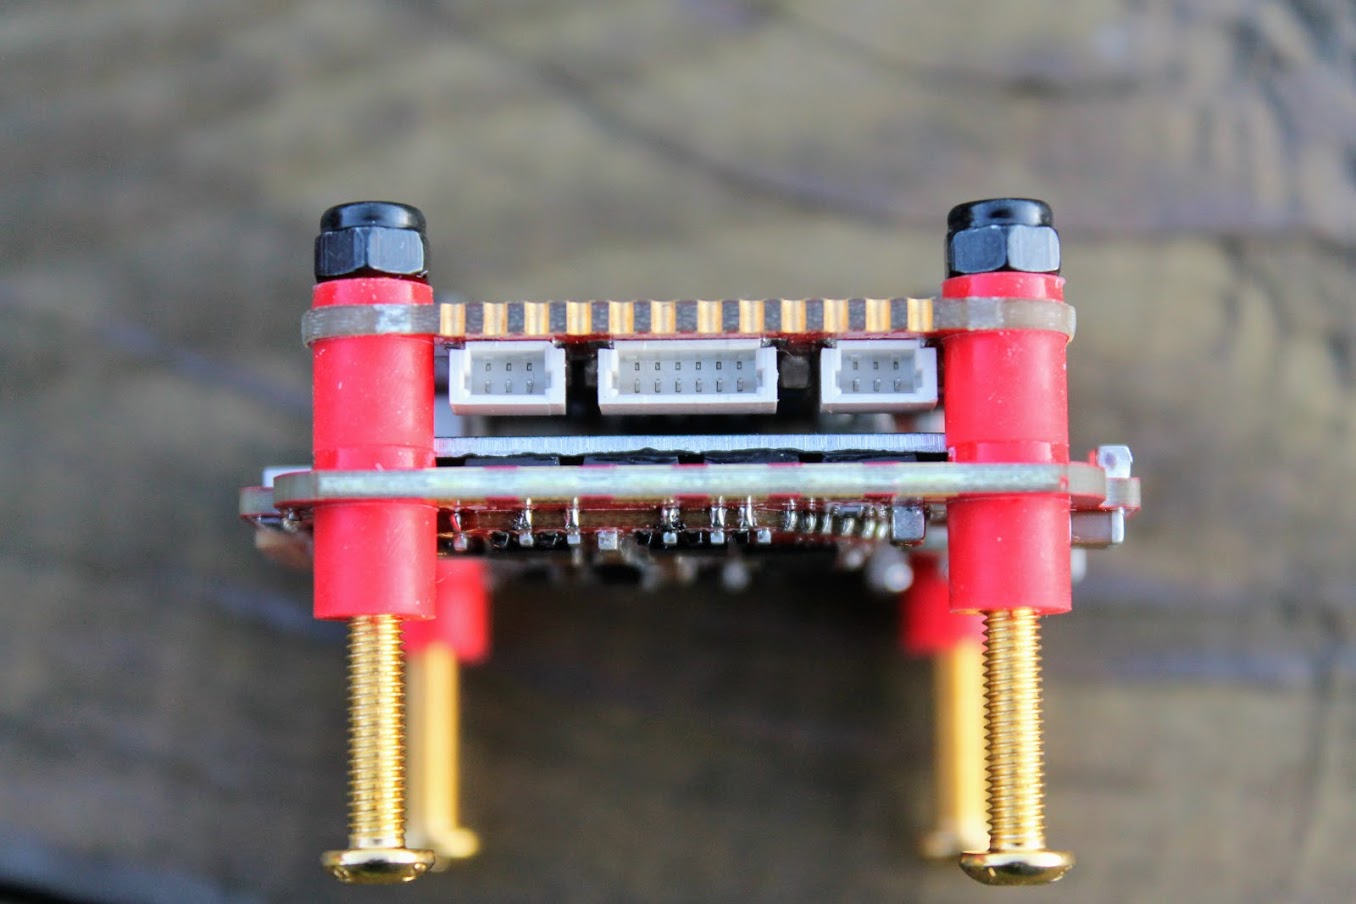
Separate 6pin SH1.0 connector socket for easy GPS and compass installation. Two 3pin SH1.0 connector sockets for controllable LEDs.
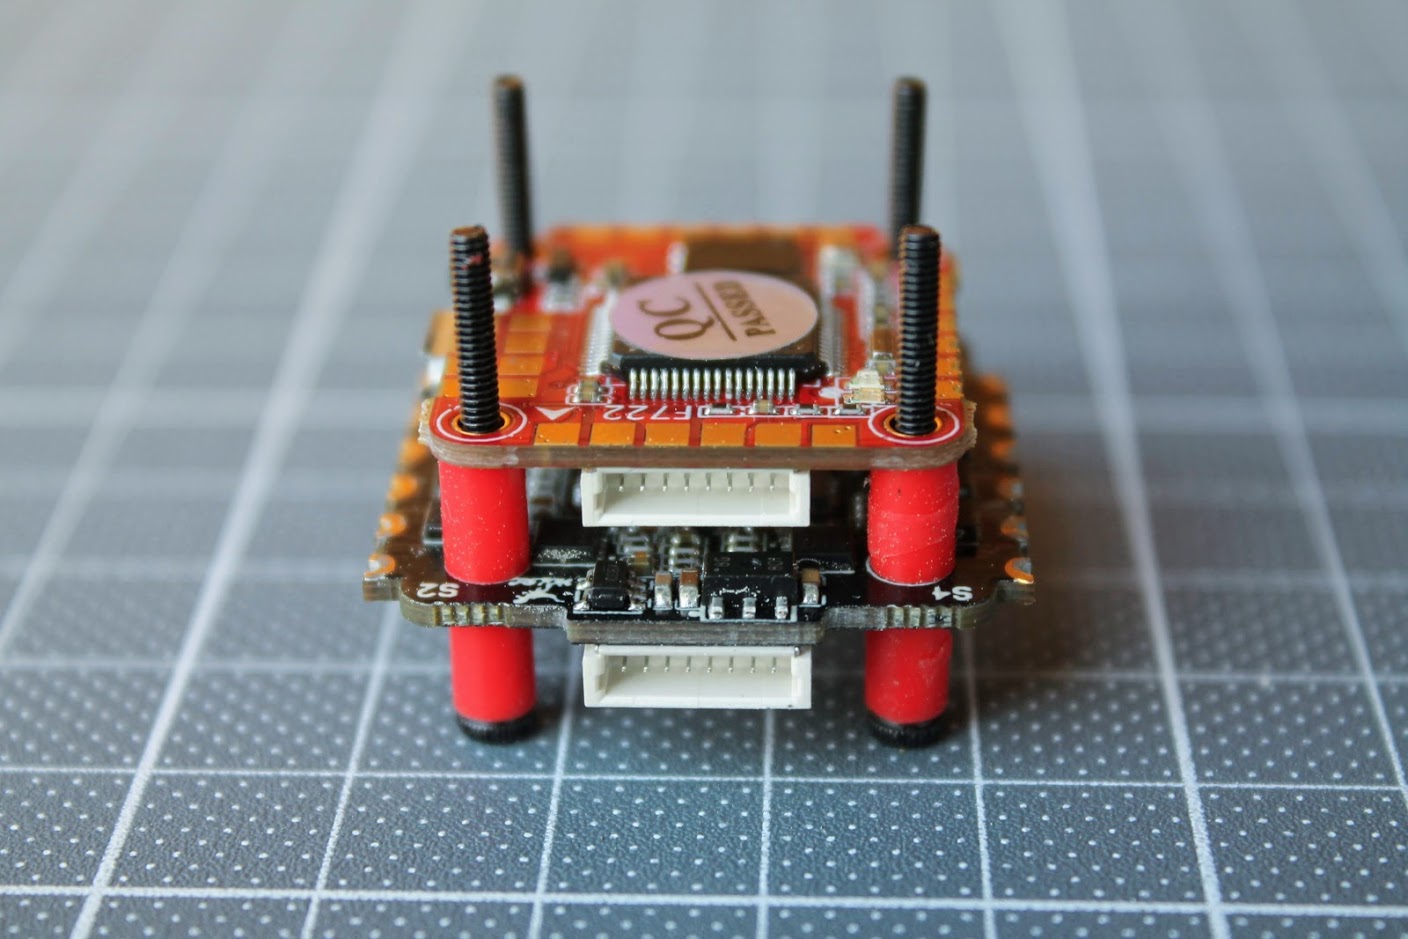
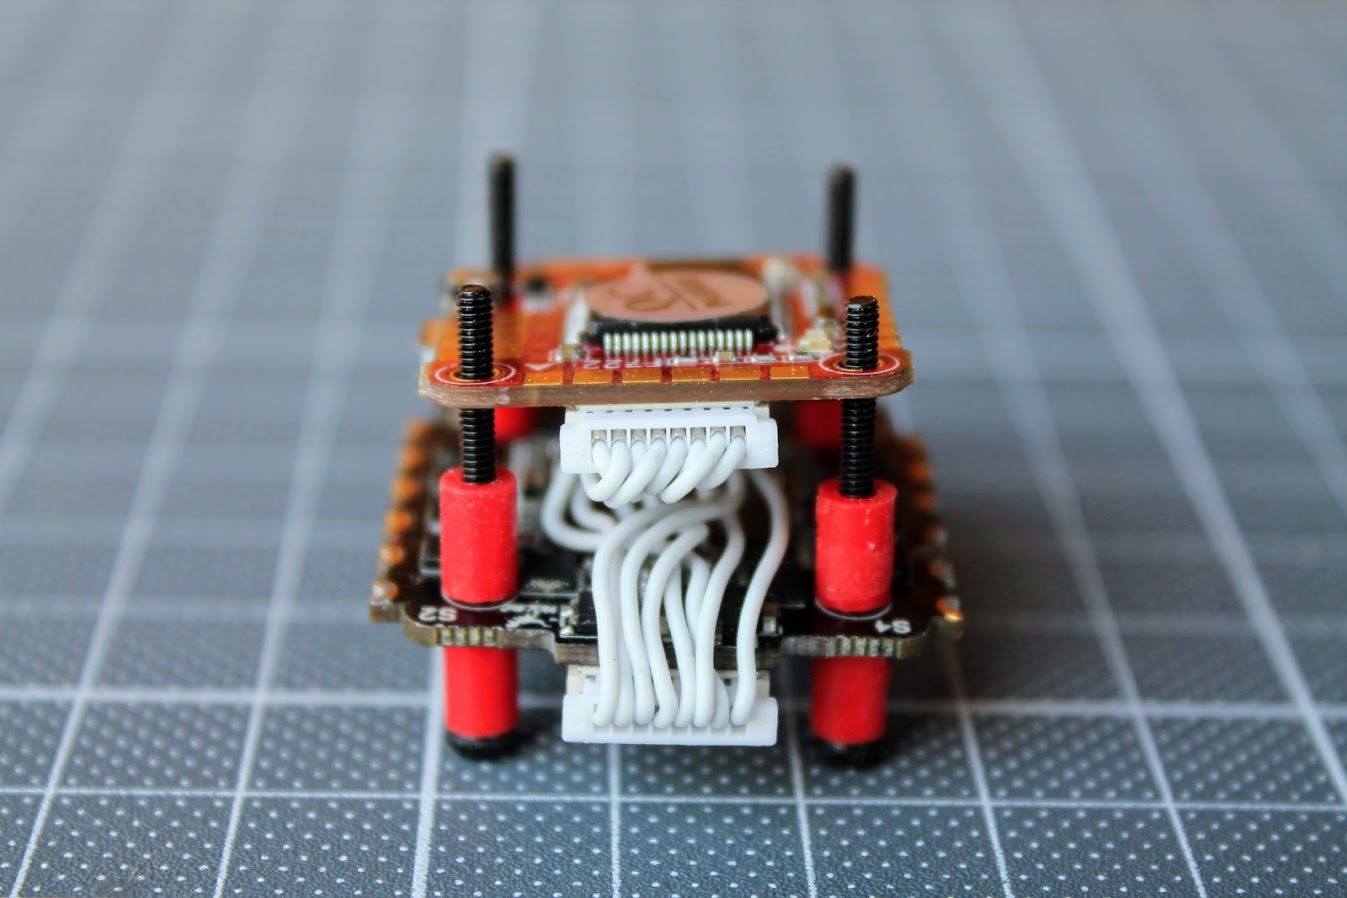
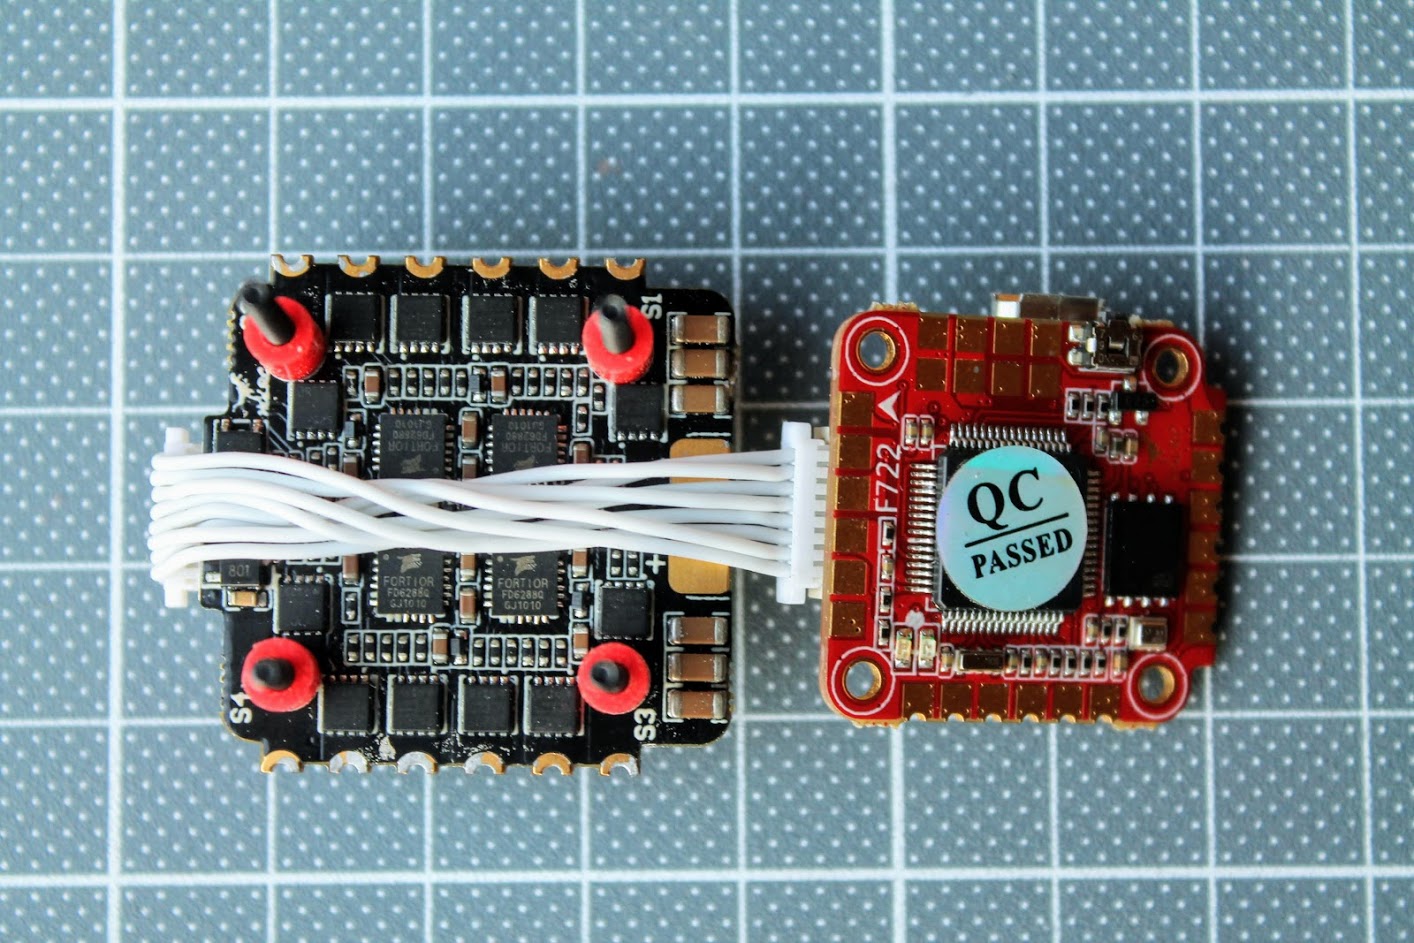
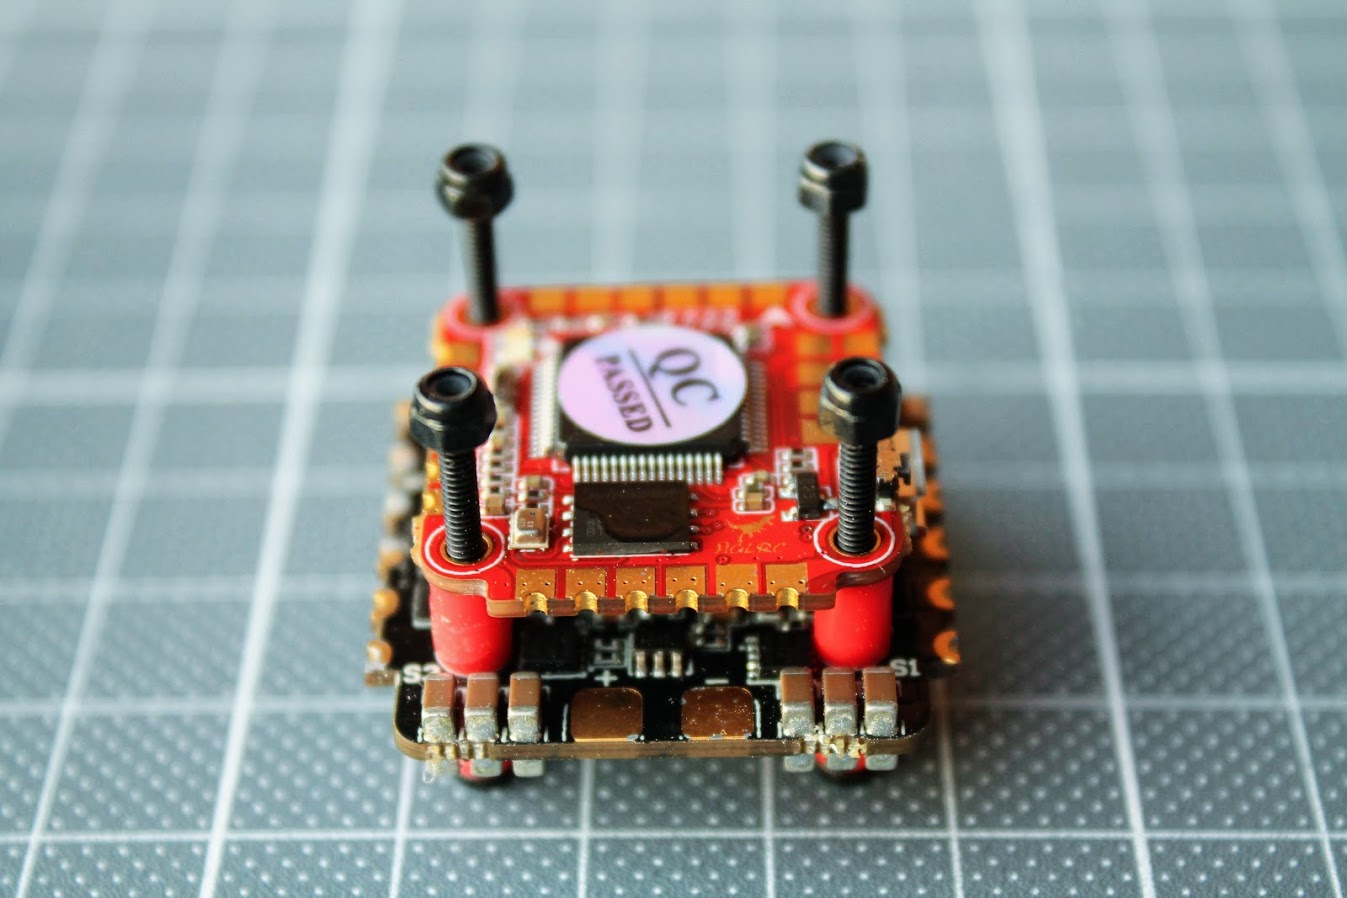
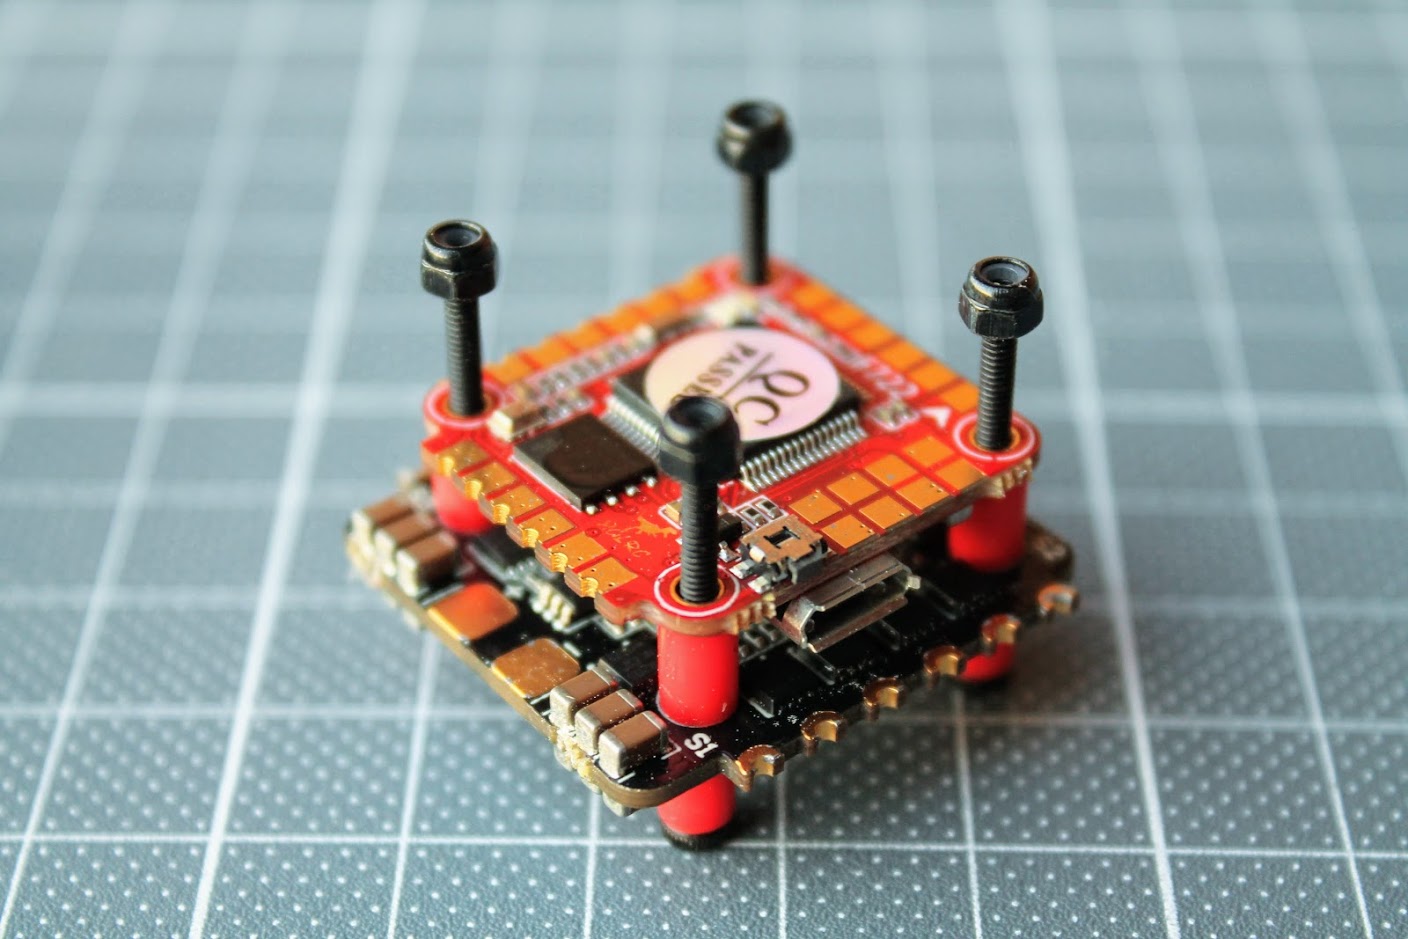
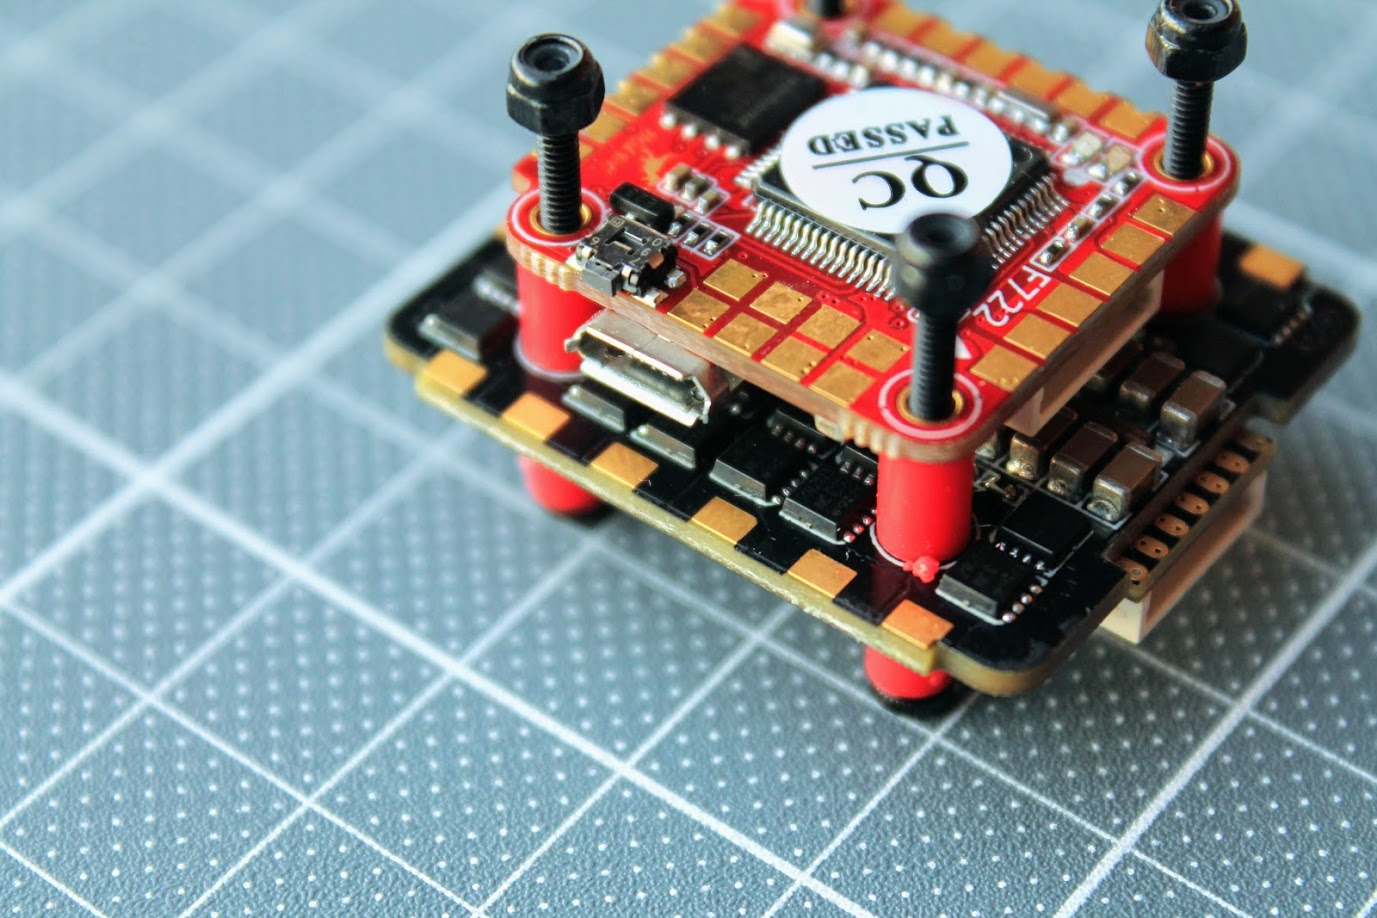
FC and the 4in1 ESC can be connected with 8pin SH1.0 flat cable.
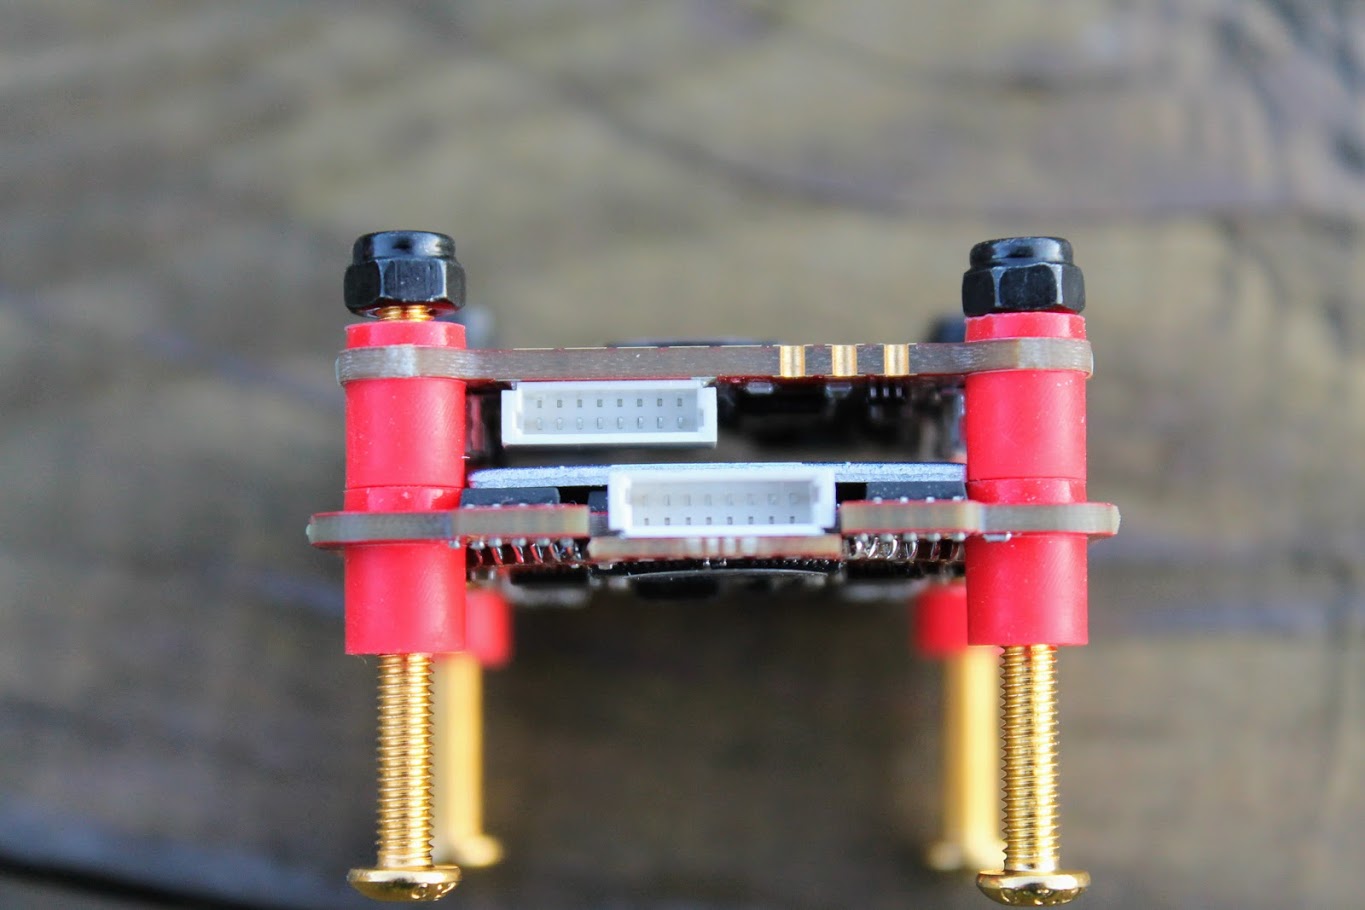
I wish the cable would be shorter. Now its a little too long and just takes up the unnecessary space.
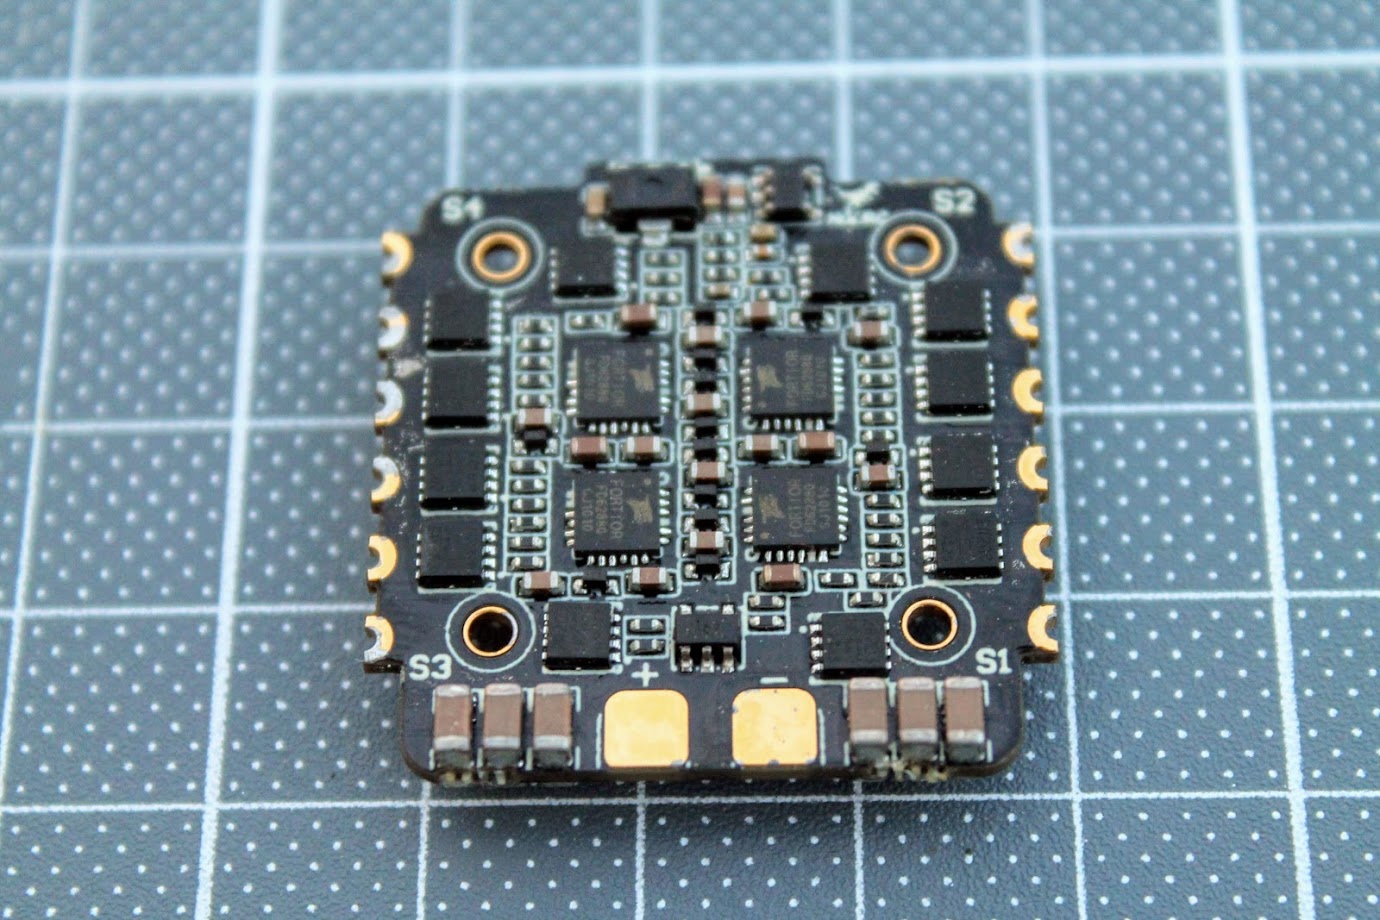
ESC
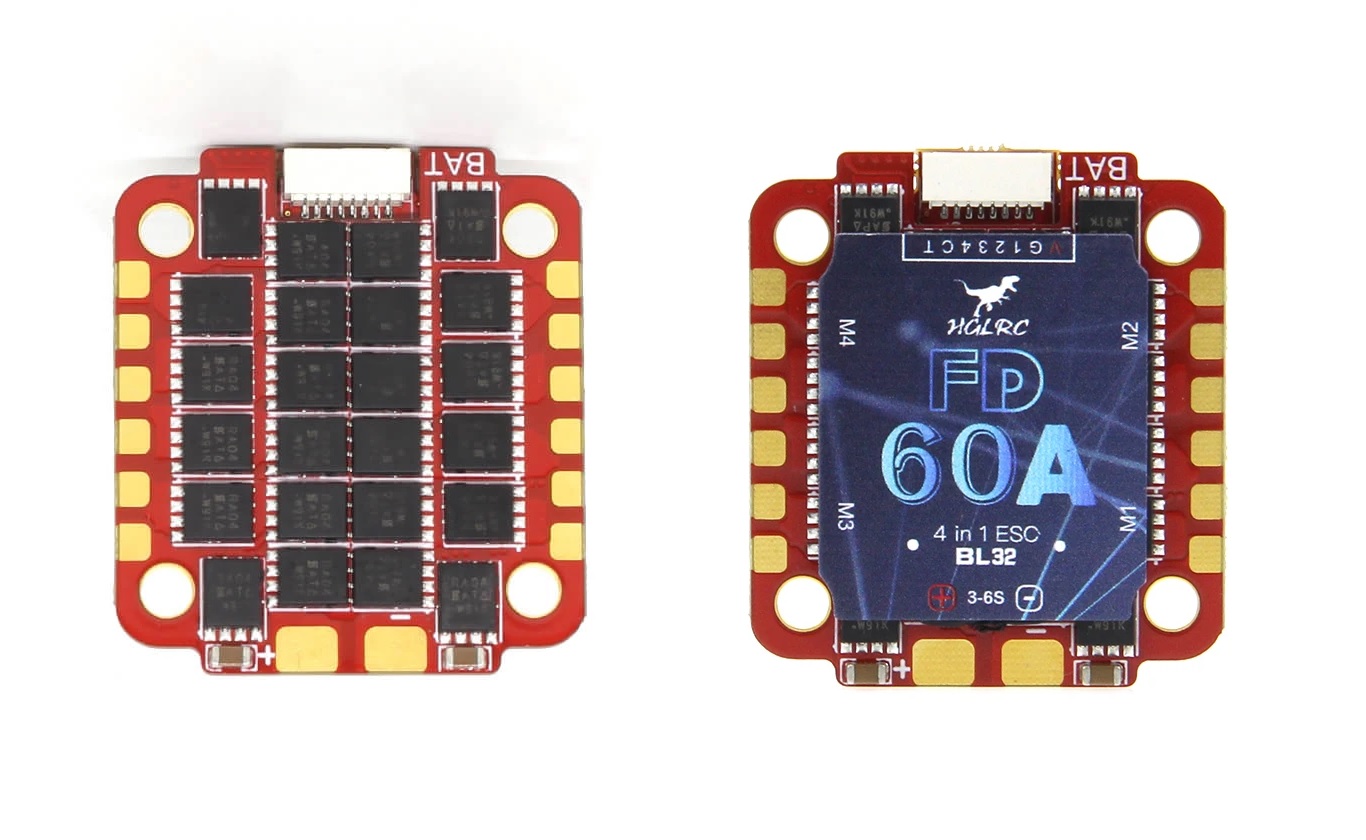
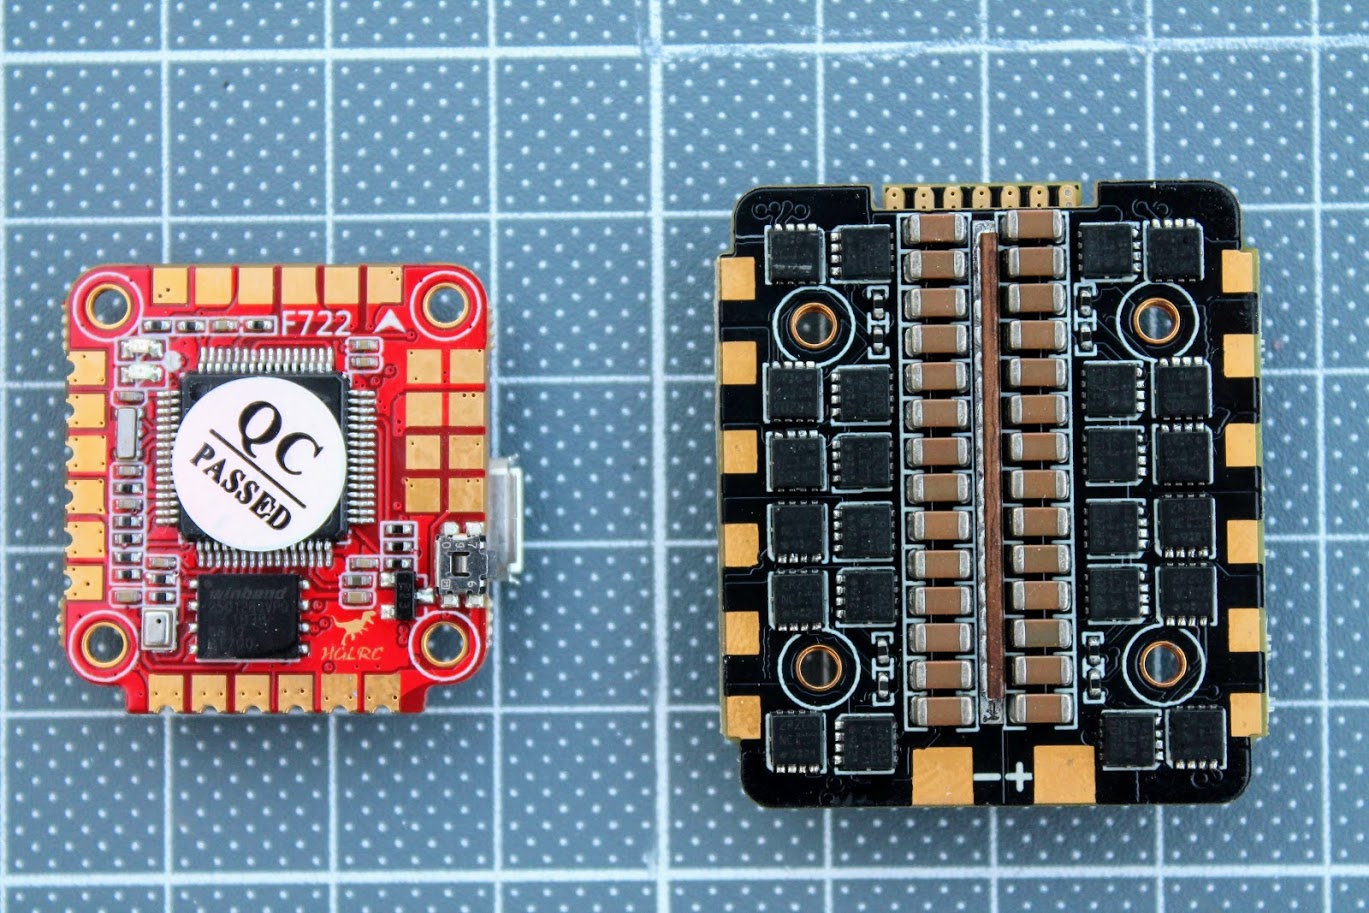
Top side of the HGLRC FD60A 4in1 ESC. There is an aluminum heatsink glued down to the MOSFETS.
On the bottom side of the FD60A 4in1 ESC you can see the ESC control part located on the separate PCB, attached to the main PCB with power MOSFETS. The bottom of the ESC is conformal coated for the water splash resistance.
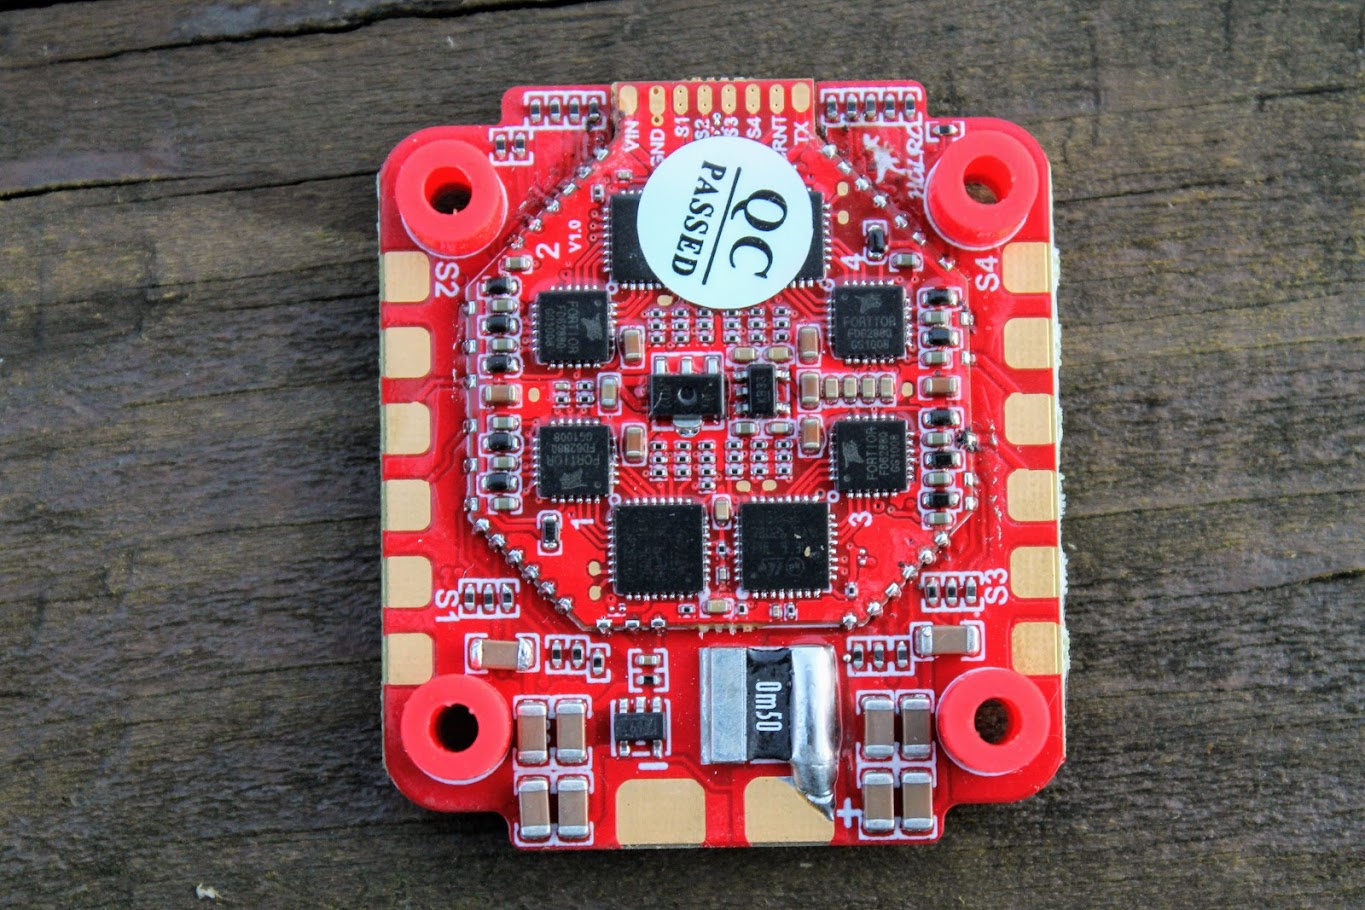
ESC has large pads for battery leads.
HGLRC FD60A ESC has BLHeli_32 firmware and can work with the bidirectional DSHOT ESC protocol for RPM filtering. HGLRC FD60A ESC in fact is the same HGLRC FD55A ESC just with the added heatsink to be able to provide the higher currents.
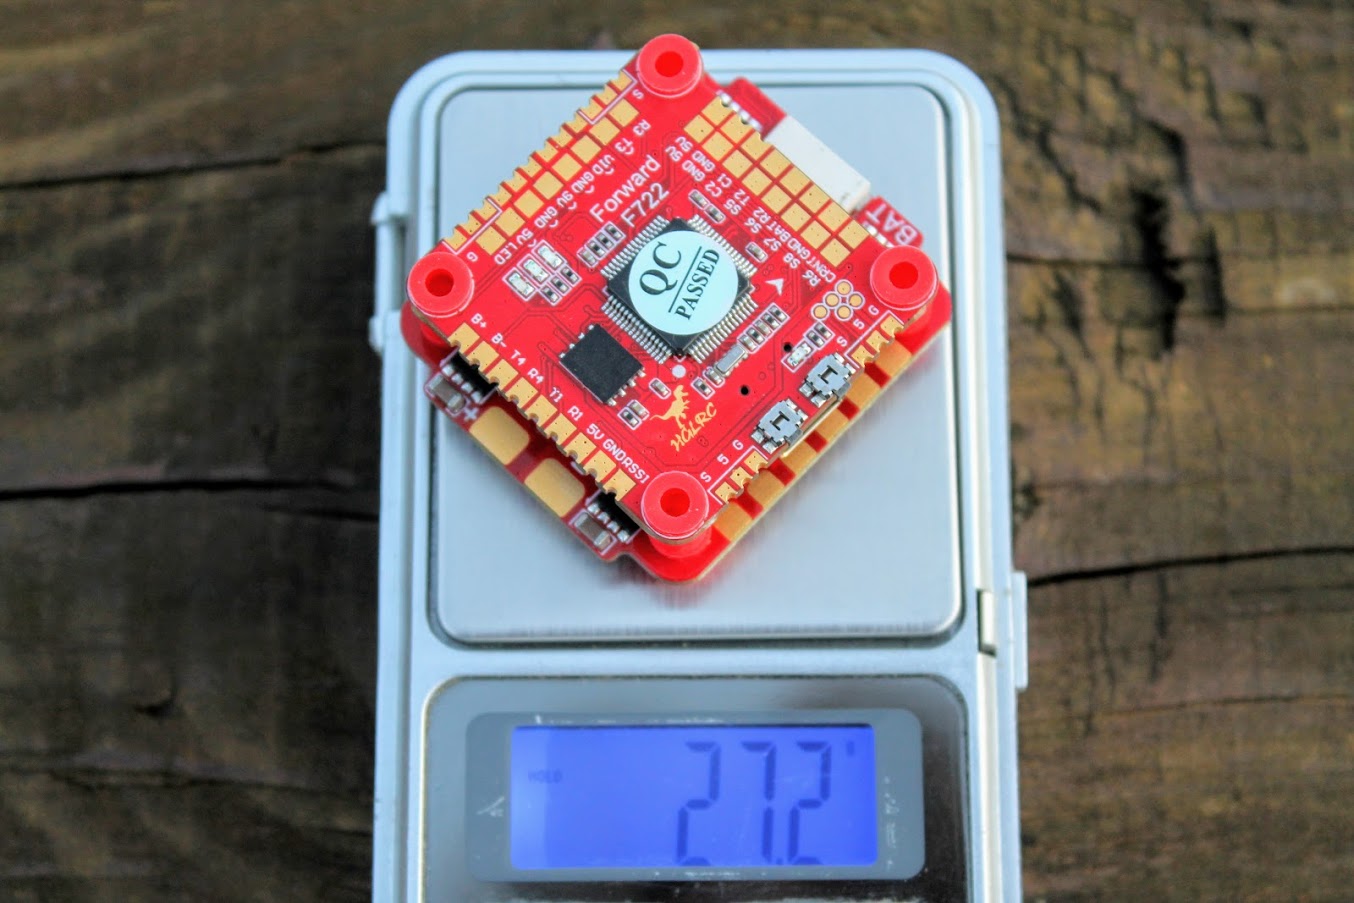
HGLRC FD760 FC and ESC only weight is 27.2g.
FC and ESC weight with supplied screws and lock nuts is 34.5g.
TBS Crossfire nano receiver and TBS Unify Pro 32 Nano VTX mounting option:
HGLRC Zeus (Forward) F722 connection diagram:
HGLRC Zeus F760 User Manual: https://cdn.shopify.cn/s/files/1/2672/8290/files/Zeus_F760_Stack_Manual.pdf
Available @:
Zeus F760 stack:
Banggood: https://www.banggood.com/30_5x30_5mm-HGLRC-Zeus-F760-F7-Flight-Controller-…-1682969.html
Forward FD60A ESC:
HGLRC: https://www.hglrc.com/products/hglrc-forward-60a-3-6s-blheli-32-4in1-esc-for-fpv-racing-drone
]]>
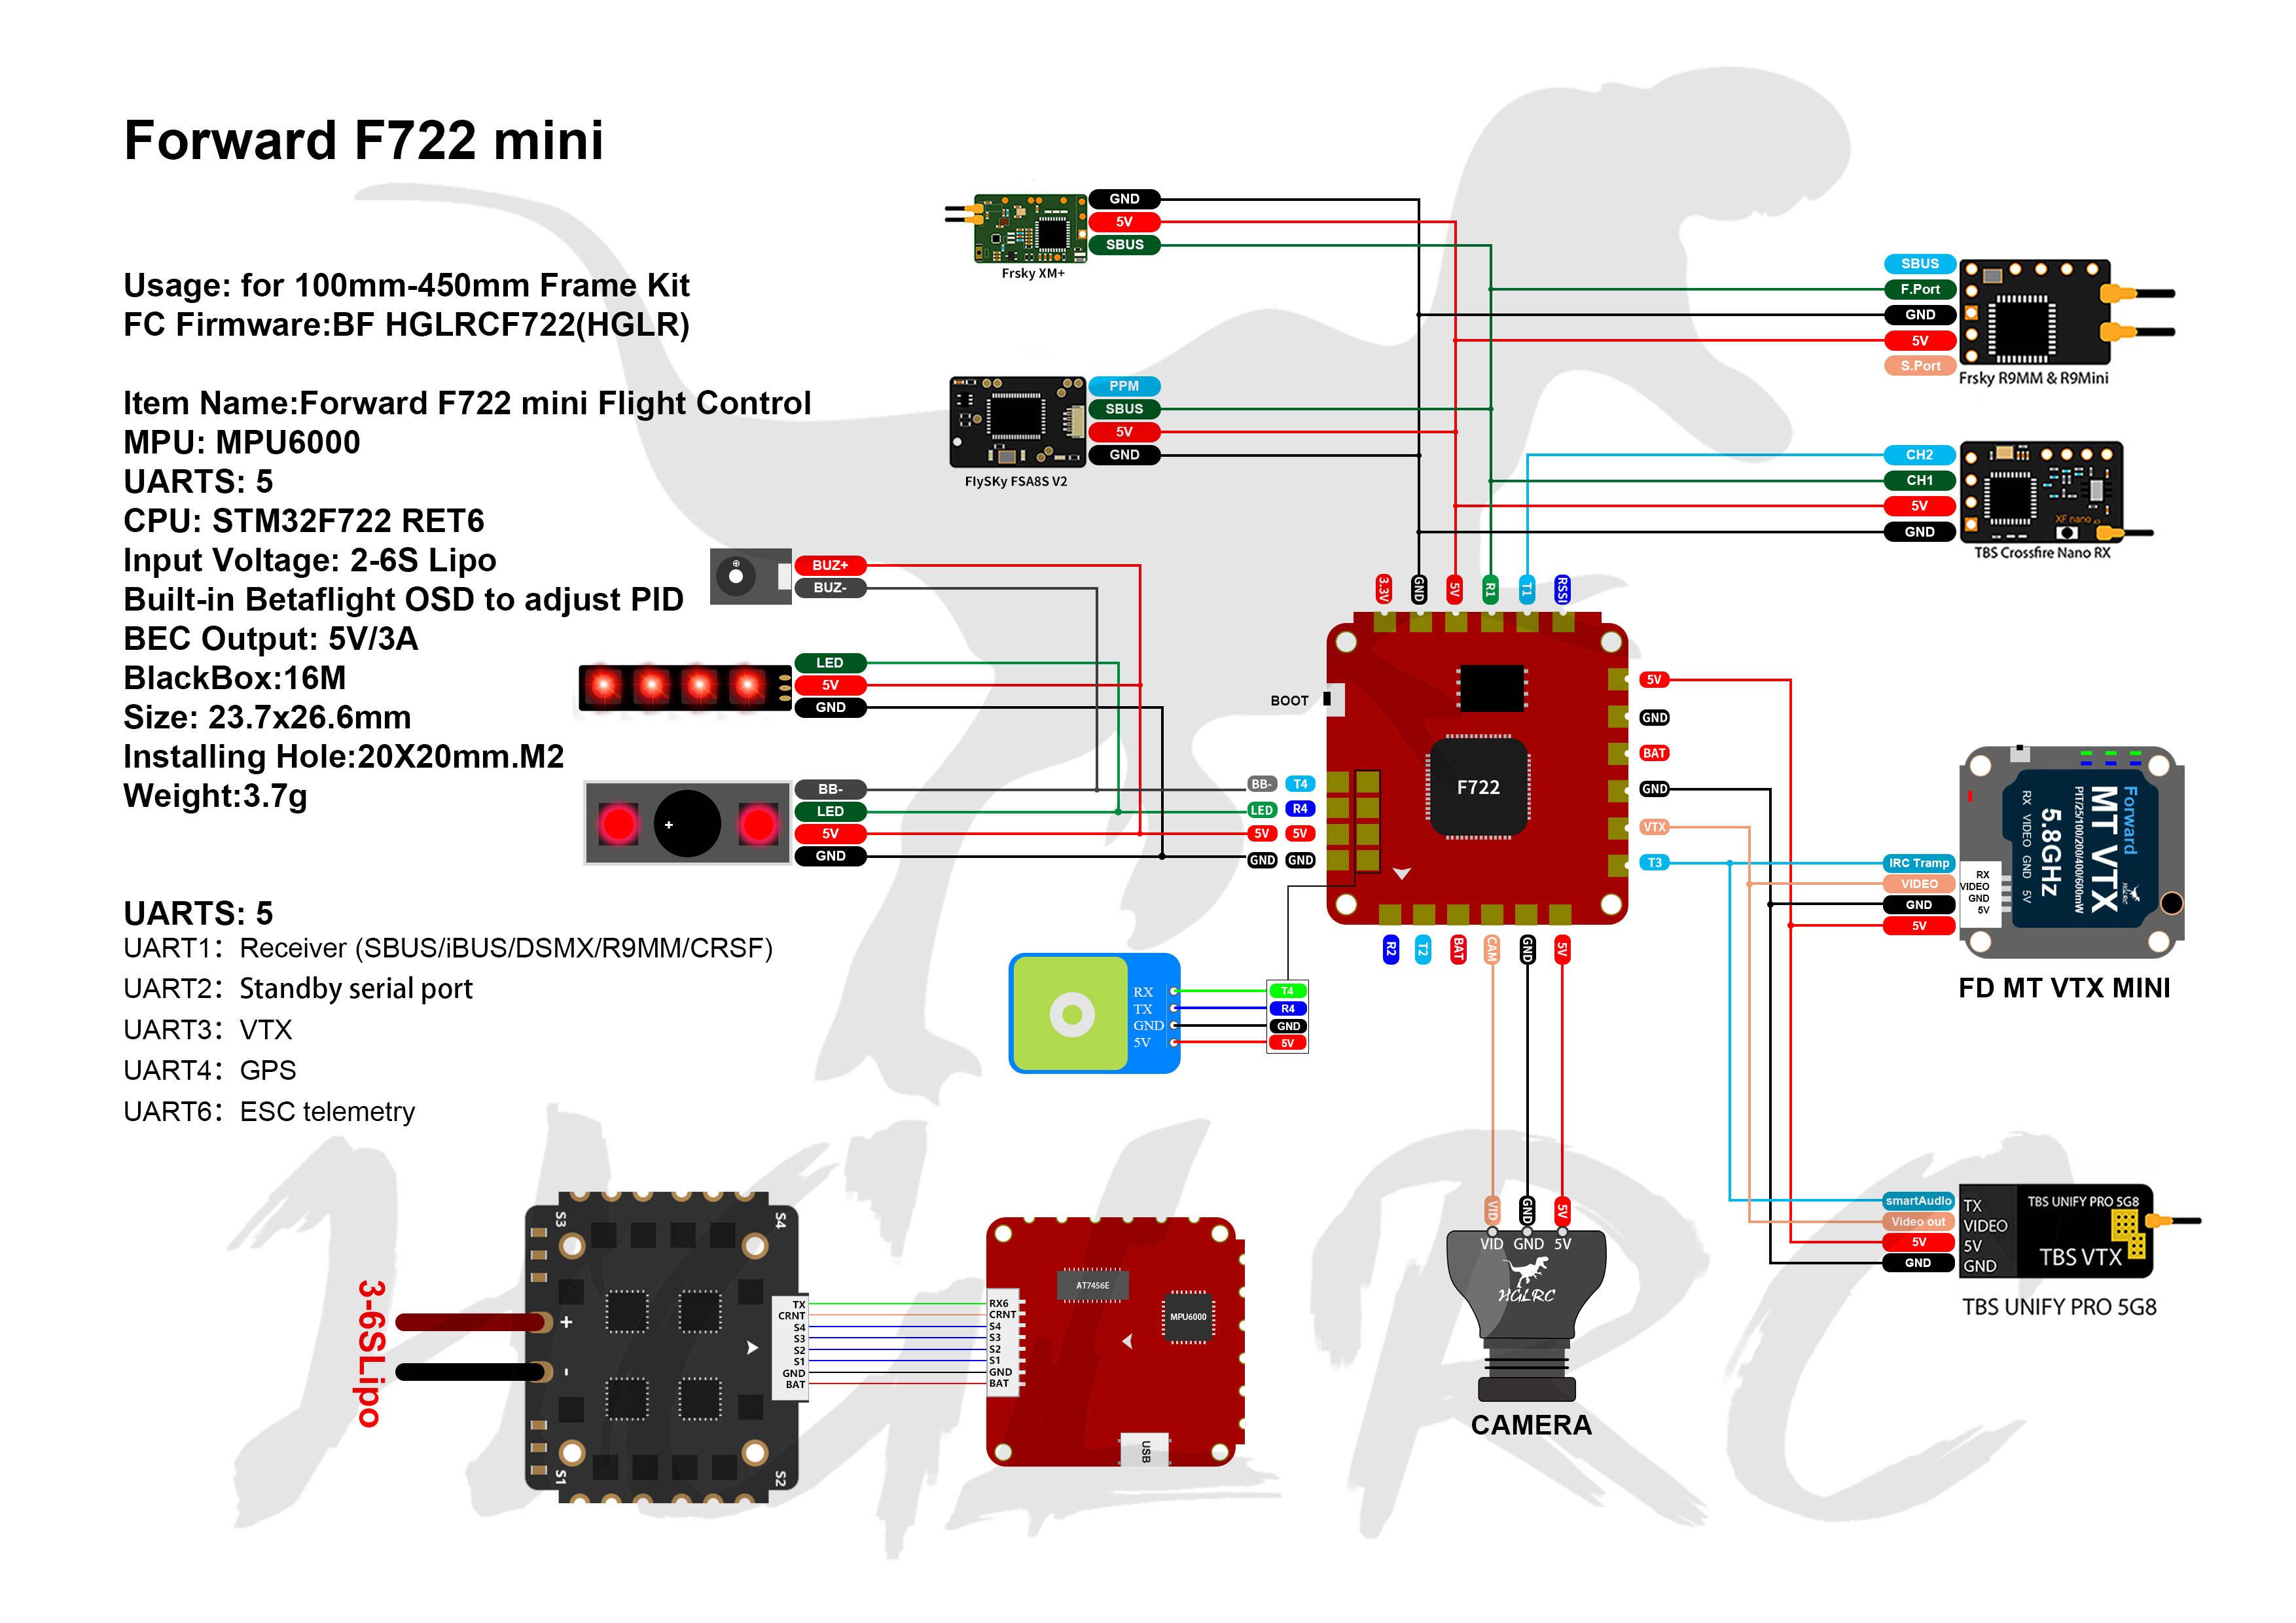
Specifications
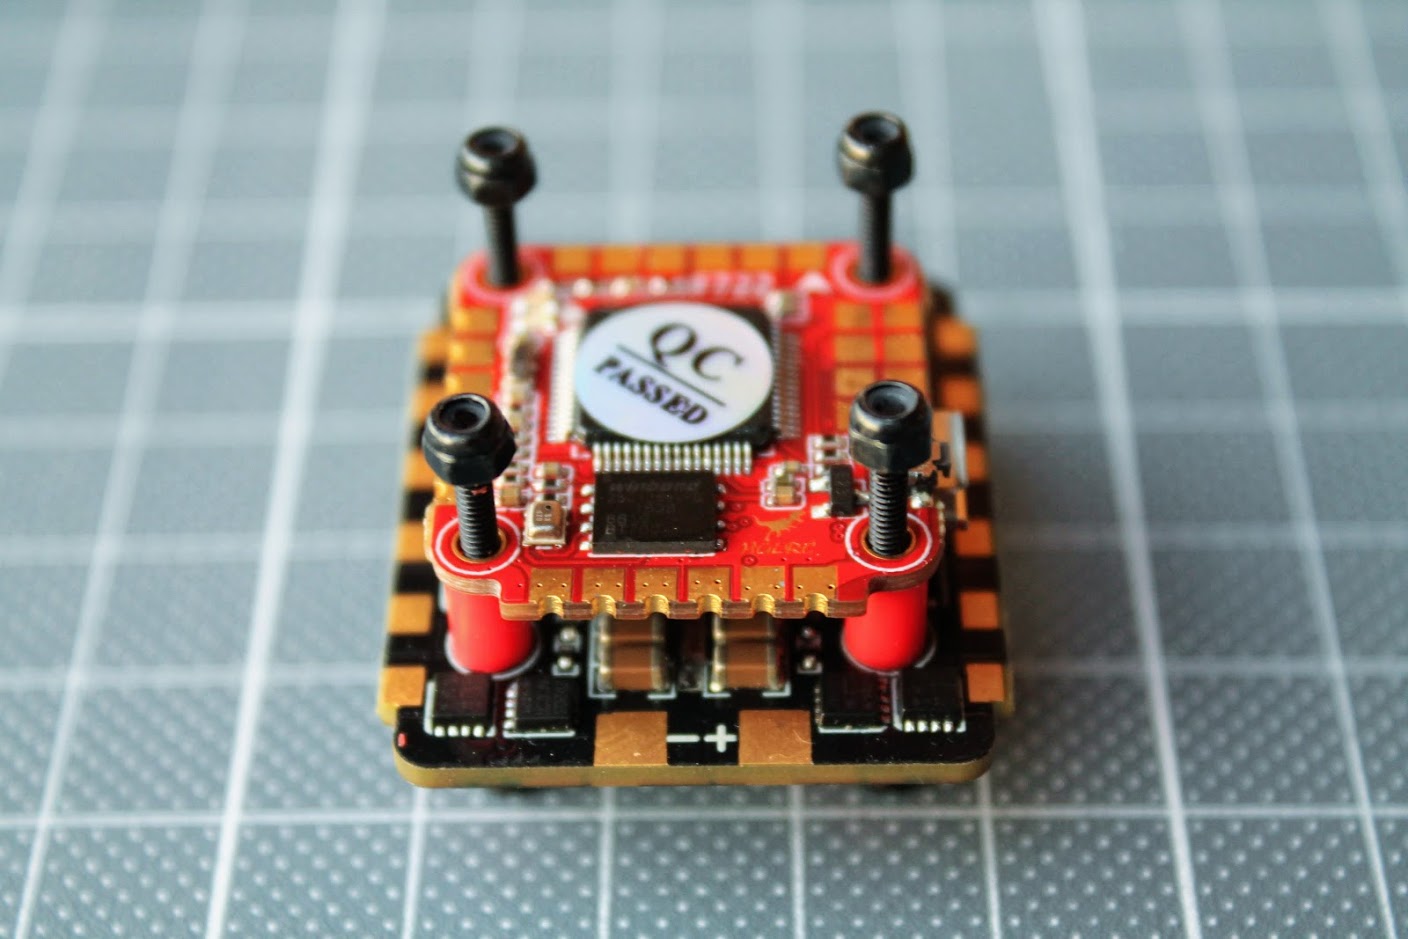
HGLRC F722 mini FC
MPU: MPU6000
UARTS:5
CPU: STM32F722 RET6
Input Voltage: 2-6S Lipo battery
Built-in Betaflight OSD
BEC Output: 5V/3A
BlackBox: 16M
Size: 23.7×26.6mm
Installing Hole: 20X20mm. M2
Weight:3.7g
HGLRC FD35A 4in1 ESC
CPU: STM32F051
Input Voltage: 3-6S Lipo battery
Steady Current: 35A
Peak Current: 40A (10 Sec)
Firmware: BLheli_32
Installing Hole: 20x20mm, M2
Weight: 6.5g
HGLRC FD45A 4in1 ESC
CPU: STM32F051
Input Voltage: 2-6S Lipo battery
Constant Current: 45A-4S / 35A-6S
Peak Current: 55A (5s)
BEC Ouput: NO
Firmware: BLheli_32
Size: 31.7×36.5mm
Installing Hole: 20x20mm, M2
Weight: 10.8g
HGLRC Zeus F735
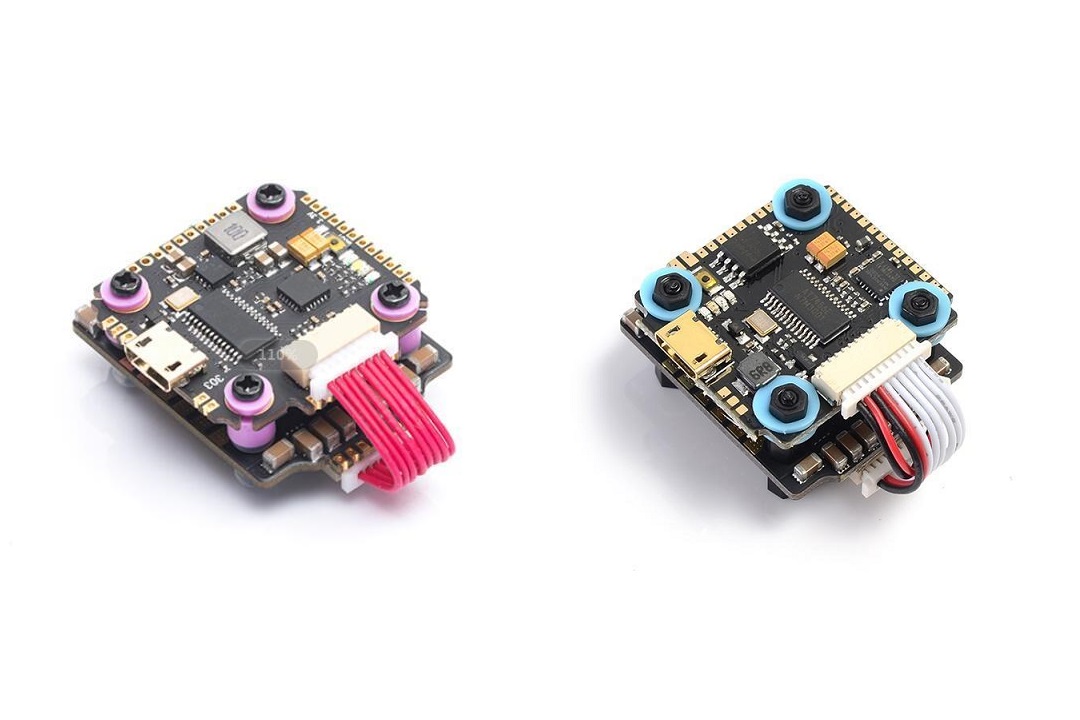
Zeus F735 package contains F722 mini FC, FD35A 4in1 ESC, 1000uF 35V and 220uF 35V capacitors, XT30 pigtail with 18AWG silicon wire, XT60 plug with 14AWG wire, 8pin SH1.0mm connection cable, 25mm long 2mm diameter metal screws and nuts and dampening silicon rubber spacers. There is a 2.54mm pin headers included for direct soldering of the receivers to FC.
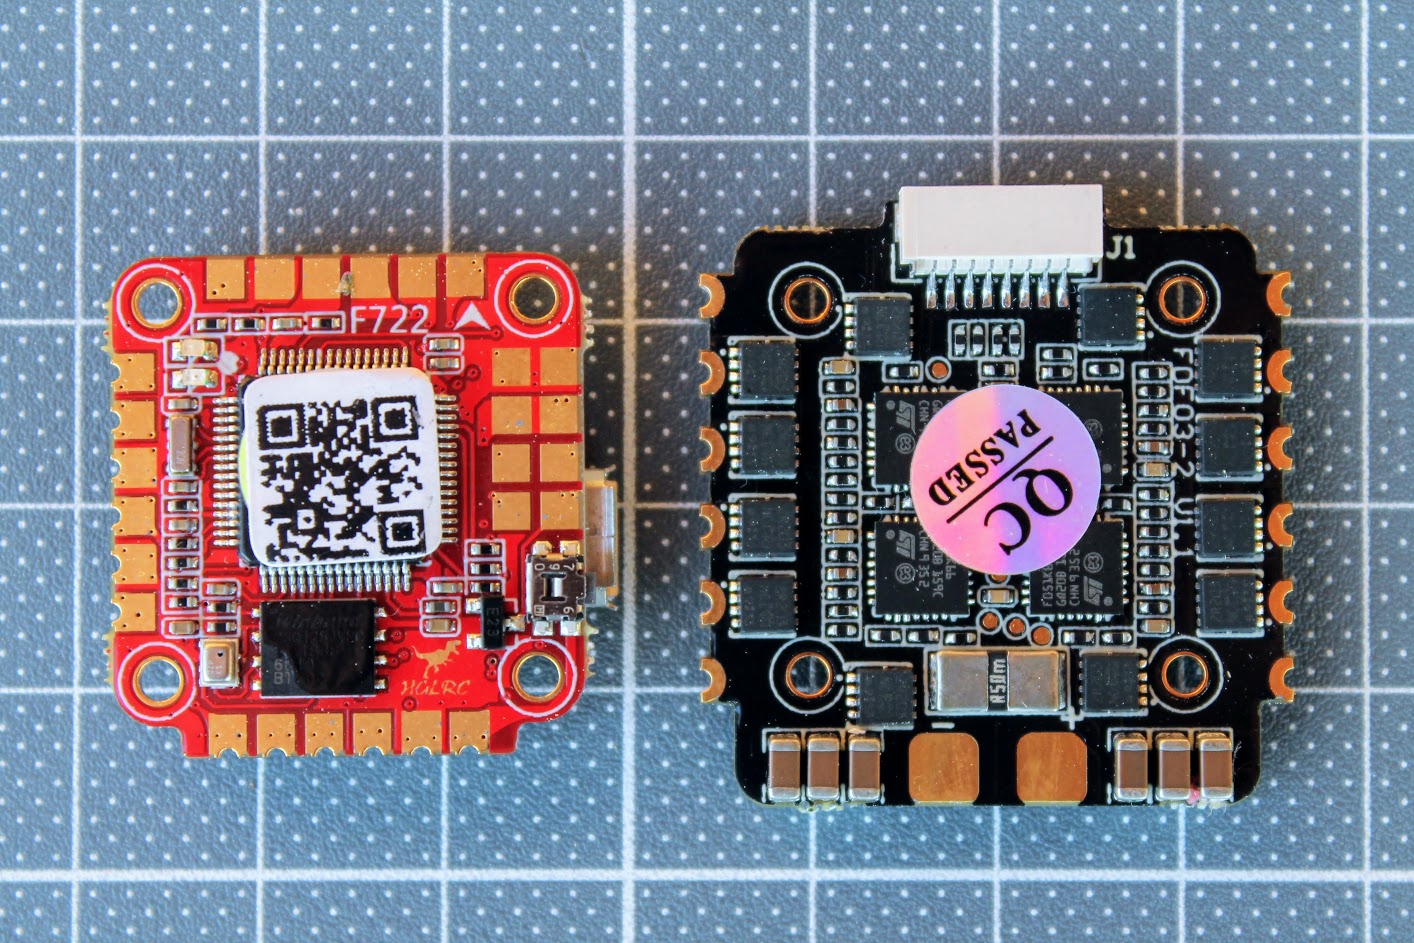
HGLRC F722 mini flight controller has F722 MCU with 5 UART ports available. However UART ports 3 and 6 are reserved for VTX control and ESC telemetry respectively, so in reality you have 3 full UART ports available. That’s enough for almost any configuration.
The F722 mini flight controller is covered with conformal coating. This adds some moisture resistance. Flight controller has really big solder pads that makes really easy to solder the wires to them. Most of the pads have vias (small through holes), these help to keep the pads from tearing away when they are overheated while soldering.
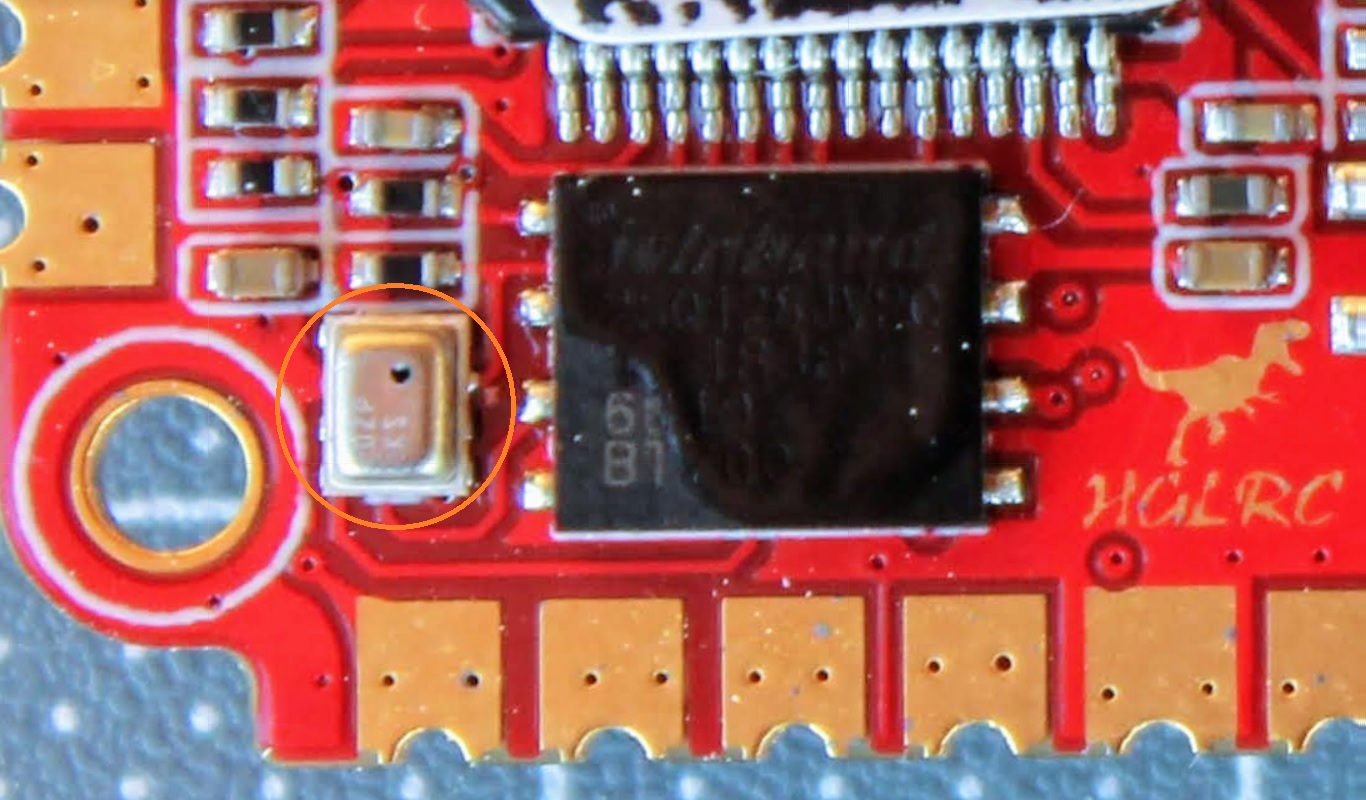
F722 mini FC has barometer installed on the board.
HGLRC F722 mini and FD35 4in1 ESC have 20x20mm pattern M2 diameter mount holes.
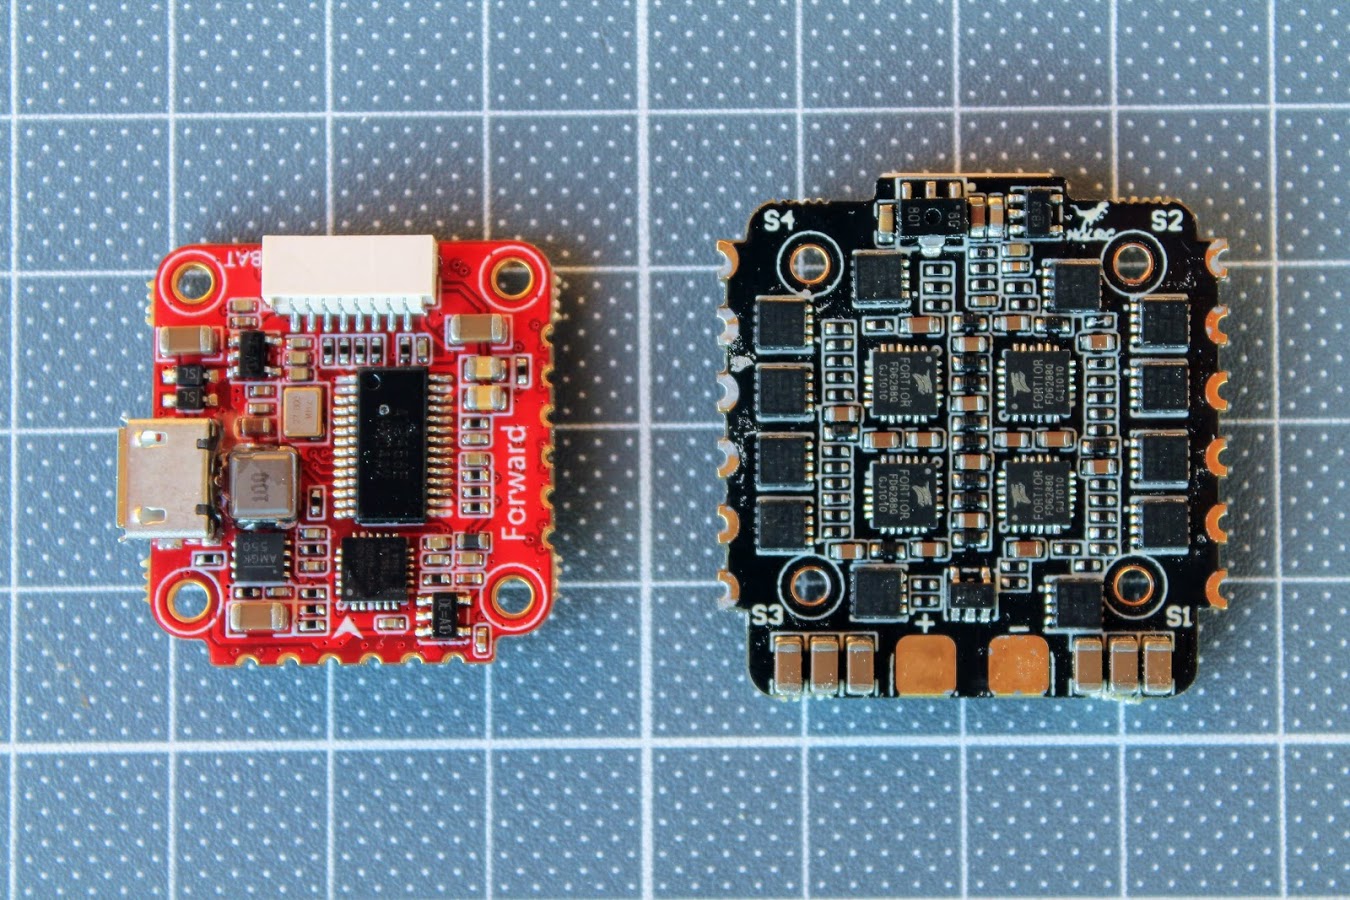
Stack includes the FD35 4in1 ESC. The same ESC is used in the HGLRC FD435 stack .
Forward FD35A ESC has arc curved solder pads that are convenient for soldering the ESC wires vertically.
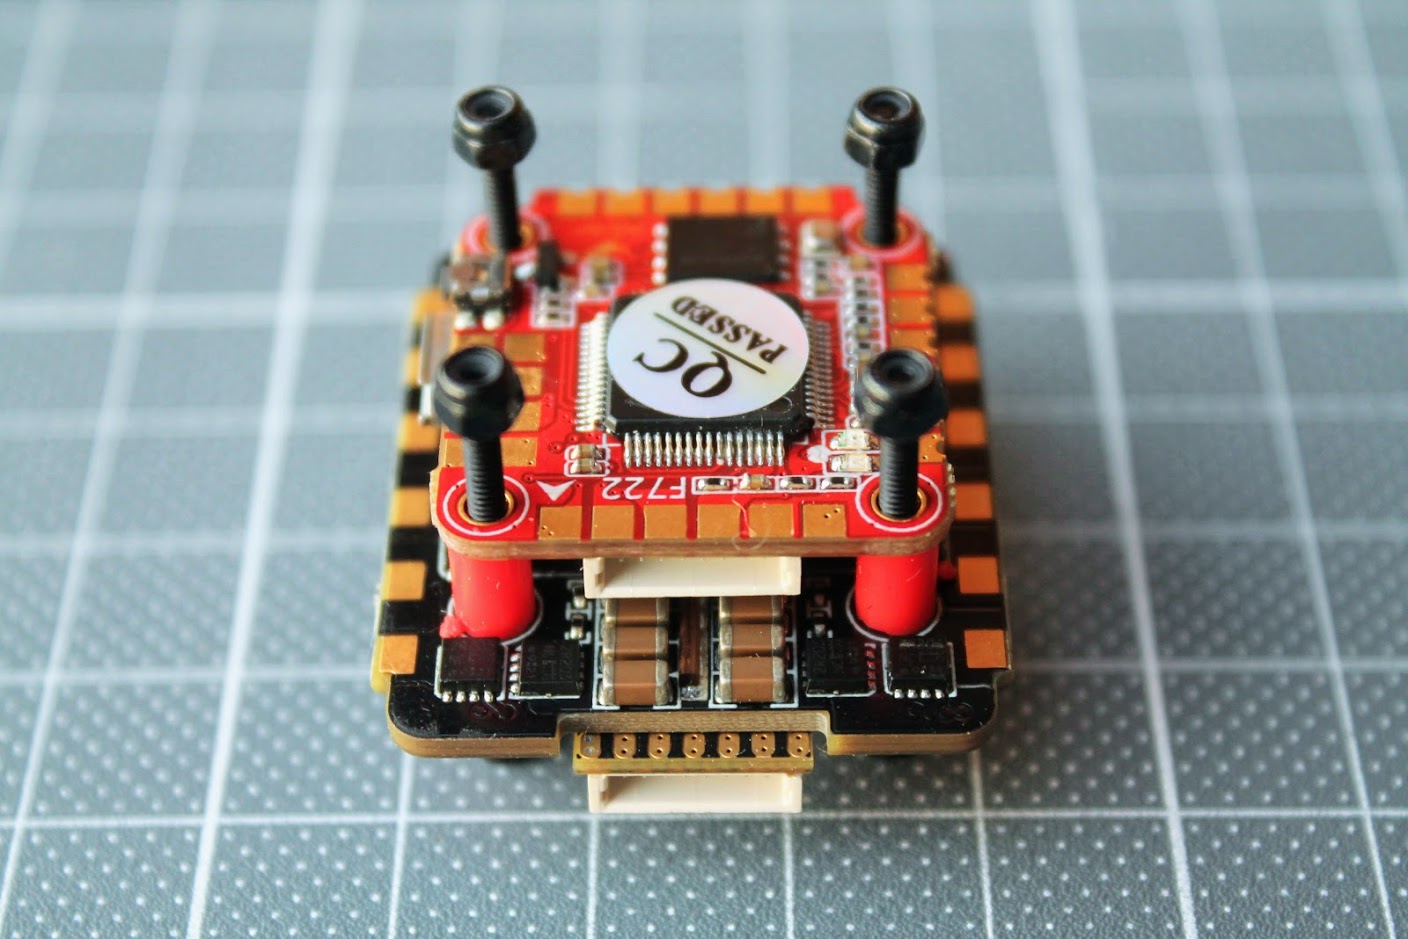
There are SH1.0mm 8pin sockets for connection cable between the FC and ESC. This should make the installation quick and easy.
However the included cable is more than 4cm long and even must be cross twisted thus takes up a lot of space and is challenging to make a clean build.
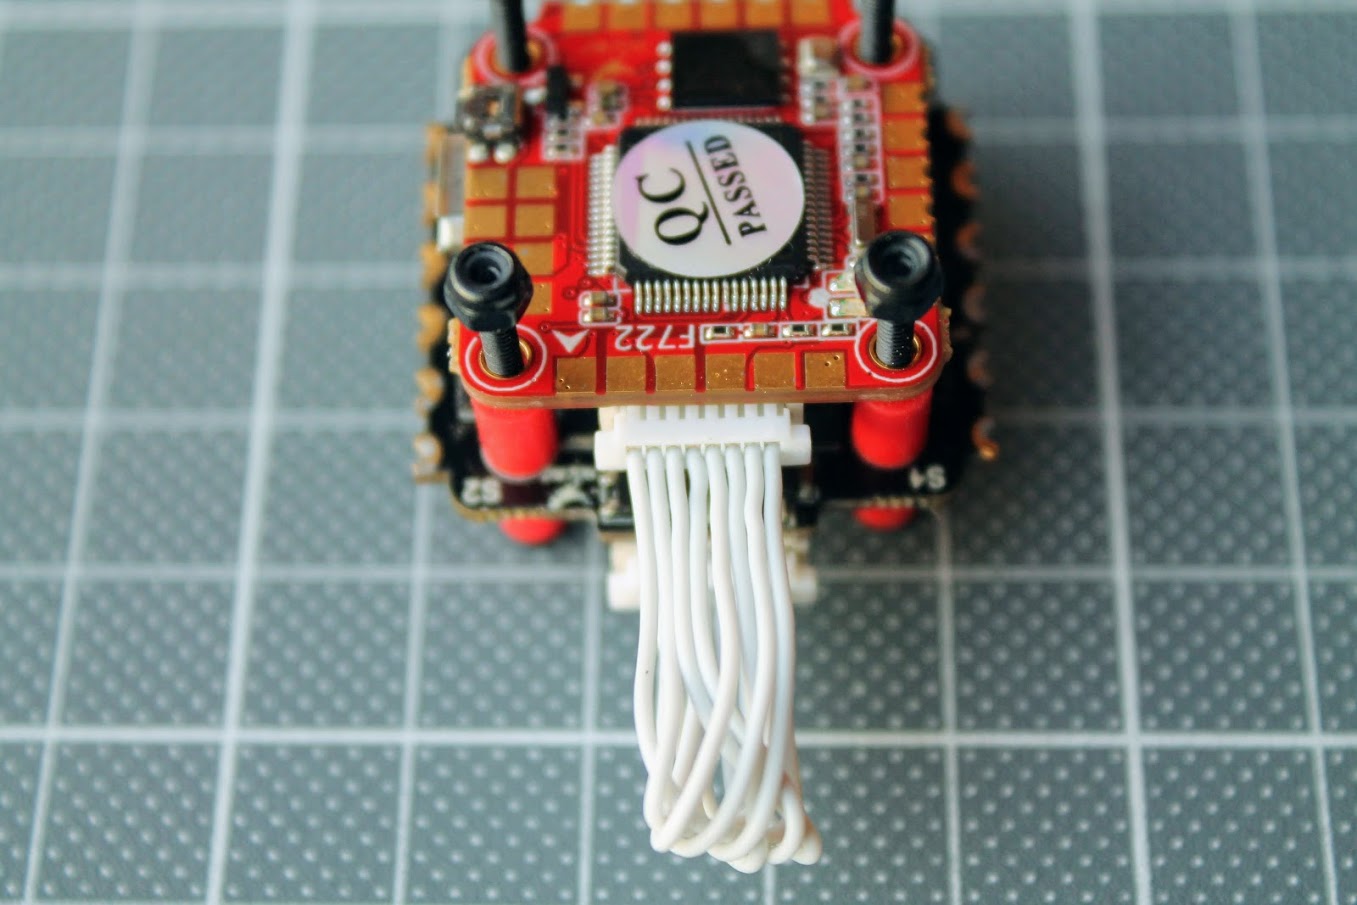
I wish HGLRC could make this cable only 1,5cm long and make it connect straight forward for the perfect fit. As an example how Diatone does with their stack wires.
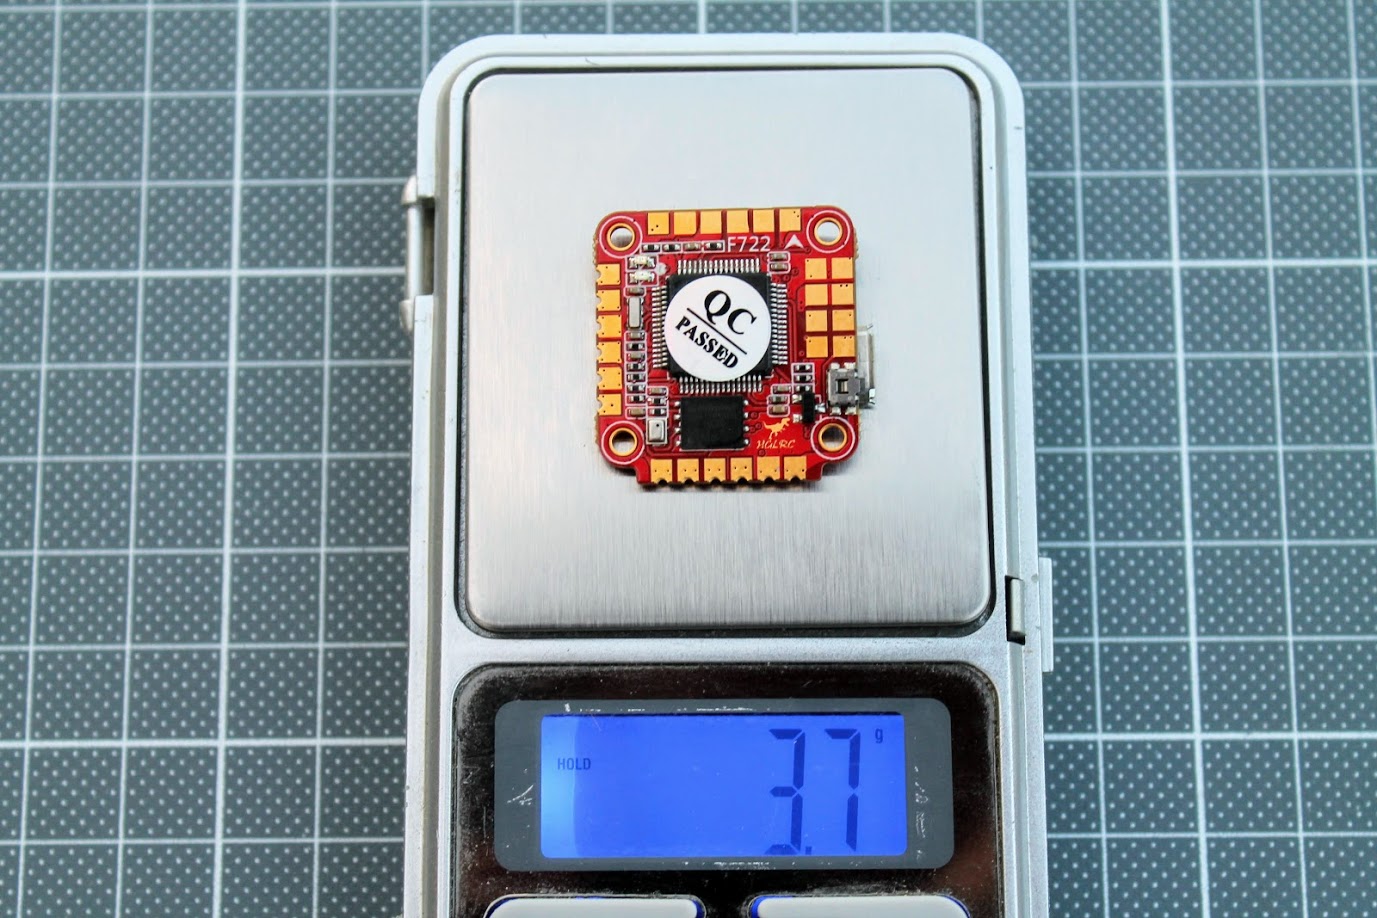
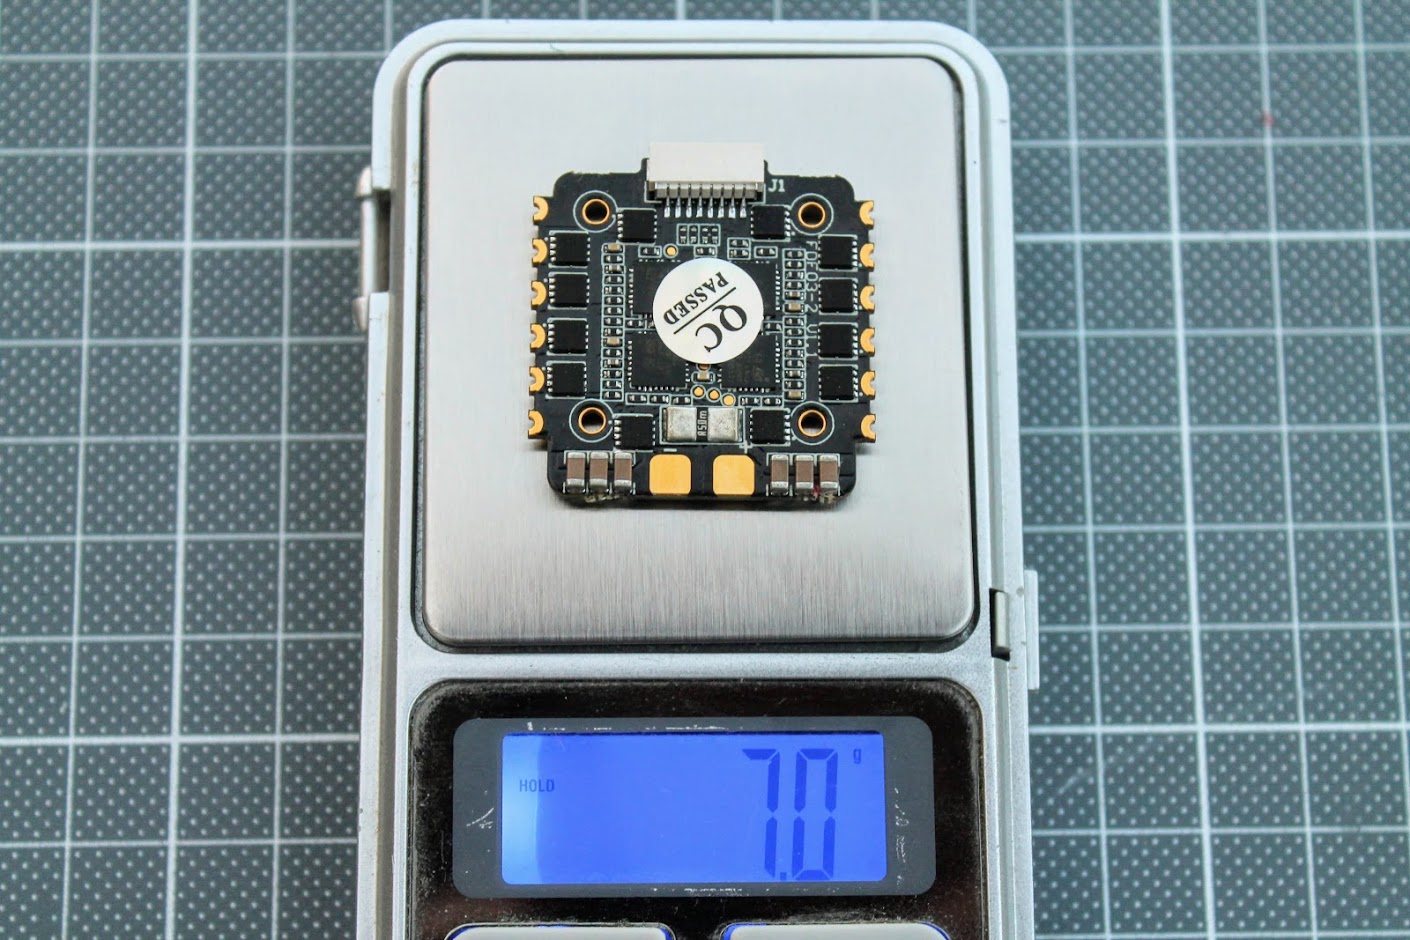
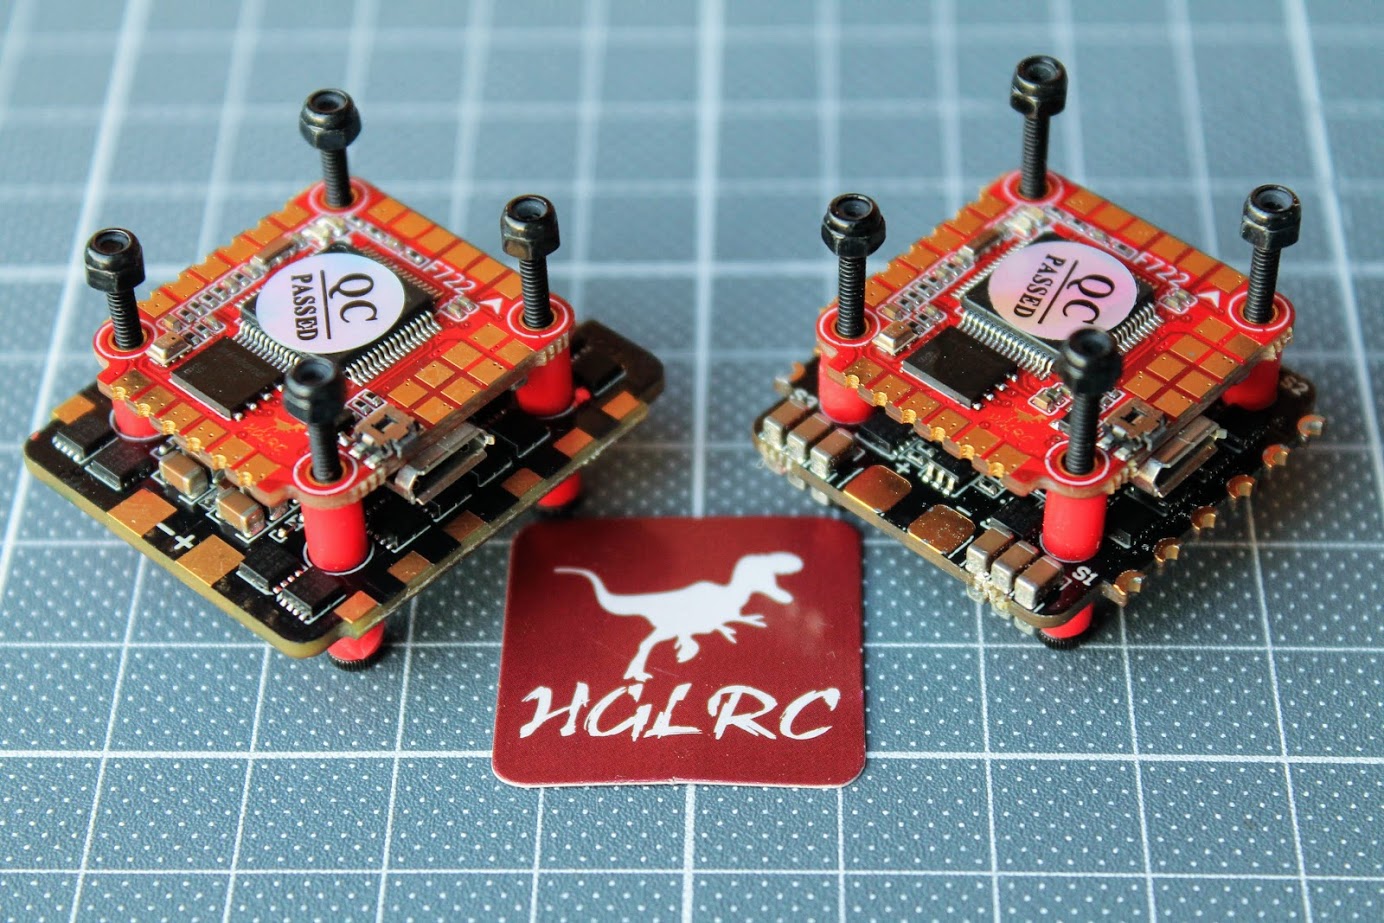
The HGLRC F722 mini FC weights only 3.7 grams.
The HGLRC FD35A 4in1 ESC weights 7 grams.
Whole stack weights 14.7 grams including the wires and metal screws.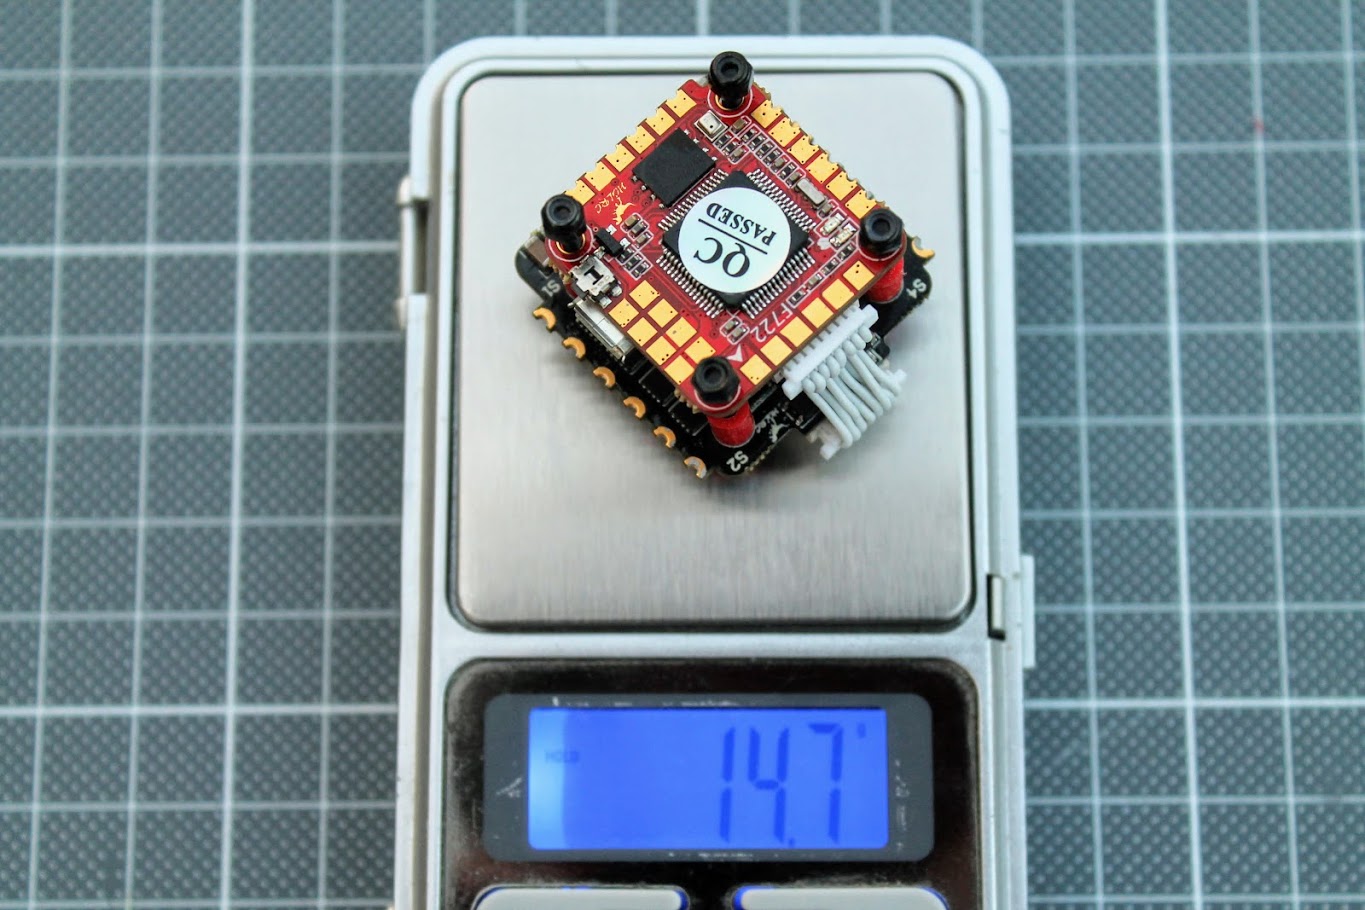

HGLRC Zeus F745
Zeus F745 package contains F722 mini FC, FD45A 4in1 ESC, 1000uF 35V and 220uF 35V capacitors, XT30 pigtail with 18AWG silicon wire, XT60 plug with 14AWG wire, 8pin SH1.0mm connection cable, 25mm long 2mm diameter metal screws and nuts and dampening silicon rubber spacers. There is a 2.54mm pin headers included for direct soldering of the receivers to FC.
Zeus F745 stack has the same F722 mini FC and the more powerful FD45A 4in1 ESC. The ESC size is 36.5×31.7mm, so it is bigger than usual 20x20mm board. Notice that ESC has double PCB style – the power switching part is on the one PCB and the FET commutation logic part is separated on the second PCB. This allows to make bigger power lines for larger currents and maximizes thermal dissipation.
ESC has two arrays of the ceramic capacitors for the filtering and voltage stabilization.
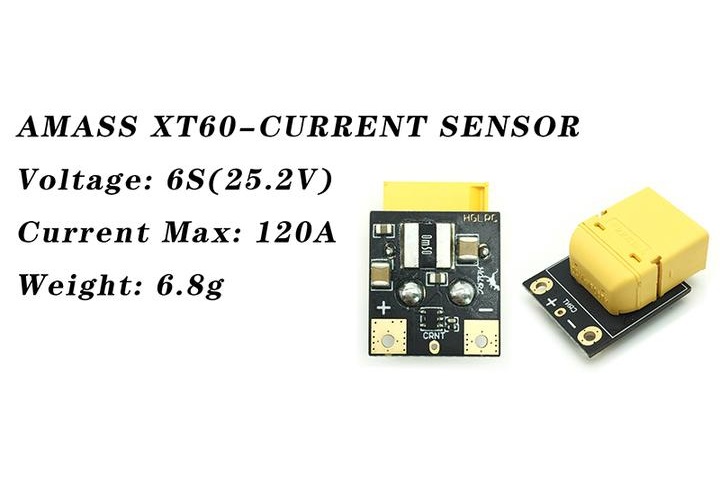
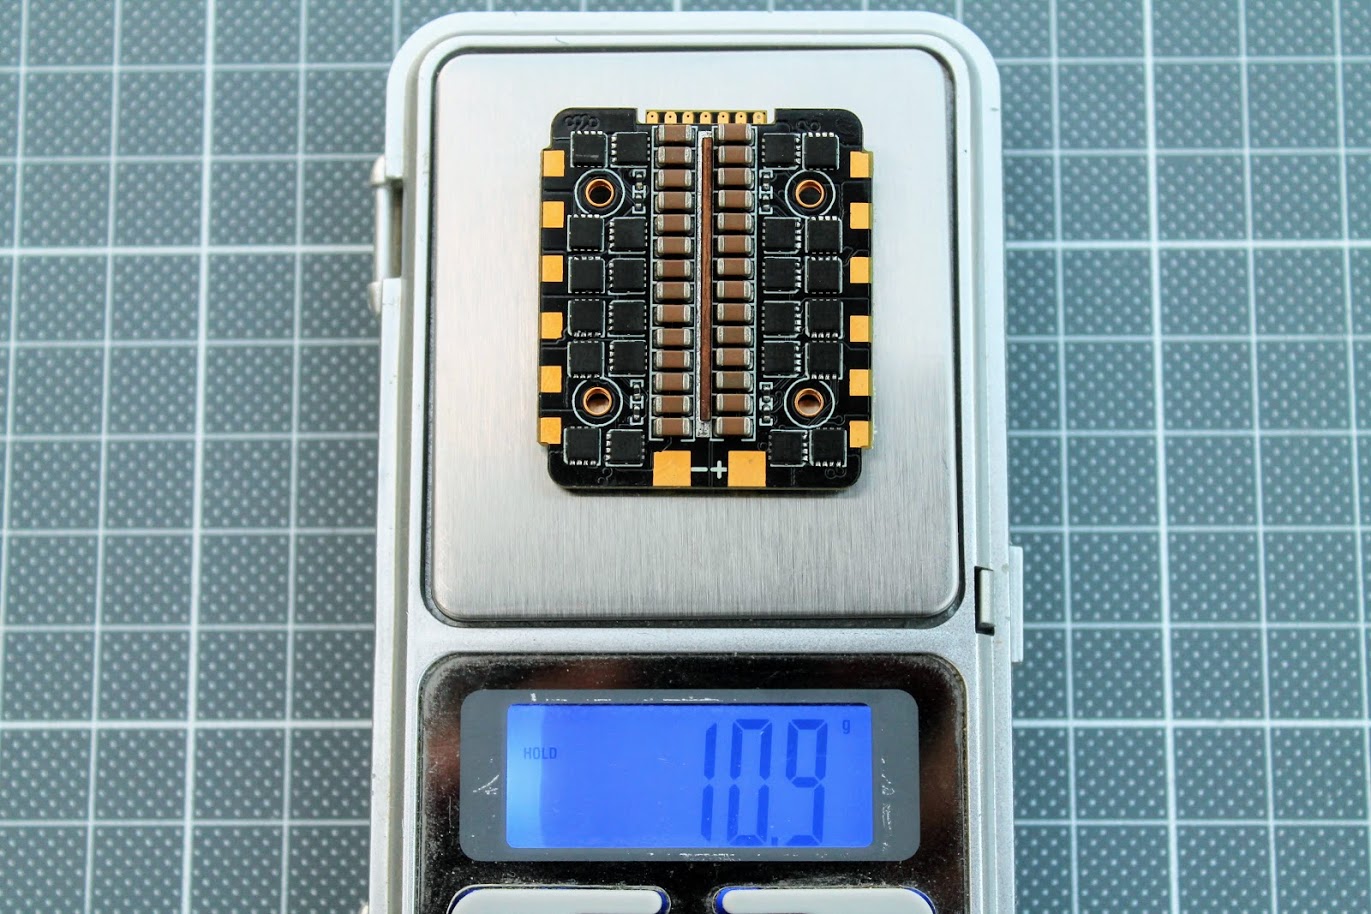
However you can notice that FD45 ESC does not have current sensor, so you will need the special XT60 connector with integrated current sensor if you want to have the amp reading on your OSD or Blackbox logs.
The weight of the FD45 4in1 ESC is 10.9 grams. It obviously weights more than 35A version because of the thicker and bigger PCB.
The weight of the complete stack is 18.8 grams including the metal screws, nuts and cable. 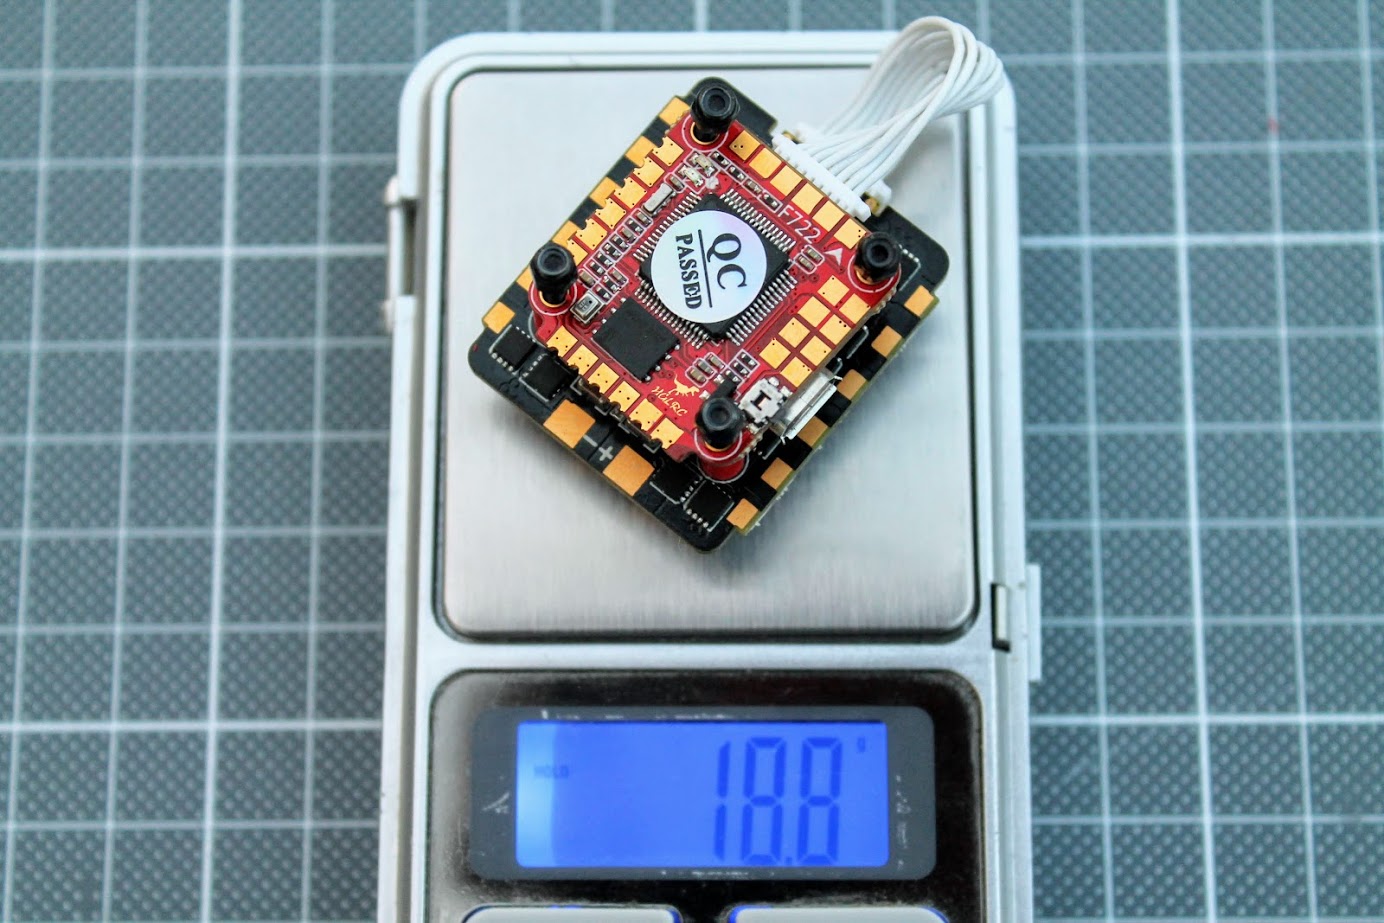
HGLRC Forward FD45 ESC has big motor pads on the top side of the ESC board.
Setting up the HGLRC F735 and F745
Both stacks use the same F722 mini flight controller, so the configuration procedures are the same for both stacks.
Port definitions:
UART1 is for receiver input (SBUS, iBUS)
UART2 is free
UART3 is for VTX Betaflight control
UART4 is free (GPS or other peripherals)
UART6 is for ESC telemetry
HGLRC F722 mini Flight controller user manual: https://cdn.shopify.com/s/files/1/2672/8290/files/F722_mini.pdf
HGLRC F722 mini connection diagram:
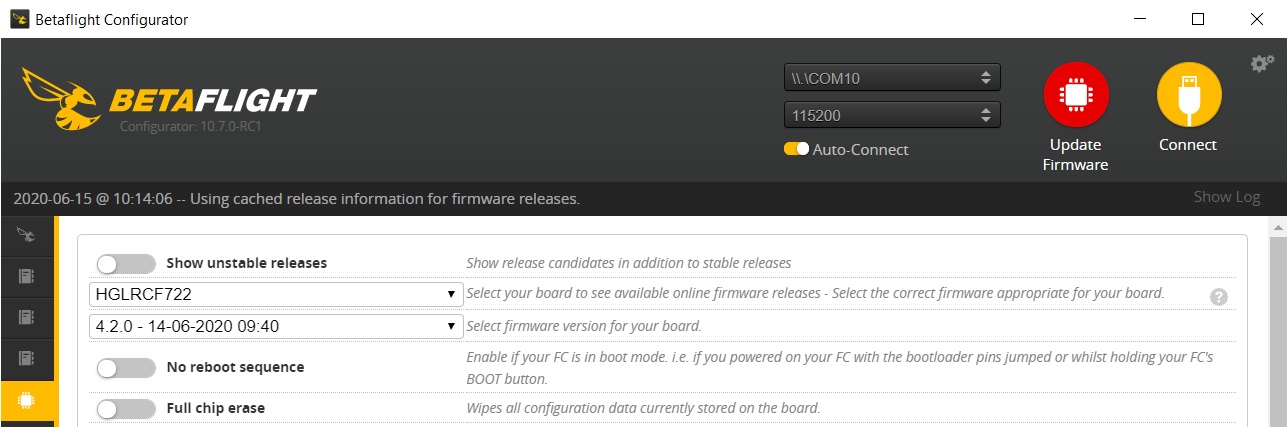
If you will need to upgrade firmware, then HGLRC F722 mini FC Betaflight target is HGLRCF722 or HGLRCF722(HGLRC) if using BF higher than 4.0.
Conclusions and final thoughts
HGLRC Zeus F735 and F745 stacks are the combination of the already known and proven FD35A and FD45A 4in1 ESC and the newest HGRC F722 mini flight controller. F722 MCU, used in this FC, ensures that you will have a lot of room for the processing power and the MCU support will not be discontinued in the nearest future (as it was done with F3 MCU and F4 MCU days are going to the end inevitably). HGLRC F722 mini flight controller has no problems with the UART inversion (as F4 MCU has), so you can be sure that any receiver will work with this FC (FrSky, Flysky, TBS Crossfire & others). It even has header pins for direct soldering of the popular XM+ or TBS Crossfire Nano receivers. Flight controller also has big pads for easy soldering, conformal coating for moisture protection. HGLRC managed to fit the Barometer and 16Mb blackbox flash memory into this F722 mini flight controller.
HGLRC Zeus F735 is the cheapest F7 mini stack on the market and the F745 stack is on sale for only $45.59 plus you’ll get 4pcs of free arm led strips!
HGLRC:
Banggood:
Zeus F735: https://www.banggood.com/search/hglrc-f735.html?from=nav
Zeus F745: https://www.banggood.com/search/hglrc-f745.html?from=nav
Disclaimer: This item was supplied by HGLRC for a fair and unbiased review. HGLRC never asked for a positive review and never influenced my opinion in any way. I’m trying my best to stay uninfluenced and give only my own opinion. All affiliate links if there are any help me purchase items for future reviews and tests.
]]>Total motors thrust is about 4.14 Kg and the thrust to weight ratio is about 16.8! Weight without battery is only 146g.


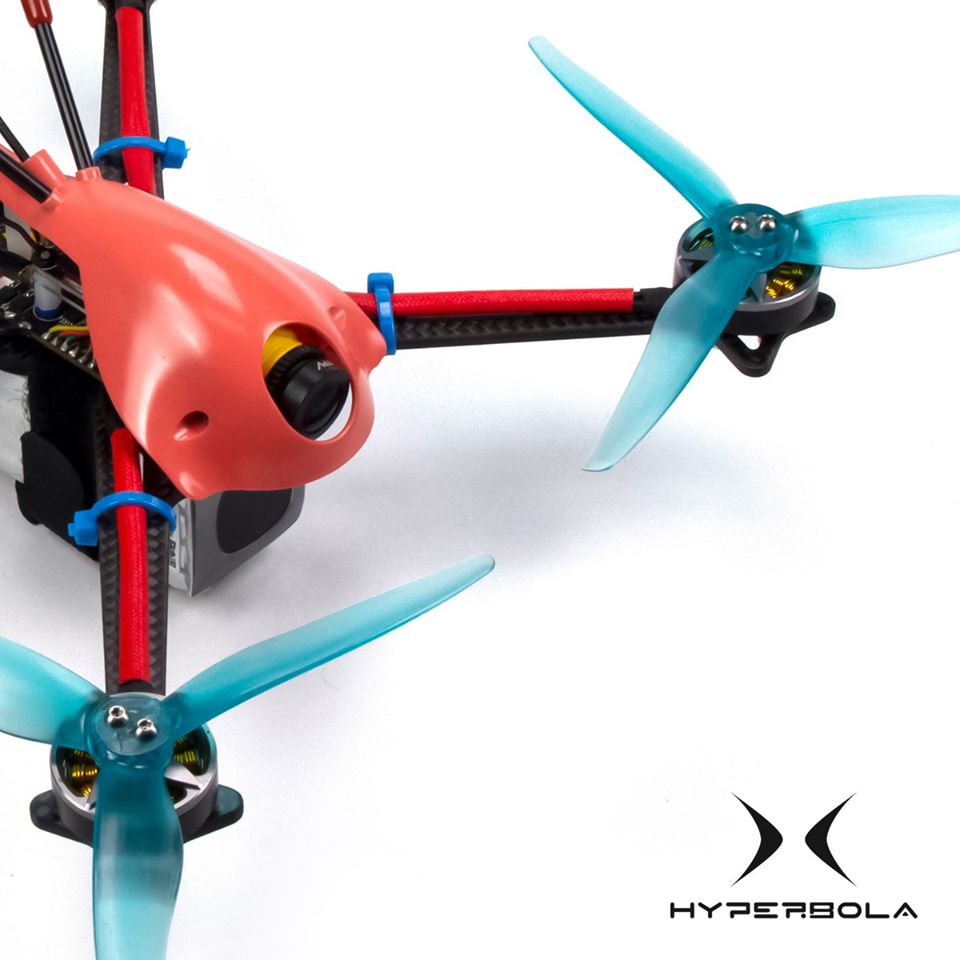
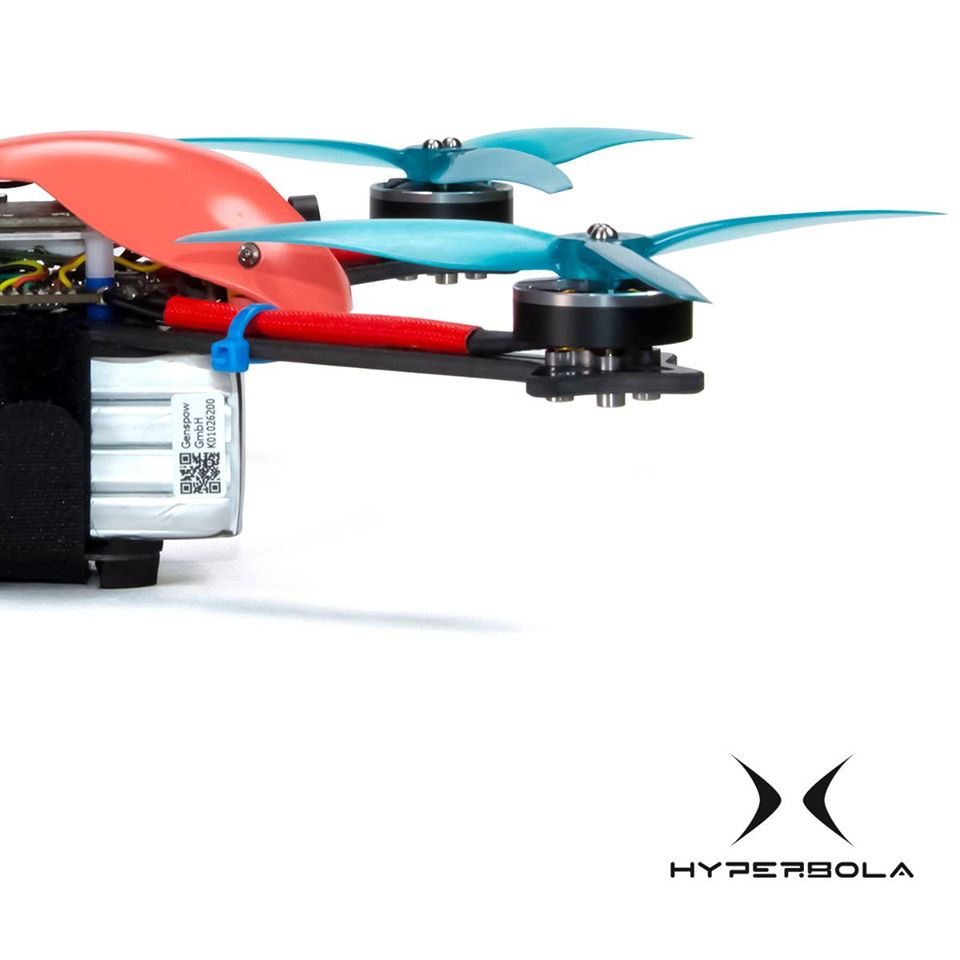
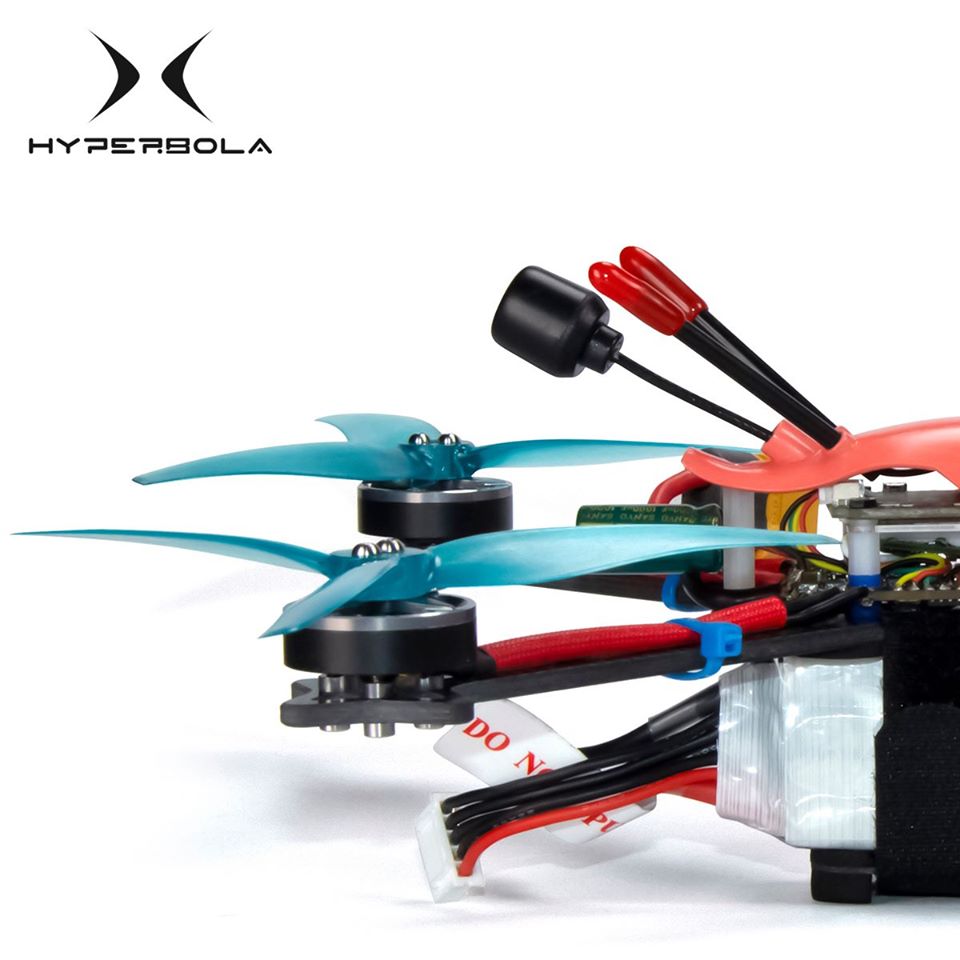
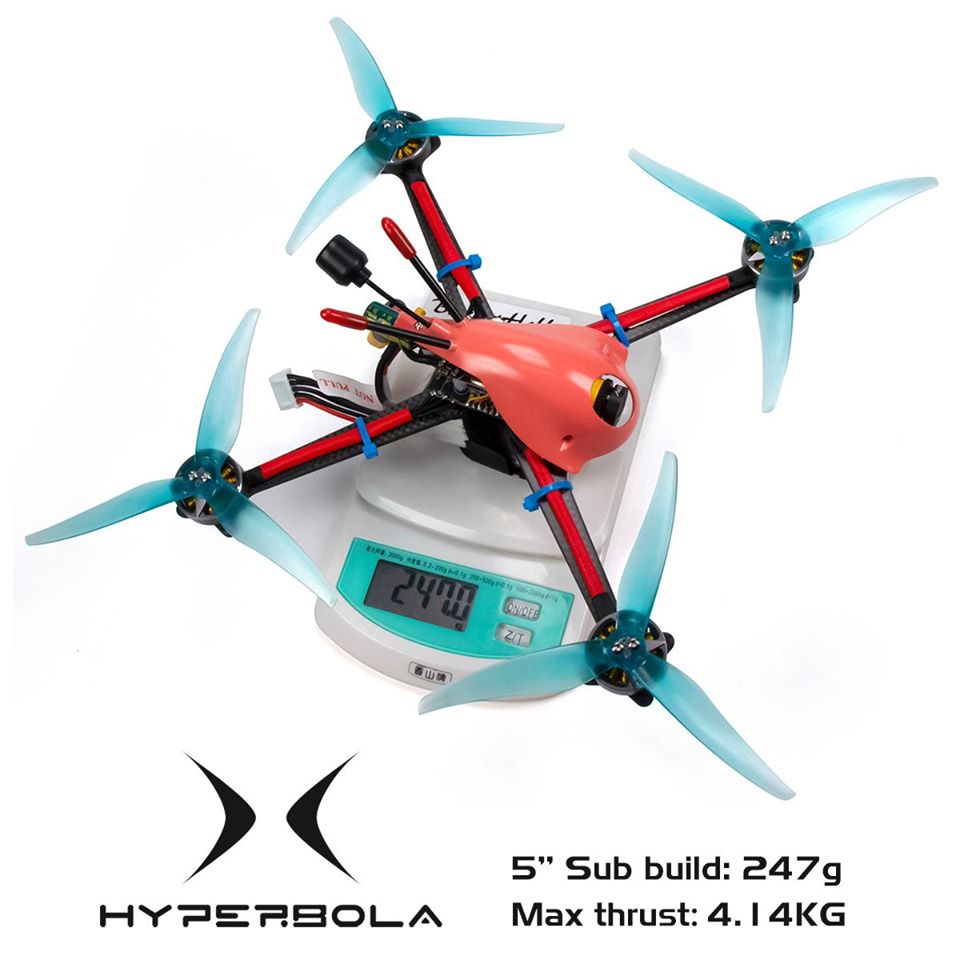
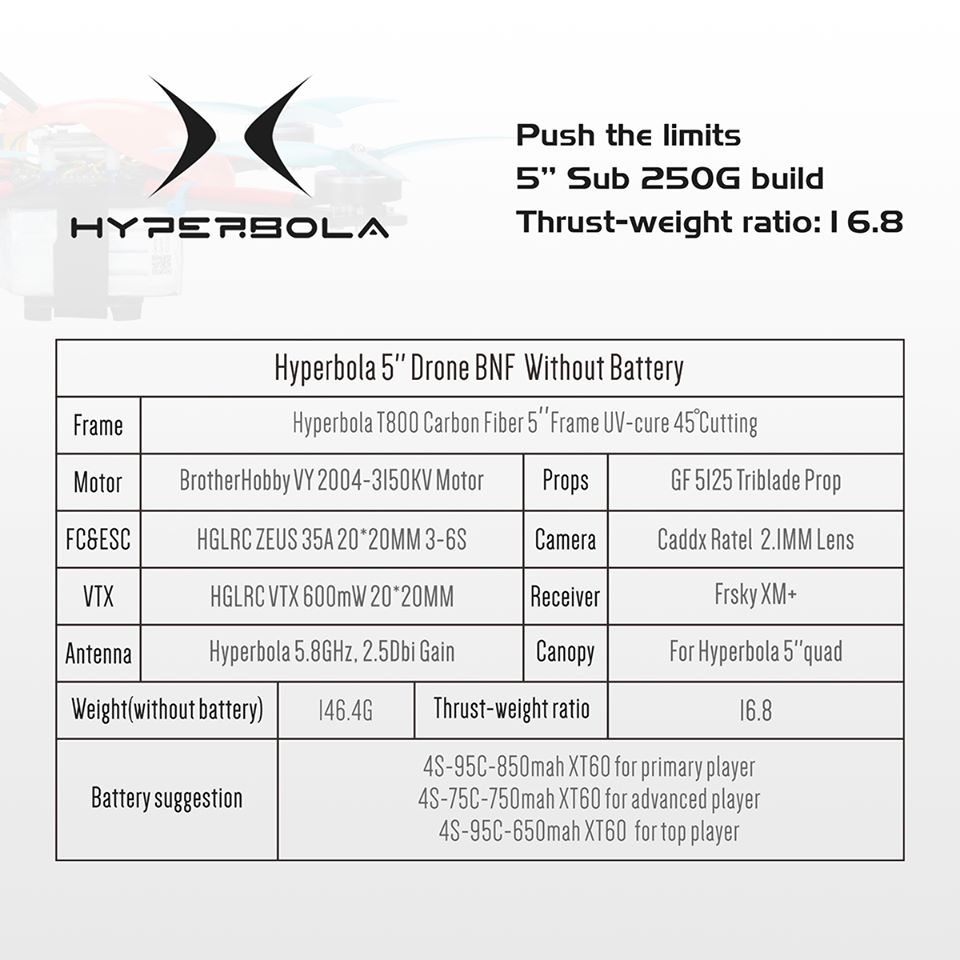
Hyperbola frame thickness is 3mm, weight is only 22g.
Available @ Nowhere.
Rumored release date: 2020 June.
]]>
Frame specifications
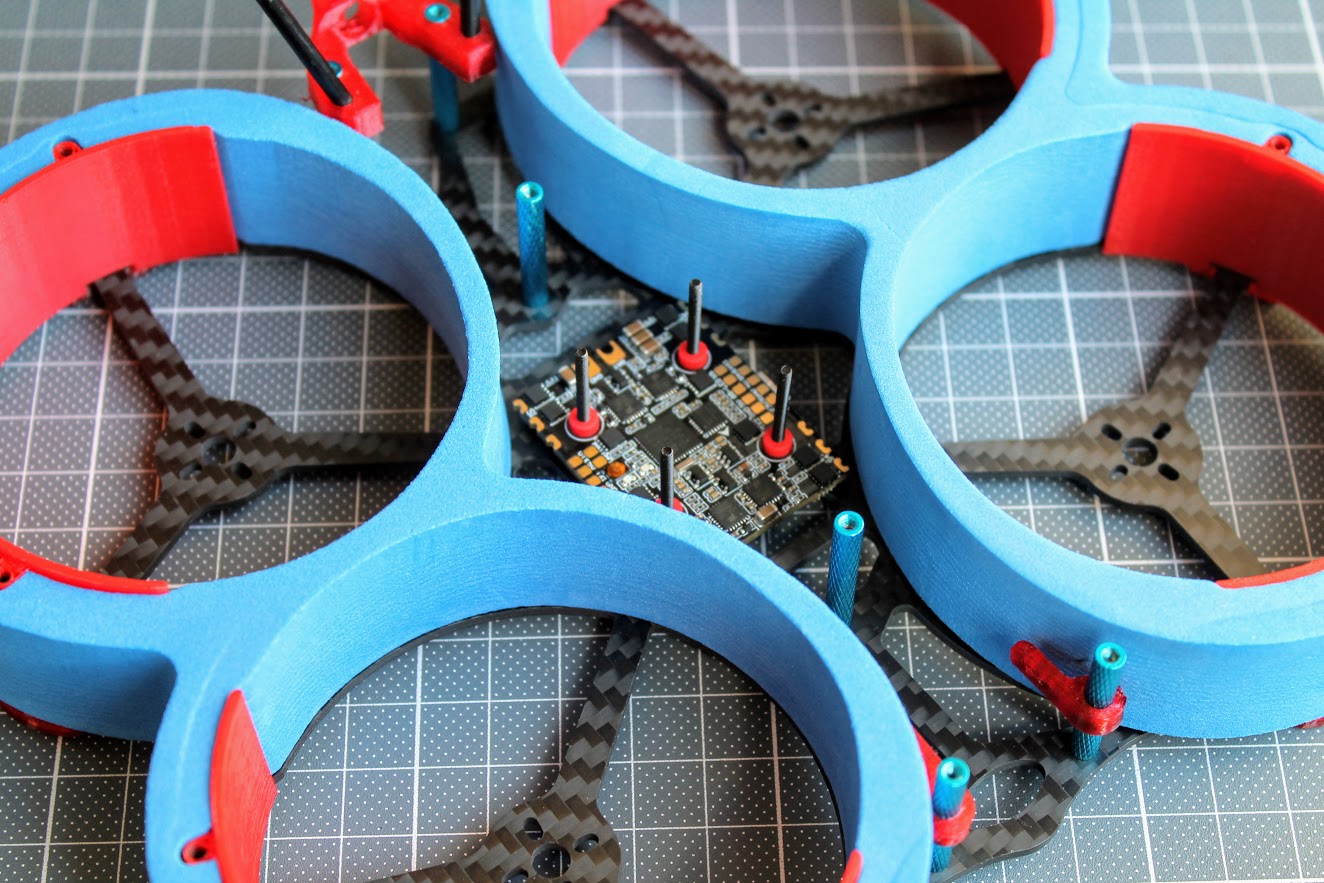
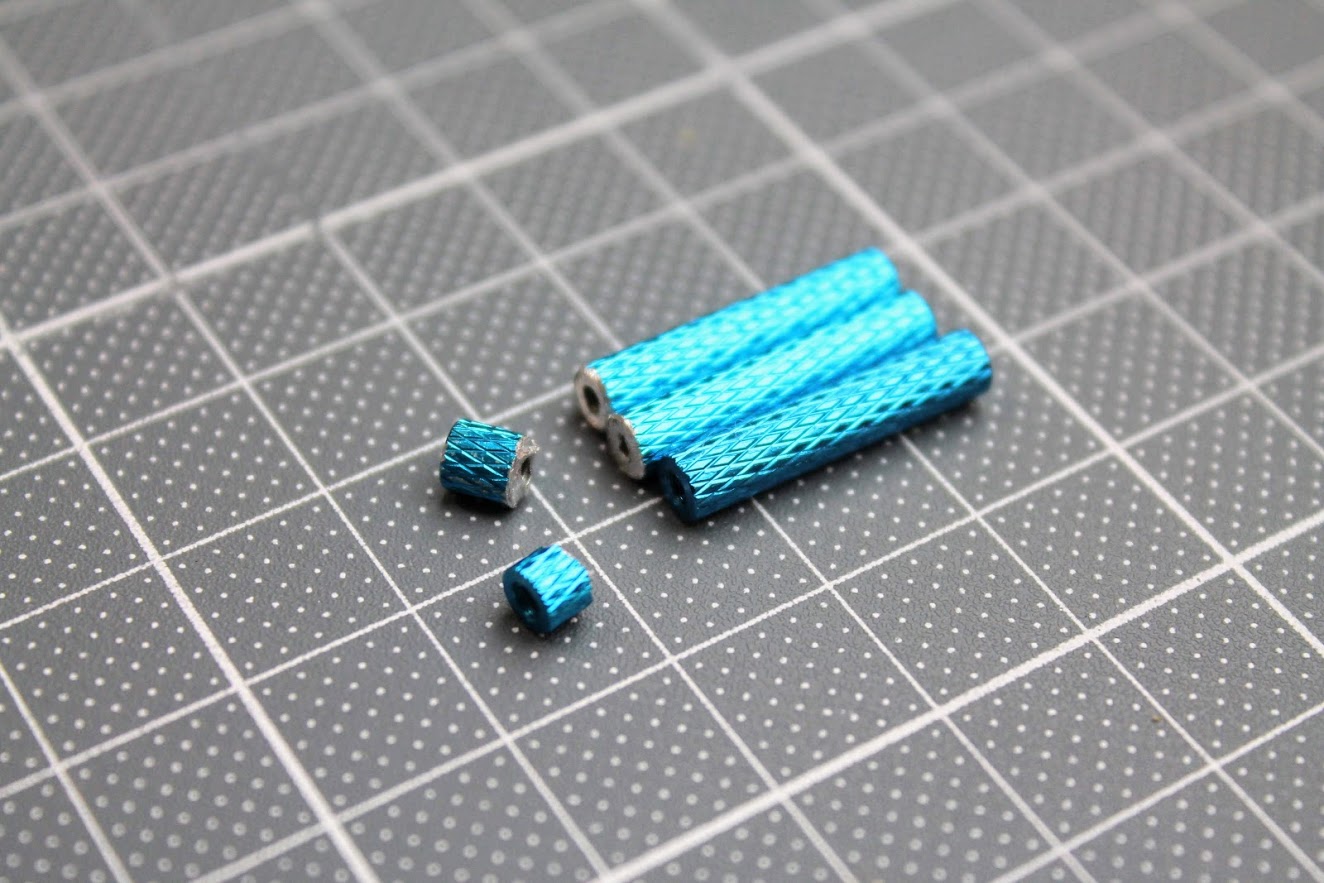
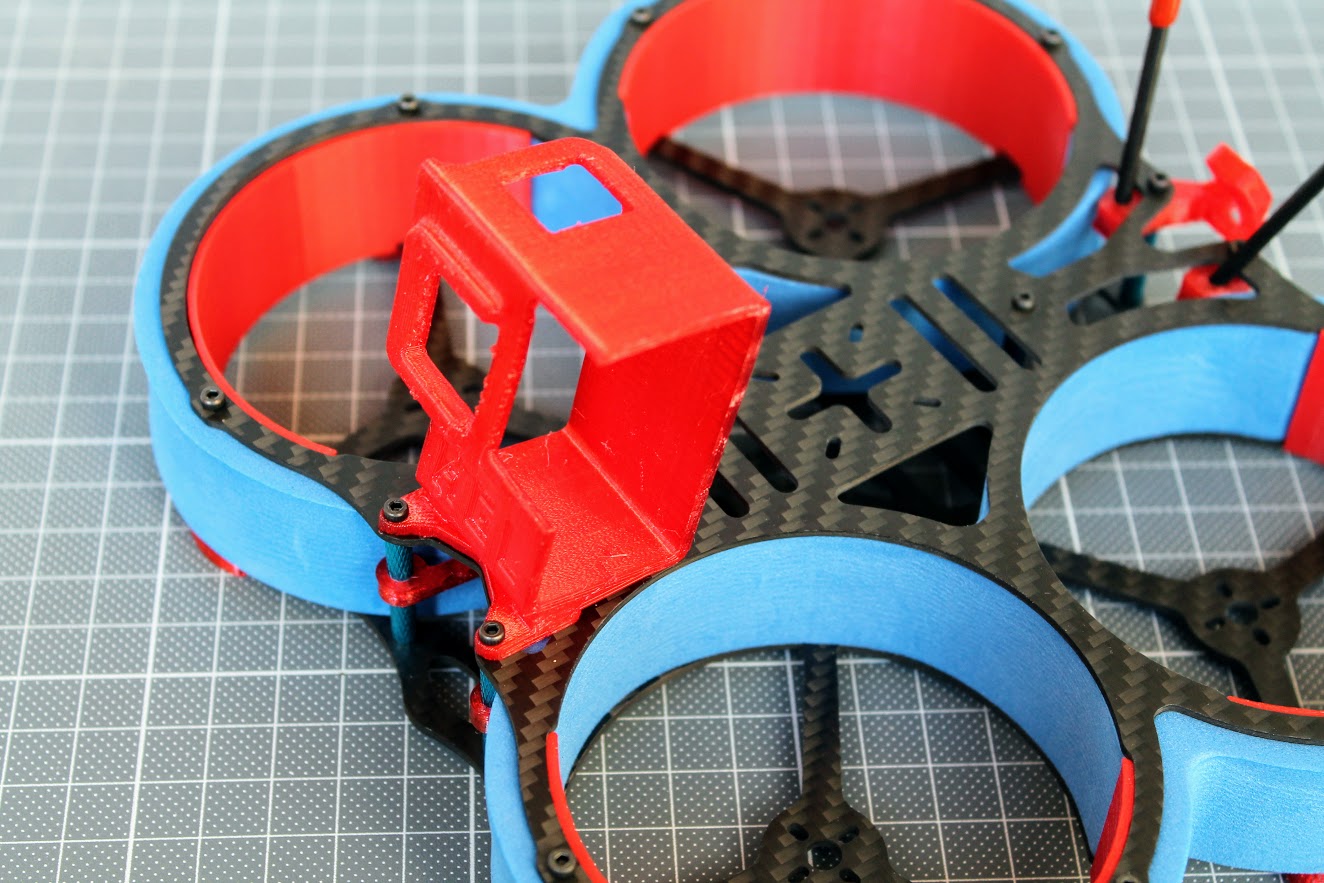
Frame kit contents: Bottom and top plates, EVA duct protectors, 3D printer ducts, 3D printed parts, GoPro mount, antenna protection tubes, USB angle extender, battery rubber pad, aluminium standoffs, a set of screws and two battery straps.
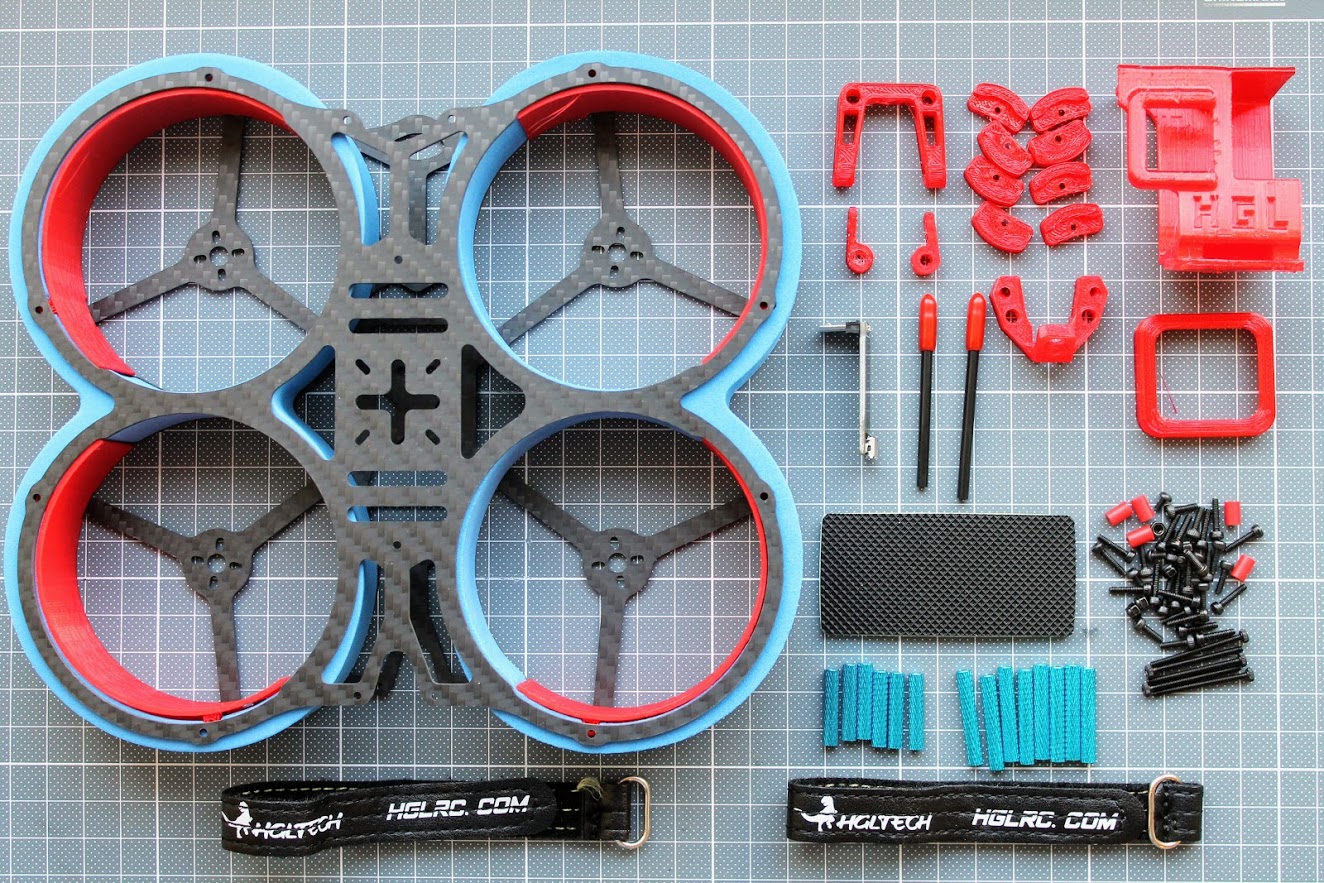
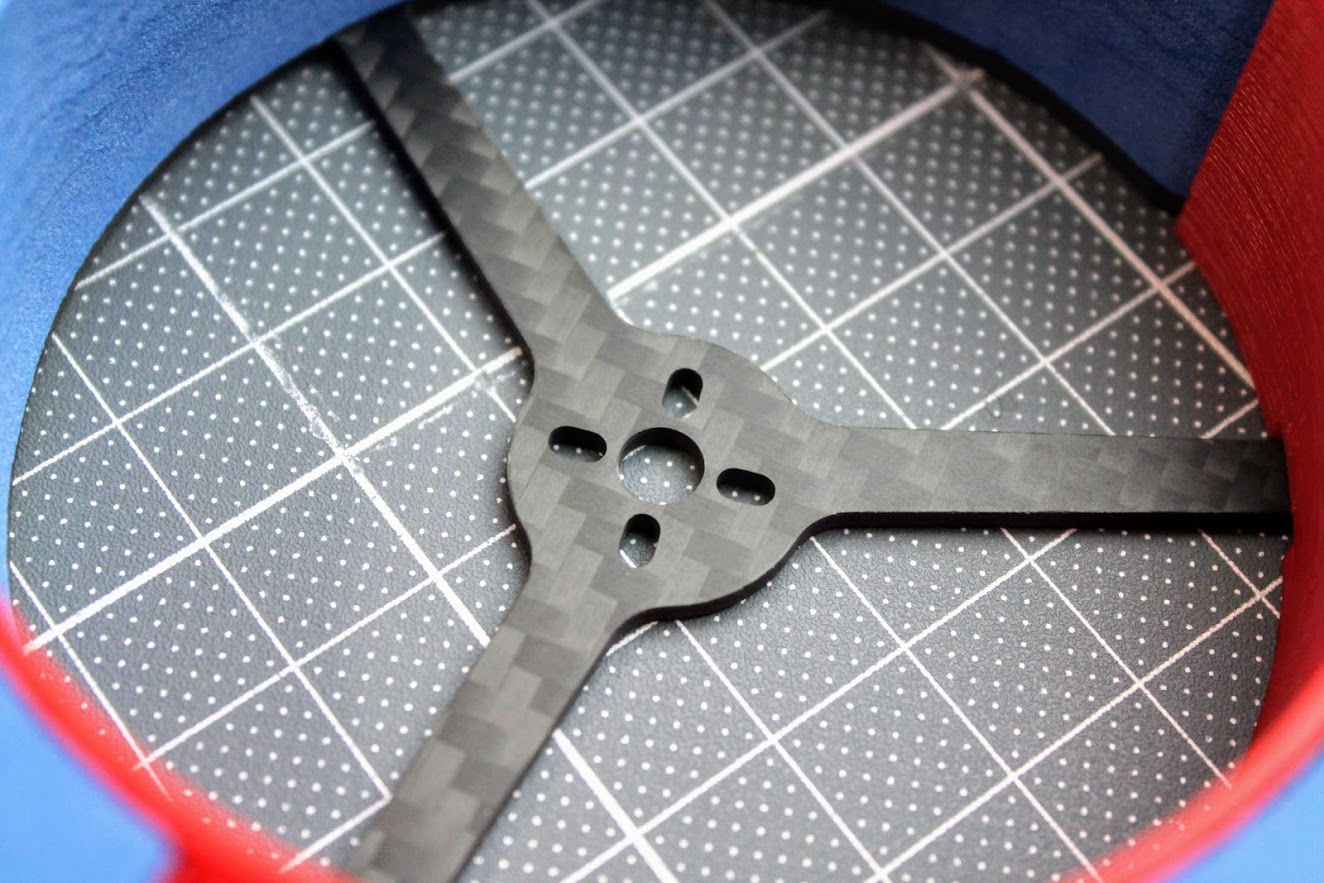
Bottom plate is 2mm thick with a holes for 9x9mm and 12x12mm motor mounting pattern.
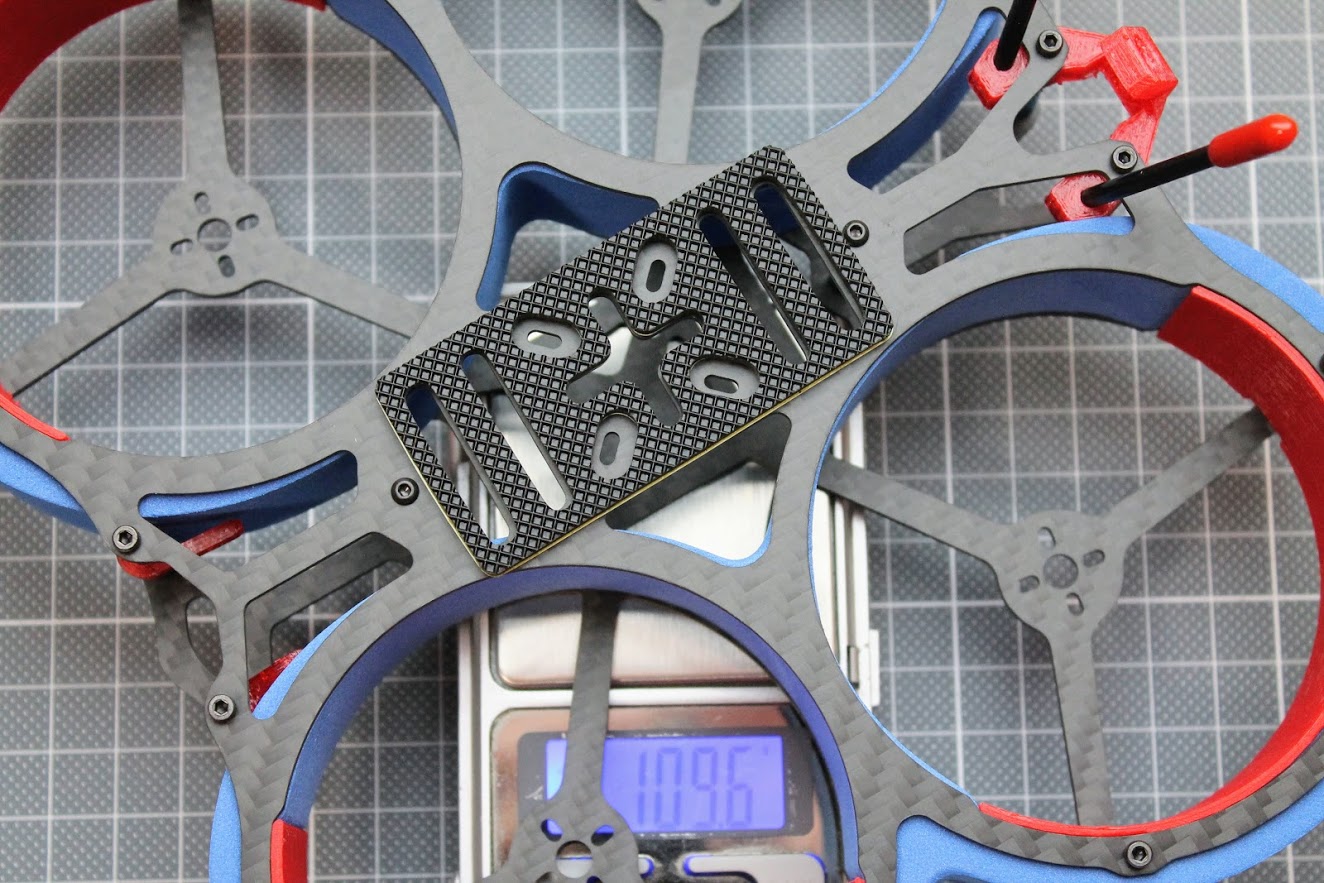
Frame has holes for 20×20 and 16×16 stacks.
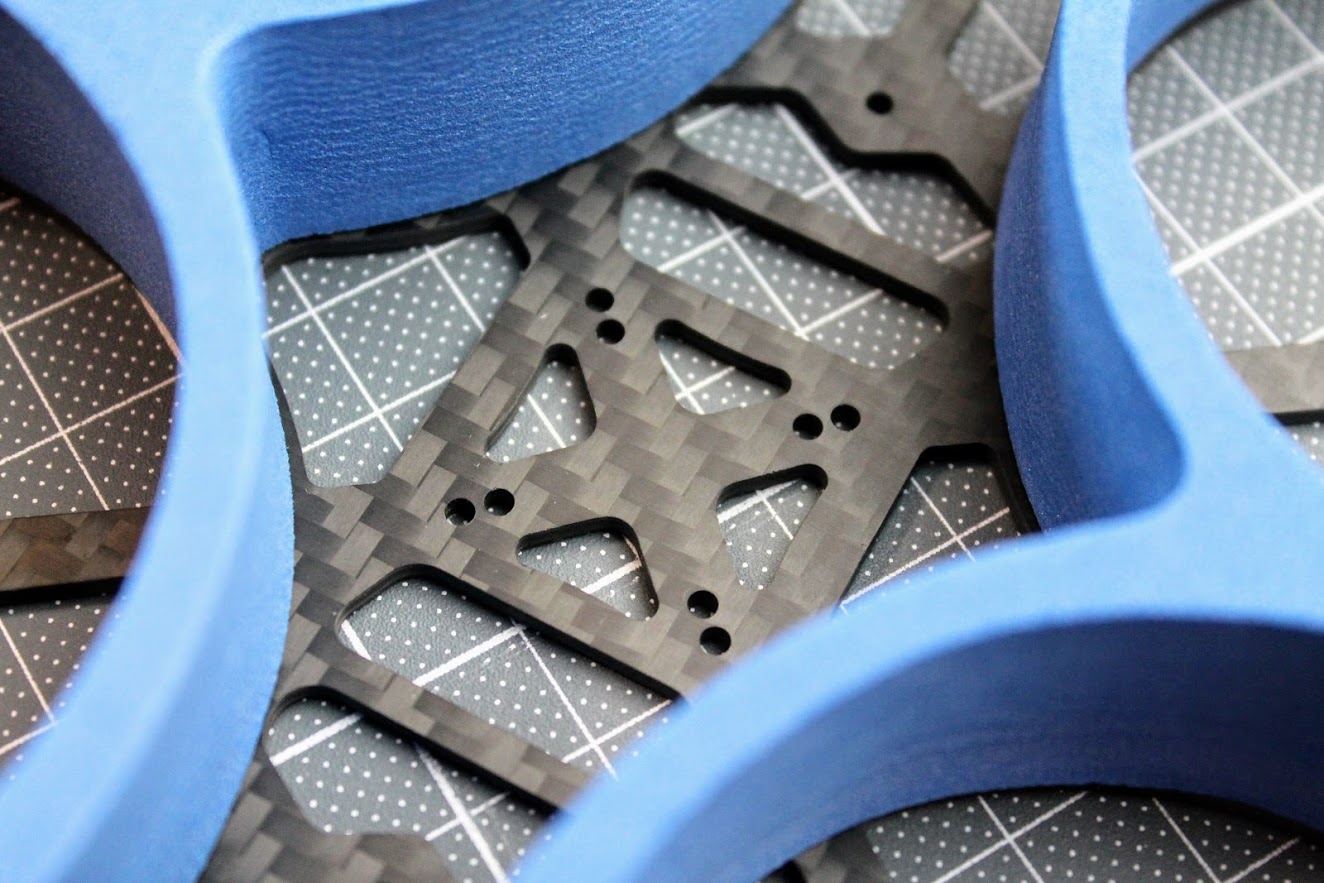
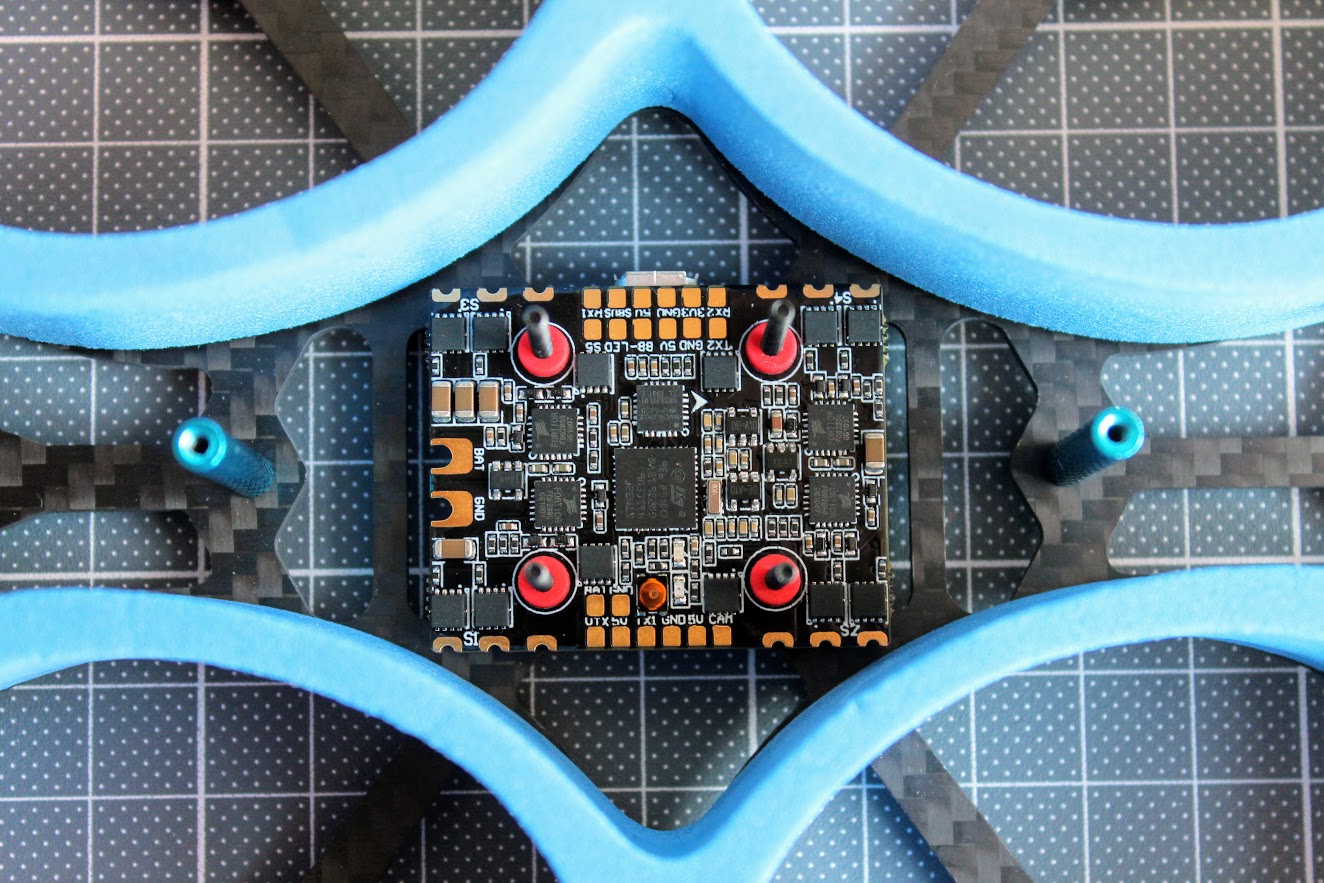
HGLRC Zeus35 AIO FC fits into this frame perfectly.
Frame has TPU camera holder for 20mm-19mm camera width.
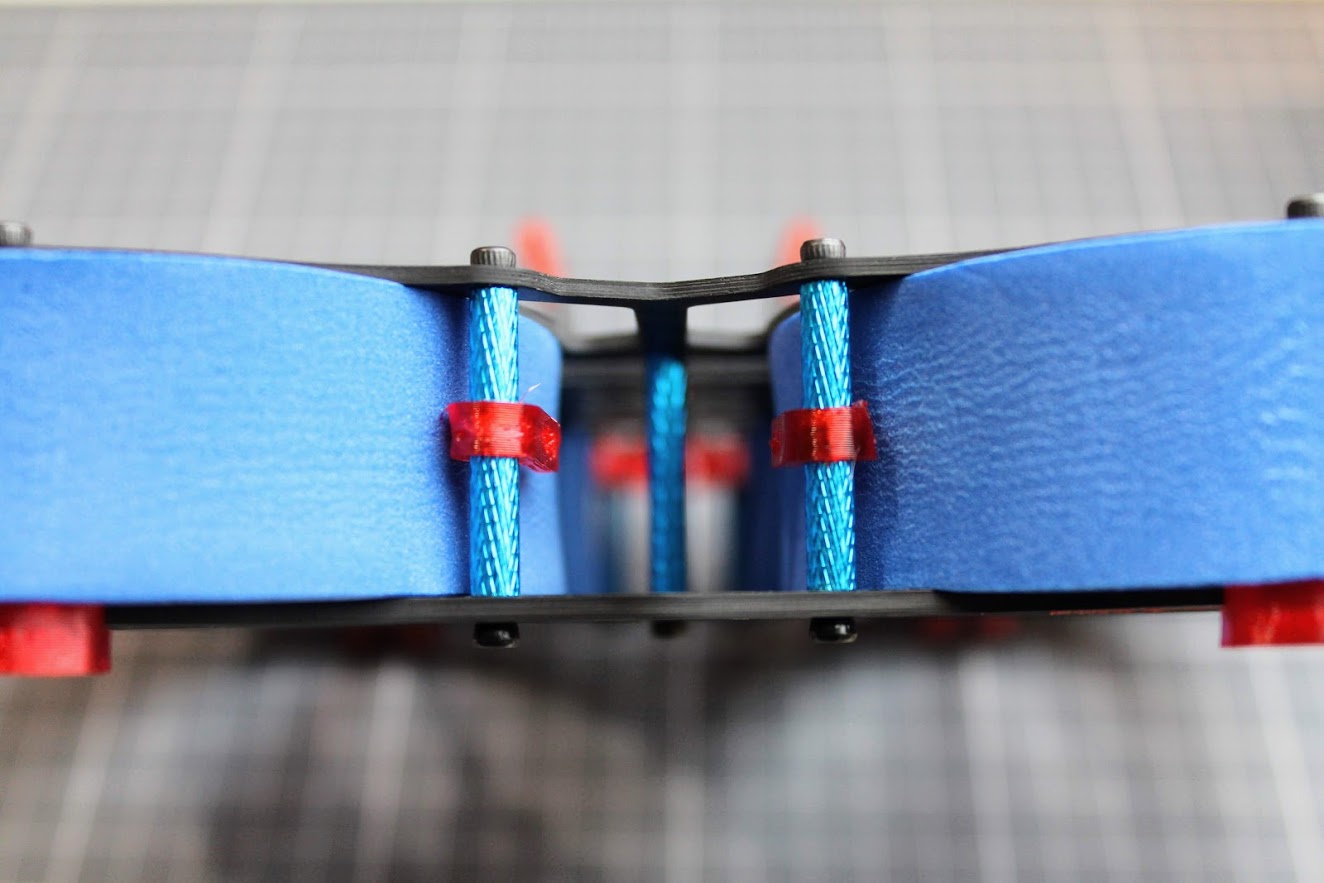
HGLRC Veyron 3 frame kit should have 8 shorter and 6 longer aluminium standoffs. Shorter standoffs for the ducts and longer are for the frame.
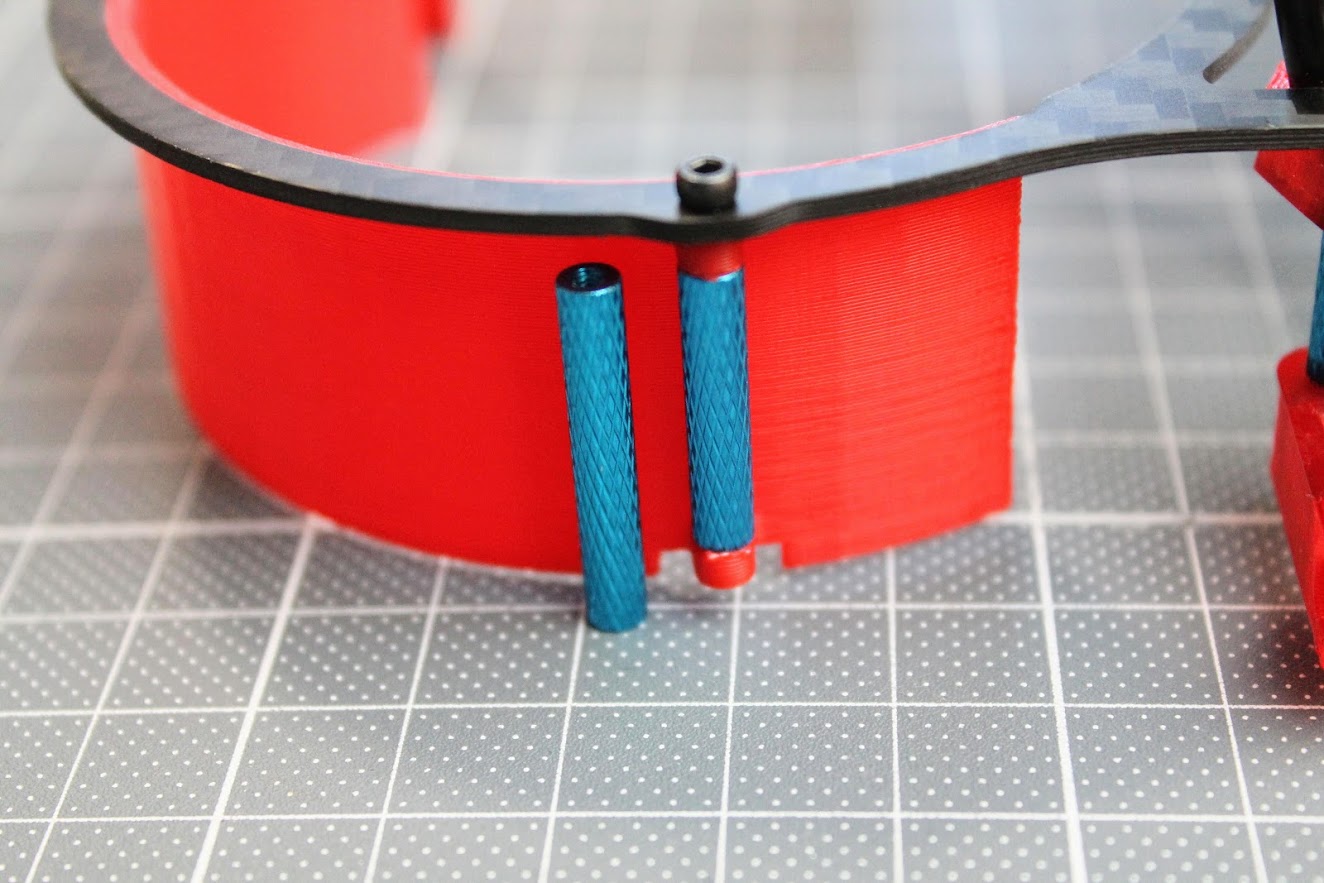
Mine frame set came with 2 long standoffs instead of the short ones.
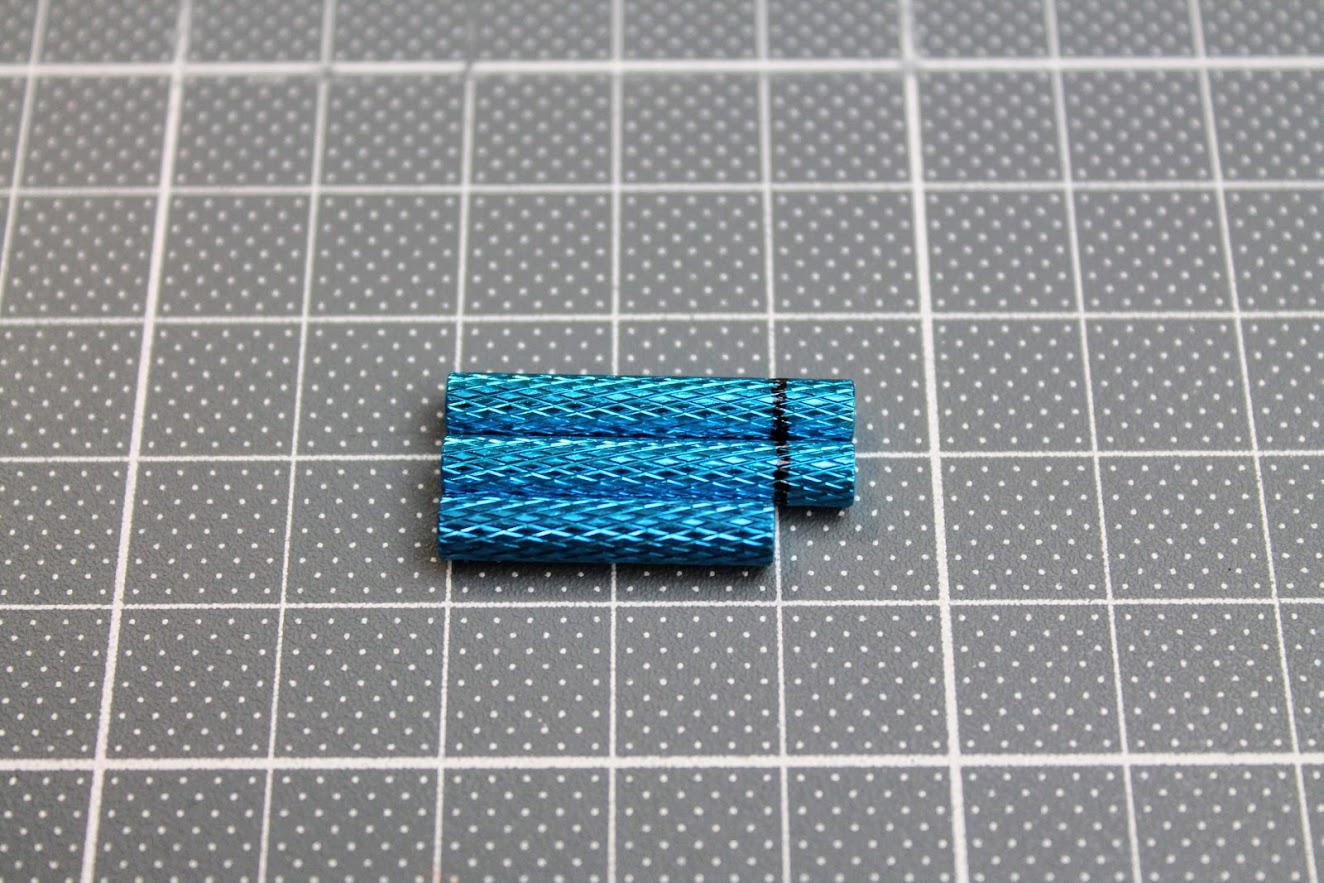
I had to cut them with the dremel tool to fit into the ducts.
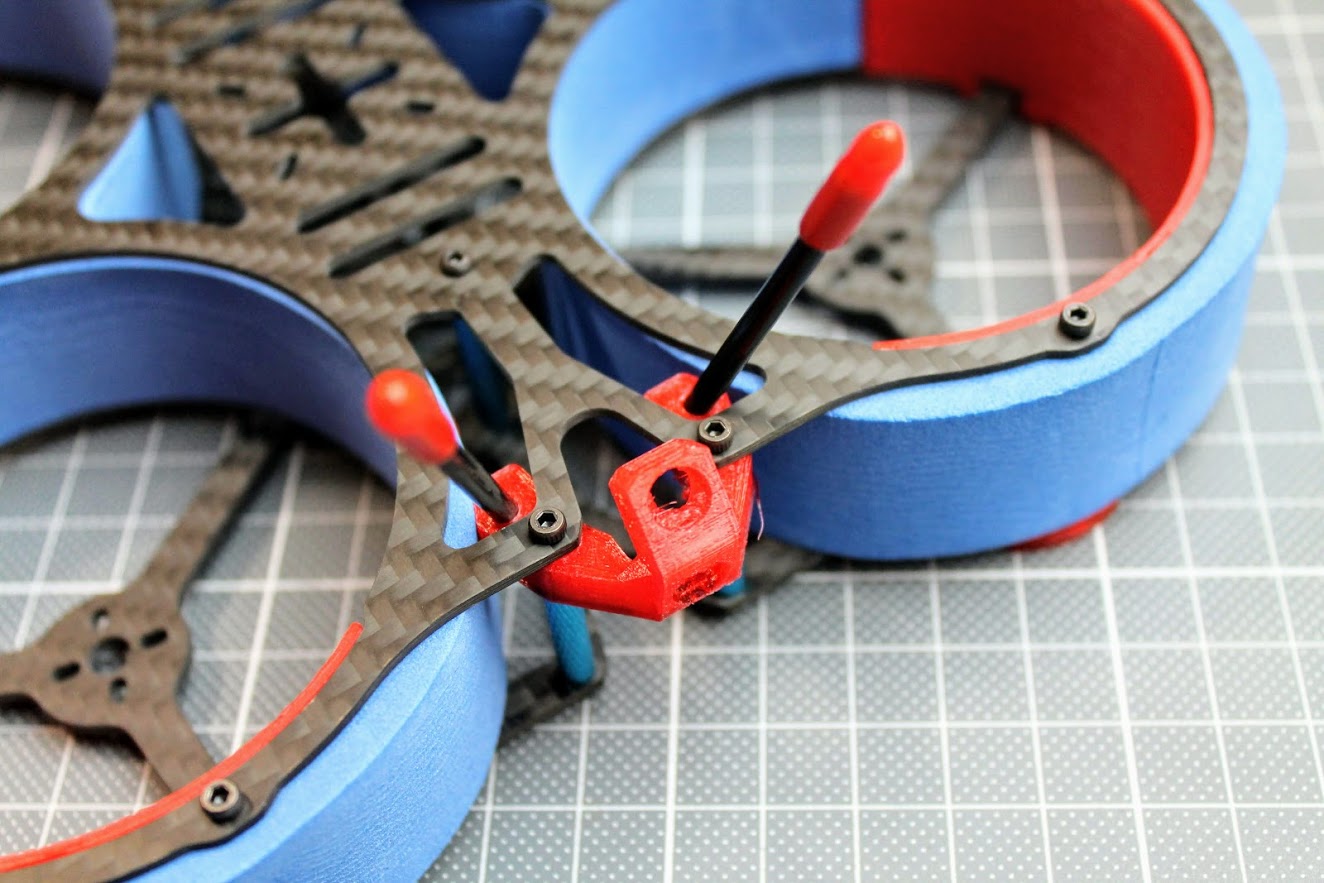
3D printed parts act as landing pads.
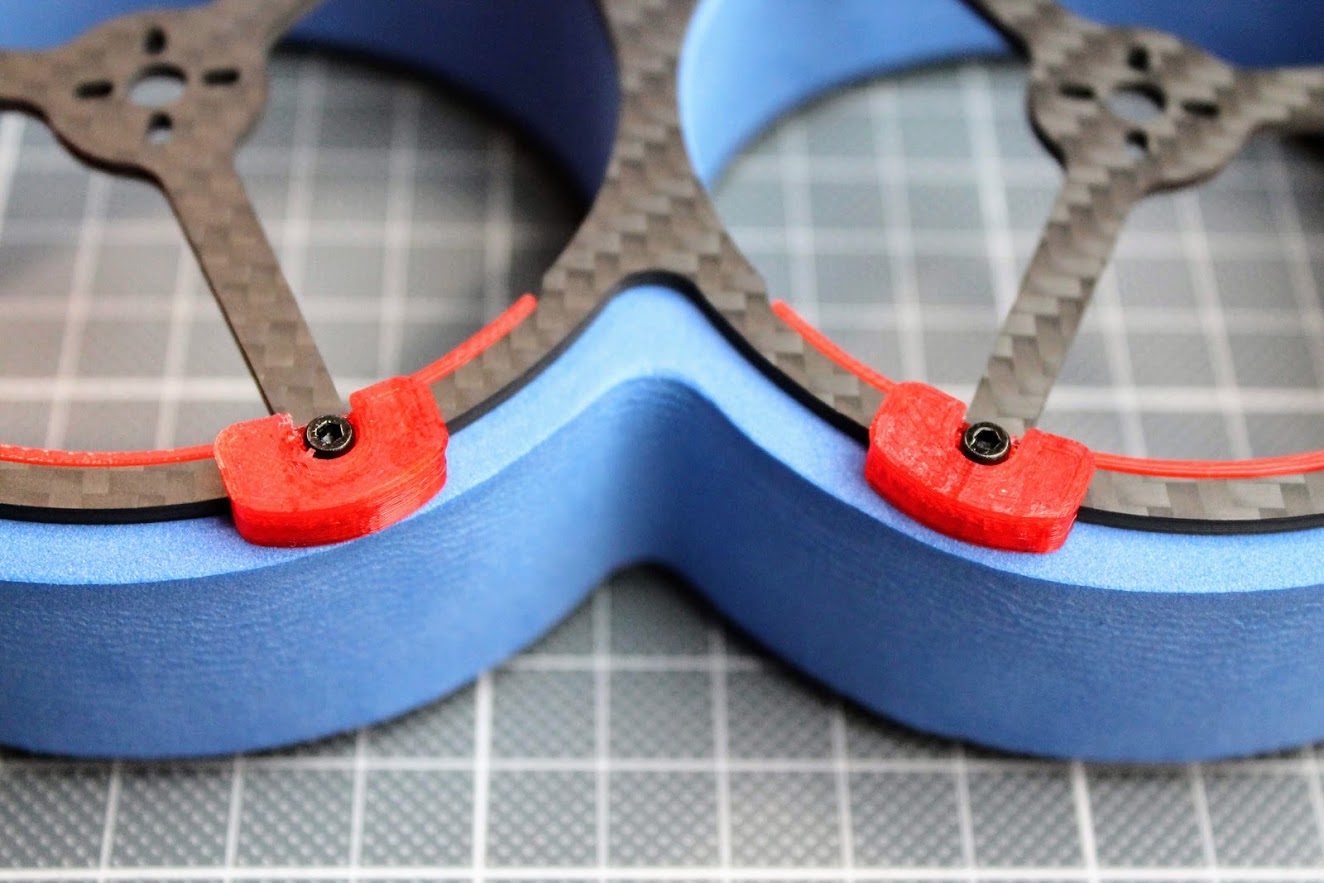
There are 3D printer crossfire antenna and analog FPV or DJI digital FPV antenna holders in the kit. Antenna holders are flexible, printed out of TPU plastic.
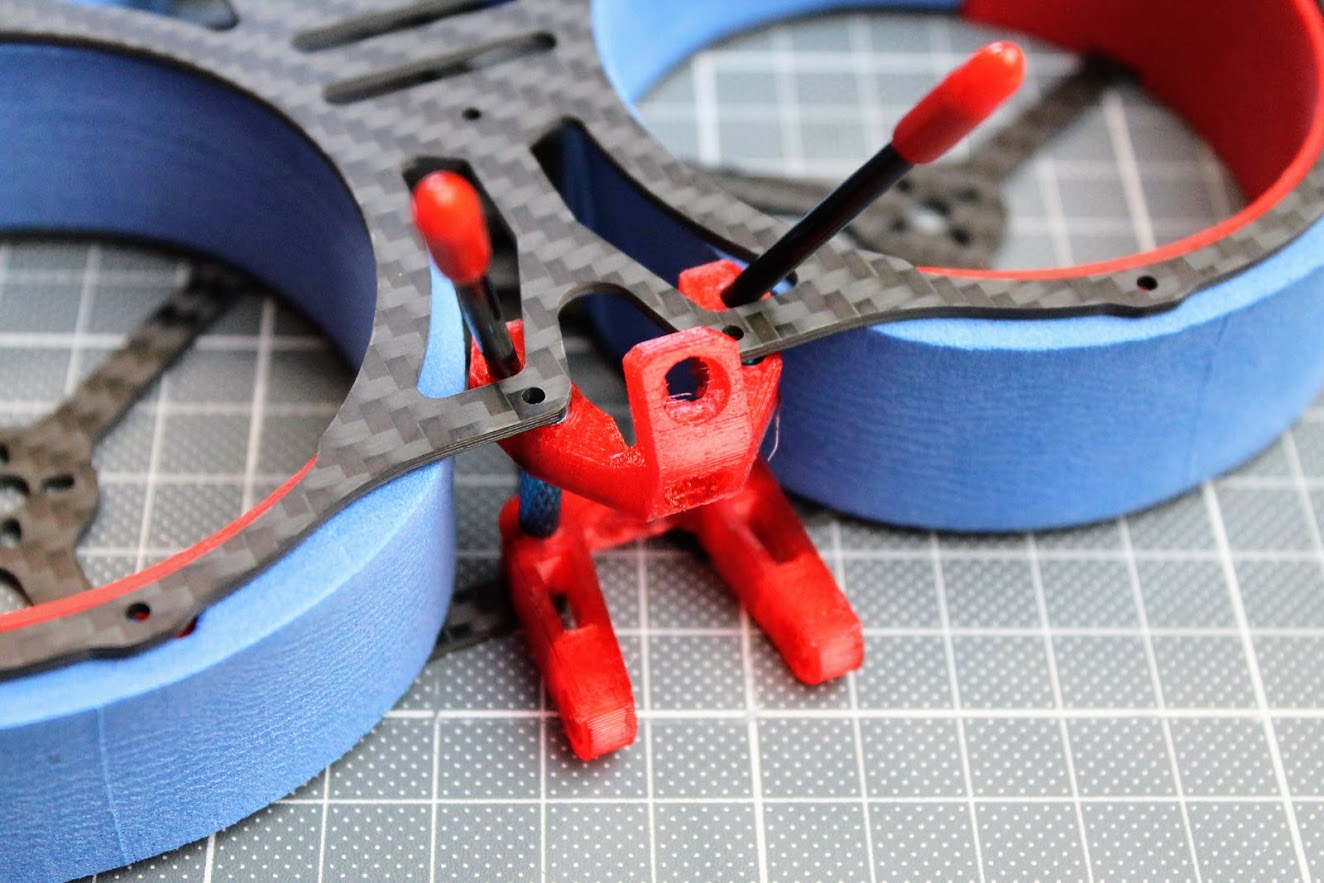
If you don’t use Crossfire you can remove unneeded holder.
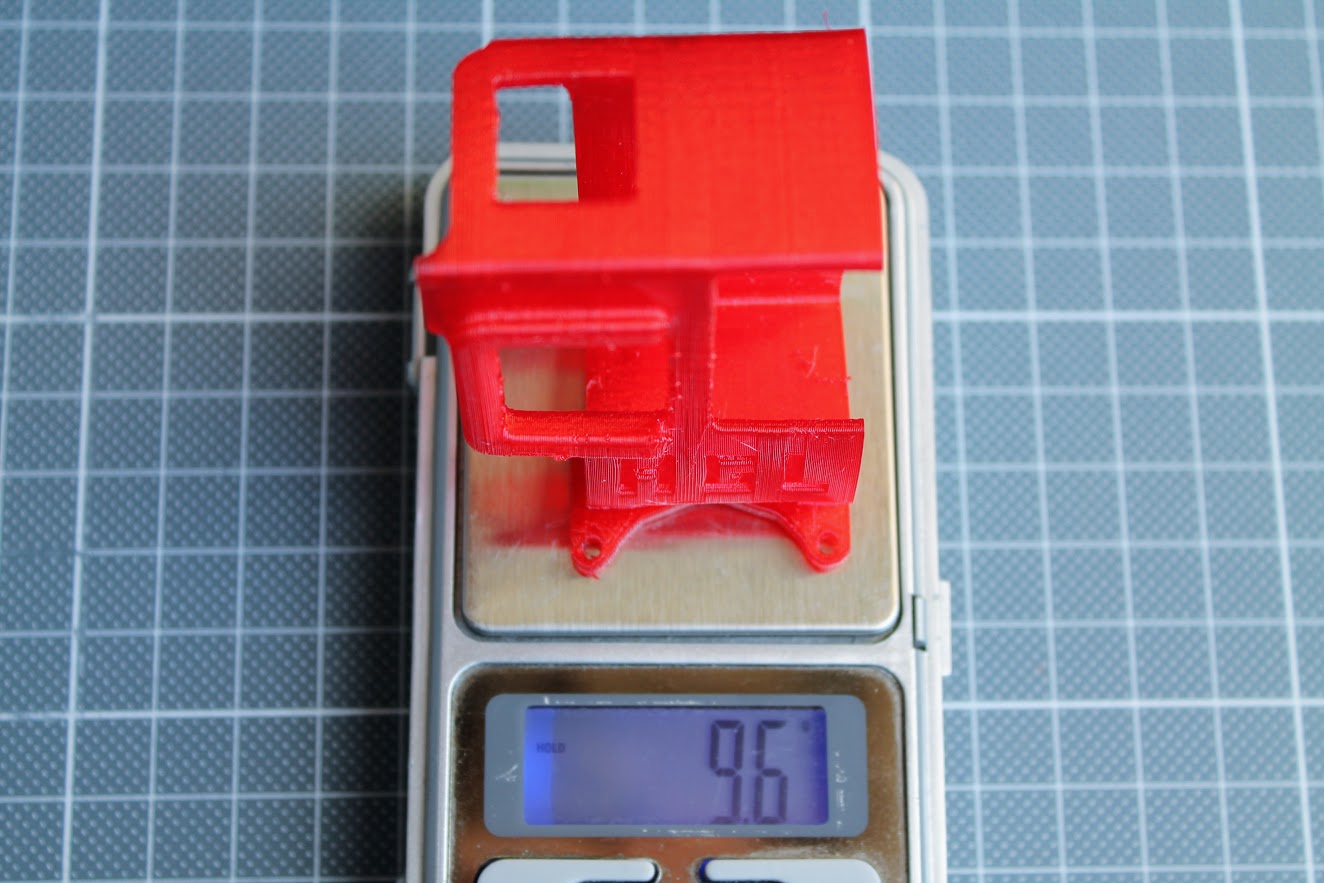
There is also GoPro Hero HD camera holder, that can be fixed to the top of the frame with supplied screws. I wish there was also GoPro Session type holder in the kit.
GoPro Hero camera holder weights additional 9.6 grams.
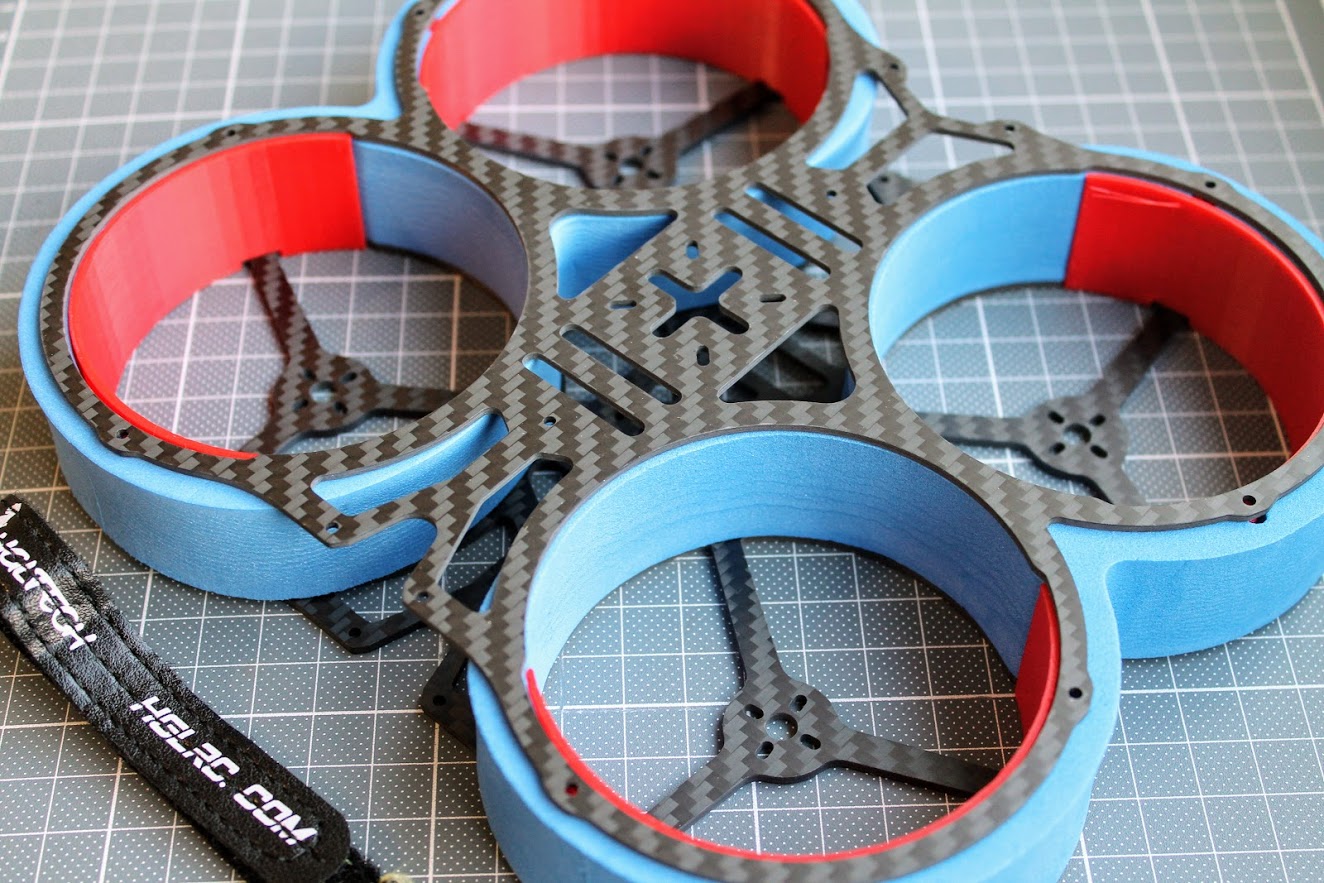
Total weight of the frame is 110 grams.
HGLRC Veyron 3 frame kit has interesting ducts design. Only the half of the duct (186°, actually) is 3D printed plastic and the other half of the duct is EVA protective foam. This helps to reduce the total weight of the frame. No surprise, the HGLRC Veyron 3 is the lightest 3 inch cinewhoop frame with the uni body top/bottom plate design (Veyron 3 – only 110 grams, iFlight BumbleBee – 134.1 grams, Diatone Taycan – 175 grams).
HGLRC Veyron 3 frame kit can be purchased @
HGLRC: https://www.hglrc.com/collections/new-arrivals/products/hglrc-veyron-3-cinewhoop-frame-kit
]]>
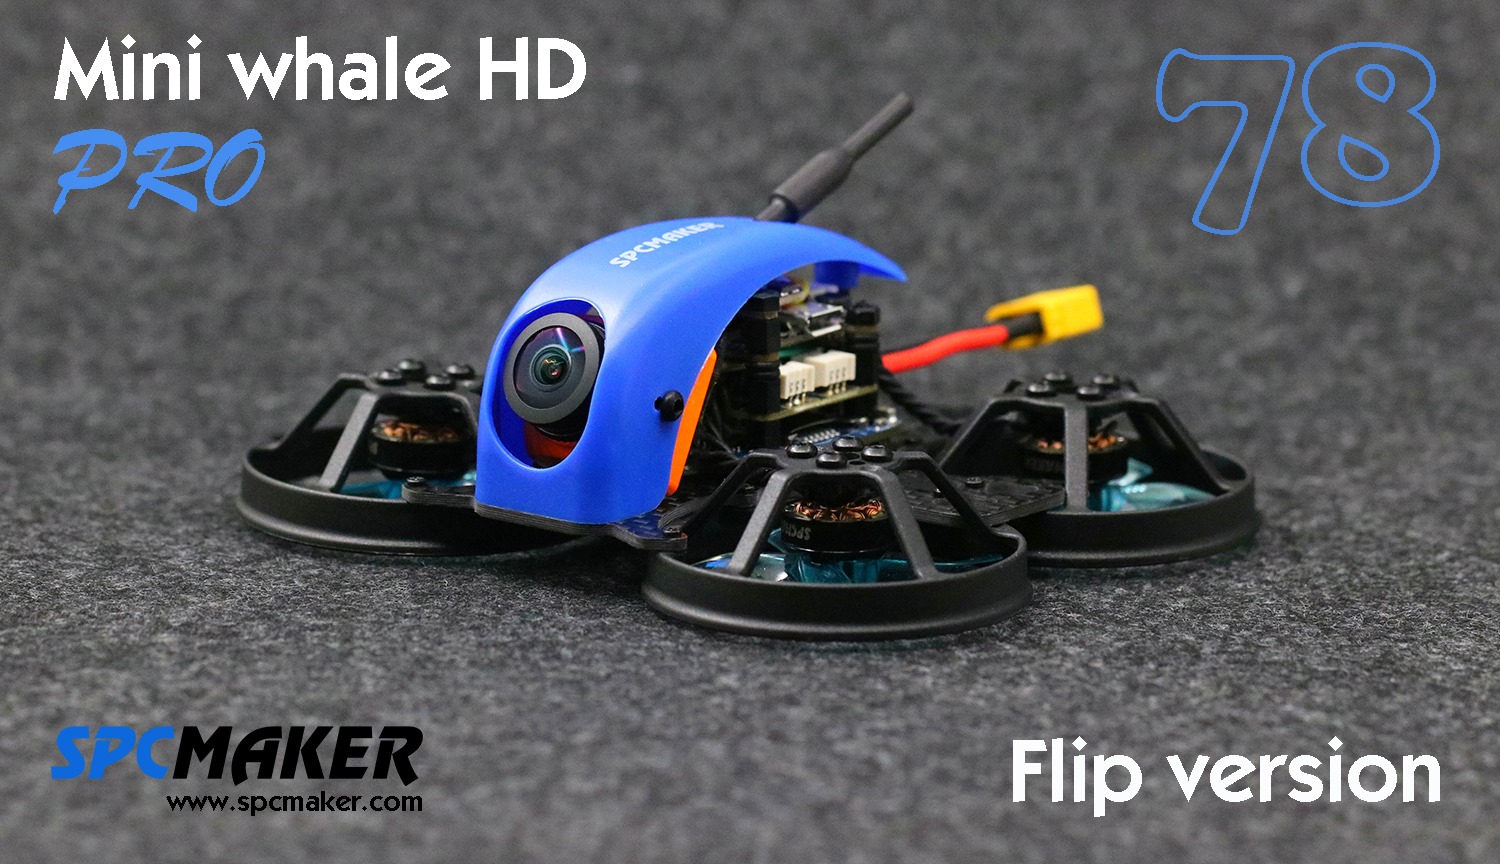
SPCMaker Mini Whale Flip
SPCMaker is following the new hype and has announced the inverted (flipped) version of it’s Mini Whale 78 HD Flip brushless whoop. Actually they only flipped the ducts and voila, you have a new whoop.
HGLRC MotoWhoop
HGLRC posted a few photos in the media with the upcoming 85mm sized brushless MotoWhoop.

Team BlackSheep Source V
TBS released new open source frame Source V. It is vertical frame with the low air drag.
Pre-order : https://www.team-blacksheep.com/products/prod:source_v

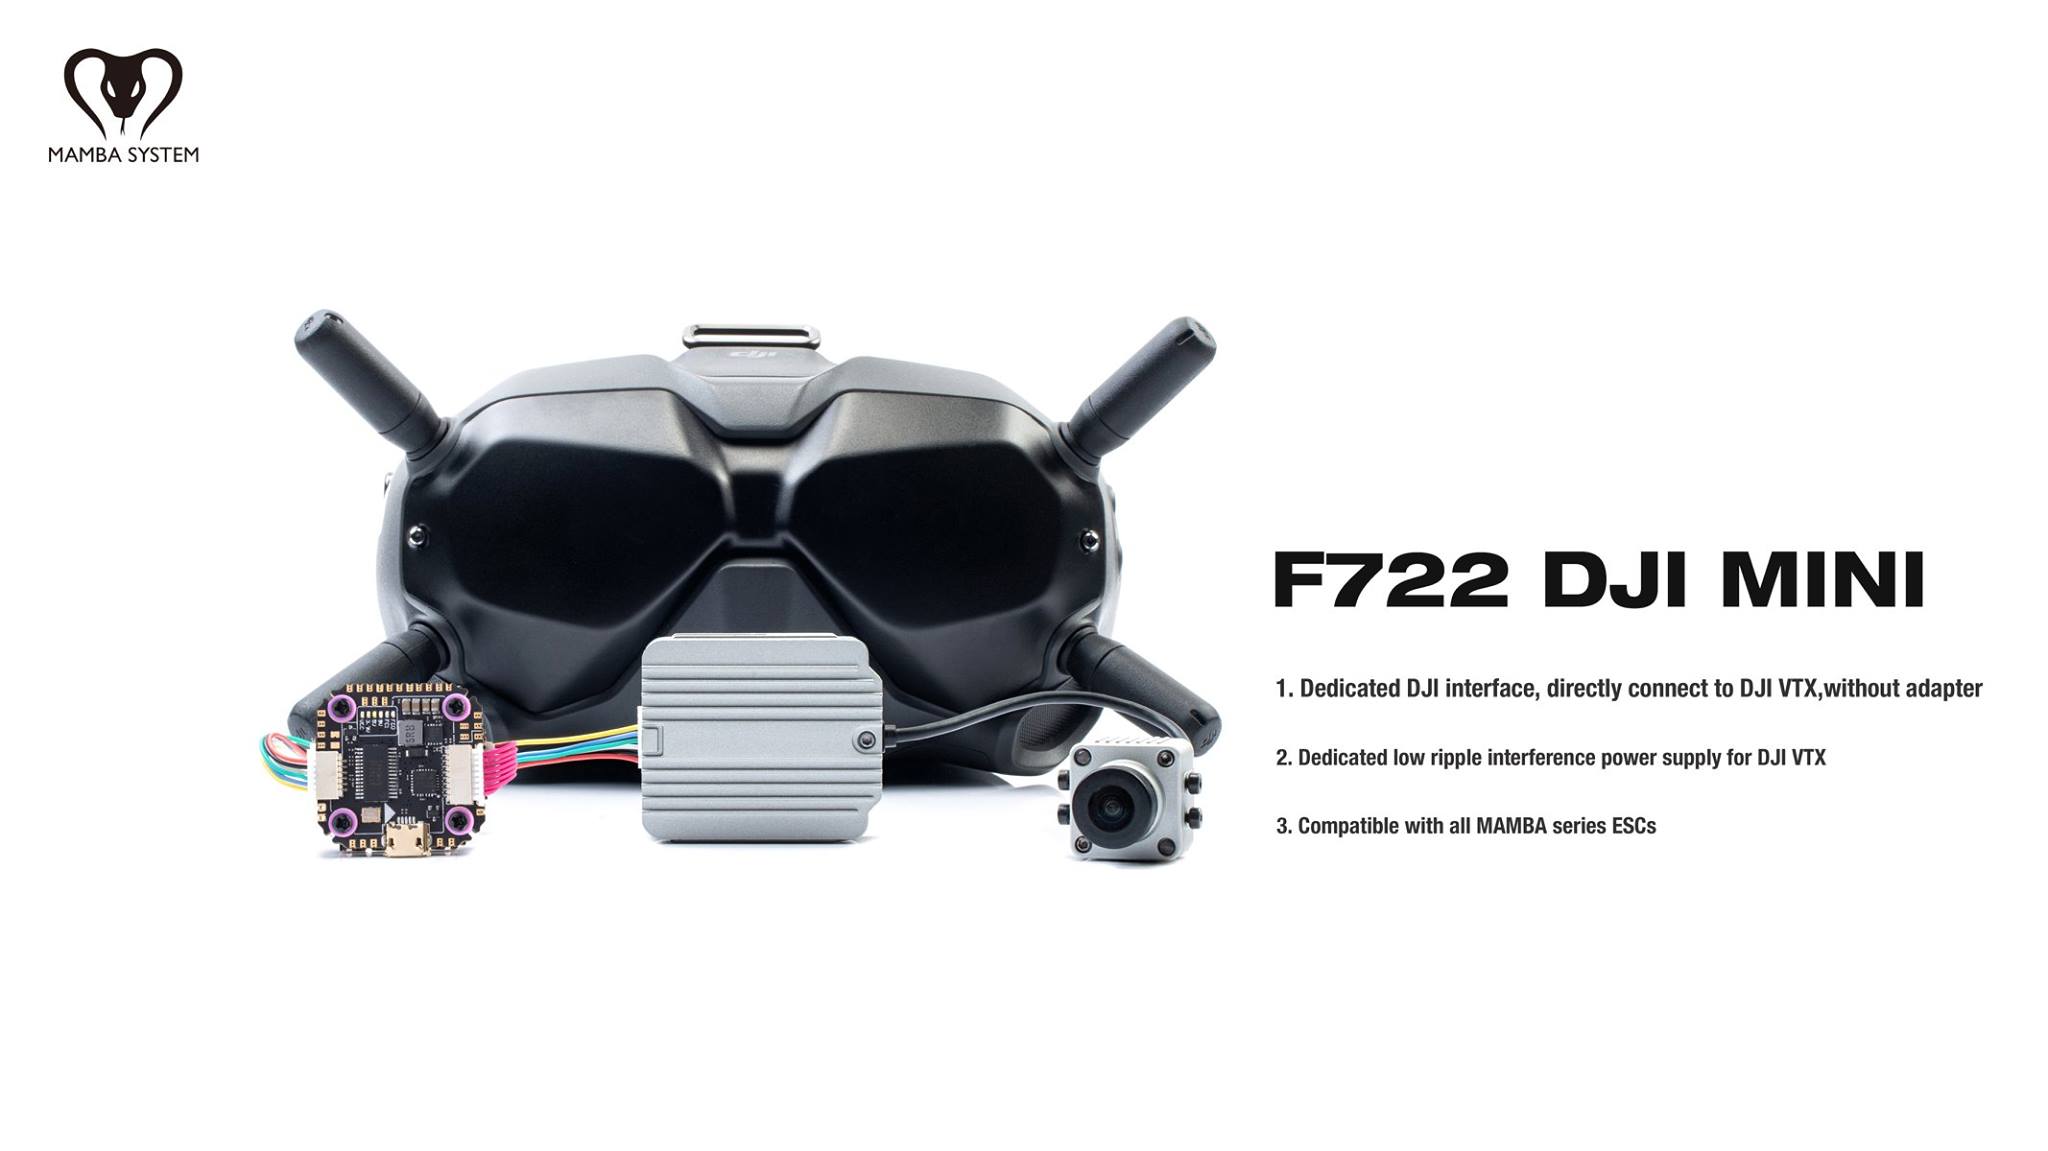
Diatone Mamba F722 DJI Mini
Diatone announced the Mamba F722 Mini sized FC, designed specially for DJI Digital FPV system.
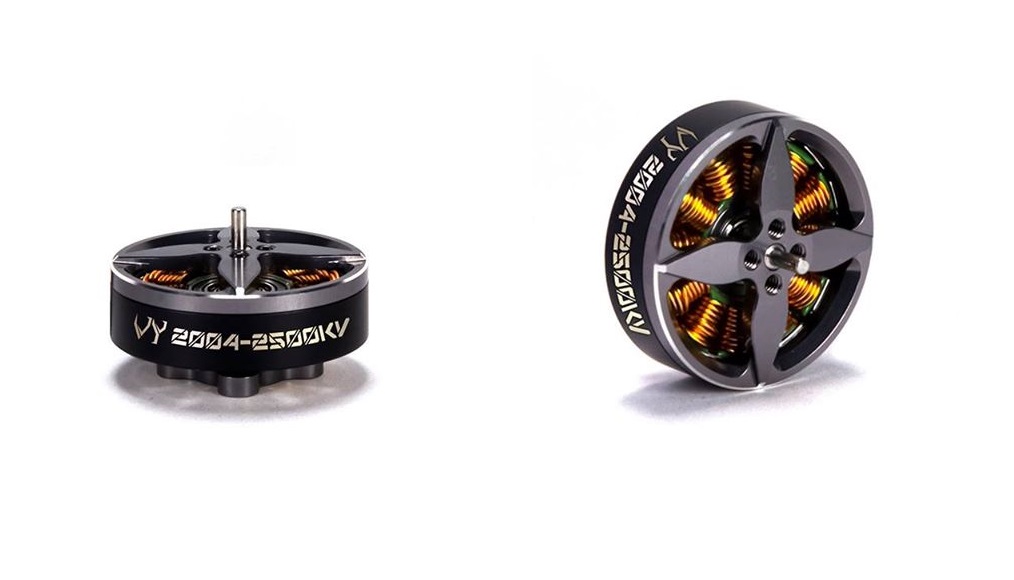
BrotherHobbby VY2004 motor
BrotherHobby has announced the lightweight 2004 size motor for sub 250g quadcopters with 5 inch props. Motor weights about 16g, and it is as efficient as 2207 or 2306 motors.
Foxeer Micro Lollipop

Lighter, Smaller, but Stronger!
Fashion & Durable Design!
2.5dBi gain!
Center Frequency: 5.7GHz
V.SWR 1.06 at center frequency
Uniform Radiation!
Vivid colors: Red/Black/Fluor Green/Purple
Different connectors: UFL/SMA/MMCX straight & angle/RPSMA , RHCP/LHCP
Size: ?11*65mm
Weight: UFL 1.6g/ SMA & RPSMA: 4.7g / MMCX Straight: 3.1g/ MMCX Angle: 3.2g
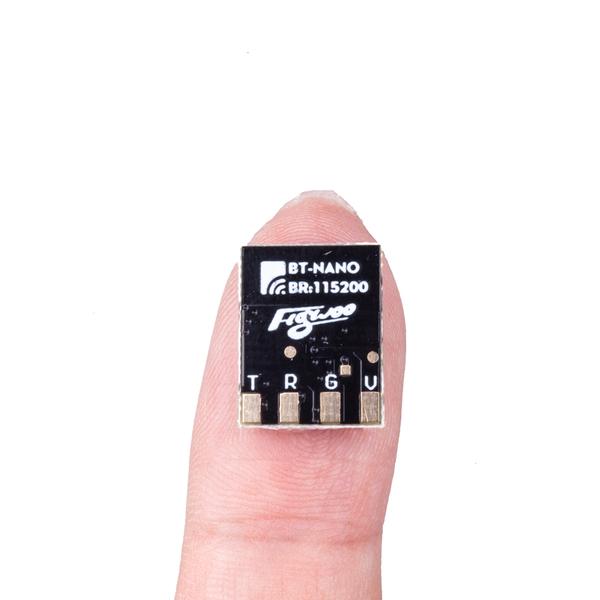
Flywoo BT Nano
Flywoo designed even smaller, lighter (only 0.3g), faster, more stable transmission and more transmission distance Bluetooth module for wireless configuration.
https://flywoo.net/collections/new/products/flywoo-bt-nano-v2-bluetooth-module-for-fpv-drone
Source: Facebook, Instagram
]]>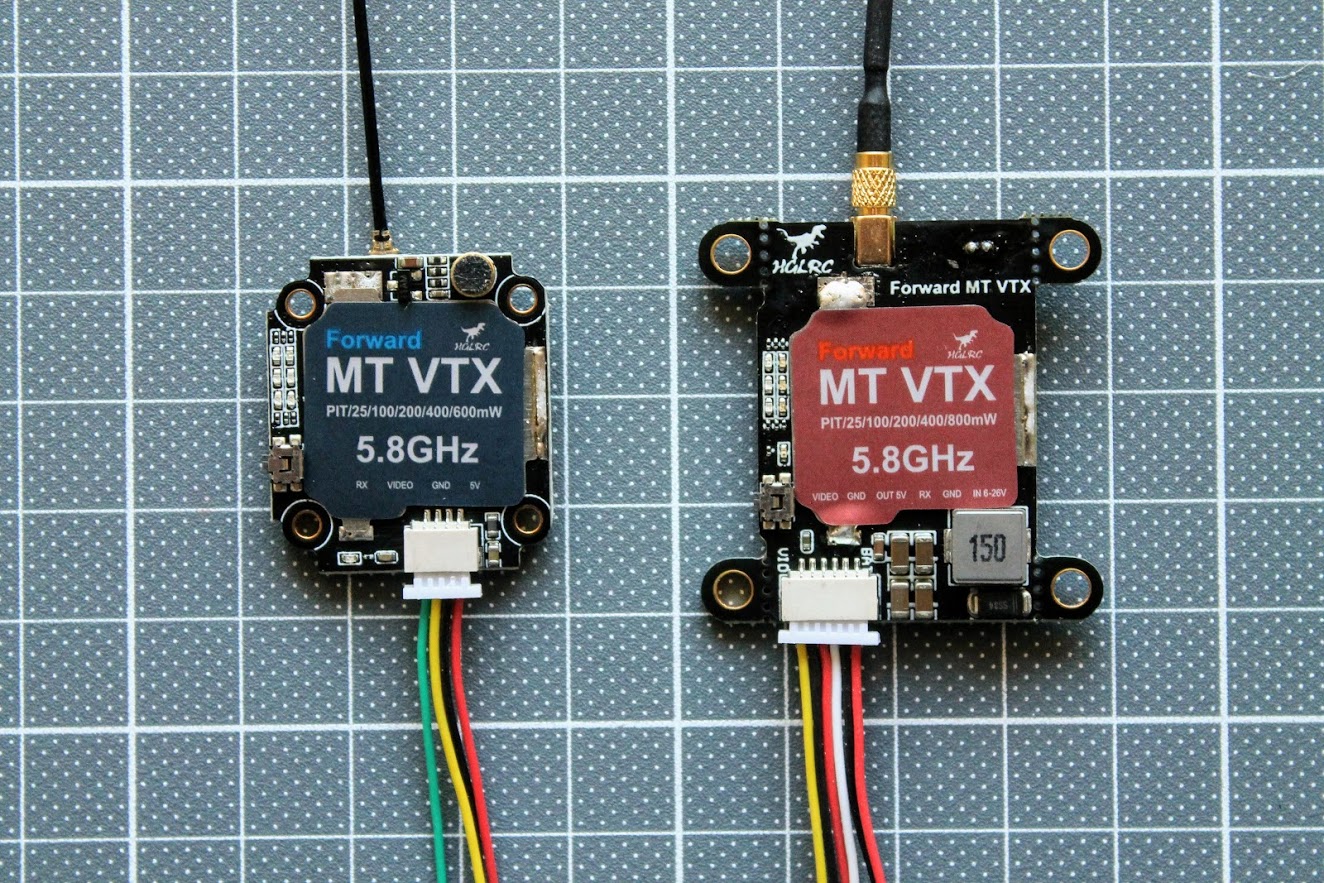
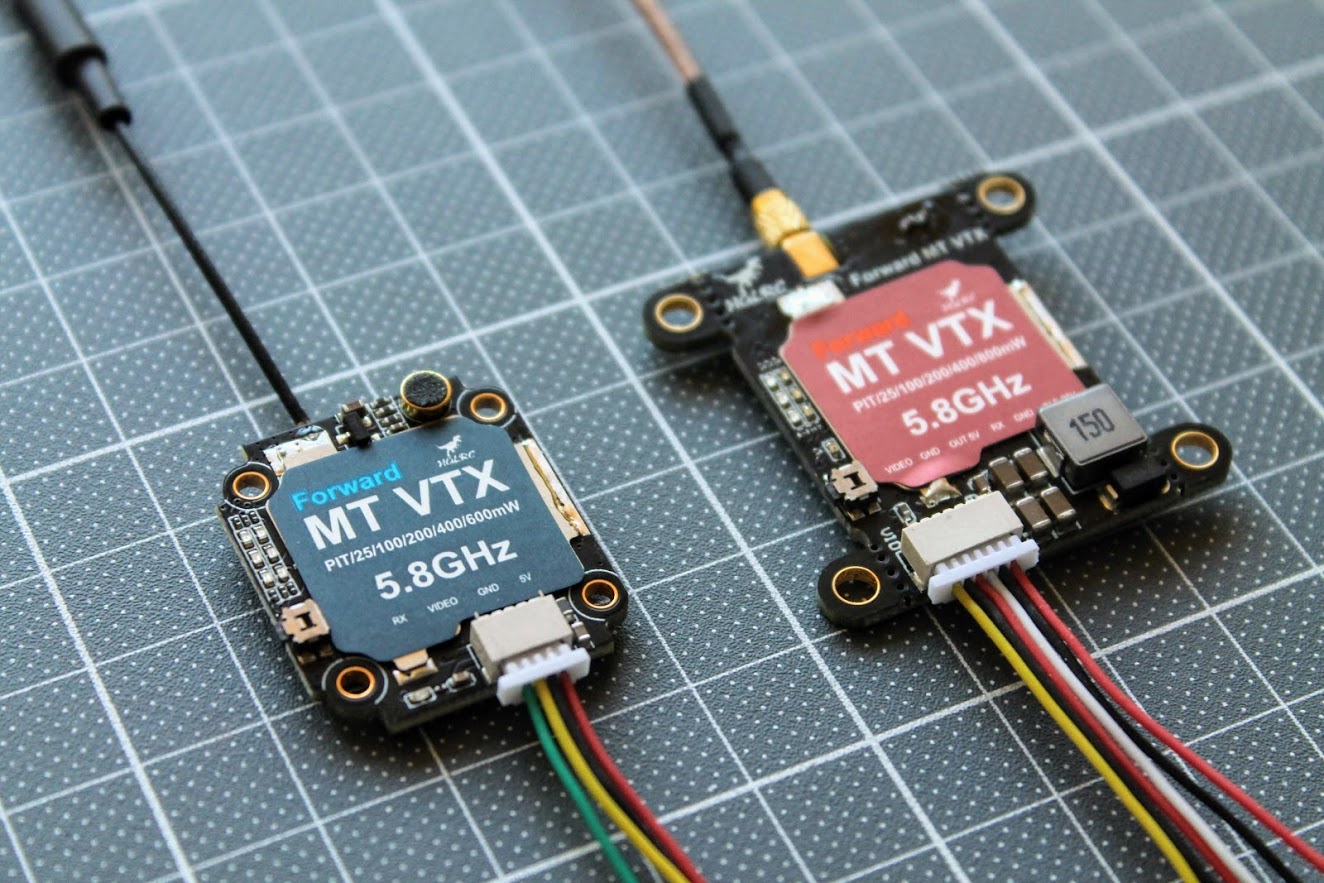
HGLRC MT VTX Mini
Specifications
Input voltage: DC 5V
5V/PIT@70mA
5V/25mW@230mA/14dBm
5V/100mW@280mA/20dBm
5V/200mW@330mA/23dBm
5V/400mW@400mA/26dBm
5V/600mW@600mA/29dBm
Antenna interface: IPEX
Output power:PIT / 25mW/100mW/200mW/ 400mW/600mW switchable
Built-in Microphone
Size: 25.6mm x 29.0mm x 6mm
Weight: 3.9g
HGLRC MT VTX
Specifications
Input voltage: DC 6-26V
Output voltage: 5V/2A
5V/PIT@70mA
5V/25mW@230mA/14dBm
5V/100mW@280mA/20dBm
5V/200mW@330mA/23dBm
5V/400mW@400mA/26dBm
5V/800mW@600mA/29dBm
Antenna interface: MMCX
Output power:PIT / 25mW/100mW/200mW/ 400mW/800mW switchable
Built-in Microphone
Size: 37mm x 36.5mm x 6mm
Weight: 6.7g
Both, the HGLRC MT and HGLRC MT Mini VTX packages contains the VTX, linear antenna, RP-SMA pigtail, connector with silicone wires and instructions manual.
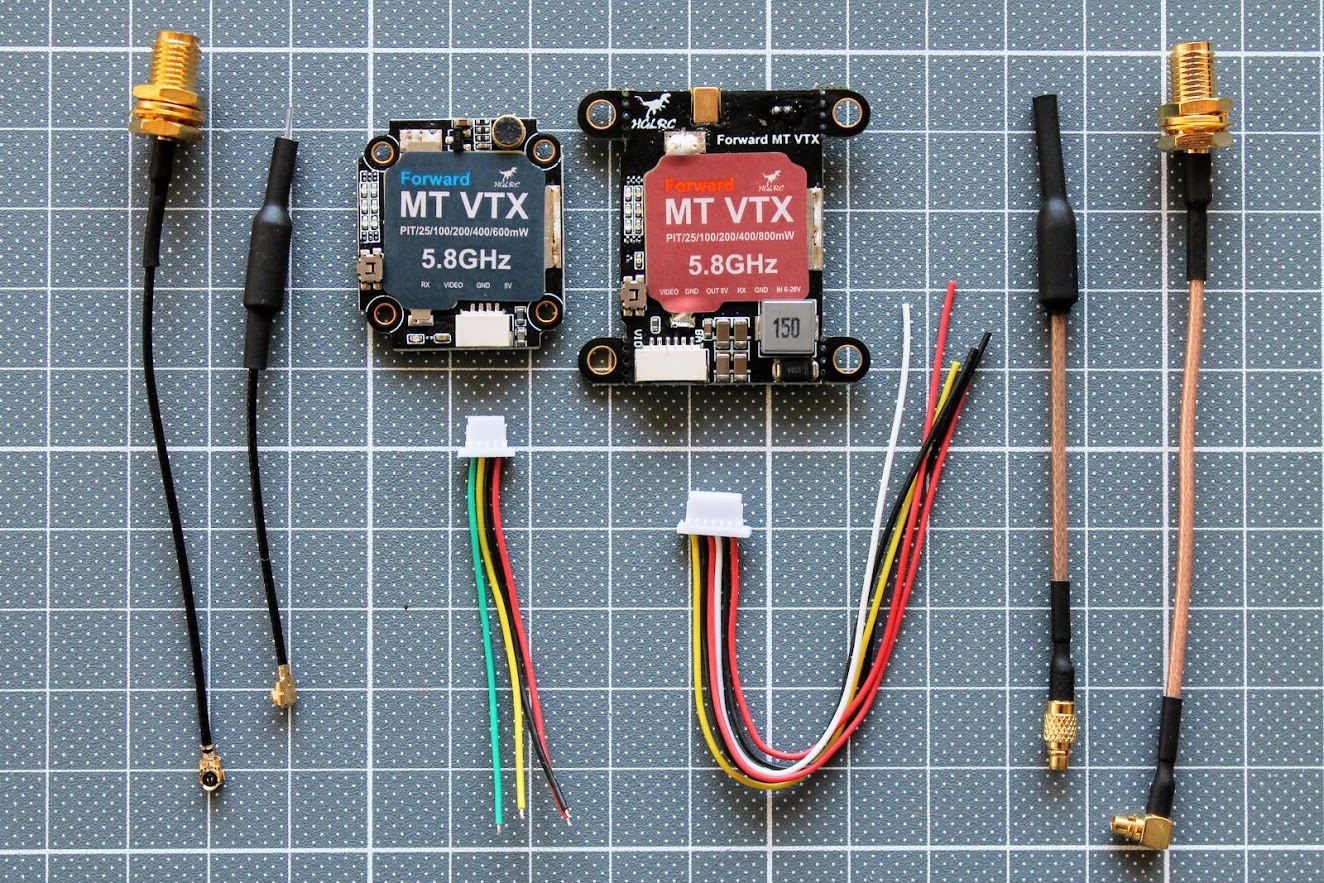
Top view of the HGLRC MT VTX & MT Mini VTX

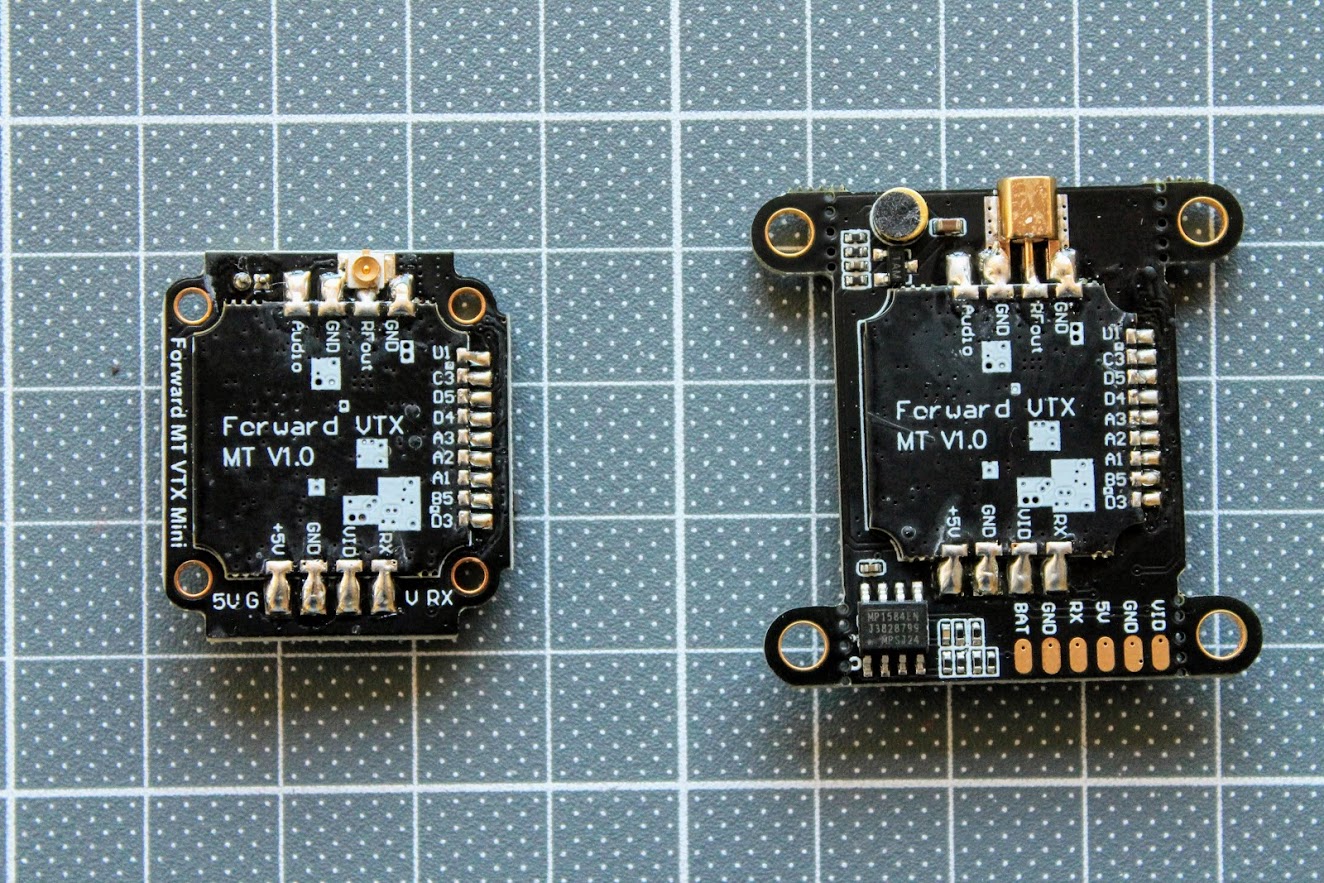
Bottom view. You can instantly spot that both VTX have the same separate RF module (Forward VTX MT V1.0).
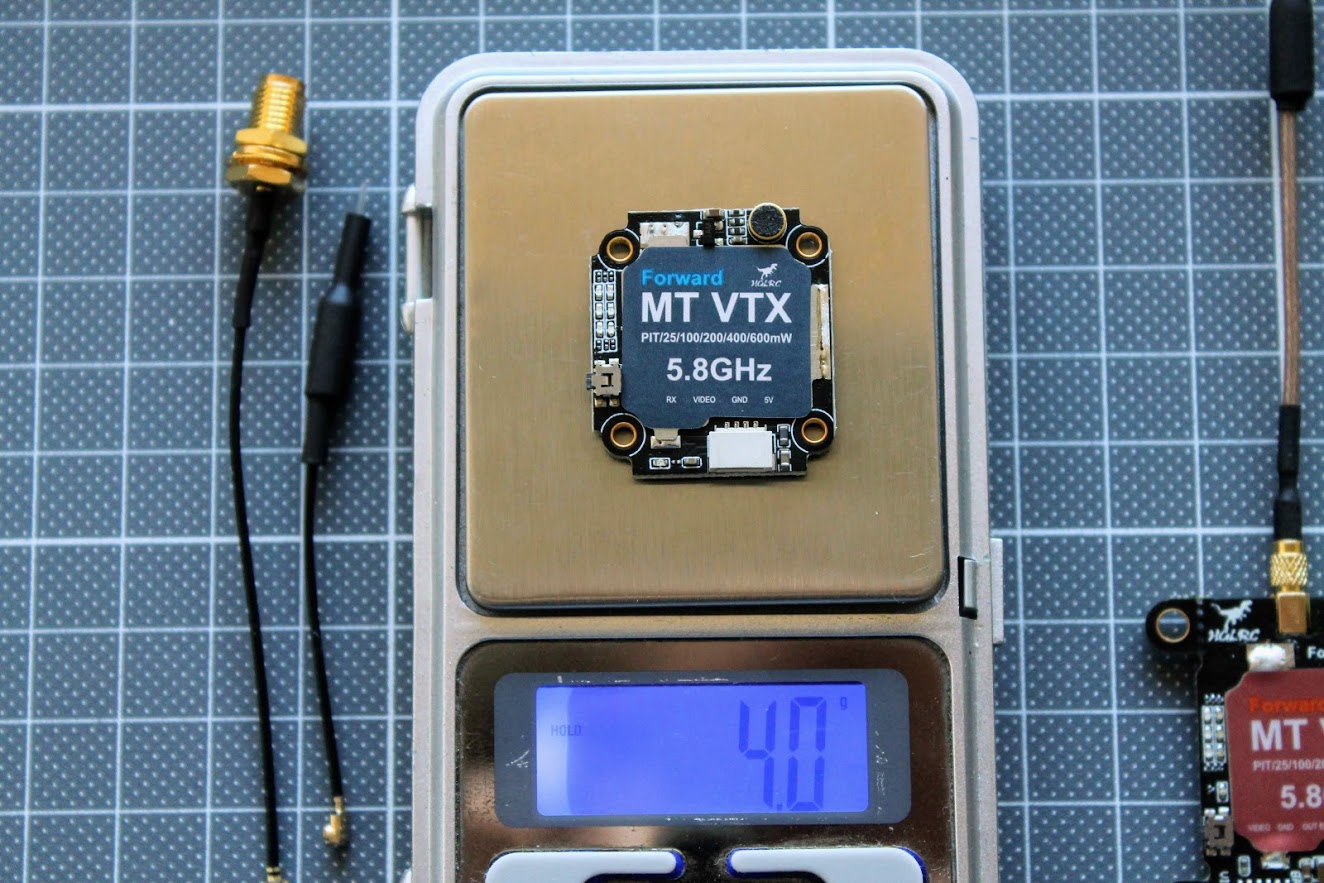
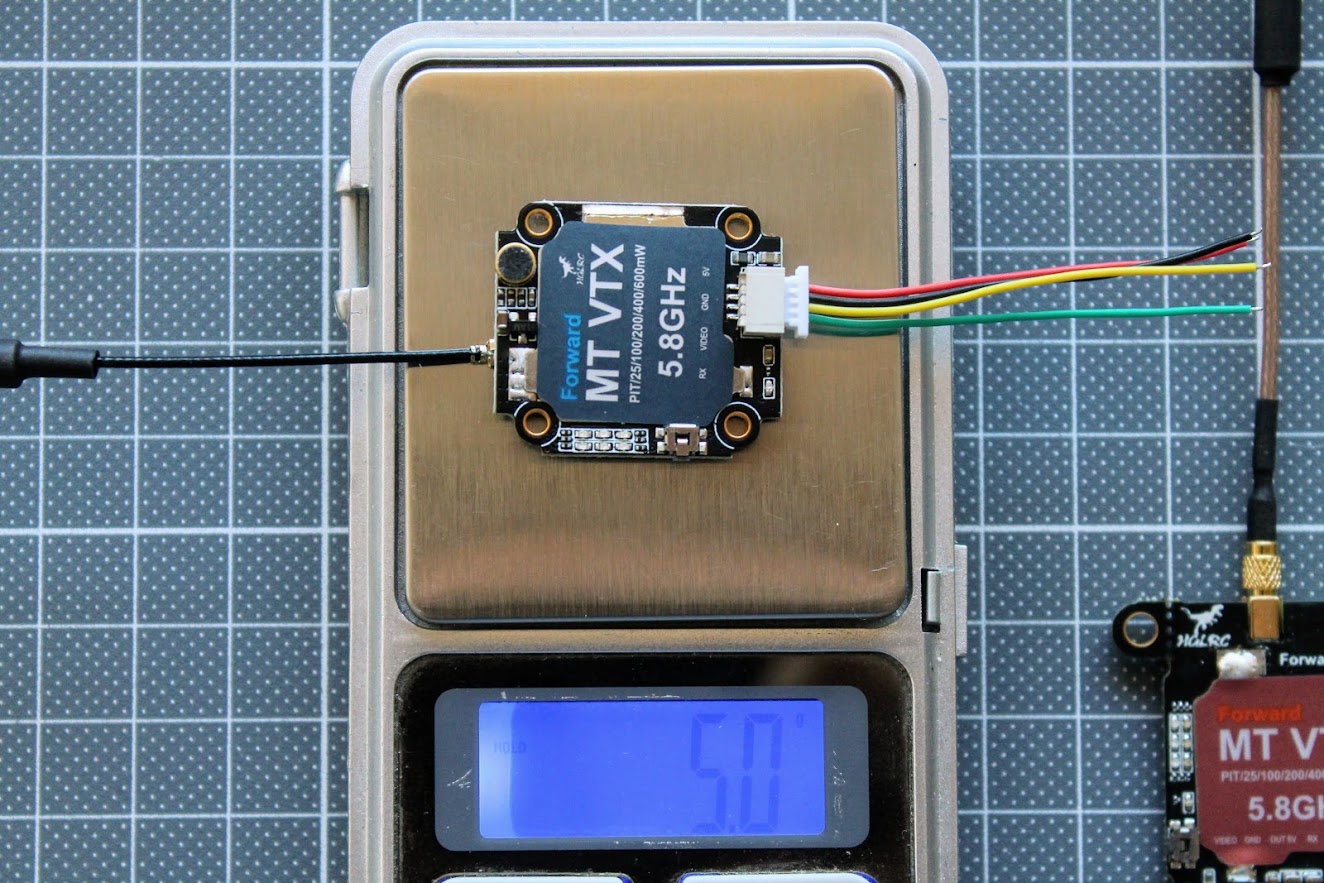
The weight of the bare HGLRC MT Mini is 4 grams.
Weight of the MT Mini VTX with the included linear antenna and connection wires is 5 grams.
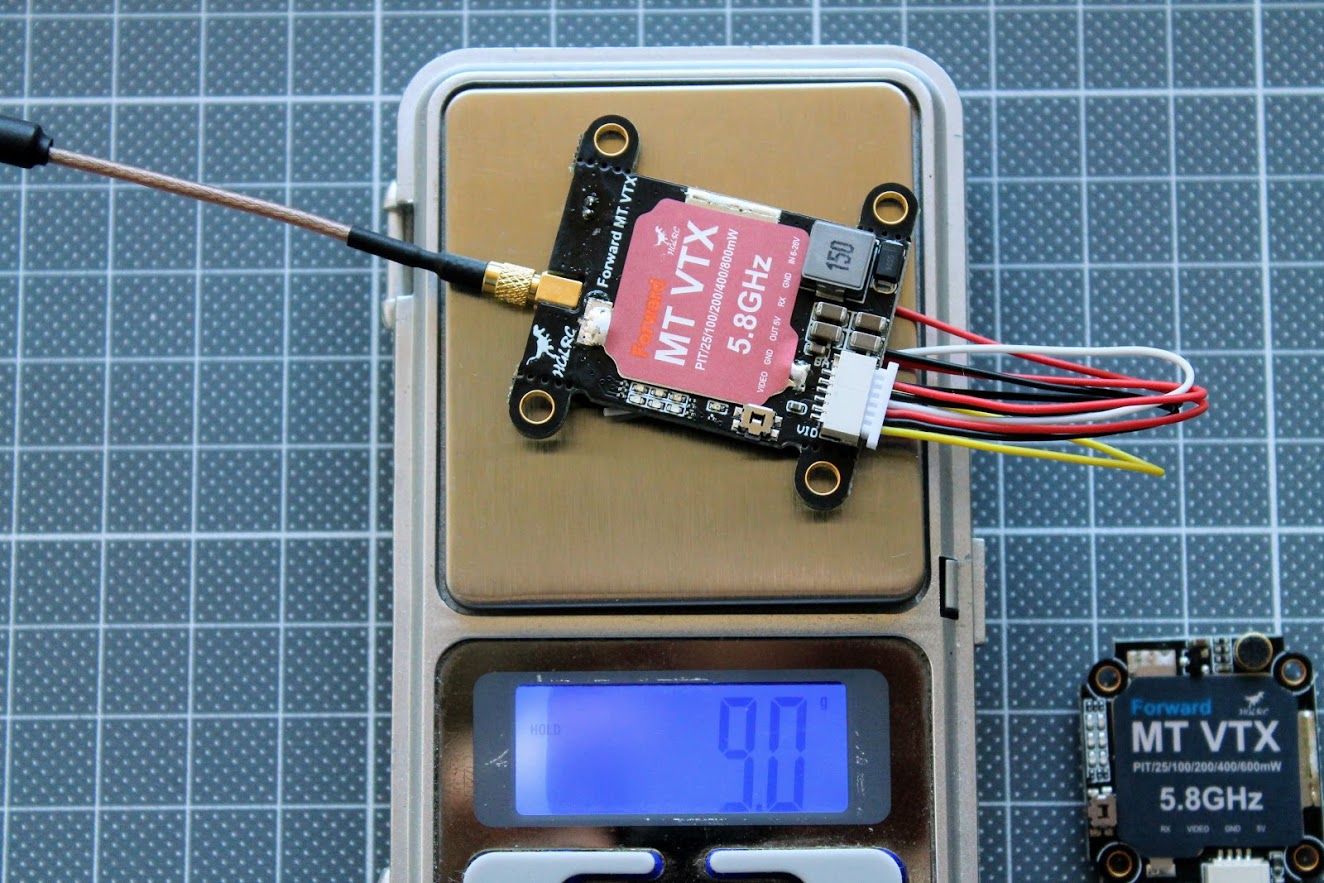
The weight of the bare HGLRC MT VTX is 6.6 grams.

Weight of the MT Mini VTX with the included linear antenna and connection wires is 9 grams.
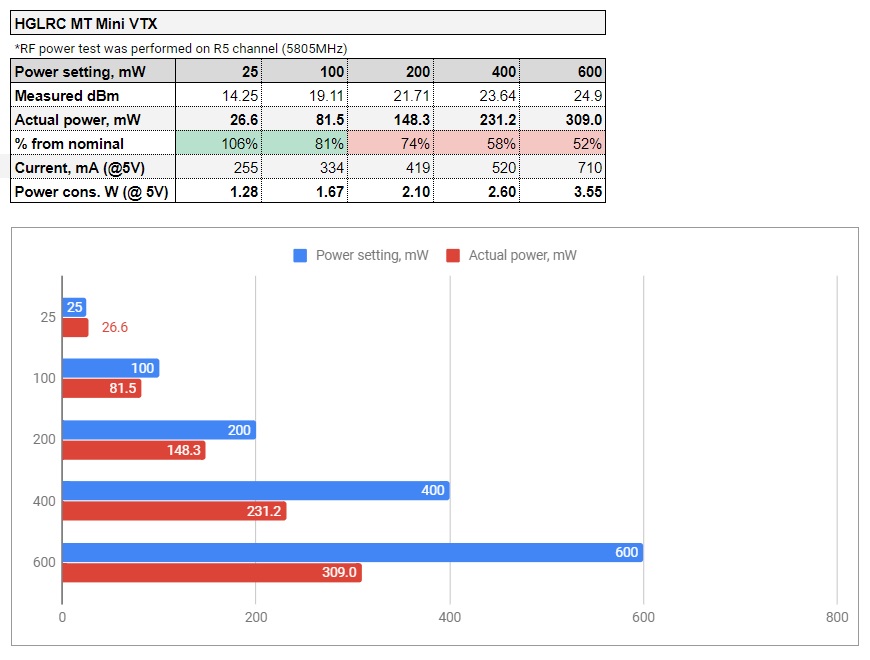
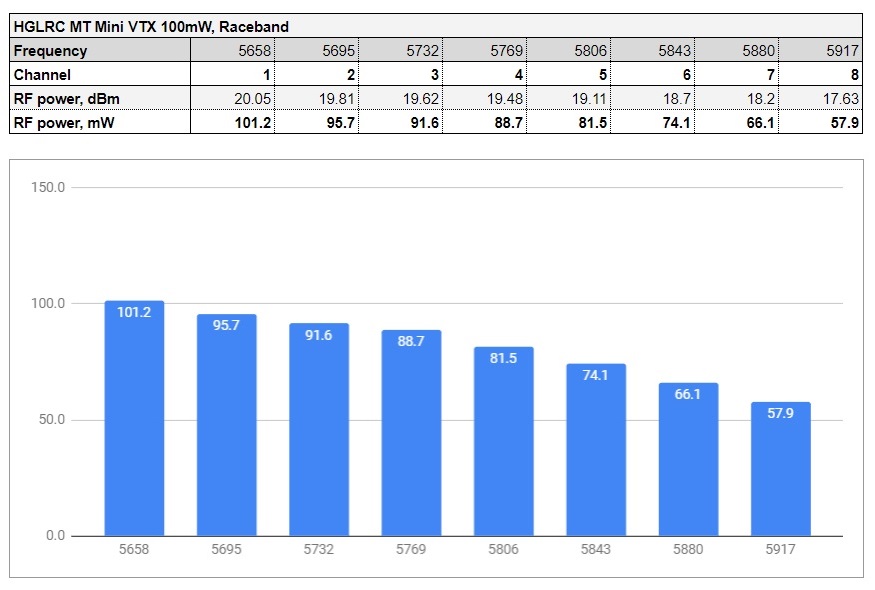
HGLRC MT Mini VTX Power output measurements
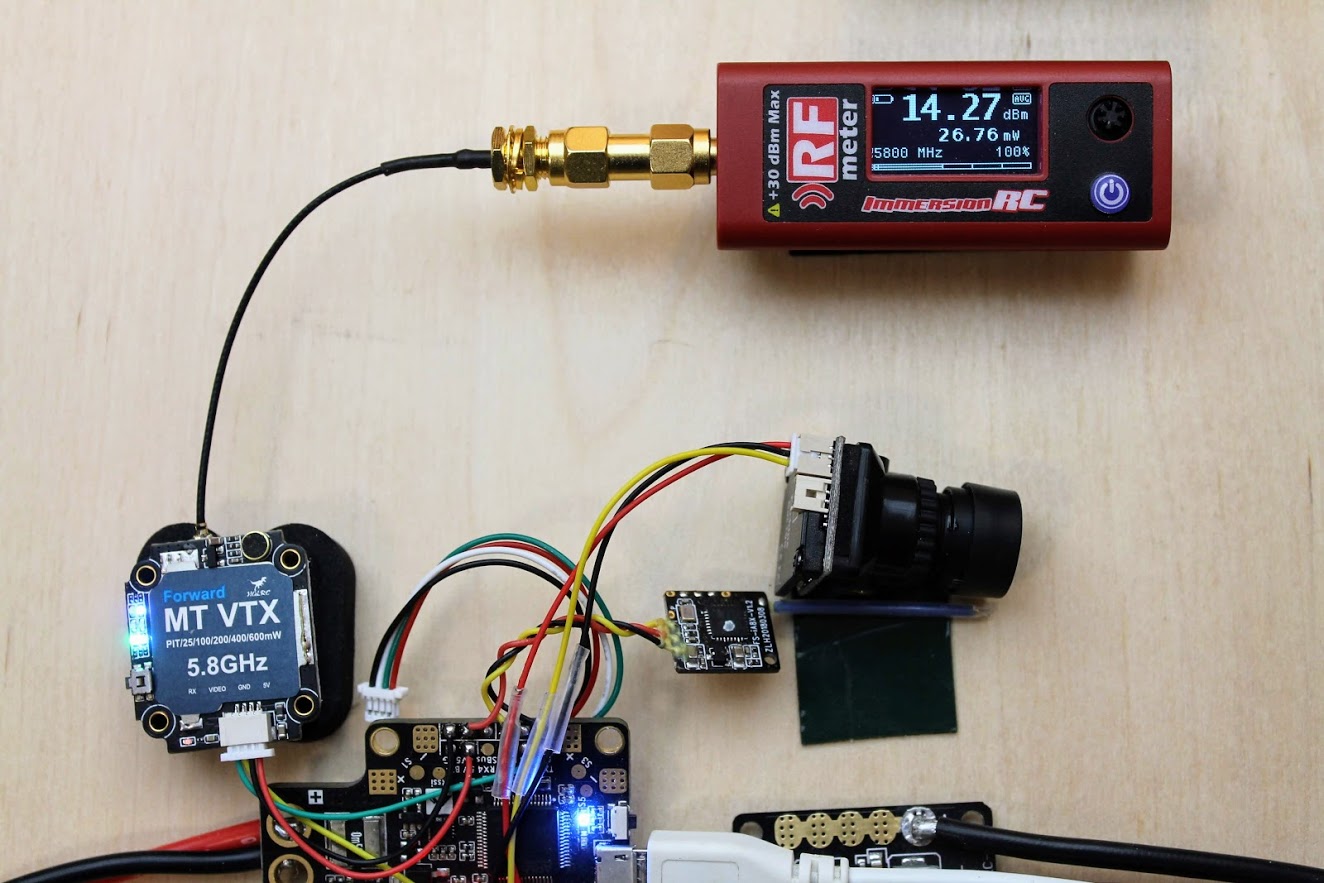
Power output tests were conducted on Raceband, CH5 (5805Mhz).
On 25mW setting RF power meter shows 26.8mW. Pretty much on spot.
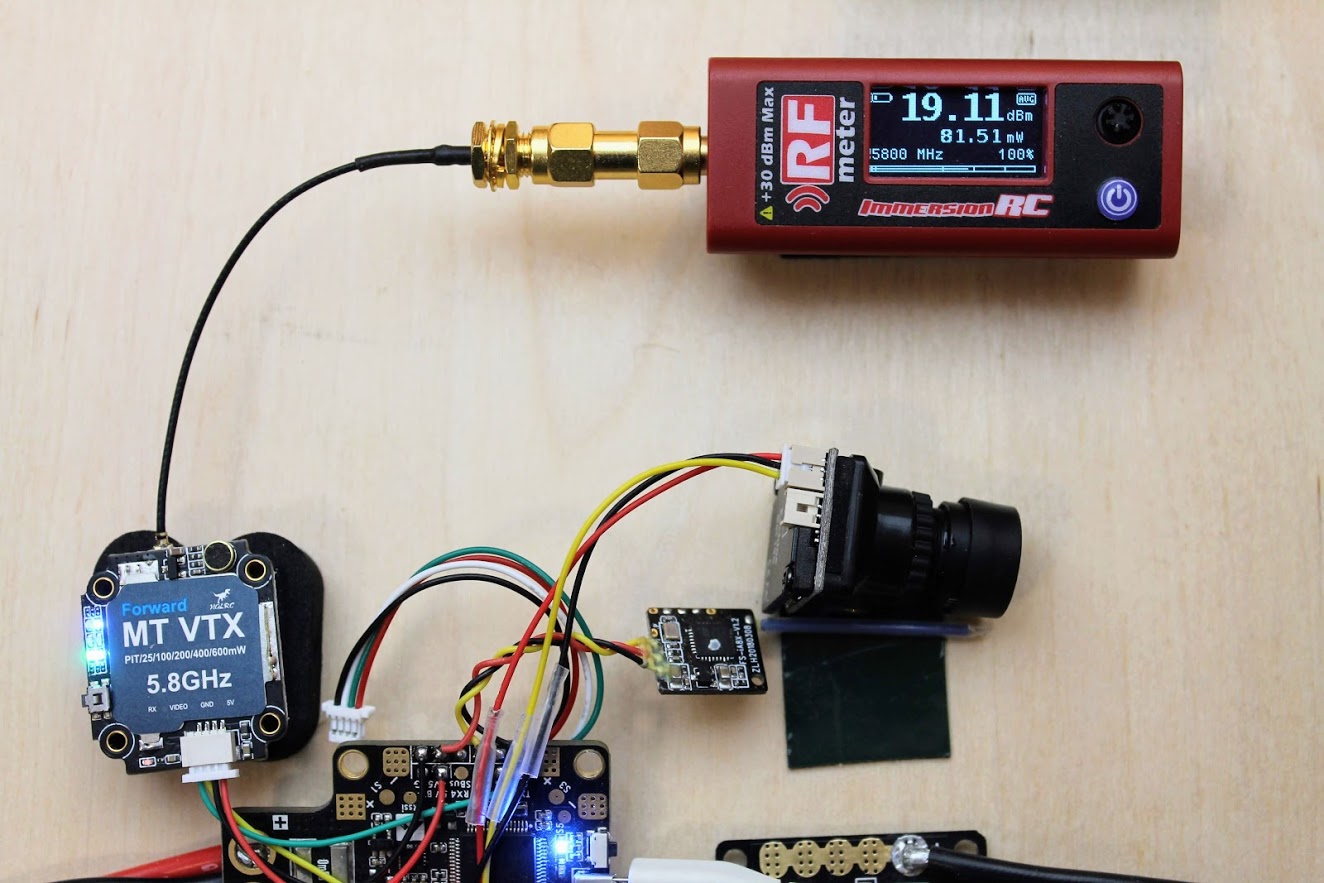
On 100mW setting power meter shows 81.6 mW.
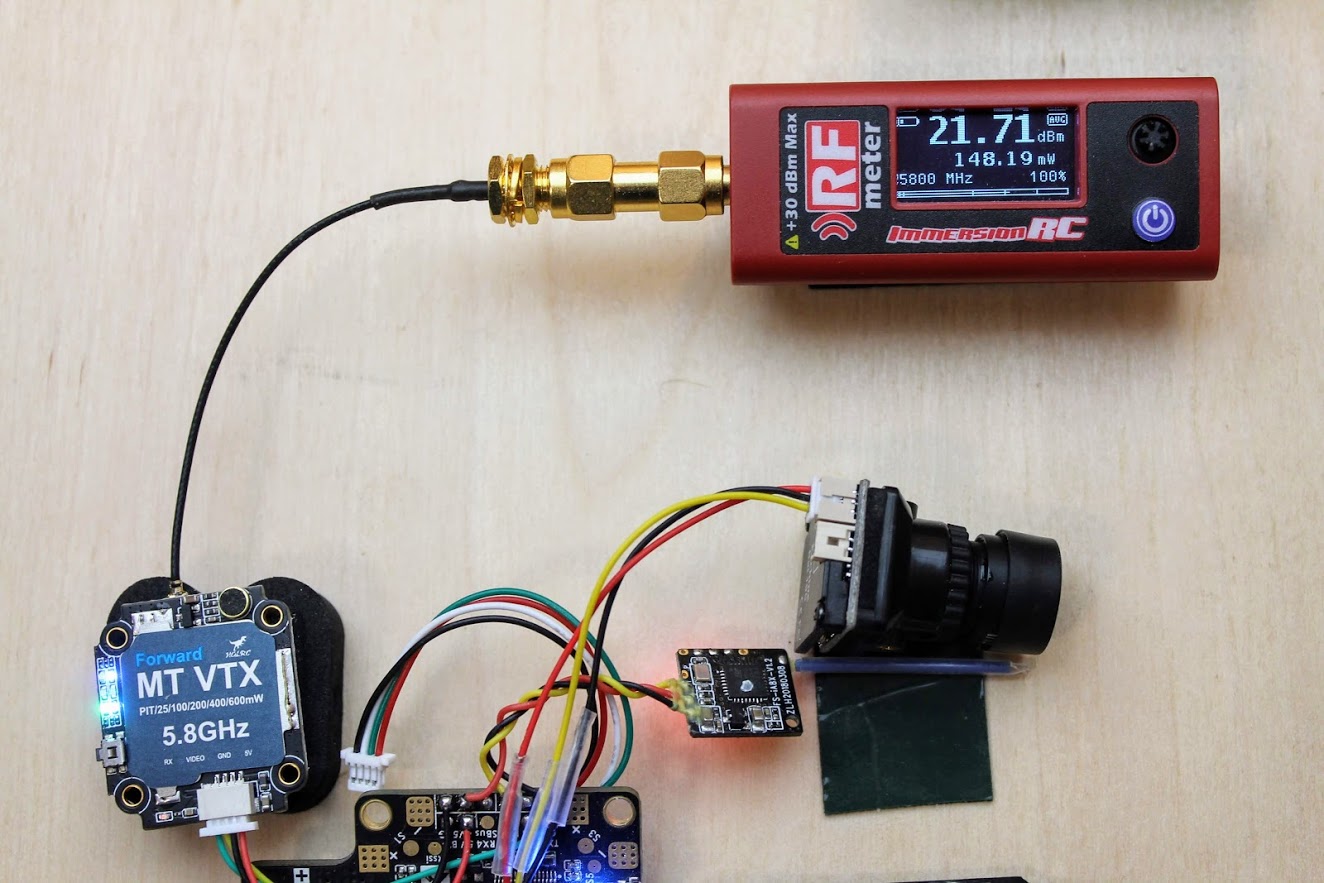
On 200mW setting power meter shows 148 mW.
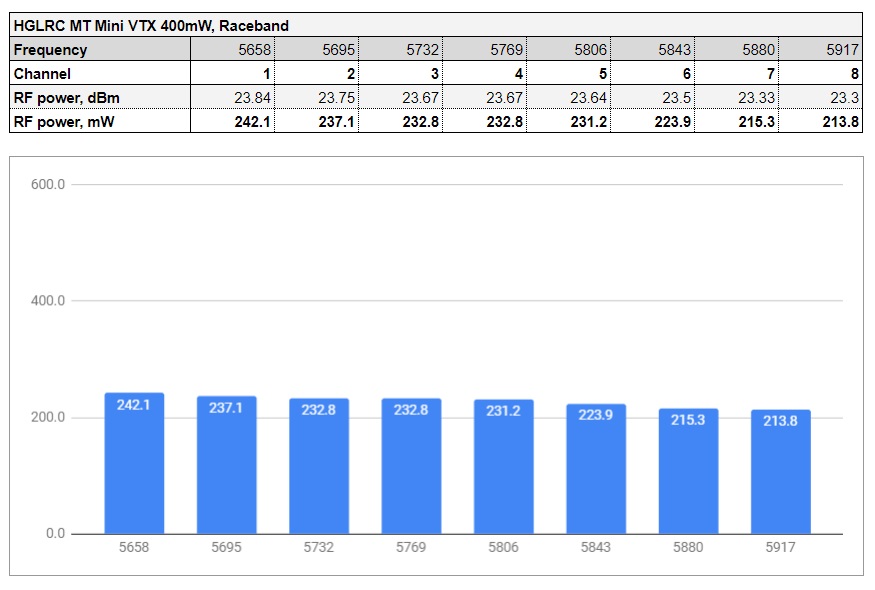
On 400mW setting power meter shows 231 mW.

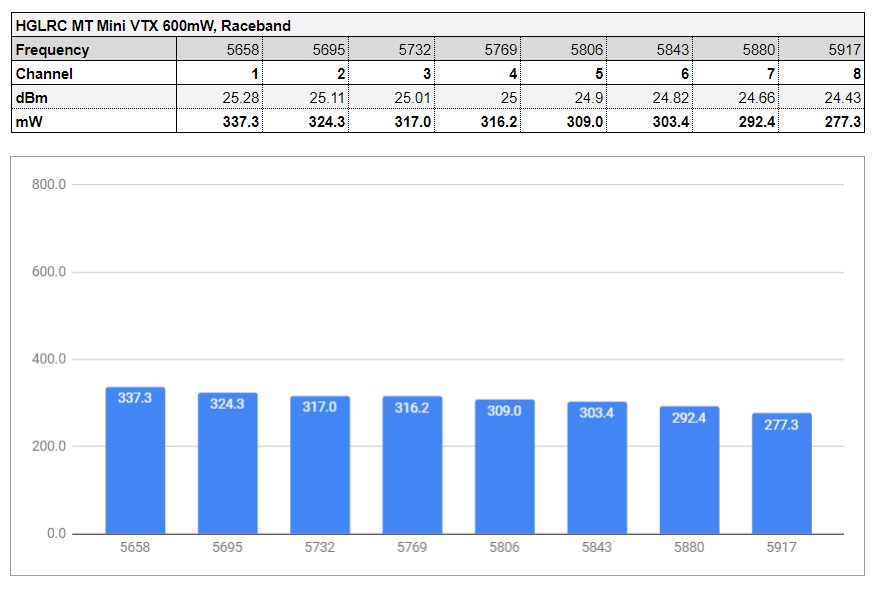
On 600mW setting power meter shows 309 mW. This is almost only the half of the nominal RF Output on 600mW.
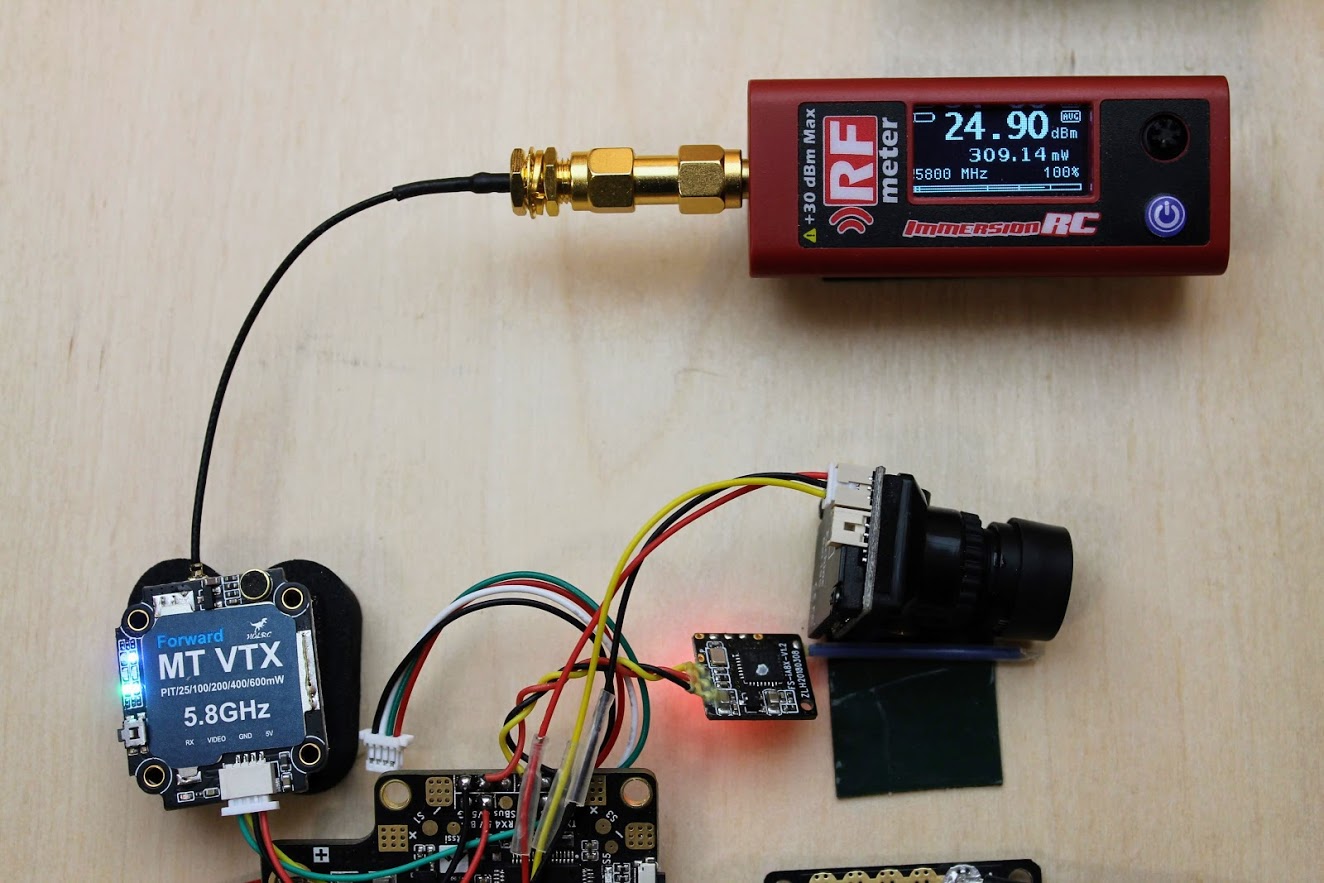
Below are the RF power outputs and electrical current consumption for all power levels. Measured at Raceband, CH5.
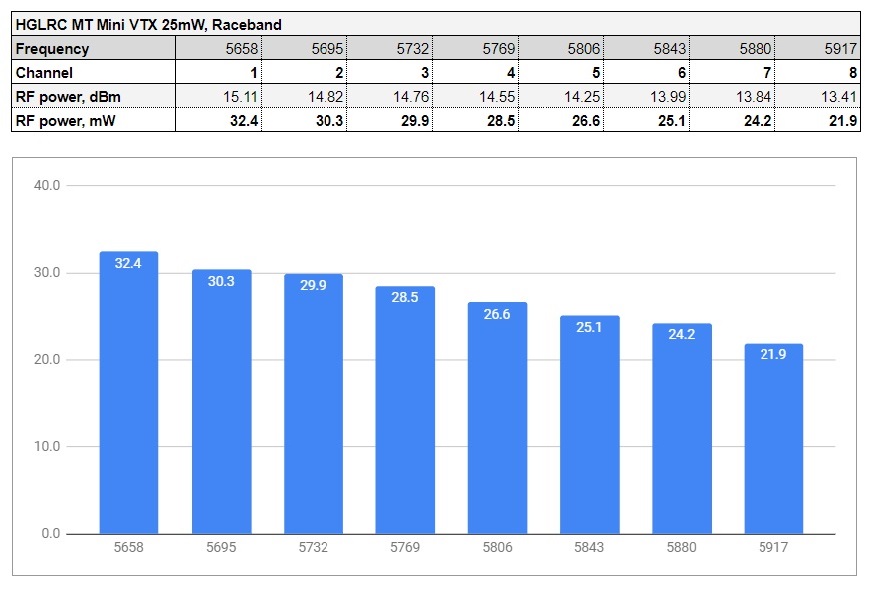
Below is the power output vs frequency for 25mW power level on Raceband.
Power output vs frequency for 100mW power level on Raceband.
Power output vs frequency for 200mW power level on Raceband.

Power output vs frequency for 400mW power level on Raceband.
Power output vs frequency for 600mW power level on Raceband.
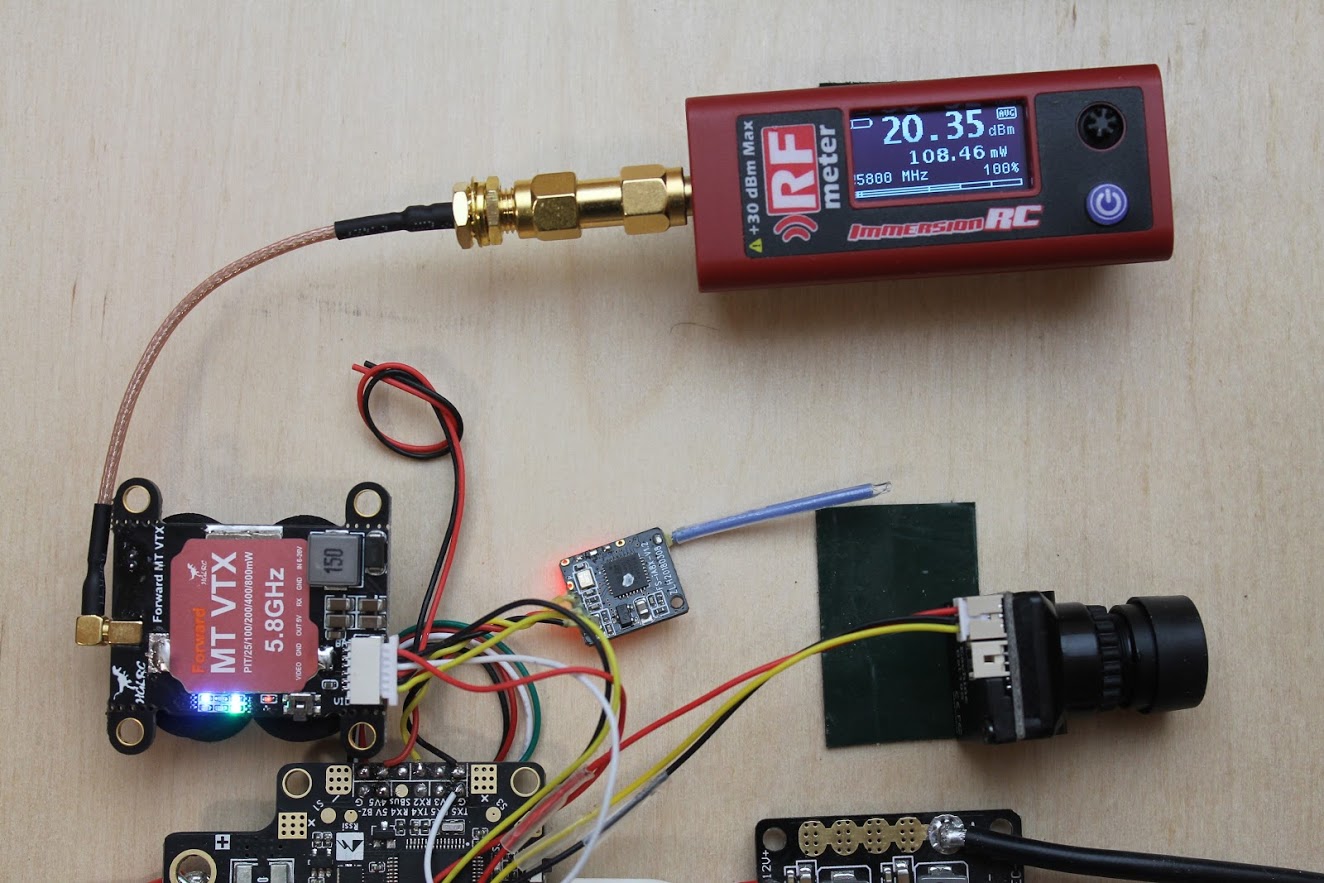
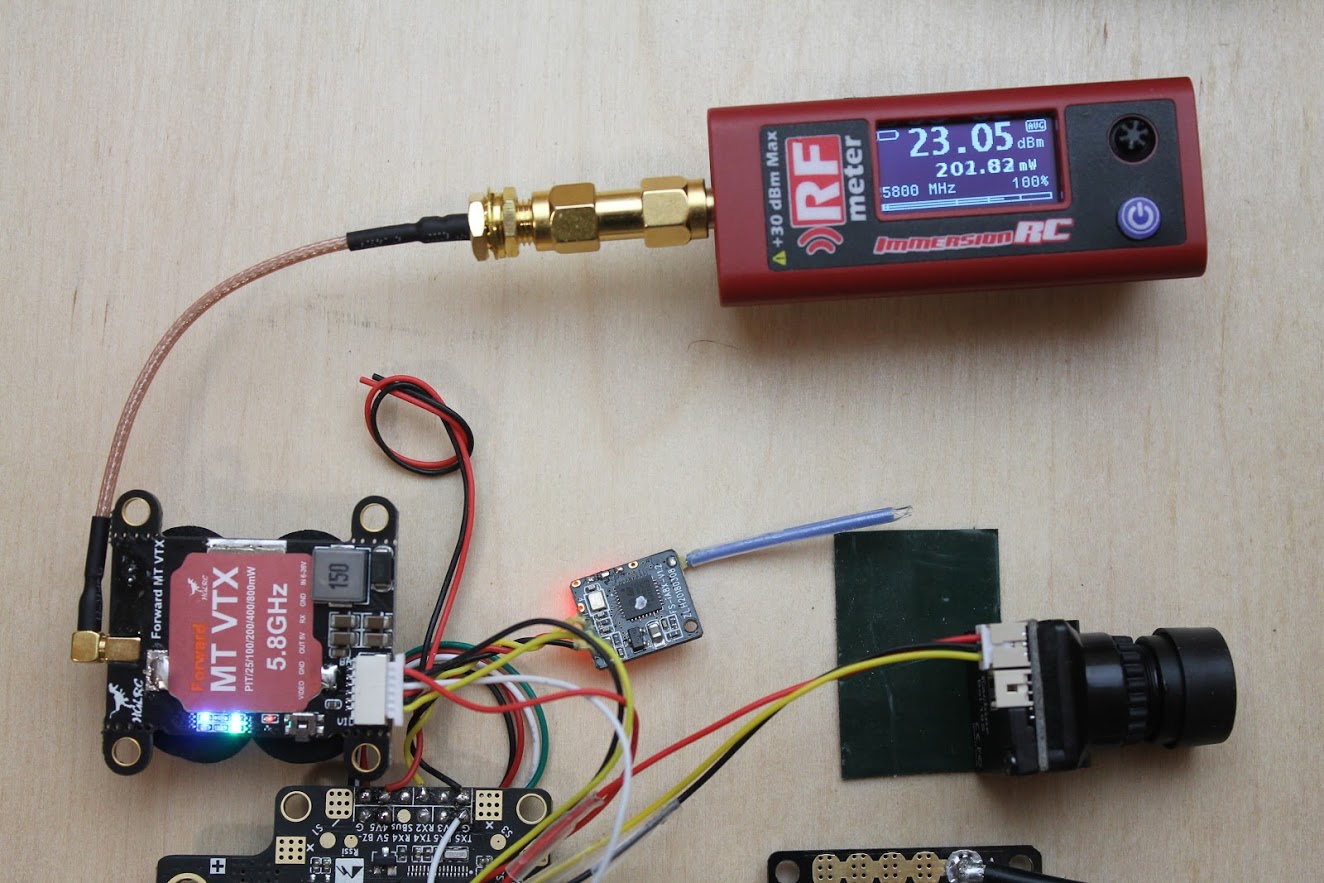
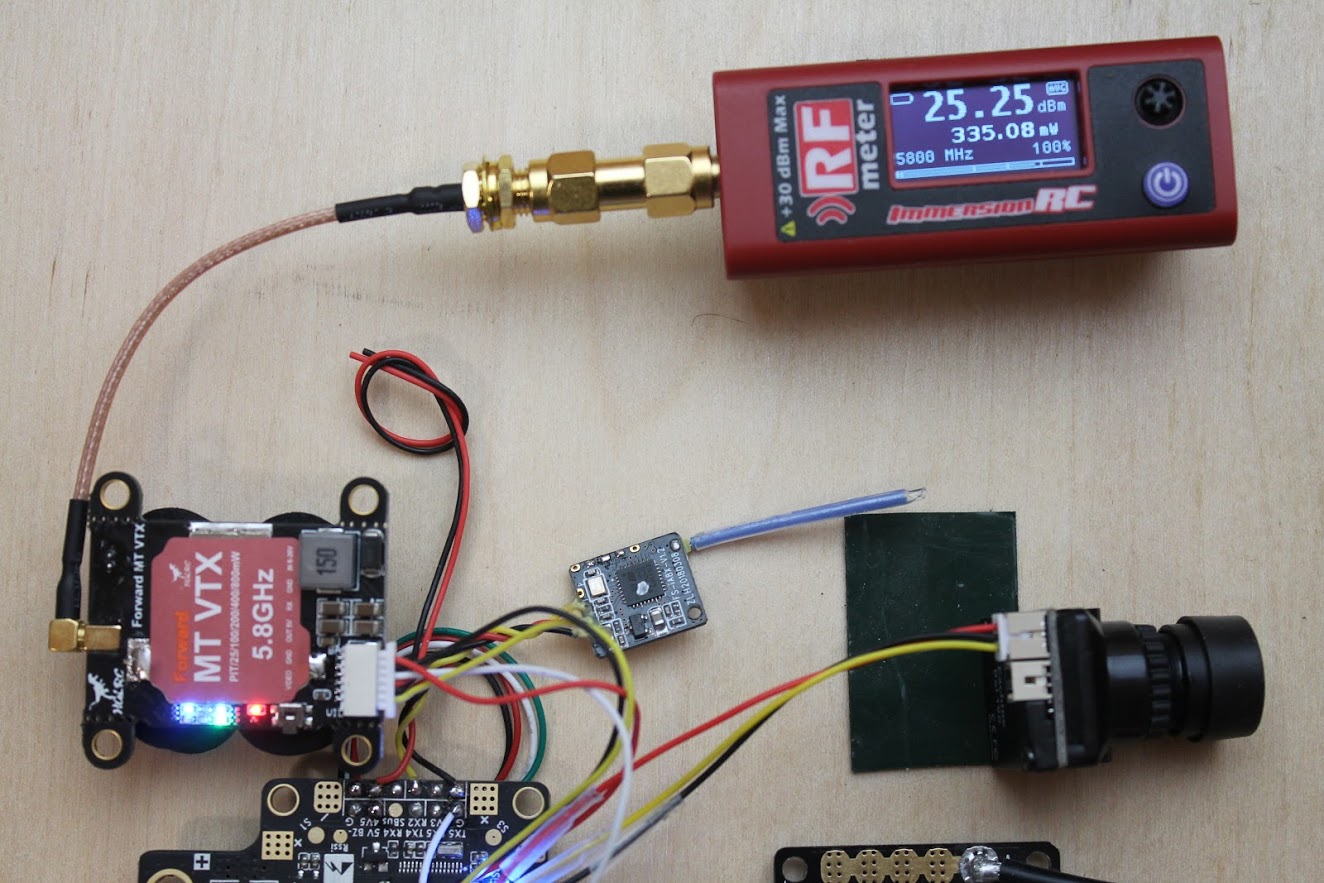
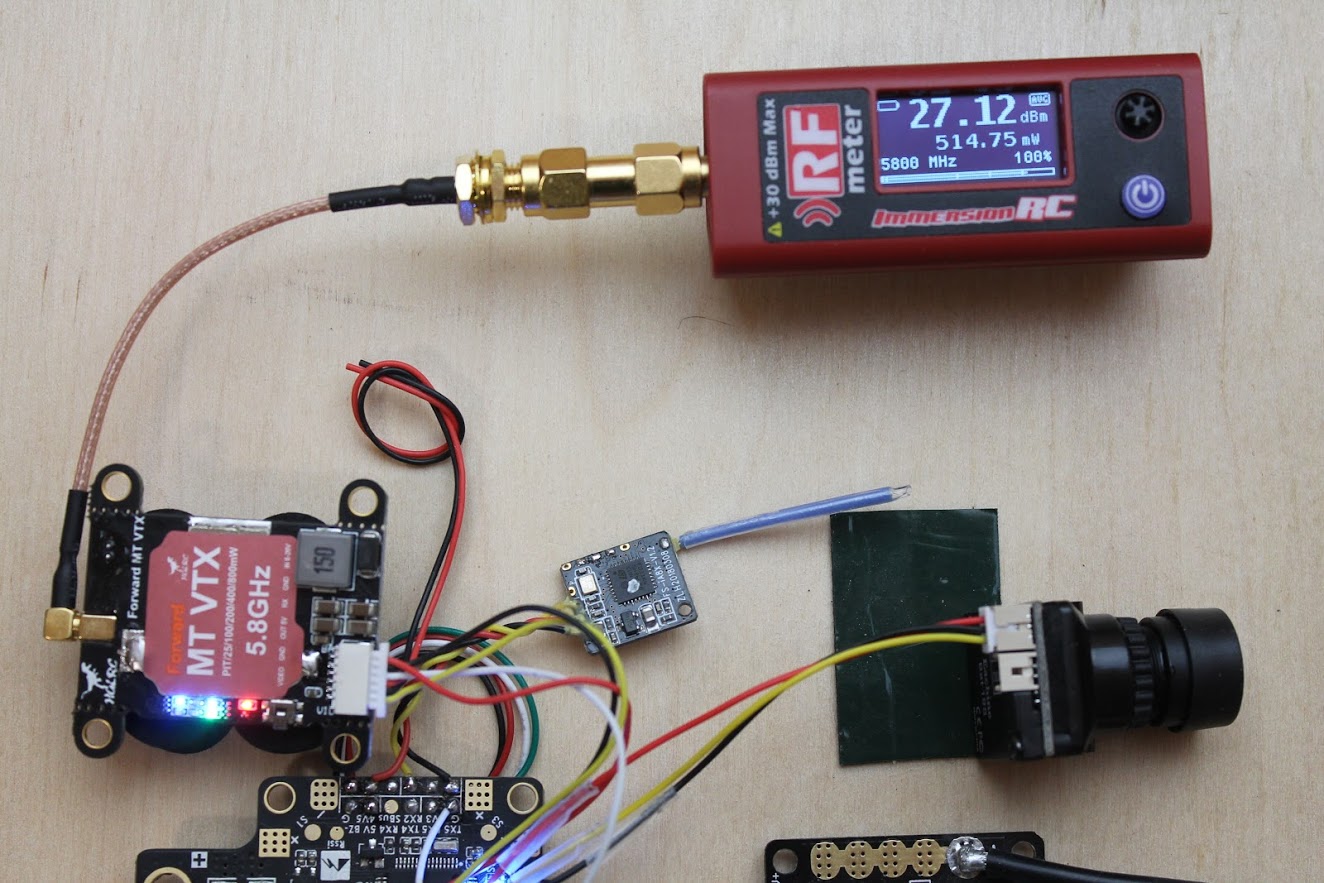
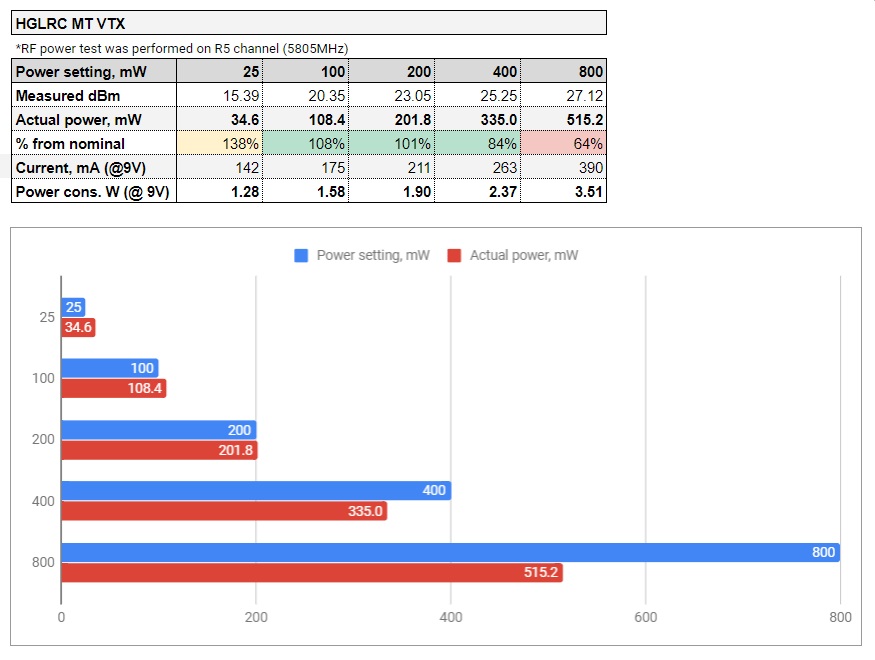
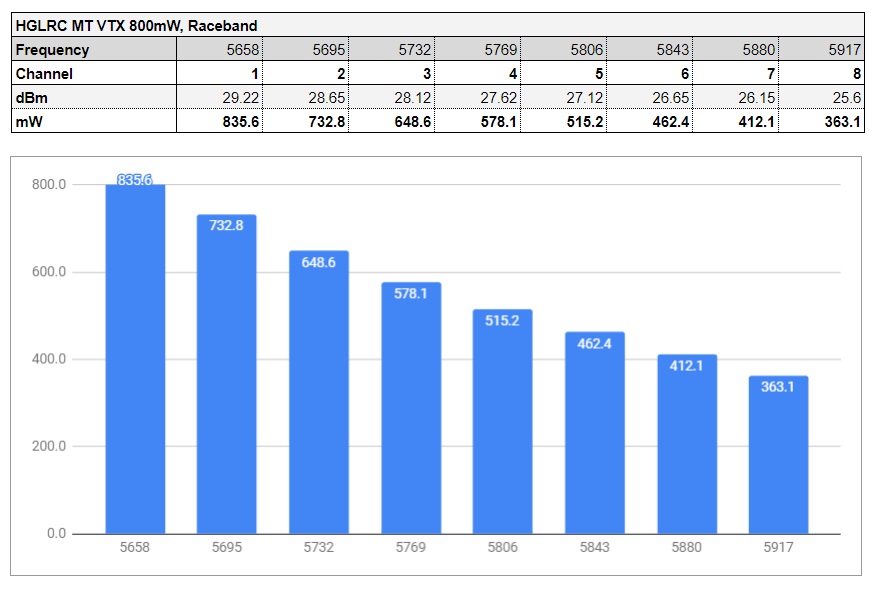
HGLRC MT VTX Power output measurements
On 25mW setting RF power meter shows 34.6 mW. 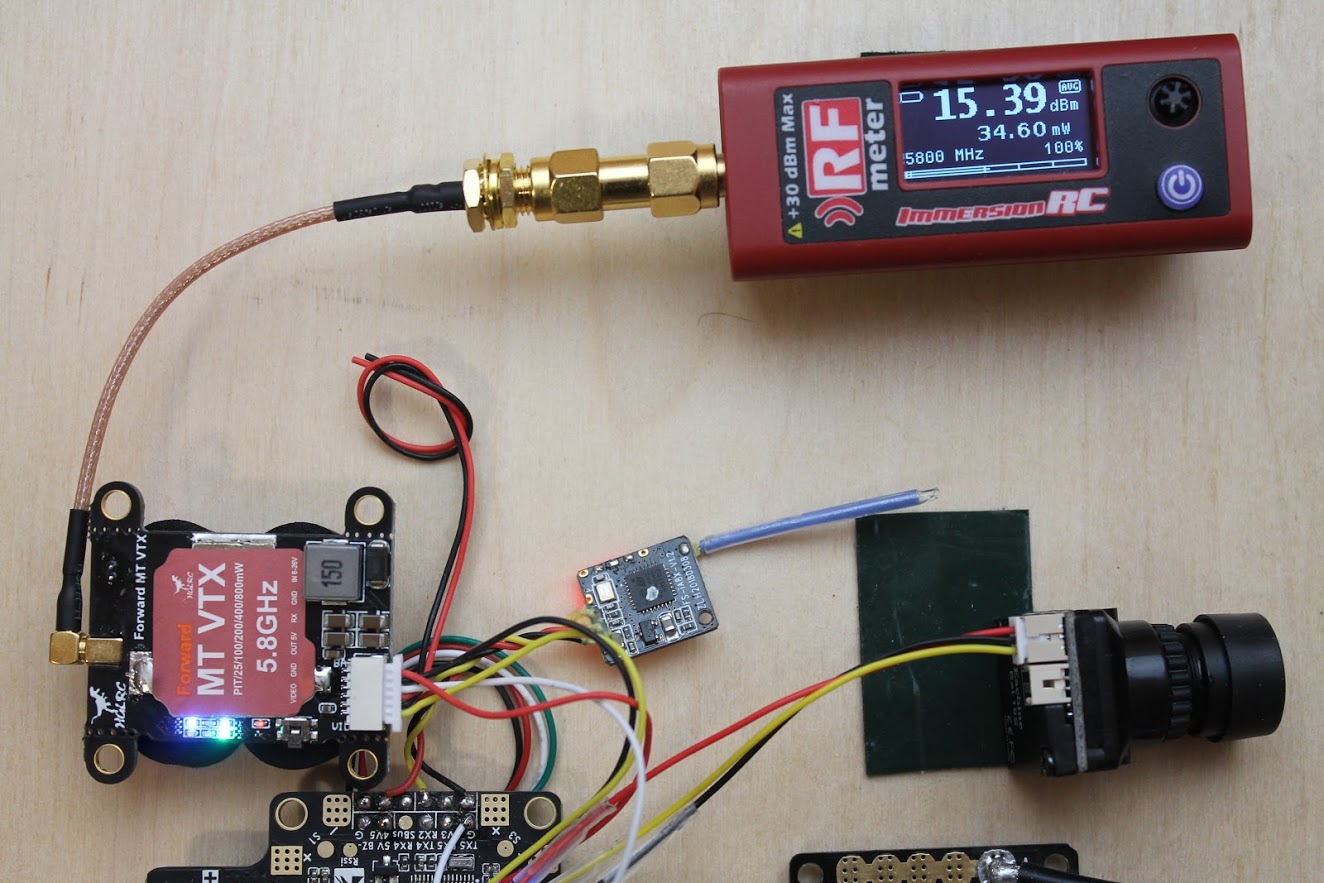
On 100mW setting RF power meter shows 108.5 mW. Pretty accurate.
On 200mW setting RF power meter shows 202 mW. Very good result, almost on spot.
On 400mW setting RF power meter shows 335 mW.
On 800mW setting RF power meter shows 515 mW.
Below are the RF power outputs and electrical current consumption for all power levels. Measured at Raceband, CH5.
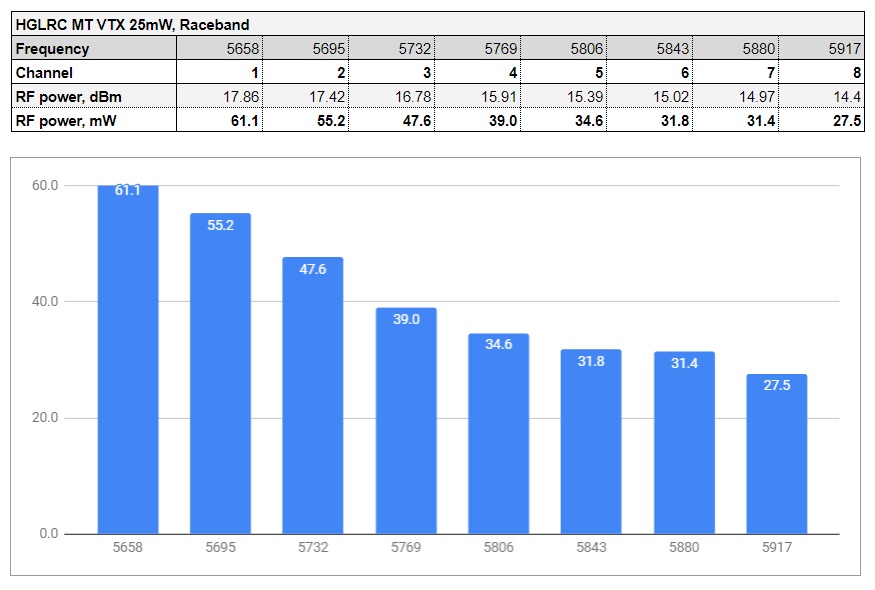
Power output vs frequency for 25mW power level on Raceband.
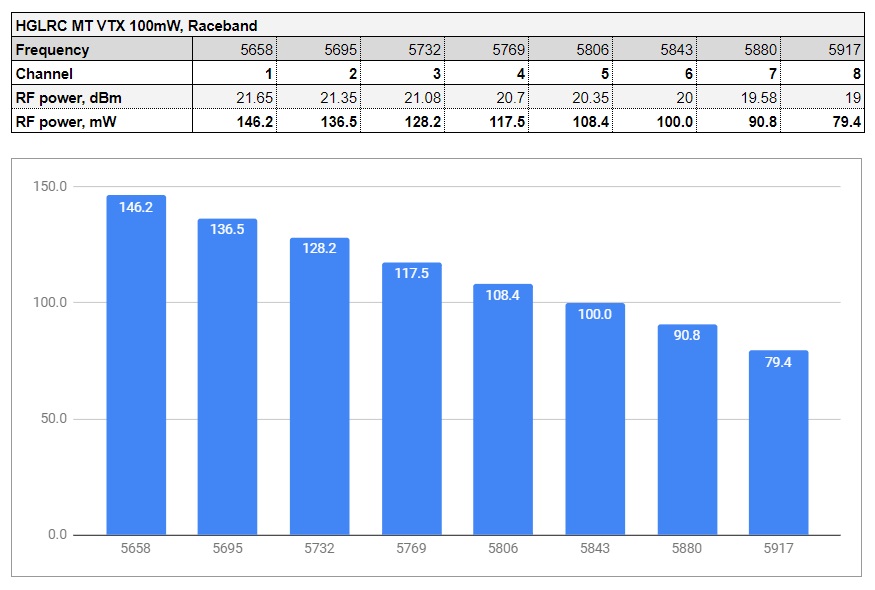
Power output vs frequency for 100mW power level on Raceband.
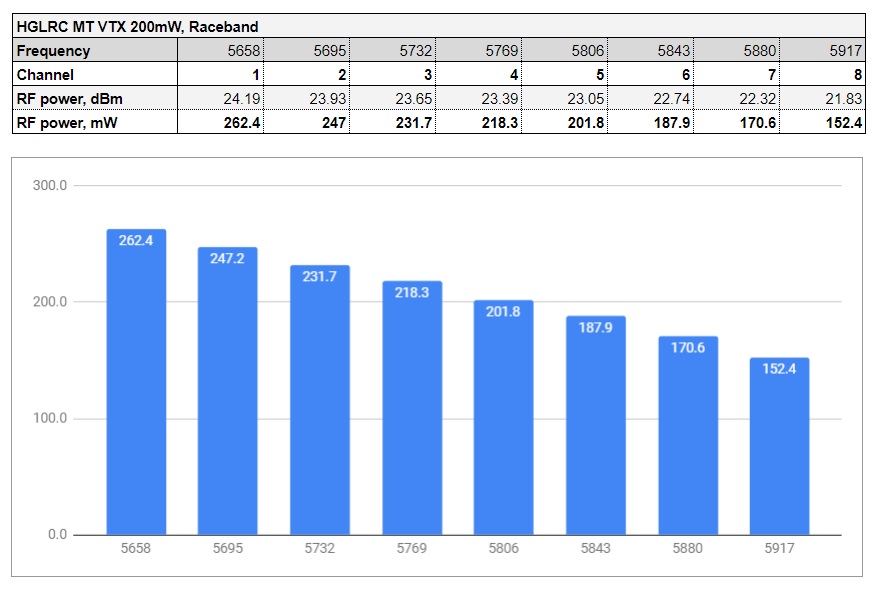
Power output vs frequency for 200mW power level on Raceband.
Power output vs frequency for 400mW power level on Raceband.
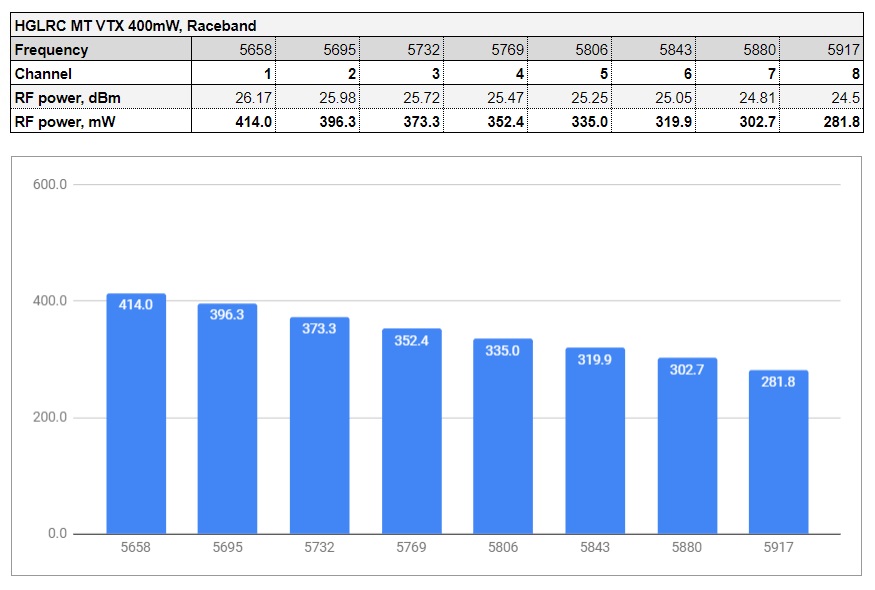
Power output vs frequency for 800mW power level on Raceband.
As you can see there are significant deviations between the nominal power and measured power output across the whole Raceband. These deviations are common thing in almost all the video transmitters. You should have this in mind when selecting the channel/band for FPV feed – it outputs more power on the lower frequencies and less power on the higher frequencies.
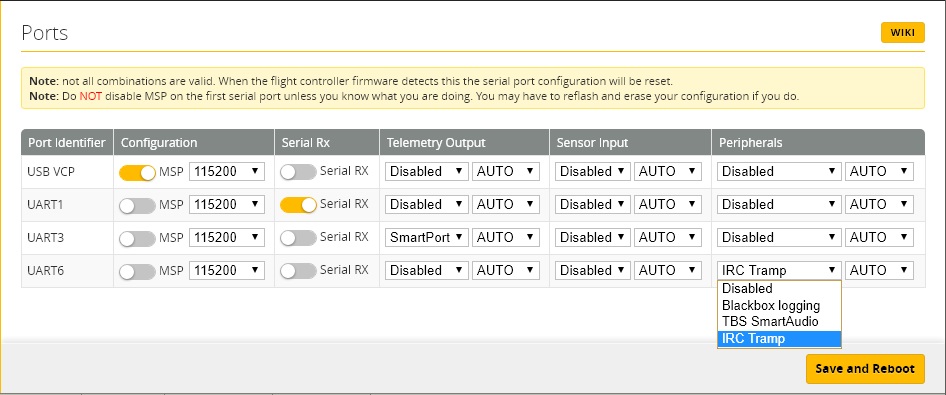
Betaflight OSD control – IRC Tramp feature
HGLRC MT & MT Mini VTX can be controlled by Betafligth OSD. This type of the settings control should be preferred to the button control. It is really hard to count the flashing LED’s and the setting up by button is troublesome.
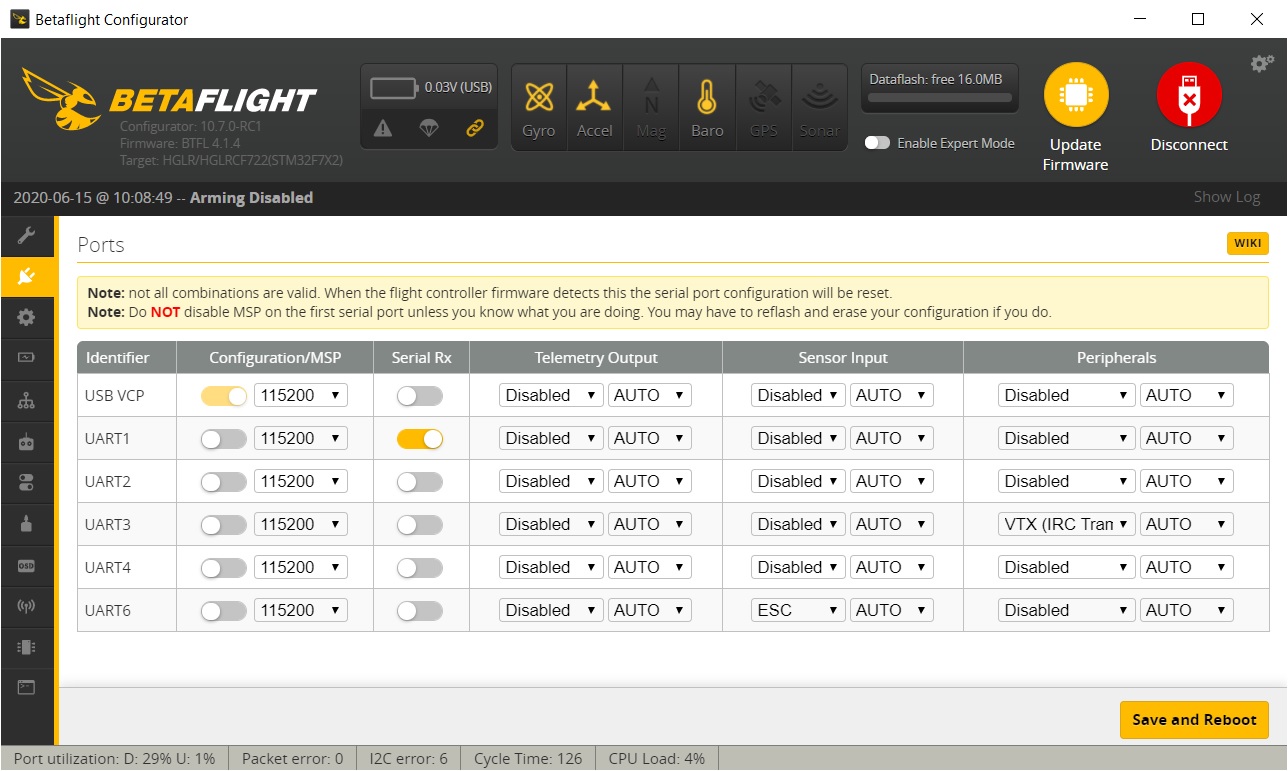
To setup the IRC Trump control you need to connect green wire from the HGLRC MT & MT Mini VTX to any free flight controller TX pad. Then go to Ports tab in the Betaflight Configurator and select the “IRC Tramp” option in the Peripherals column.
Betaflight VTX Tables
If you are using (or planing to use) the Betaflight versions 4.x then you should set up the VTX Tables. More about the VTX tables is in this guide: VTX Tables and how to set them up
Open Betaflight Configurator, connect to the flight controller, select “Video Transmitter” tab. Load the VTX table from the file by clicking on the “Load from file”.
Select the VTX table file. If there are separate VTX table files for US and/or EU region then you should select the right file for your region. If there is only one file then it is most likely is so called “global” and has all the channels enabled. Use on your own responsibility. (Hint: European table has only the 3 channels on Raceband).
HGLRC MT Mini VTX Table: https://drive.google.com/open?id=1YRUUzOqkCWLEV-auQM6LdJC1NBaMAmnJ
HGLRC MT VTX Table: https://drive.google.com/open?id=1RroPf7fZycV-9bTTjCThdavVJOBwifzd
After you will load the file, you should see the VTX table configuration on the screen. Don’t forget to click the “Save“.
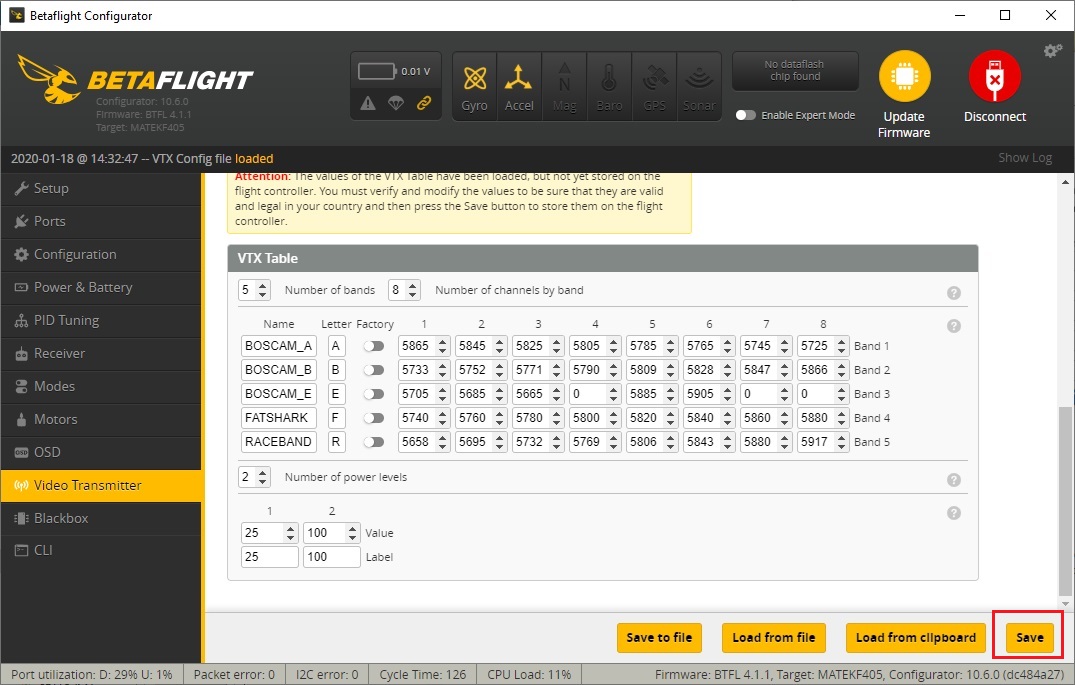
If everything is set up correctly, then you should see the VTX settings information on the right panel.

A note on the HGLRC MT VTX table: somehow I was able to set the highest VTX power level only by setting the value “600” instead of the “800” for 800mW. This is probably the small bug in the VTX software, but can be easily fixed by using the correct VTX table.
Available @
HGLRC
MT Mini VTX: https://www.hglrc.com/collections/new-arrivals/products/hglrc-forward-mt-vtx-800mw-30-5×30-5-for-fpv-racing-drone
Banggood
PROS
- RF shield and heat sink (arguable)
- IRC Tramp control
- Wide range of power levels Pit/25/100/200/400/600(800) mW
- Stable RF power output
- Does not overheat
- On board microphone
CONS
- MT Mini VTX has low RF power on 400mW and 600mW
- MT VTX has incorrect power settings in the firmware
- MT Mini has only 5V power supply option
CONCLUSION
HGLRC Forward MT and MT Mini video transmitters have almost everything you need from VTX – wide range of power levels, stable RF power, effective thermal control, microphone on board and are stackable on the flight stack. They have low profile even including the heat sink. Engineers have made really good job designing these two new products.
However as nobody is perfect these VTX are no exception. HGLRC MT Mini, the smaller one, has struggled to provide the nominal RF power on the 400mW and 600mW settings, while the bigger brother, HGLRC MT VTX showed pretty decent results. My guess is the metal plate (so called “heat sink”) on the top of the VTX board is not working effective enough. Probably HGLRC could add thermal paste between the RF amplifier chip and heat sink plate, to increase the heat dissipation. HGLRC MT, has bigger mass and has no problem with the heat. I should note that both video transmitters worked stable and didn’t overheat even without active cooling on the bench. Also RF power output remained stable and has dropped only the little.
HGLRC MT VTX has small bug in the firmware and you need to set the value “600” in order to set the 800mW power level in the VTX table. This is no big deal, you just have to know this, or you can get nuts trying to set power level in this VTX. Use the VTX tables provided in this article.
Disclaimer: This item was supplied by HGLRC for a fair and unbiased review. HGLRC never asked for a positive review and never influenced my opinion in any way. I’m trying my best to stay uninfluenced and give only my own opinion. All affiliate links if there are any help me purchase items for future reviews and tests.
]]>