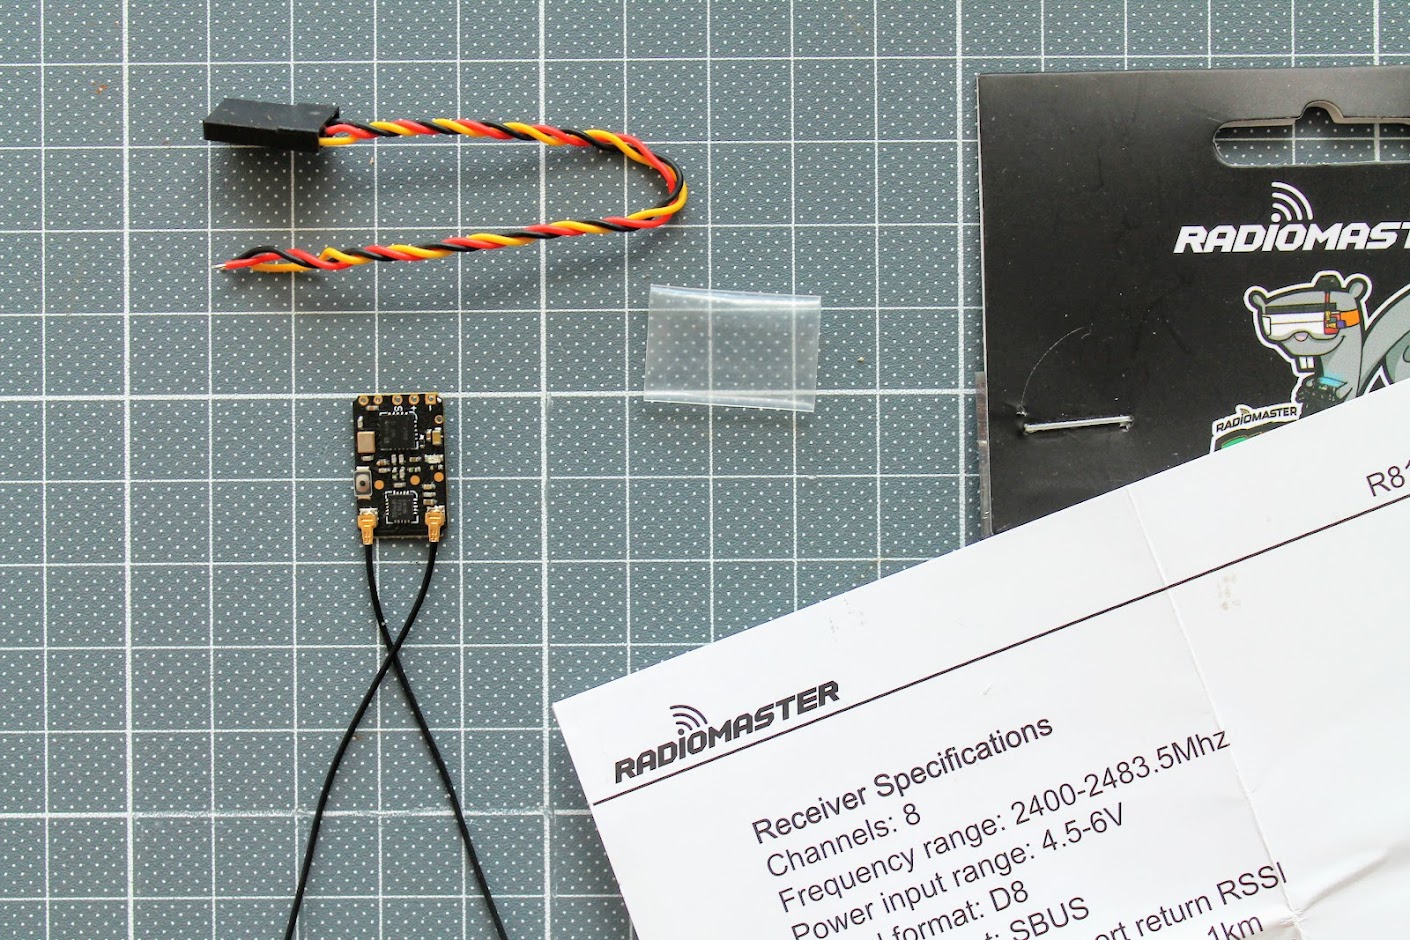
Specifications
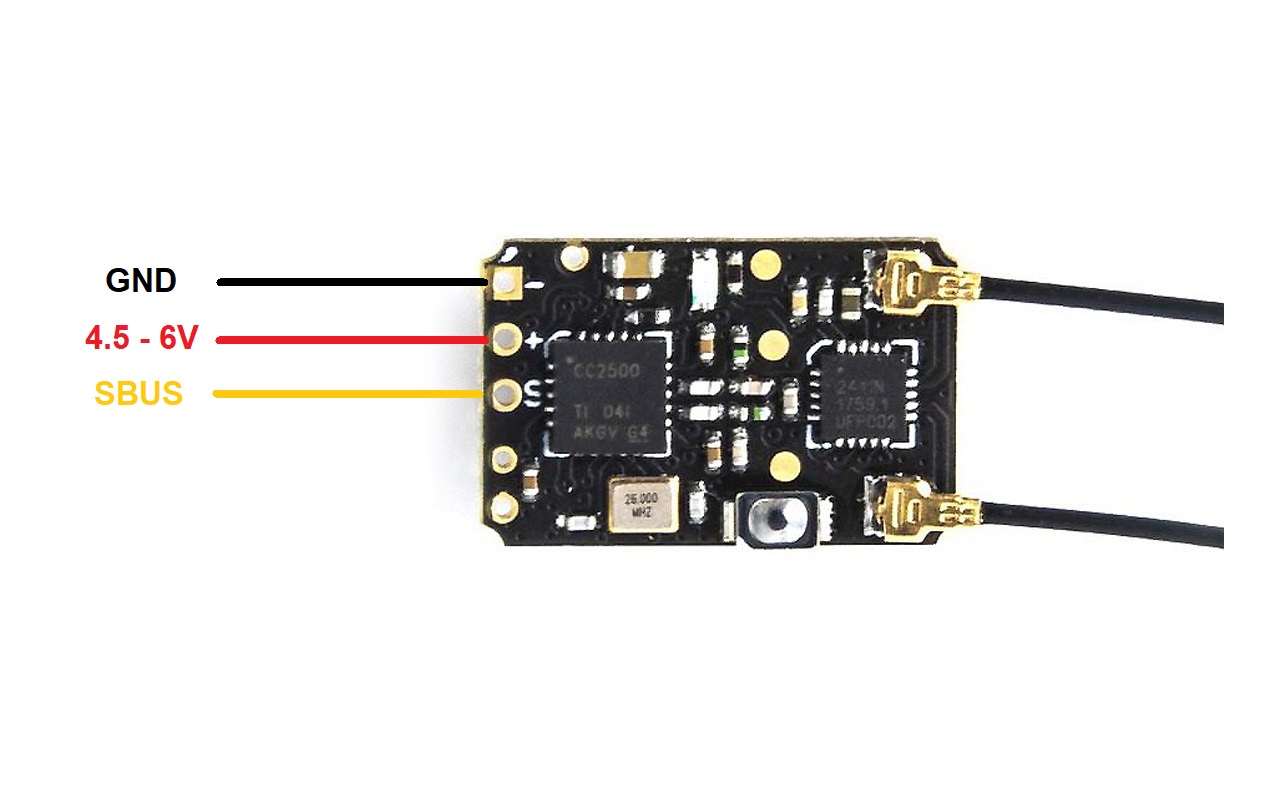
Radiomater R81 – D8 Nano SBUS Receiver
Channels: 8 (+1 for RSSI)
Frequency range: 2400-2483.5Mhz
Power input range: 4.5-6V
Signal format: Frsky D8 Compatible
Output format: SBUS
RSSI: RSSI on Ch9 of Sbus Output
Range: > 1km
Antenna length: Approximately 6cm
Size: 17x11mm
Weight: 2 grams (actually less)
Closer look
Radiomaster R81 is Frsky D8 protocol receiver. This is compatible with the most Frsky radios and with all multiprotocol enabled radios. The receiver size?17x11mm ?is a little bit smaller than Frsky XM+ and a little bit bigger than Frsky R-XSR receiver.

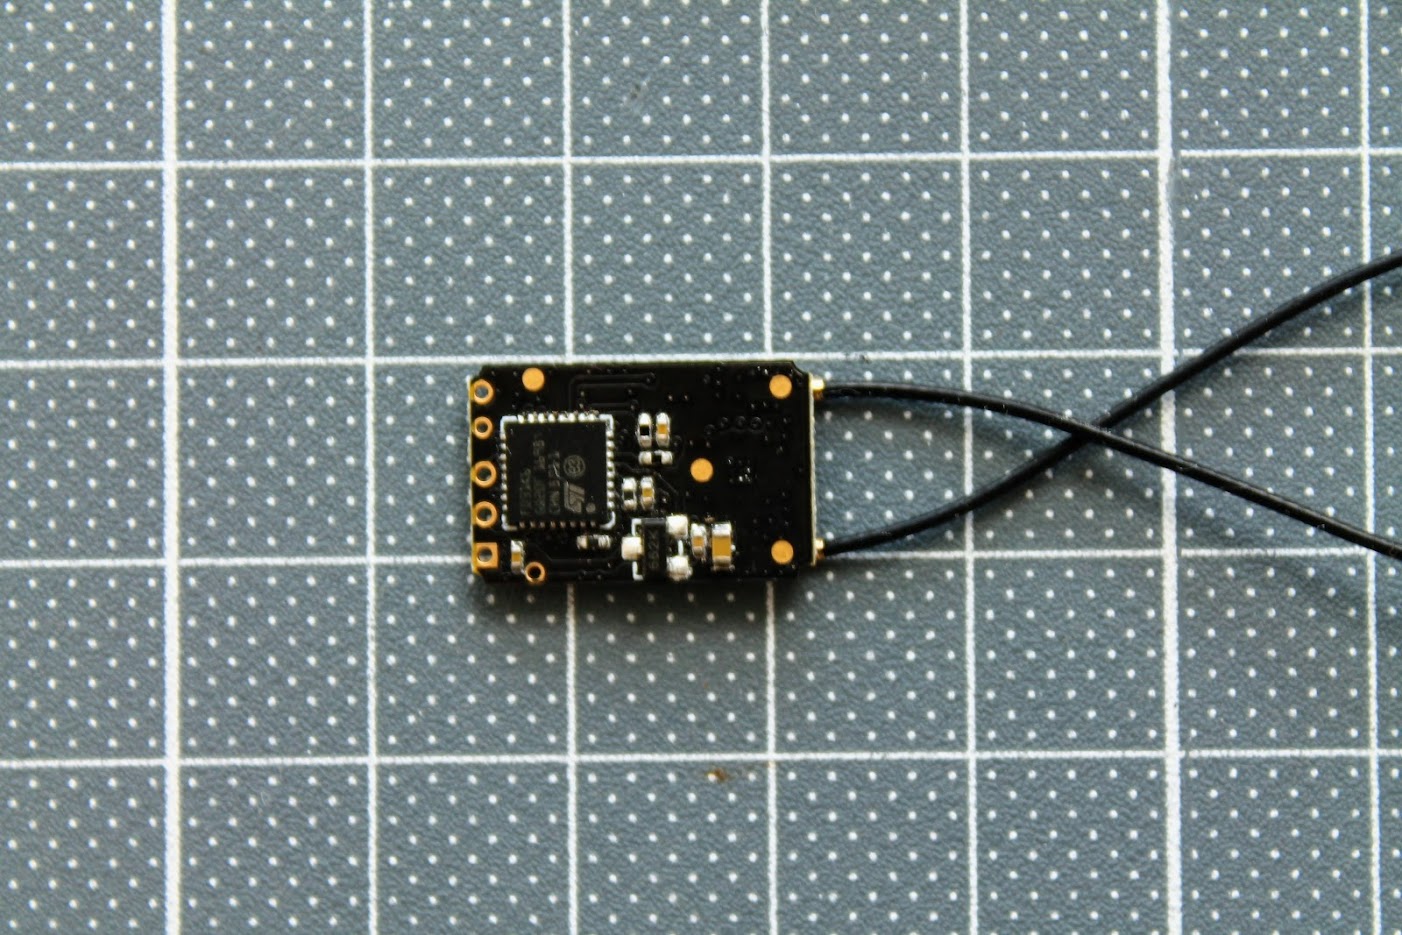
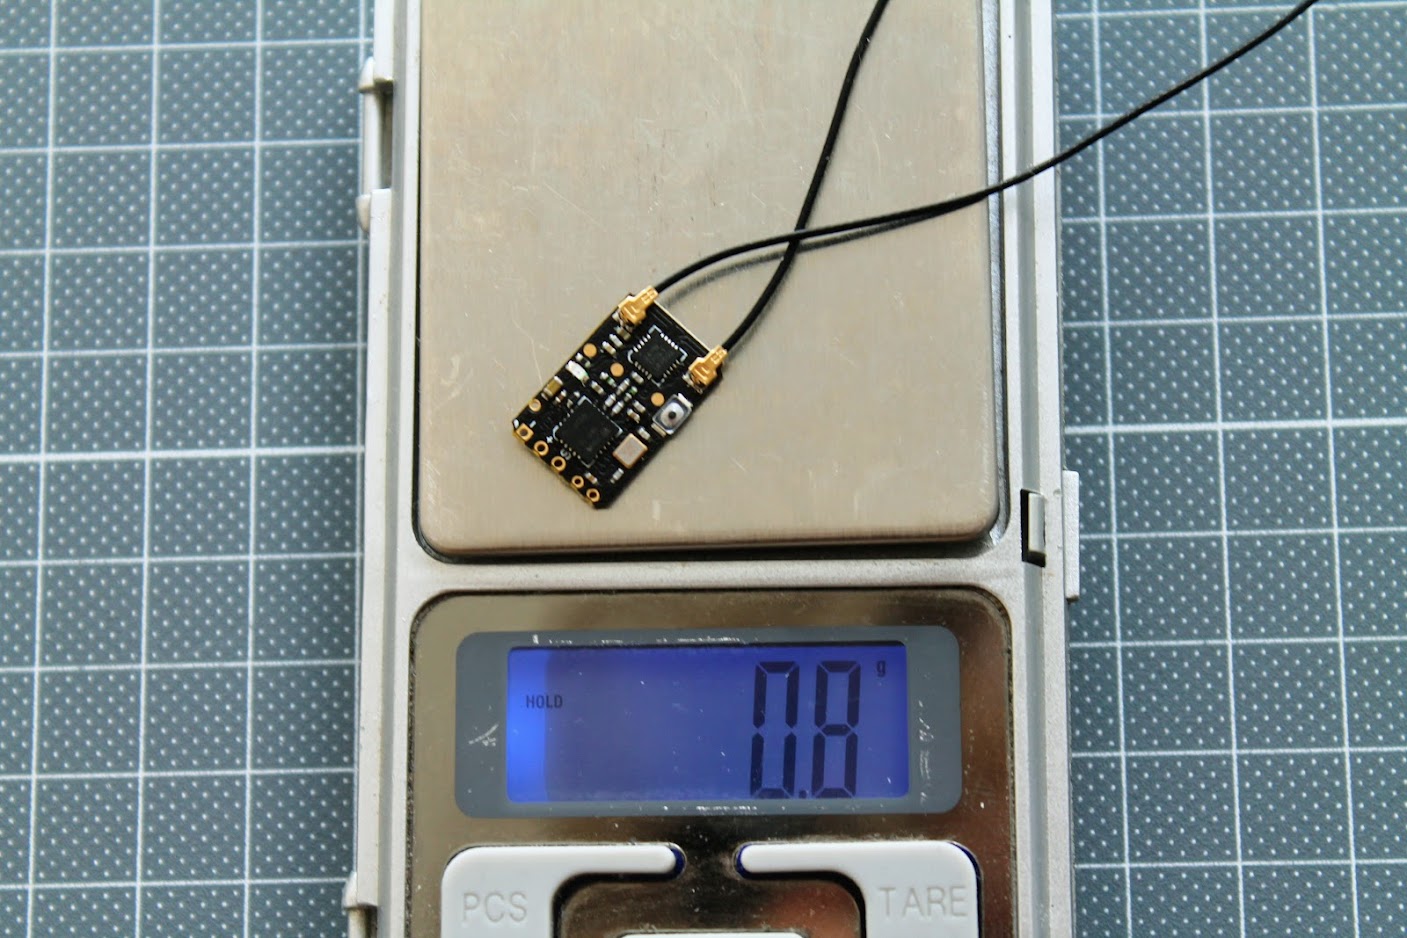
The weight is actually only 0.8 grams with included antennas.
OpenTX setup
Select D8 protocol on the FrSky radio or FrskyX protocol and D8 as subprotocol on the multiprotocol module equipped radios.
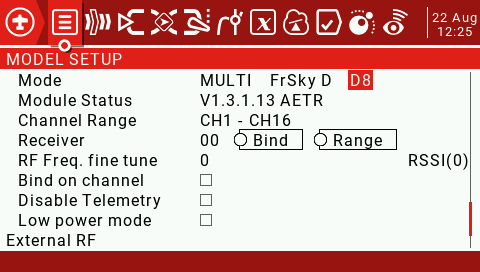
Binding
1. Press and hold the BIND button on the receiver then connect power. After approximately 3 seconds, the receiver LED will be RED, the receiver is now in bind mode
2. Select the D8 protocol for the multi-protocol menu of your remote control, and press the [BIND] option, the red light of the receiver will flash indicating successful bind
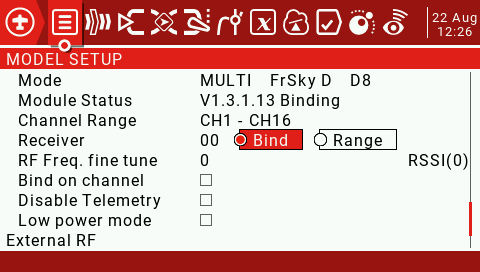
3. Exit bind mode on your remote control and disconnect power to the receiver then power the receiver once more. The LED will now be solid RED indicated the bind is now done. If not please repeat step 1 and 2
Fail-safe Protection
1. Press the BIND button once within 10 seconds of the receiver being powered on, and the receiver will save all the current channel values of the remote control as the fail-safe value
2. 10 seconds after the receiver is powered on, the BIND button function will be disabled to prevent accidental changes to to the fail-safe settings while preparing the model for flight
RSSI output
This receiver has a total of 9 channels. This includes 8 channels for radio control and one channel for the RSSI output.
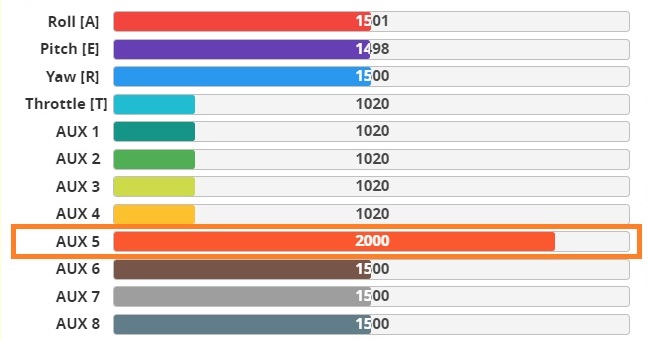
Channels 1-8 are controlled by the remote controller (radio), but the 9th channel is the signal strength RSSI value output by the receiver itself, which can be read by the flight controller and sent to the OSD device to show?signal strength on the FPV feed.
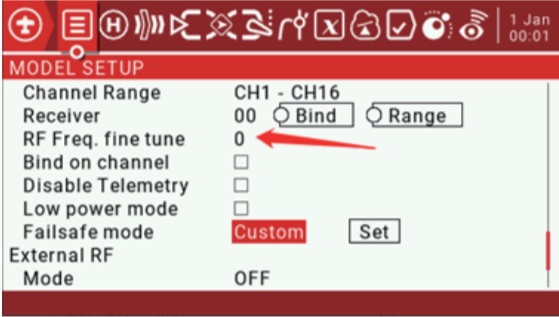
Frequency tuning
D8 and D16 compatible receivers MUST be frequency fine tuned before flight.
Once the radio is bound to the receiver:
Return to the RF Freq. fine tune option
1. Lower the value until the radio loses the connection with the receiver. Record the value (TUNE_MIN).
2. Raise the value so that the connection is restored, then continue to raise it until the radio loses the connection with the
receiver again. Record the value (TUNE_MAX).
3. Calculate the median between the two values (TUNE_MIN + TUNE_MAX) / 2 = TUNE_MEDIAN
4. Set RF Freq. fine tune to the median value
Example
Connection is lost at -73 and +35; the median is -19:
Once the Fine Tuning value is known, it can be used for all models which use the same protocol.
For More information visit https://www.multi-module.org/using-the-module/frequency-tuning
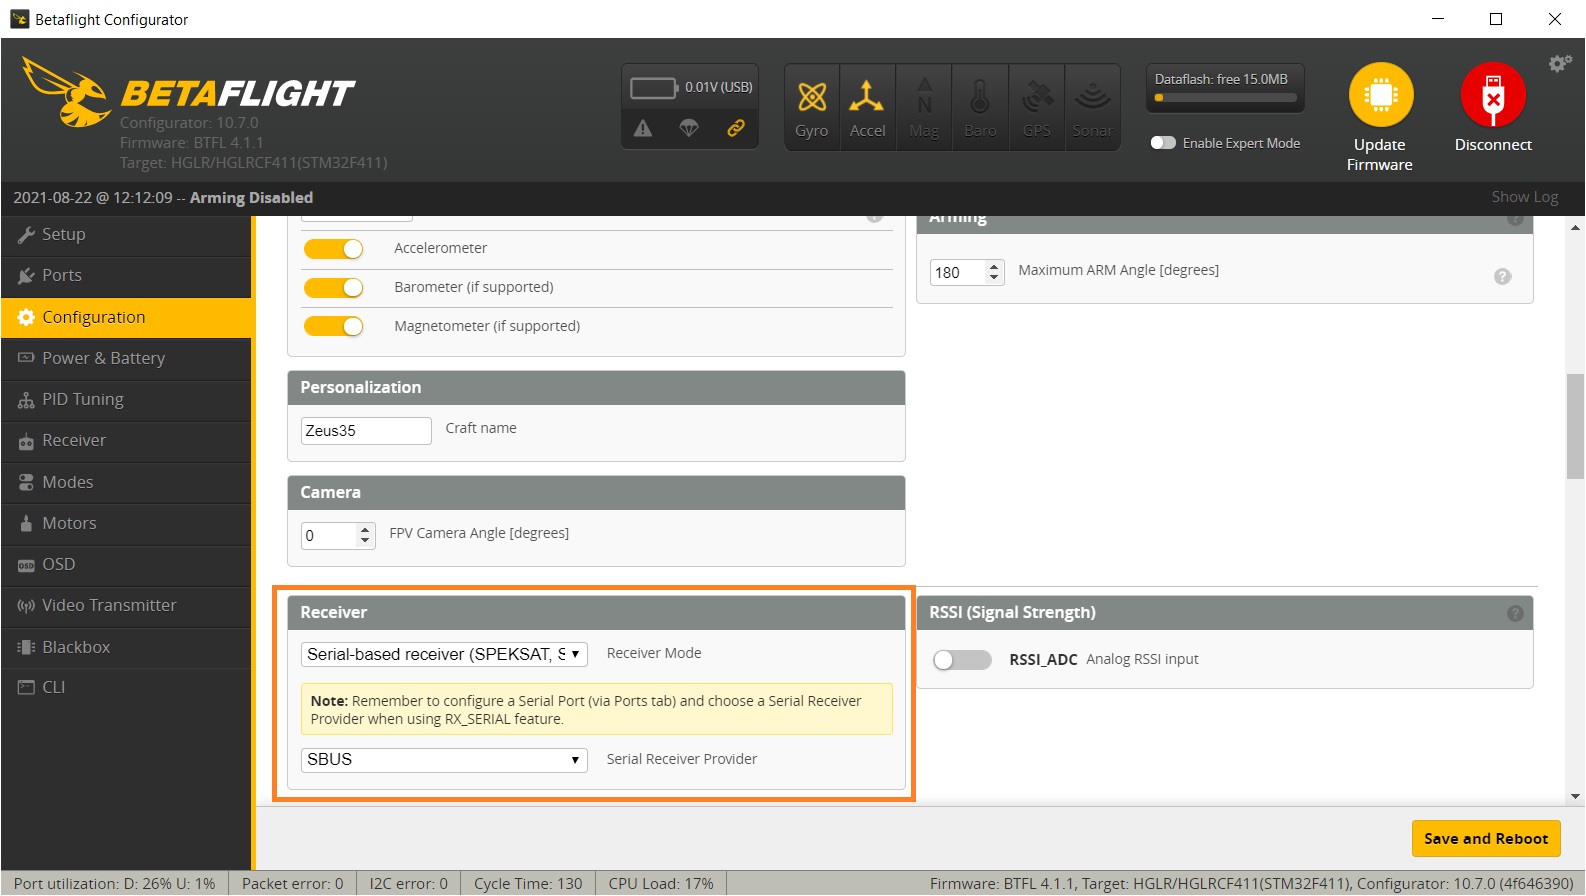
Betaflight setup
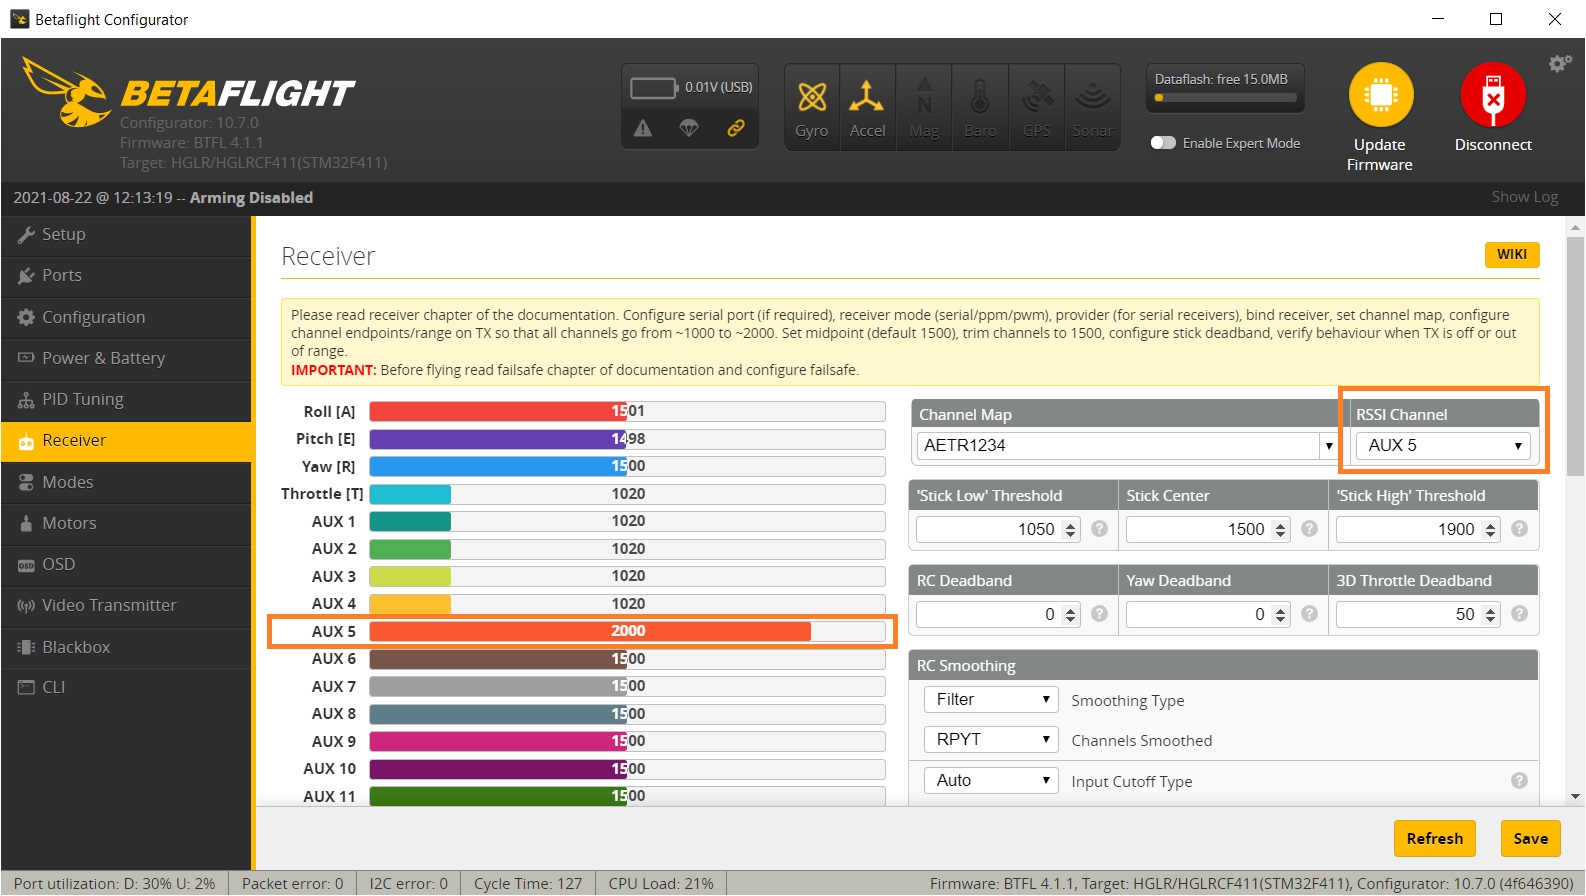
Select Serial-based receiver in the Receiver Mode selection and SBUS as Serial Receiver Provider?in the Configuration tab.
In the Receiver tab You can see the RSSI output on the Channel 9 (AUX5). Set the RSSI Channel to AUX5 respectively to get the RSSI values on the OSD.
Connection diagram
Radiomaster R81 receiver User Manual:?https://www.radiomasterrc.com/data/article/1611557935016752426.pdf
Available @
Banggood:?https://www.banggood.com/RadioMaster-R81-2_4GHz-8CH-Over-1KM-SBUS-Nano-Receiver-…-1757296.html
GetFPV:?https://www.getfpv.com/radiomaster-r81-8ch-frsky-d8-compatible-nano-receiver-w-sbus.html
]]>
OpenTX version 2.3.14 release
OpenTX version 2.3.14 was released. You should update to this version if you don’t want?Real Time Clock battery?to drain prematurely. Here are the release notes:
ALL RADIO
fix excessive RTC battery drain (Bug affecting all radio model, introduced in 2.3.0, thx MikeB for spotting this)
ACCESS RADIO
fix possible jerky servo movement
X9D + 2019 RADIO
fix trainer mode change potentially triggering emergency mode
fix trainer jack detection
MISCELLANEOUS
fix AFHSD3 option not available on some radio (x7 / x9d +)
fix AFHSD3 broken on colorlcd radio since 2.3.12
COMPANION
fix curve tip window showing blank
fix Companion Mac OS X not running on some version of Mac OS X
fix negative sign missing for telemetry source formula
ExpressLRS version 1.0.0 release
ExpressLRS released… first version ever! Actually not the first but the software is so mature, that it came out of the Release Candidate state to normal version 1.0.0. The maintenance update 1.0.1 followed shortly. ExpressLRS Configurator was also updated and now it supports updating via WiFi directly from the configurator.
Read more about the ExpressLRS in this guide:?ExpressLRS – Open Source Long Range radio control system – Complete Guide
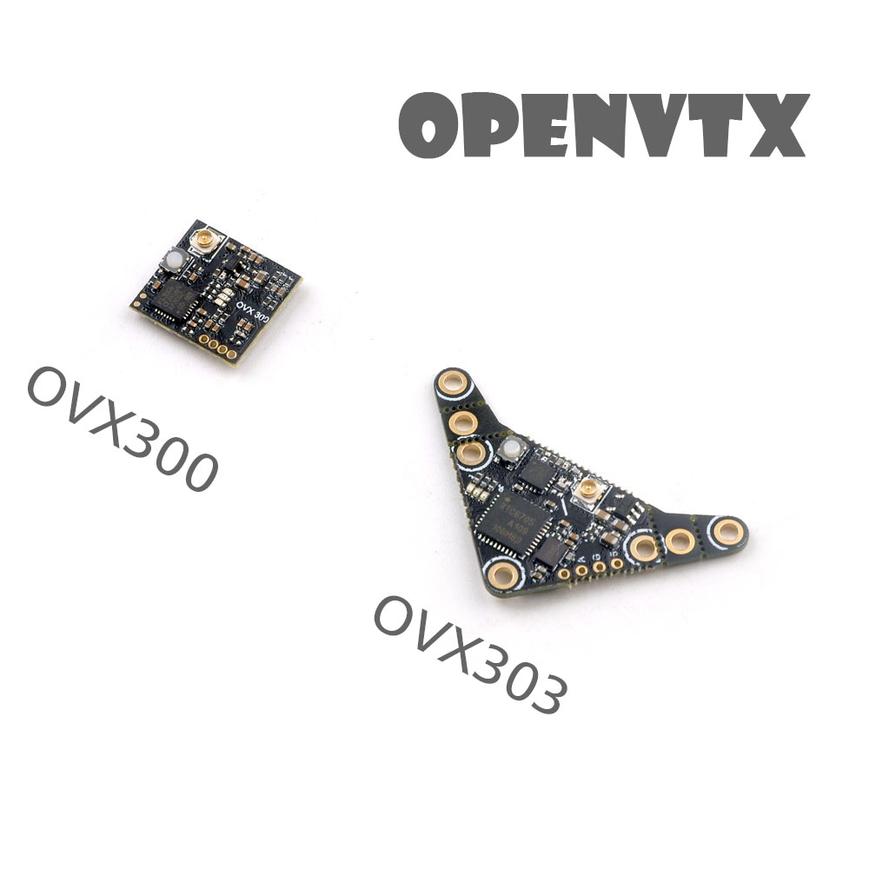
Happymodel OVX300 OVX303 5 VTX Open Source Video Transmitter
Happymodel in collaboration with ExpressLRS devs ha released the first Open Source VTX – OVX300 and OVX303. These two VTXs use Open Source firmware, written by ExpressLRS devs.??OVX300?and?OVX303 are working with the both VTX control protocols – SmartAudio and IRC Tramp. It automatically detects the working protocol and works without any headaches.
Read more about??SmartAudio?in this guide:?Guide: SmartAudio VTX control and how to set it up
Happymodel OVX300 and OVX303 VTX are designed with the ability to have its firmware updated via Betaflight Passthrough.
Available @:
XT-Xinte:?https://www.xt-xinte.com/Happymodel-OVX300-OVX303-5-8G-40ch-300mw-VTX-OpenVTX-p936004.html
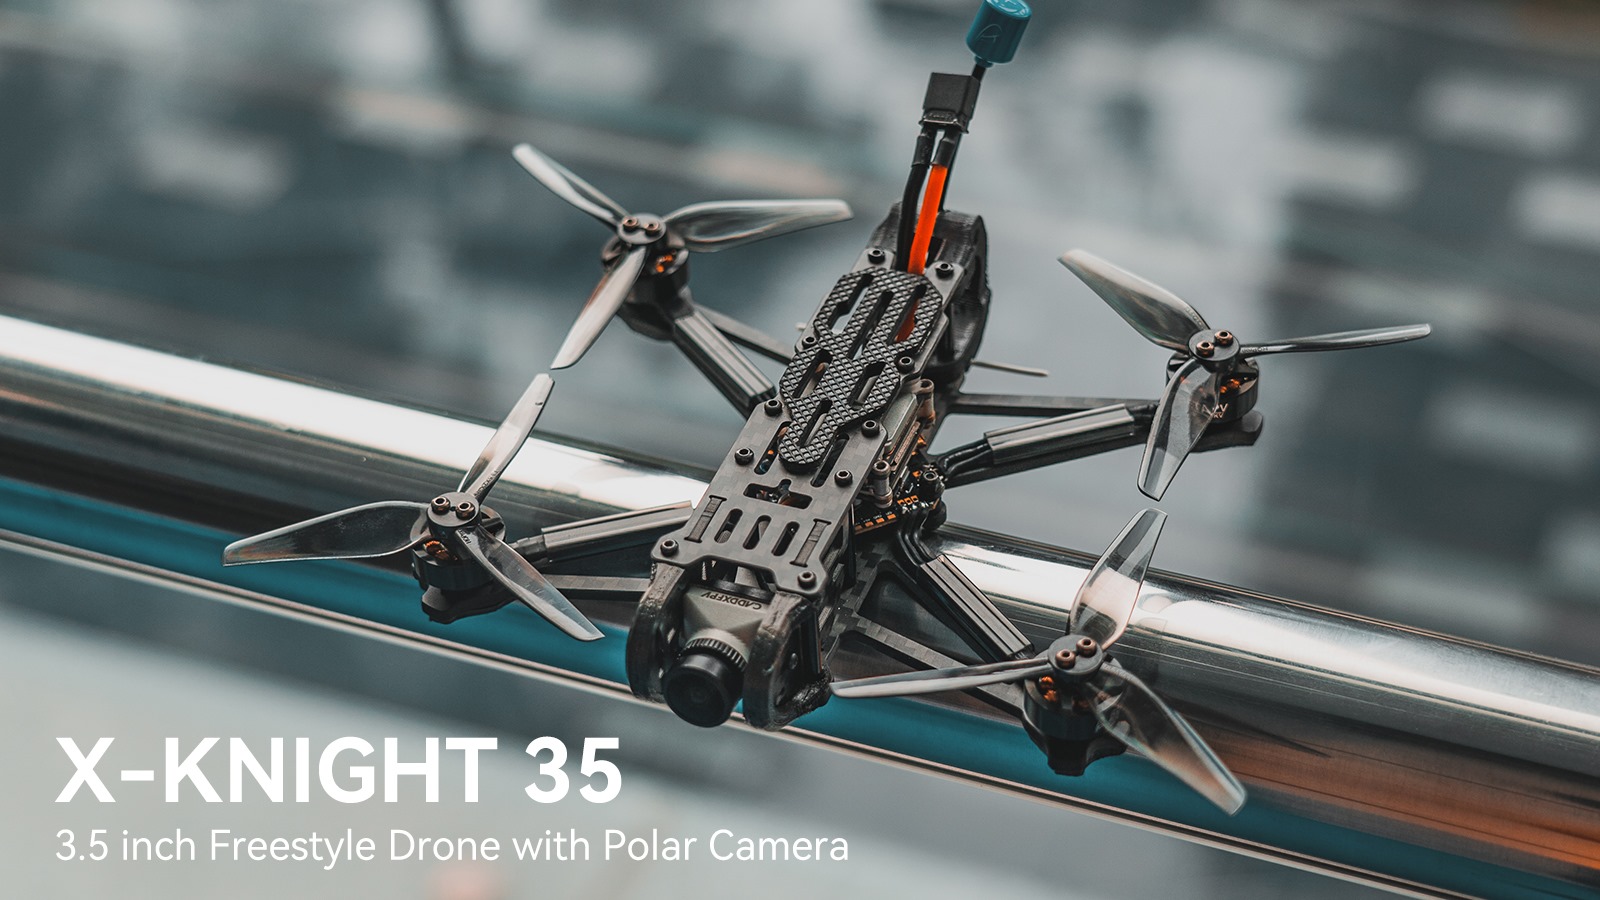
BetaFPV X-Knight 35 quadcopter
BetaFPV X-Knight 35 is the newest release from BetaFPV. It is Ready to Fly freestyle quadcopter with the new 3.5 inch prop size category. It has digital FPV system with?Caddx Polar Vista Kit containing freshly released Caddx Polar digital FPV camera.
Available @
BetaFPV:?https://betafpv.com/collections/x-knight-series/products/x-knight-35-fpv-quadcopter
Specifications:
Item: X-Knight 35 FPV Quadcopter
Weight: 142.9g (Without battery)
Motor: 1404 3800KV Brushless Motors
Power Connection: XT30?
Props: HQ 3520 3-Blade Propellers (Gray) / Gemfan 3520 3-Blade Propellers (Gray)
FC&ESC: F4 AIO 20A Brushless Flight Controller V3
Battery: 750mAh 4S 95C Lipo Battery
VTX&Camera: Caddx Polar Vista Kit (VTX)
FPV Camera Degree: 0°-60°
Diameter: 155m
Receiver: ELRS 2.4GHz Receiver / TBS Receiver
Flight time: 11~13 min smooth flight or 4~6 min flight of FPV freestyle tricks with 4S 750mAh battery
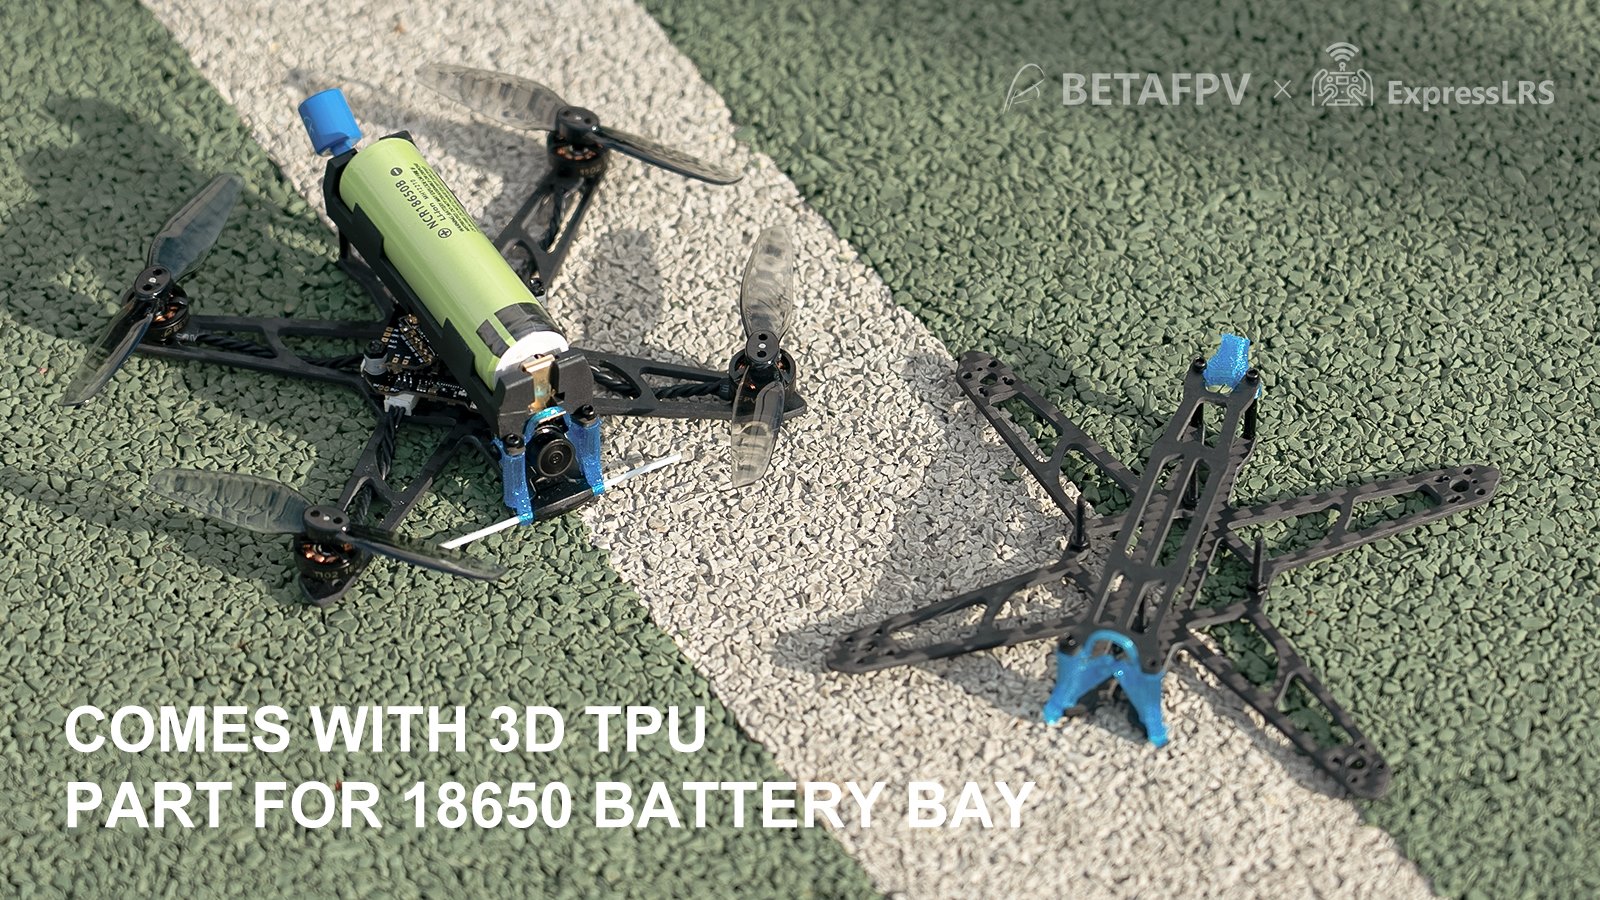
BetaFPV HX115 LR Toothpick quadcopter
BetaFPV also released HX115 LR 1S quadcopter, so called “flying battery”. It has removable battery holder for 18650 type Lion battery and the option to use regular LiPo 1S batteries as well. The BNF HX115 LR quadcopter comes with?12A 1S FC with ExpressLRS RX on board.
Available @
BetaFPV:?https://betafpv.com/collections/expresslrs-series/products/hx115-lr-toothpick-drone
Specifications:
Item: HX115 LR Toothpick Drone
Wheelbase:126mm
Weight:44g
Motor:1102-18000KV
Charge connector:BT2.0 connector
Propeller:HQ 3020 2-Blade Propellers 1.5mm Shaft
Flight controller: F4 1S 12A AIO FC with ELRS 2.4G Receiver
Battery:BT2.0 450mAh 1S Battery
VTX: M02 25-350mW 5.8G VTX
Camera:Caddx ANT camera
Camera Tilt Degree:0-60°
Receiver:Built-in ExpressLRS 2.4G Receiver
Flight time:3-5min with BT2.0 450mAh 1S Battery / 15min+ with Sony VCT6 3000mAh battery
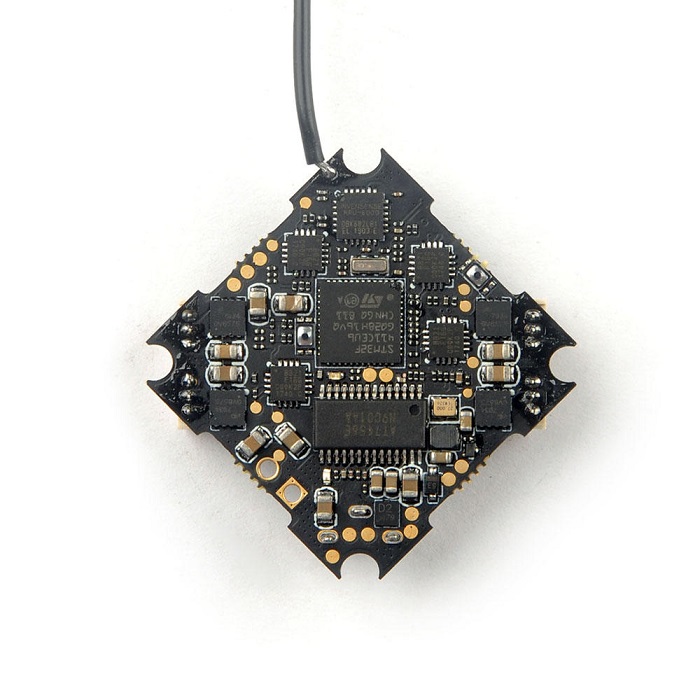
BetaFPV?F4 1S 12A AIO Flight Controller
New 1S AIO toothpick board from BetaFPV. This time it supports up to 12A power output and has two options of integrated SPI receivers – ExpressLRS and FrSky receivers. This is the first toothpick board with integrated ExpressLRS receiver.
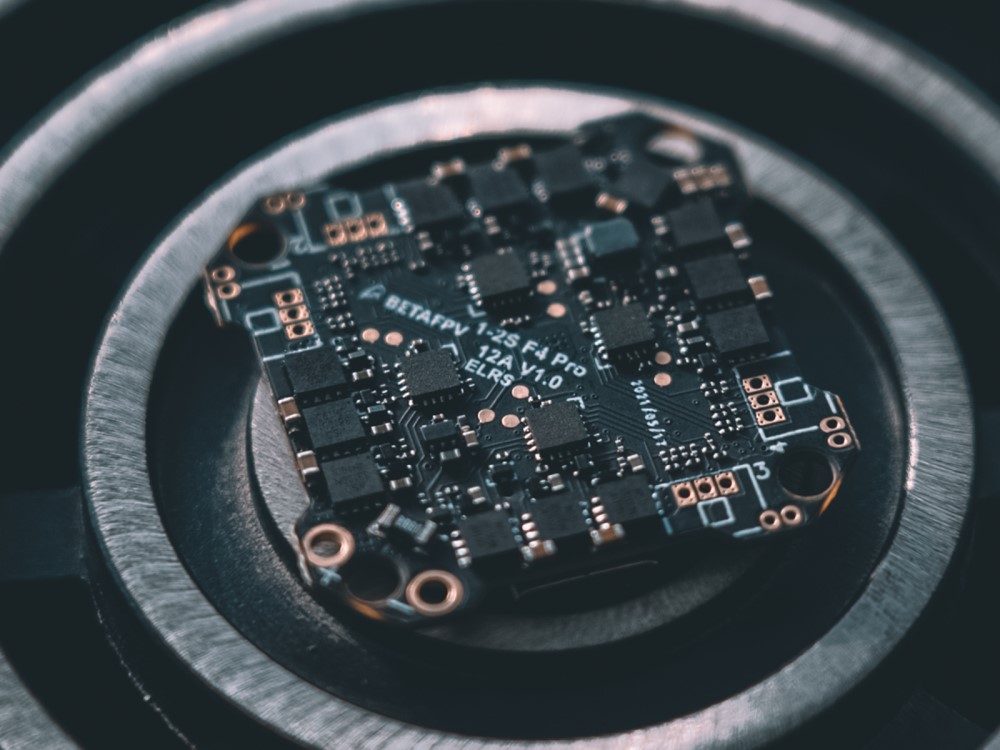
This FC is used in?BetaFPV HX115 LR Toothpick quadcopter.
Available @
BetaFPV:?https://betafpv.com/products/f4-1s-12a-flight-controller
Specifications
Item:?F4?1S?12A?AIO?FC (Frsky)
CPU:?STM32F411CEU6?(100MHZ?)
Gyro:?MPU6000?(SPI?connection)
Firmware?version:?betaflight_4.2.0_STM32F411
OSD:?Built-in?BetaFlight?OSD?(STM32?controls?OSD?chip?over?SPI?in?DMA?mode)
Receiver:?Integrated?SPI ELRS Receiver / SPI Frsky?Receiver
Motor?Pin?Connecter:?1.25mm?Header?Pins
Mounting?Hole?Size:?26mm?x?26mm (suitable?for?whoop?pattern?mounting?hole)
Weight:?4.74 g?(without?power?cable?and?BT2.0?connector)
USB?Port:?Type-C
All modern quadcopters (or any other multirotors) have Arm feature. In order to safely plug in the battery, carry or handle powered multirotor it has to be deactivated (aka Disarmed) and it is the default state of the powered quadcopter. In the deactivated state motors will not spin the propellers regardless A quadcopter has to be activated (aka Armed) only when a pilot is ready to control it.
What is PreArm and why should we use it?
PreArm feature is used for preventing of the accidental arming your quadcopter. You can easily arm the quadcopter by unintentionally hitting the arm switch. Especially if your radio transmitter is hanging on your neck by lanyard. And this happens. I’m not an exemption, I also had unexpected unintentional arming of the quadcopter, happily it ended well. Arming the modern powerful quadcopter with the motor power of several Kilowatts is dangerous thing and can lead to serious injuries.
So unless you are flying whoops with ducted fans or small toothpicks it is advised to set the PREARM mode for your quadcopter.
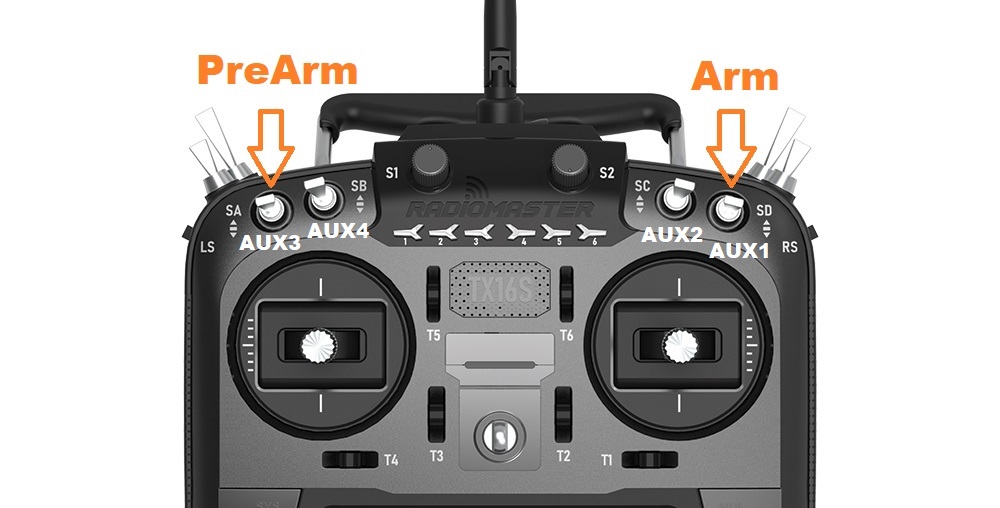
How to setup Arm and PreArm modes to the radio switches?
First you have to set the Inputs and Mixes on your radio transmitter, Model settings. My preferred switch settings are the following and the setup example is based on this configuration. You can customize the Arm and PreArm switches to your preferences.
These are the INPUTS ant MIXES configuration on my OpenTX Radio.
 |
 |
Connect your quadcopter to the Betaflight Configurator. Go to the Modes tab.
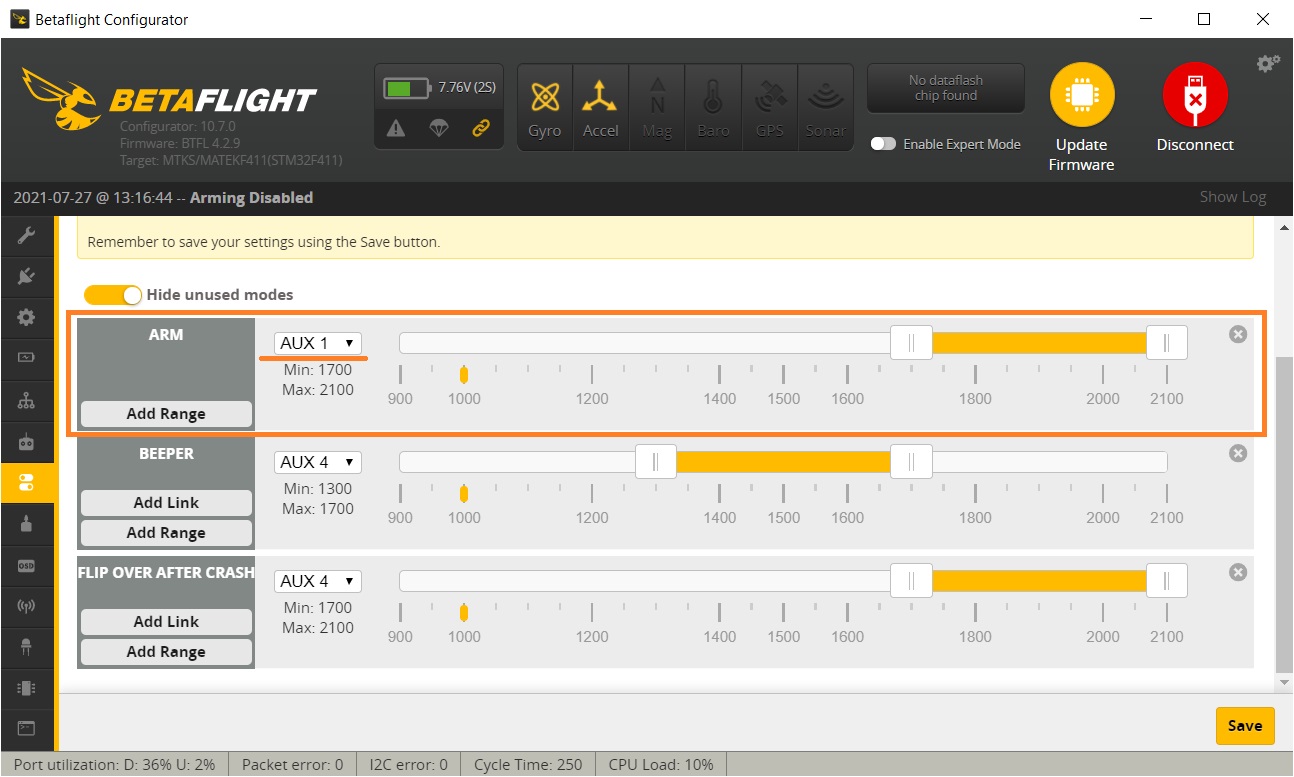
Press Add Range button on the ARM mode selector. Select the AUX channel that corresponds your preferred ARM switch or set it to AUTO and turn On-Off the preferred switch. Configurator will auto detect the switch you are toggling. Slide the sliders to the value range you want the ARM position to be active.
The following example of the configuration has ARM mode on the upper range of the AUX1 channel.
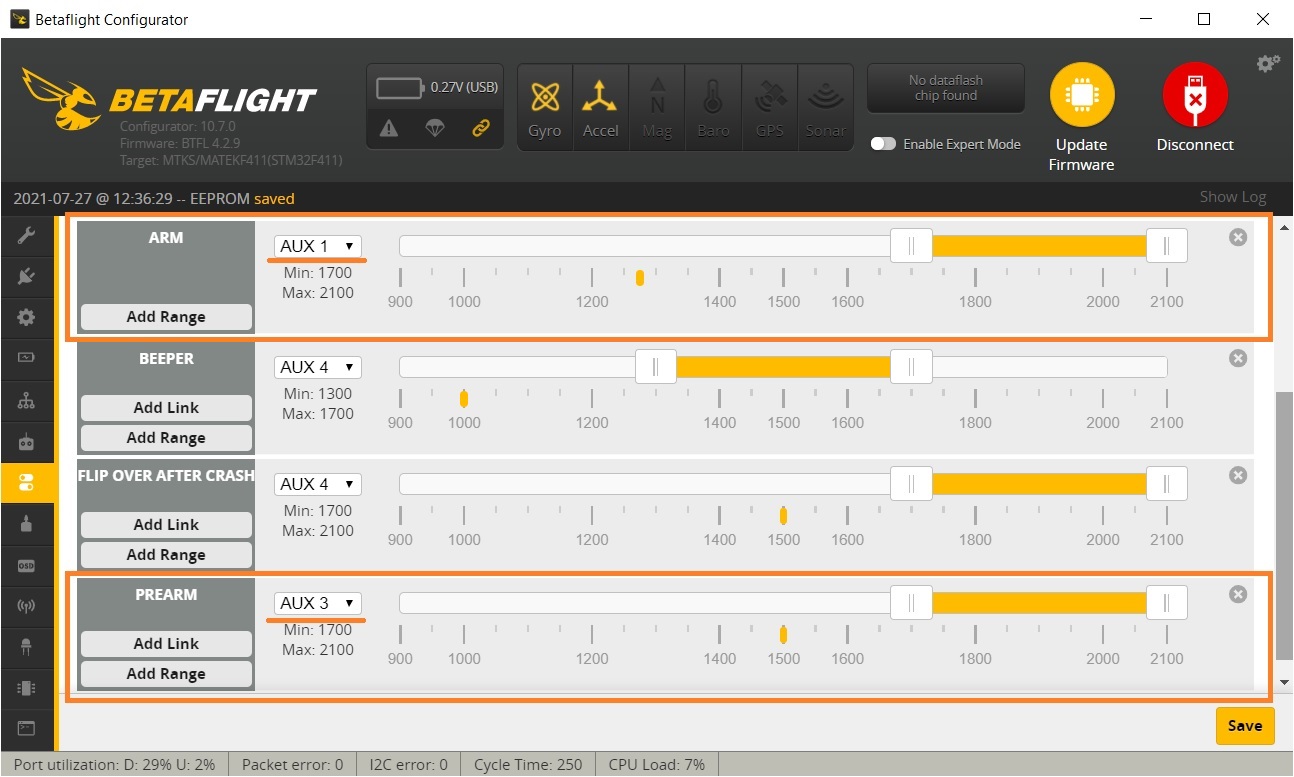
The same procedure is for PREARM mode.
Usually the PREARM switch should be the switch on the opposite side of the radio to minimize the chance of accidental switching on if you bump one side of the radio or you unintentionally hit the switch while the radio is on.
Press Add Range button on the PREARM mode selector. Select the AUX channel that corresponds your preferred PREARM switch or set it to AUTO and turn On-Off the preferred switch. Configurator will auto detect the switch you are toggling. Slide the sliders to the value range you want the PREARM position to be active.
The following example of the configuration has ARM mode on the upper range of the AUX1 channel and PREARM on the AUX3.
Notes
If you turn the ARM mode switch on and your quadcopter does not activate, your props are not spinning and your quadcoper cannot be ARMED, then look at this tutorial on how to troubleshoot the arming problems: Guide: Troubleshooting arming issues
]]>All the images are stored in the SD card, so you must connect the radio to the PC via USB cable or remove the SD card from the radio to access the images.
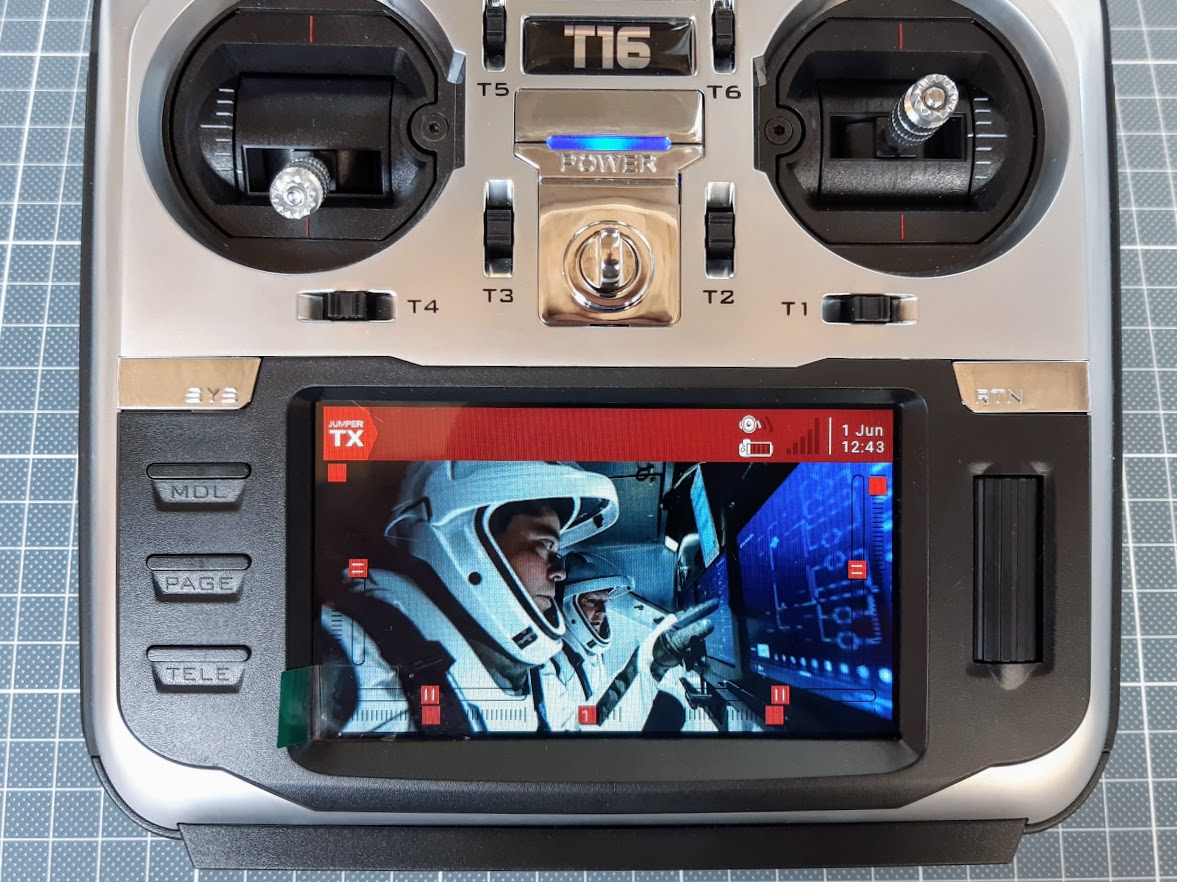
The following instructions are suitable for the following radios: Jumper T16, Jumper T18, RadioMaster TX16S and Frsky Horus X10S radios that have color LCD screen with 480x272px resolution.
How to change the Splash Screen in the radio?
Splash screen is PNG type image with a filename of splash.png. If you want to make your custom splash screen image you need to crop/resize the picture to the 480×272 px resolution
Image path: /IMAGES/splash.png
Image dimensions: 480×272 px
Here are the a few splash screen images I have made ready to use for you:


If you want to use install one of these splash screens, just right click and select save image, rename it to splash.png and copy to the /IMAGES/ folder on your radio SD card.
Tip: Any splash screen picture can be used as background picture and vice versa.
How to change the Background Image in the radio?
Background is PNG type image with a filename of background.png. If you want to make your custom background image you need to crop/resize the picture to the 480×272 px resolution.
Image path: /THEMES/DEFAULT/background.png
Image dimensions: 480×272 px
Here are some of my background images ready to use:


If you want to install one of these backgrounds, just right click and select save image, rename it to background.png and copy to the /THEMES/DEFAULT/ folder on your radio SD card.
Tip: Any background picture can be used as splash screen picture and vice versa.
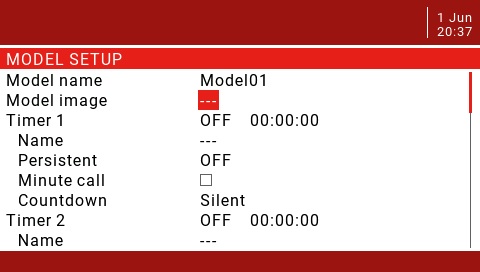
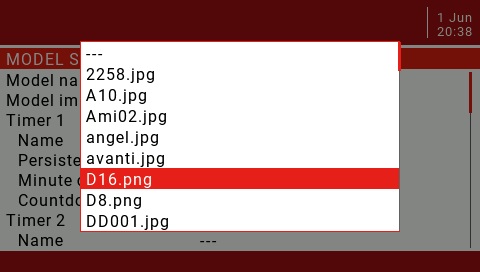
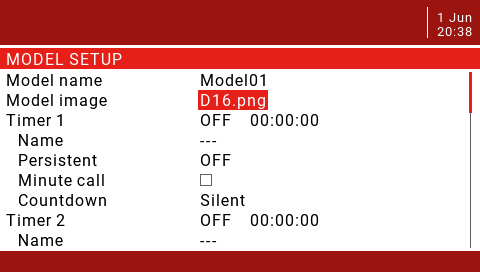
How to set the custom Model Images in the radio?
Image path: /IMAGES/******.png (image name is 6 characters maximum!)
Image dimensions: 192×114 px


If you want to install one or any number of these model images, just right click and select save image as…, keep the same image name or rename it (max 6 characters in the filename), save it to the disk and/or copy it to the /IMAGES/ folder on your radio SD card. Then in the radio model settings select the Model Image setting.
Choose the image file
History:
2020-06-01 – article created
2021-02-03 – splash screens updated
2021-06-17 – ExpressLRS, Flysky, Redpine added
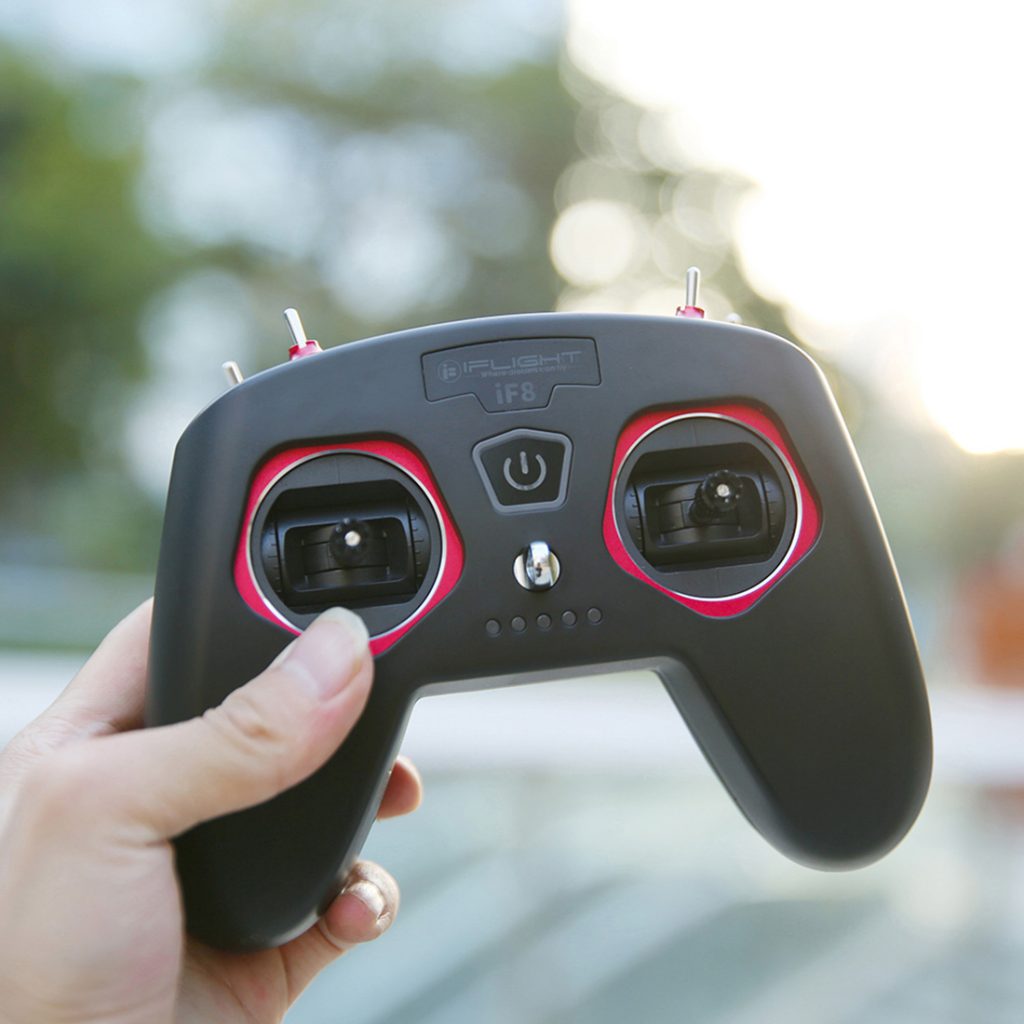
The iF8 radio has power button, neck strap hook and the 5 leds, probably for battery charge state indication.
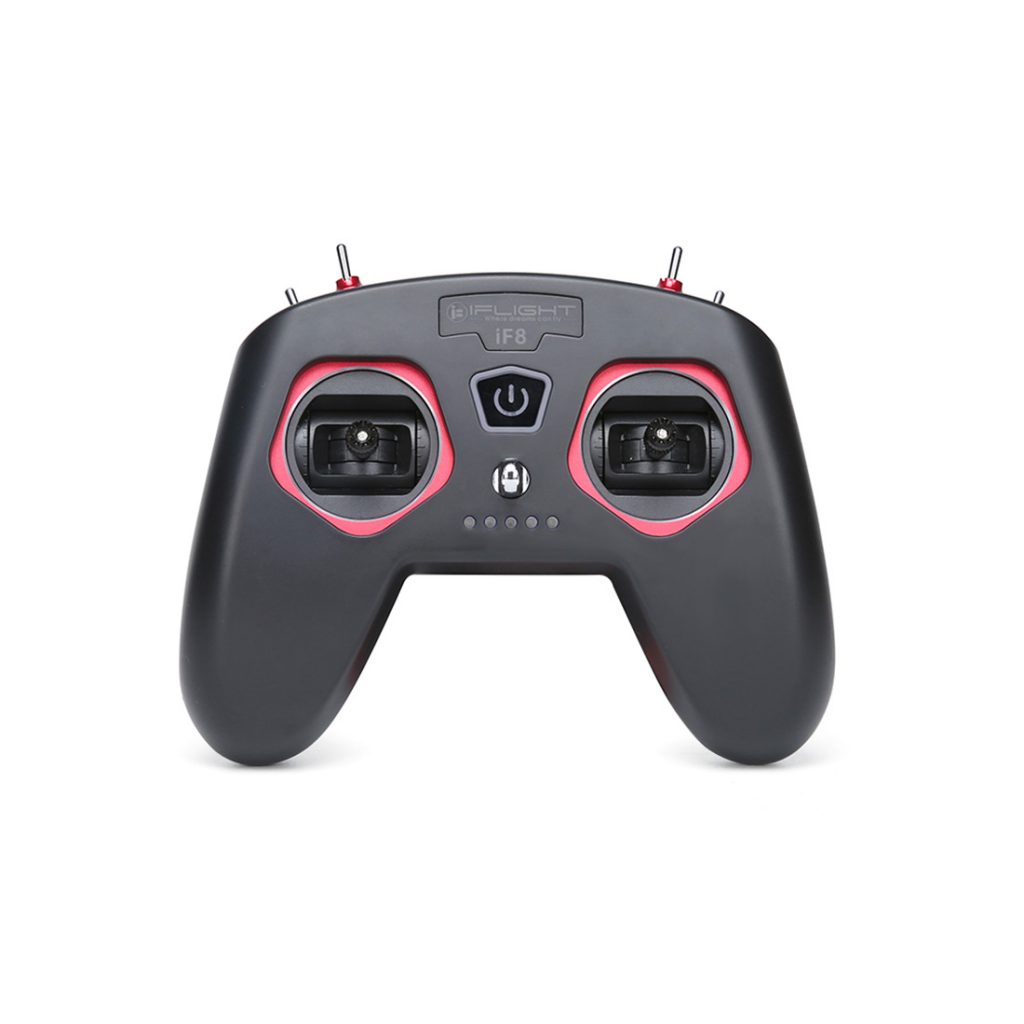
On the back of the radio you can probably find the bind button and the cover to unknown bay.
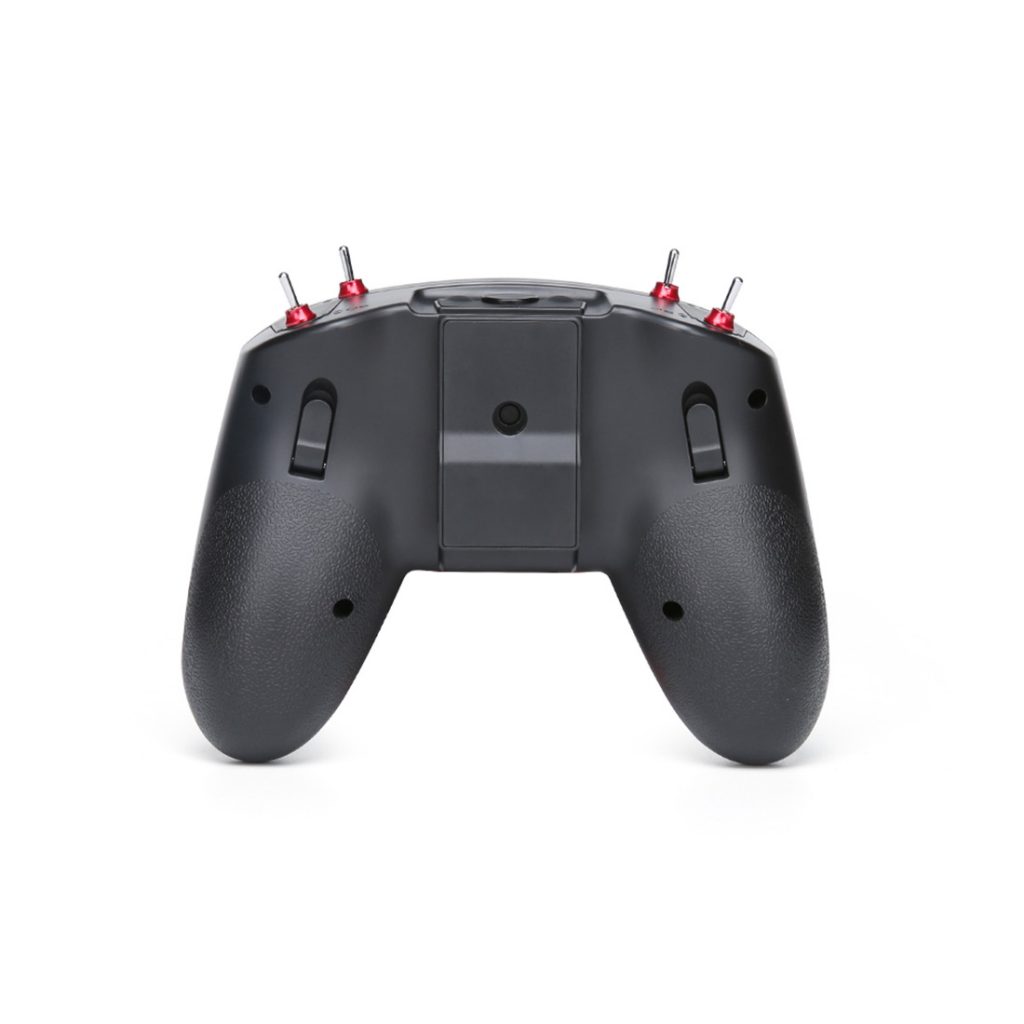
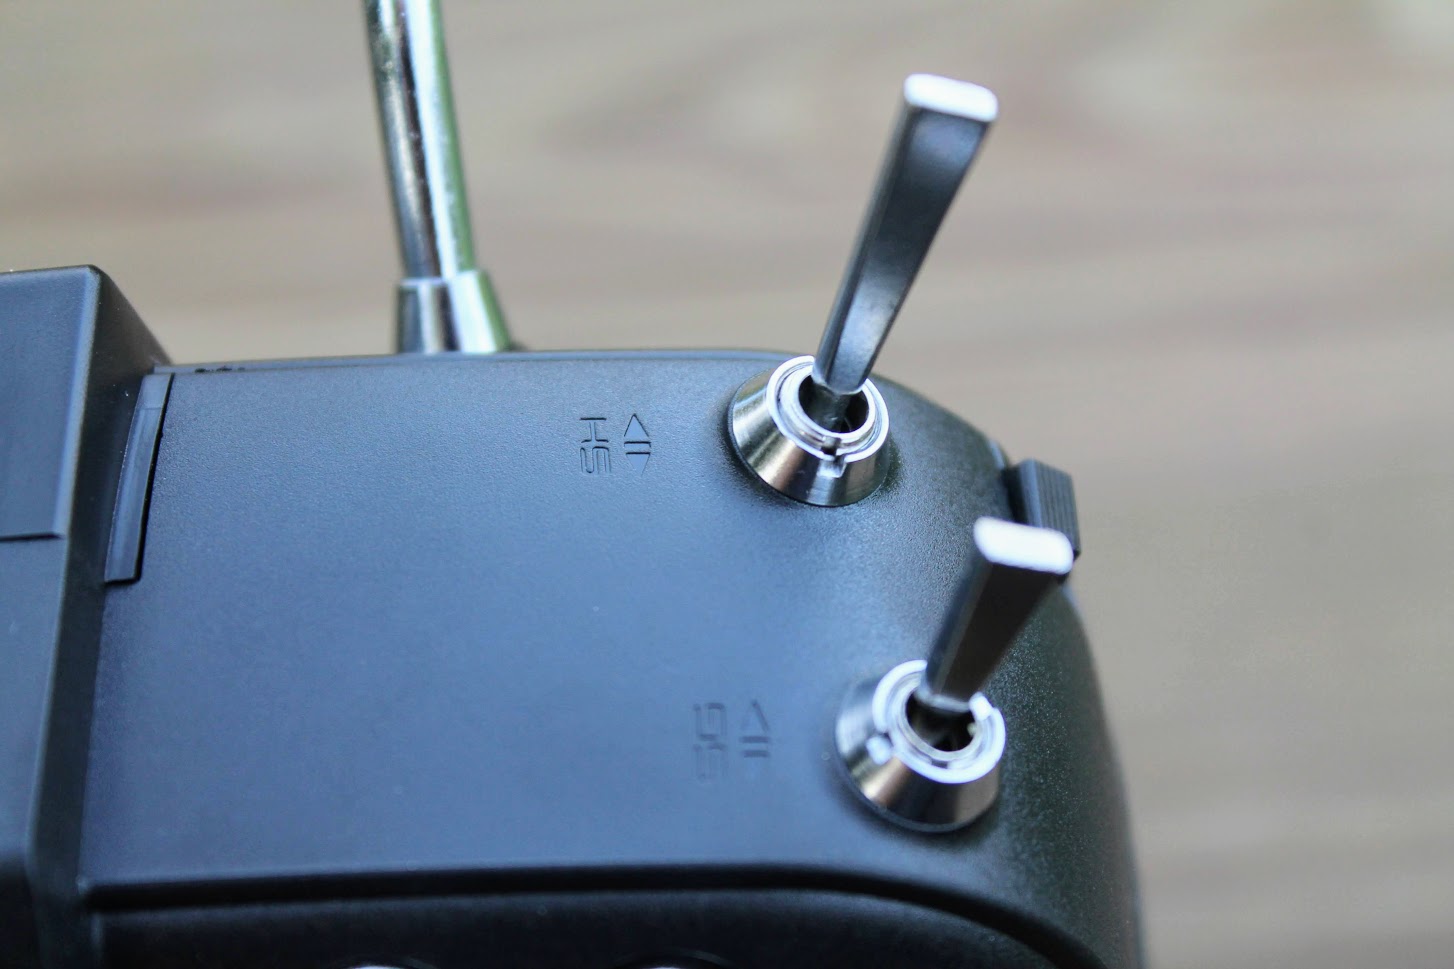
On the top side of the iF8 radio you can find the 4 switches (2 two-way and 2 three-way) and the slot for external antenna. External antenna was probably in the plans, but the final version went with internal one.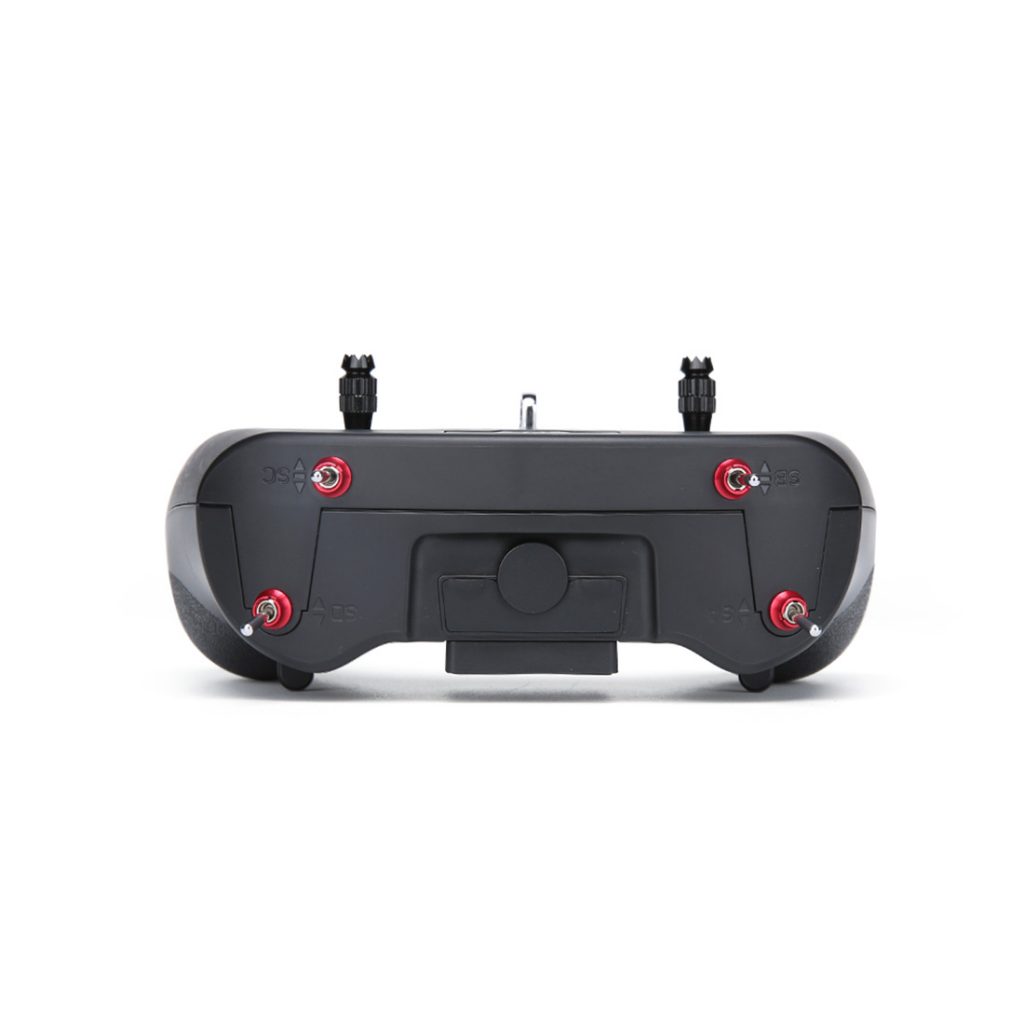
iFlight iF8 radio dimensions are similar to the BetaFPV LiteRadio 2 and Jumper T-Lite radios.


Release date: TBD
Available @:
Product: iFlight iF8
Frequency range: 2.4G (2400MHz-2480MHz)
Protocol: Frsky D8
Channels: 8 channels
Transmitting power: 19.3dbm
Remote control distance: >2KM@19.3dbm
Rocker type: potentiometer version
Working current: 160mA@8.4V
Charging voltage: 8V DC
USB charging current: 0.7A
Open source firmware: OpenTX
LED light: green light switch power light/white battery indicator light/white logo light
Battery: 2s 550mAh
Battery life: about 6 hours
Weight: 236g (including battery)
Size: 165mm*70mm*130mm
]]>
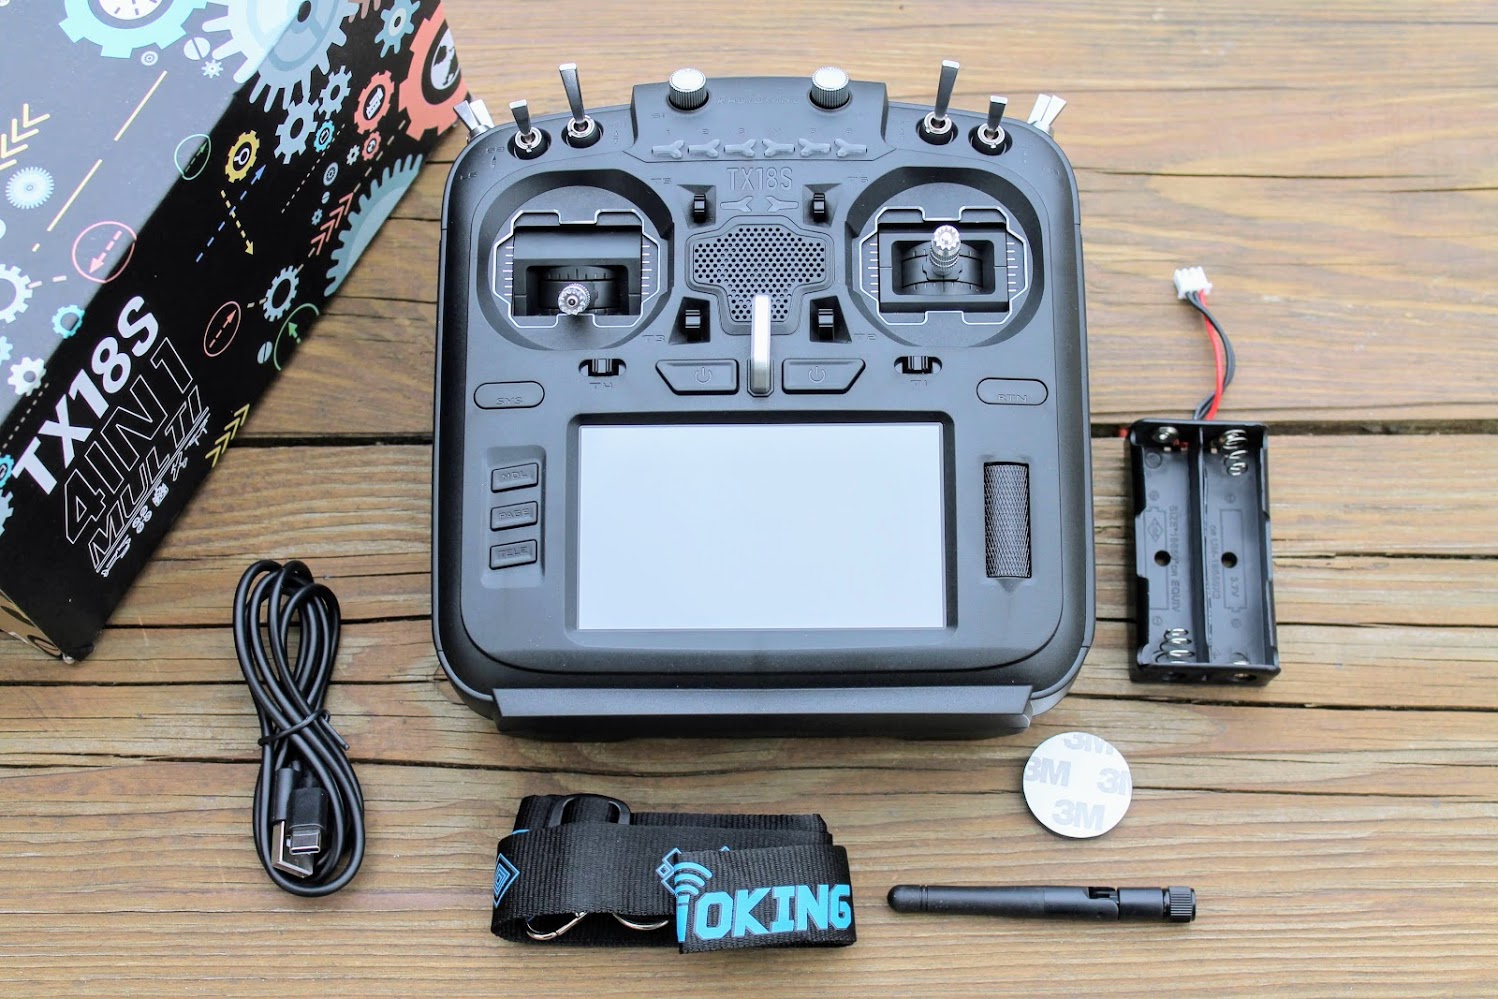
Package contents
You will receive Radioking TX18S radio, USB-C cable, neck strap, removable antenna, 18650 battery holder and foam insert.
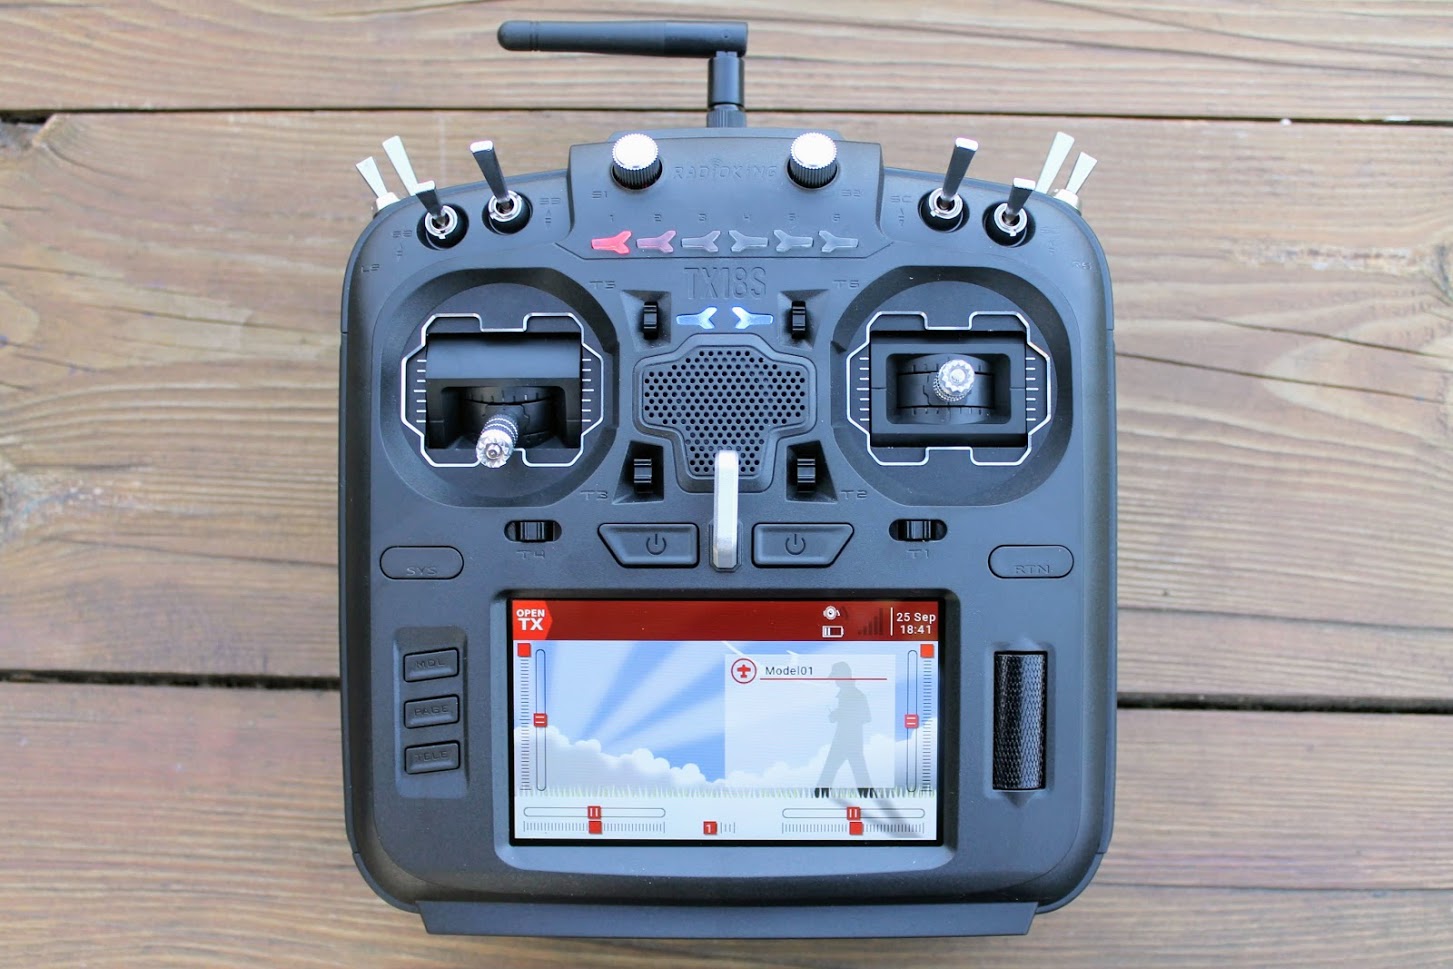
Appearance and construction
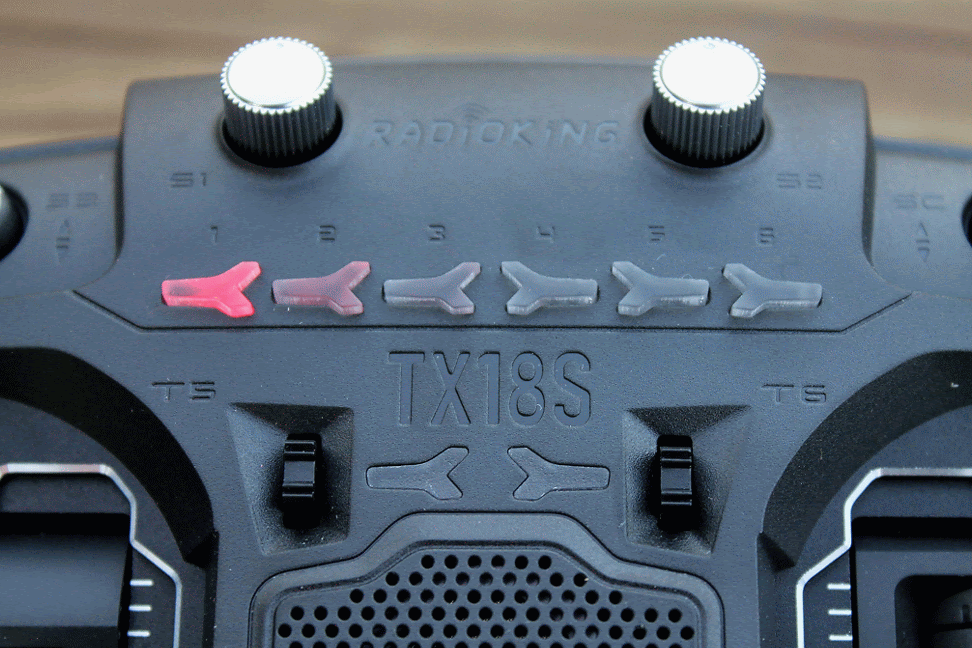
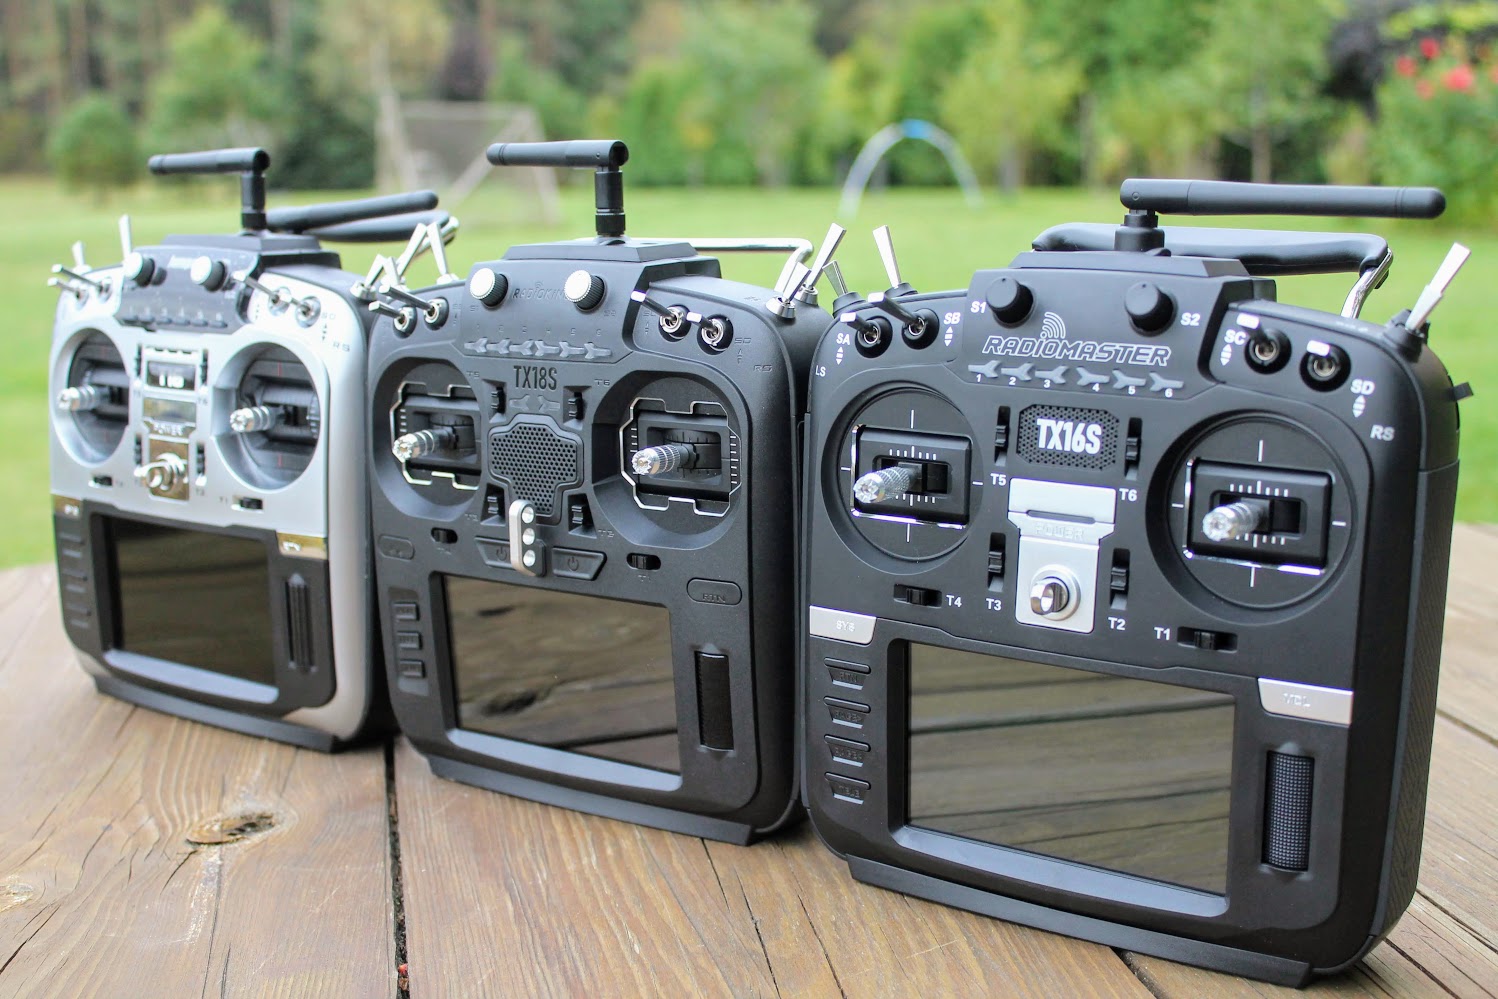
Radioking TX18S design is a mix of the Jumper T18 with some details from Radiomaster TX16S. The hall effect gimbals and the CNC gimbal plates are exact match of the Jumper T18, 6 mode led illuminated buttons resemble chicken feet.
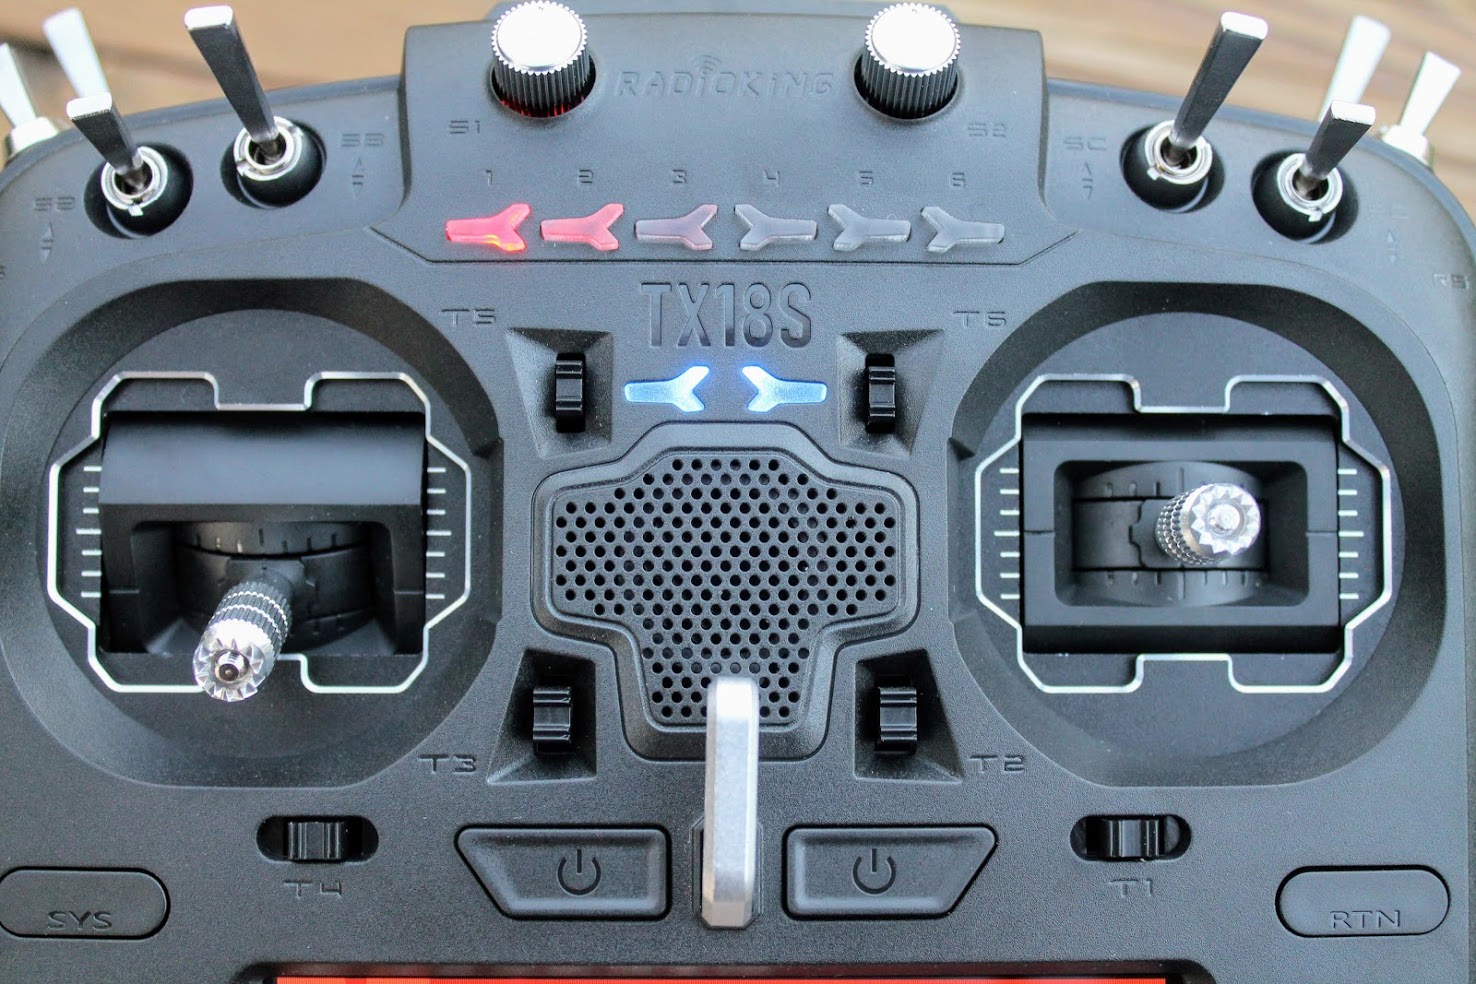
Two more chicken feet style led indicators show the radio status. RED – error, BLUE – working OK.
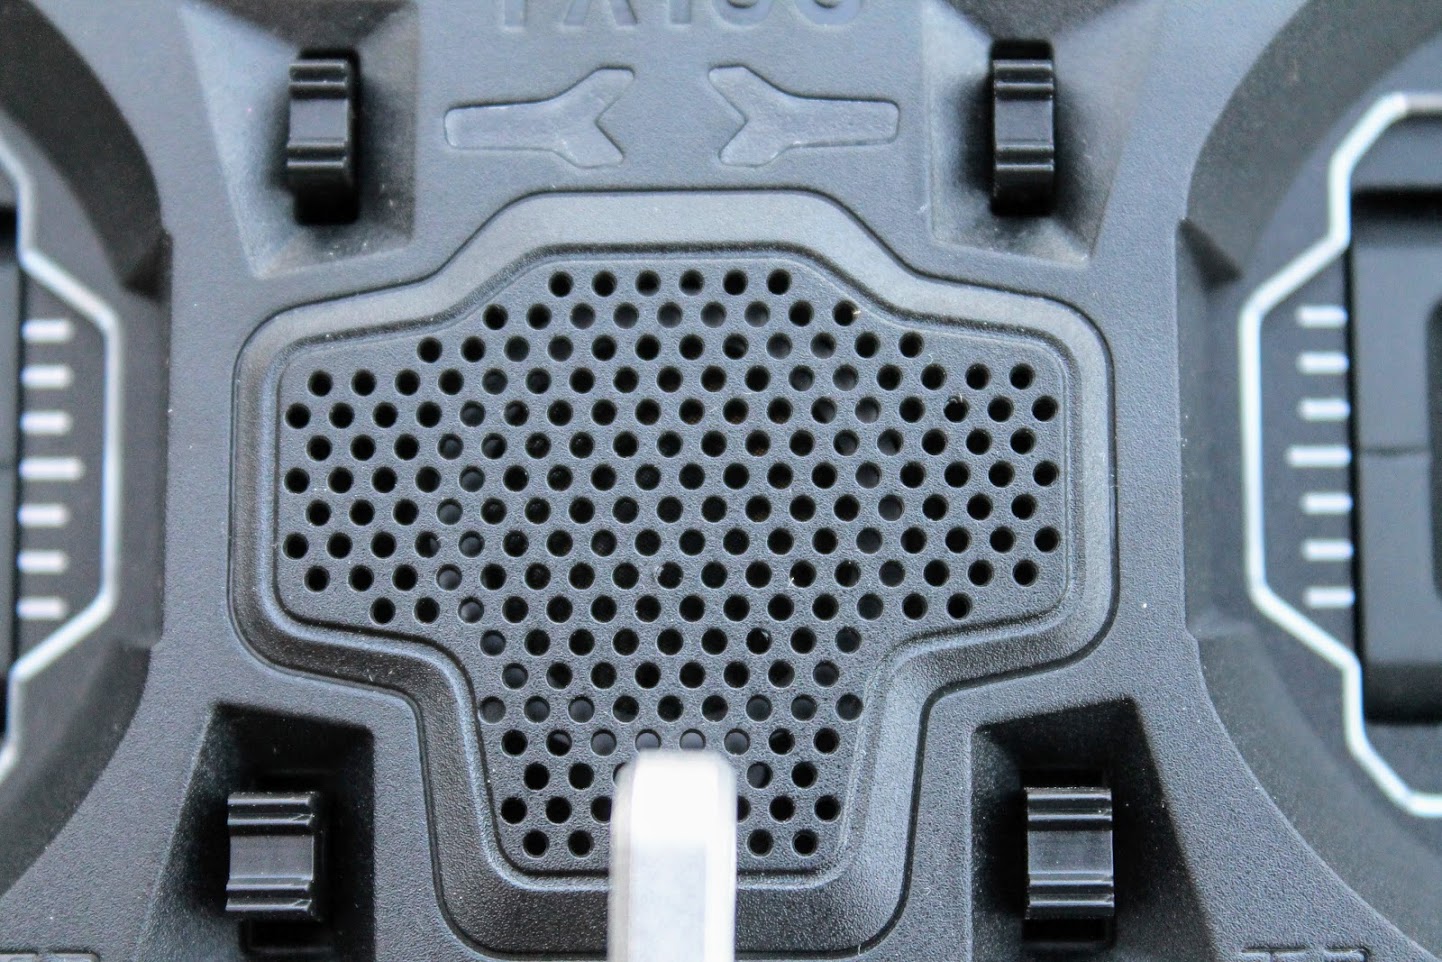
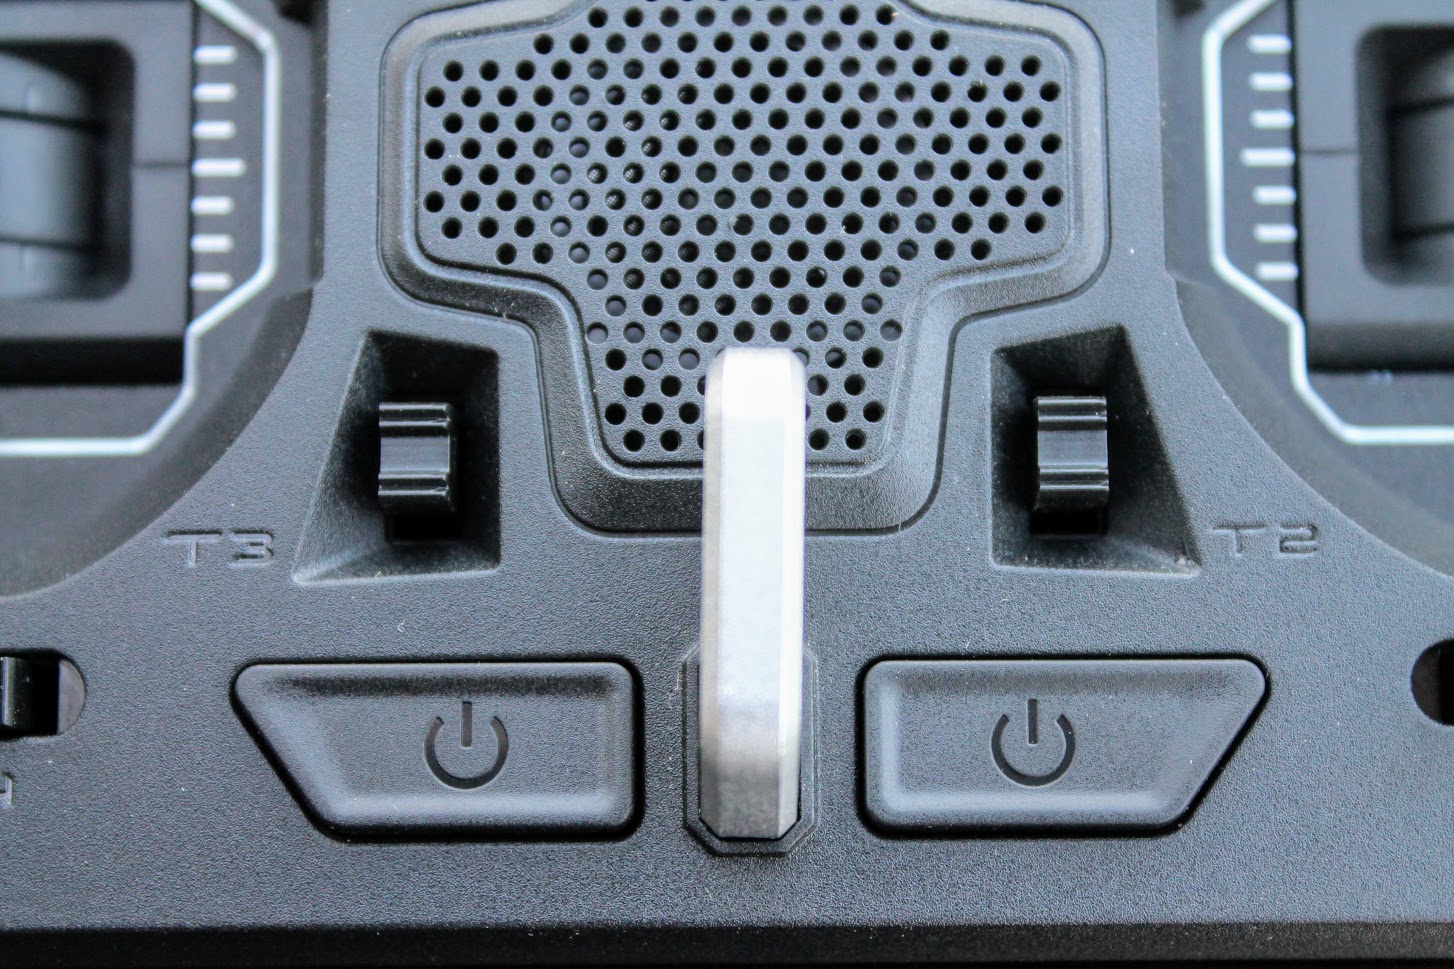
The speaker grid and the trim button looks the same as in Jumper T18.
The navigation scroll wheel is made of metal, just like in the Radiomaster TX16S radio. However mine radio came with loose scroll wheel. It rattles while shaking the radio and the navigation is difficult.
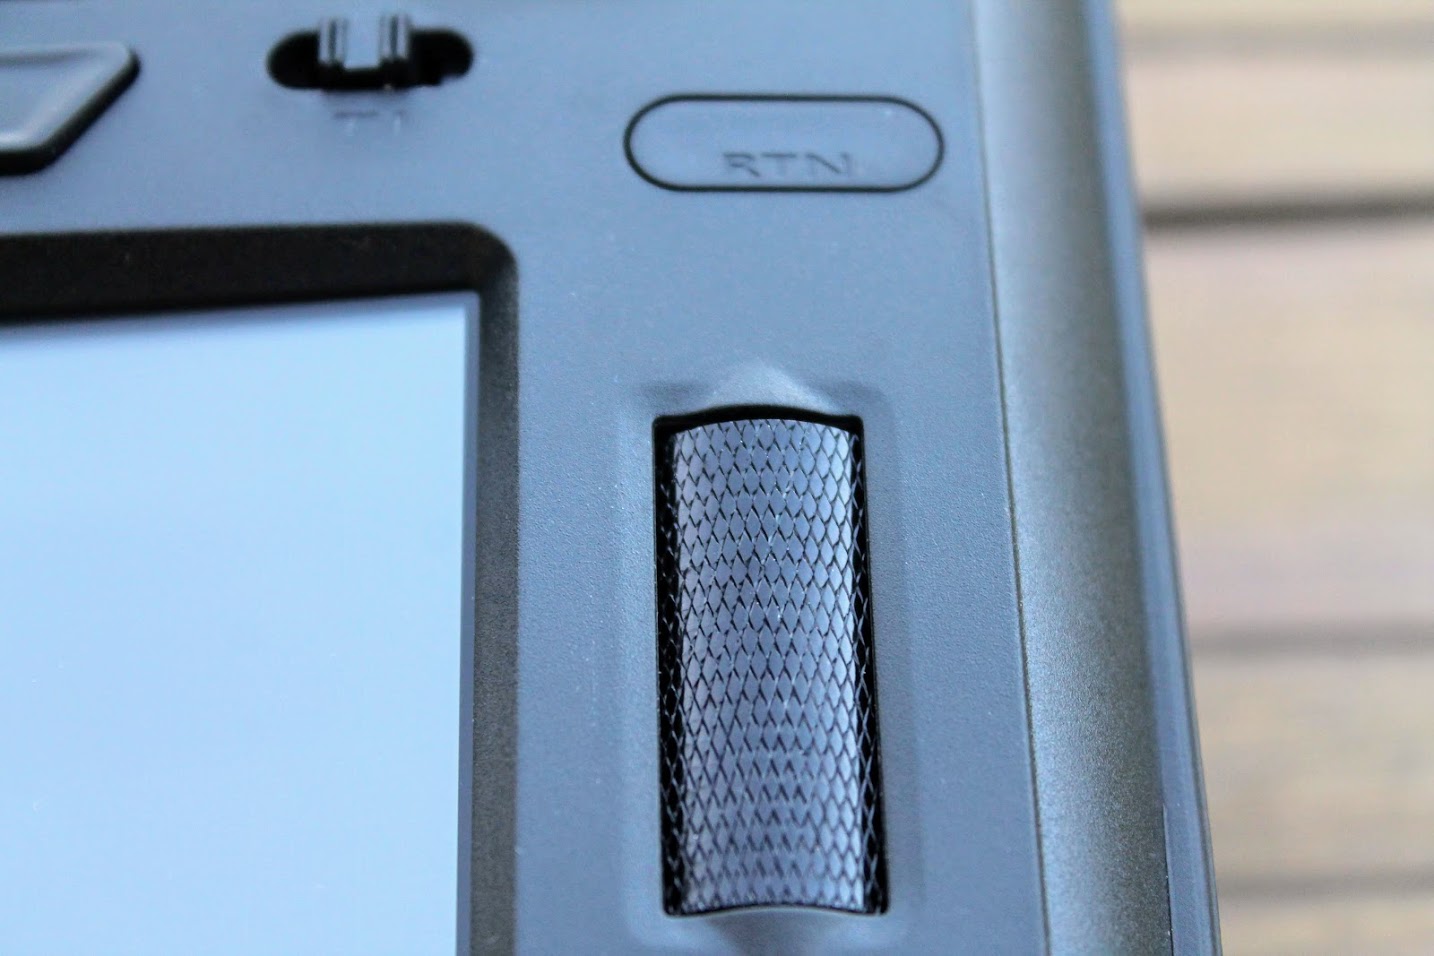
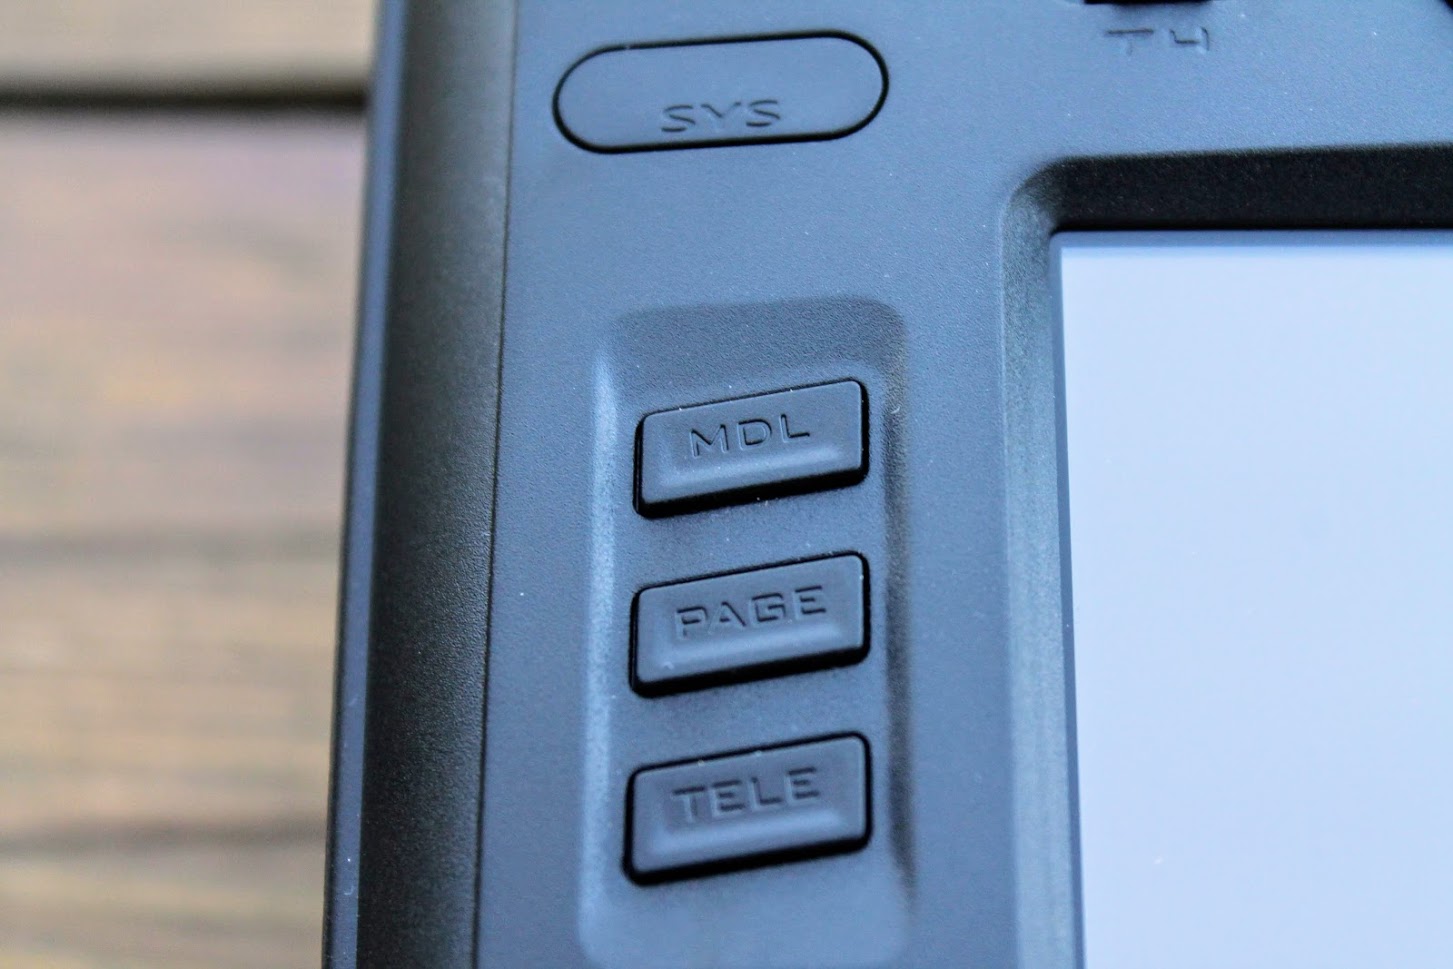
On the left side if the screen there are three control buttons. These look the same as on Jumper T18.
Radioking TX18S has heck strap hook with three holes for balancing the the radio with different batteries or external modules installed.
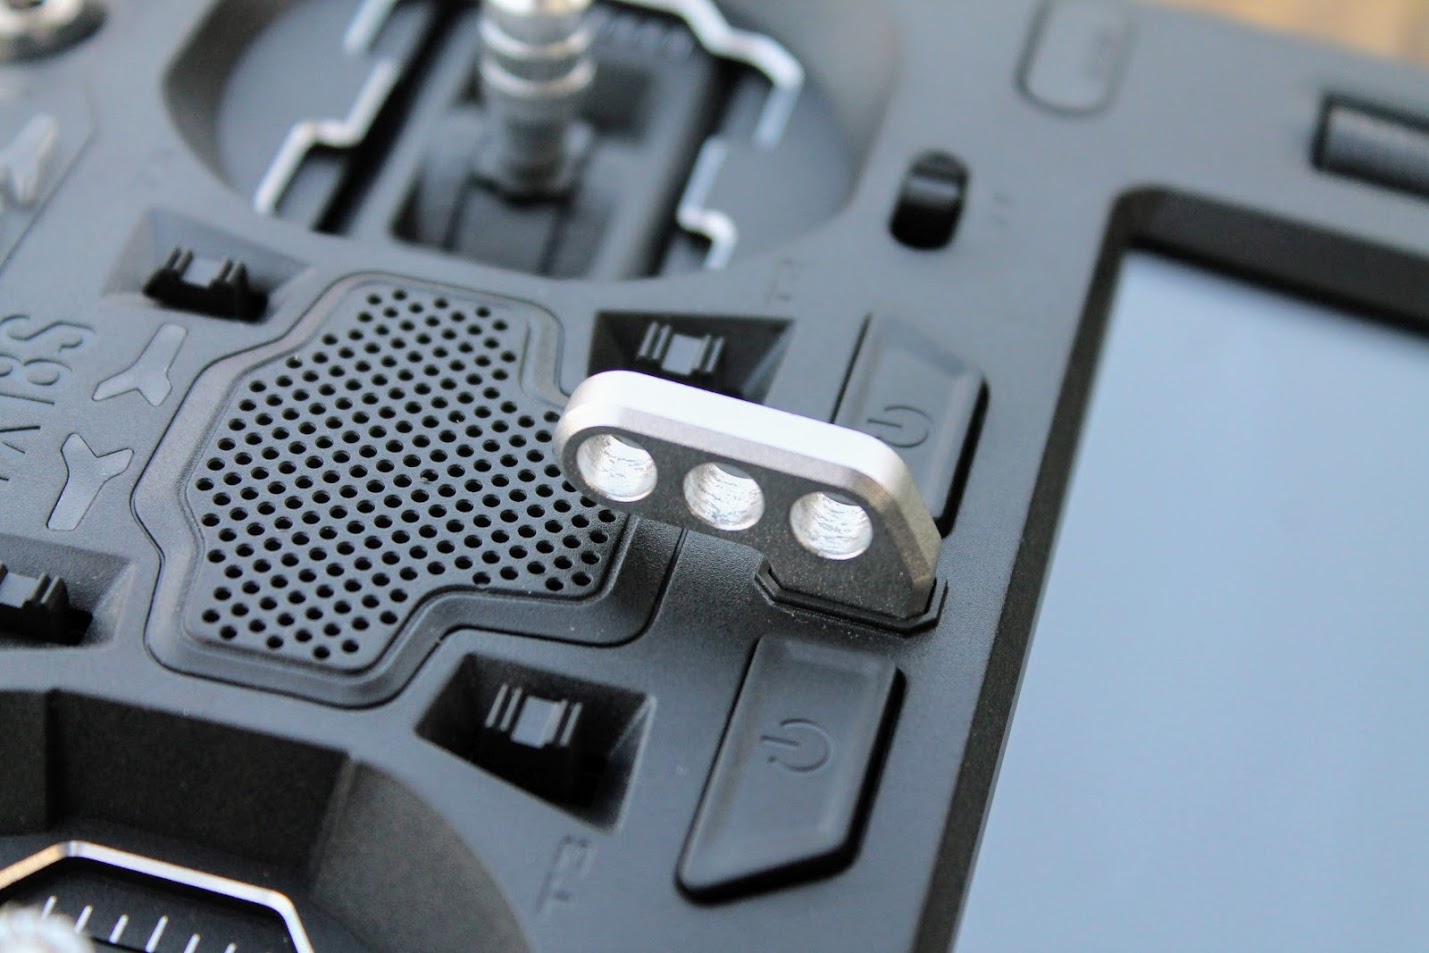
Radioking TX18S has two power buttons. If you press both of them simultaneously, radio will power off instantly. I wish the same method worked for powering on the radio.
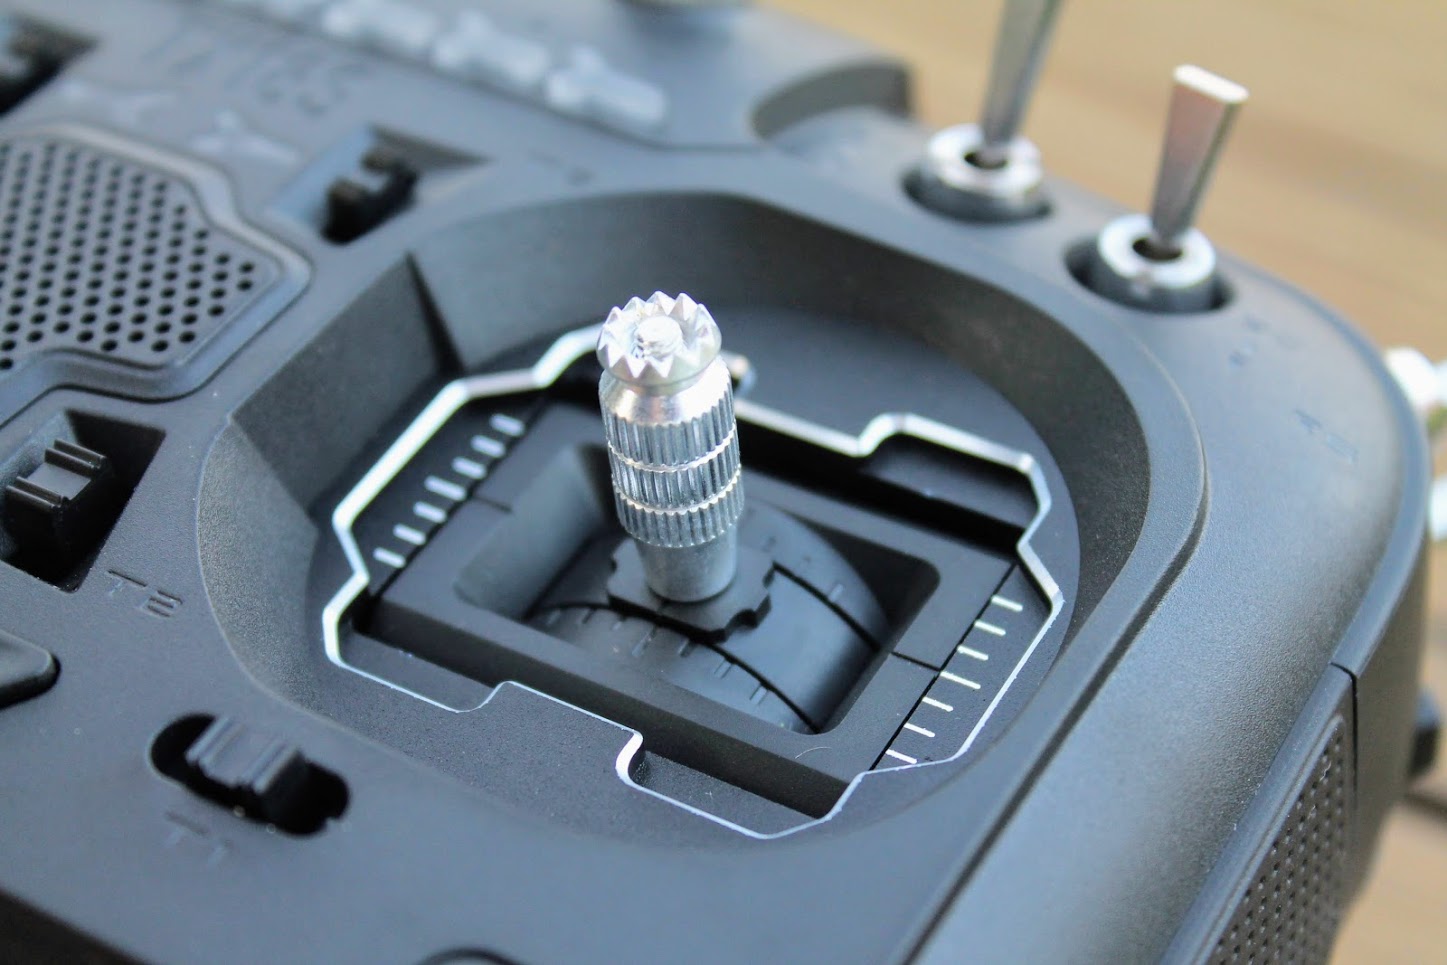
Radio has hall effect gimbals. Sticks have the possibility to be extended for the user preference. Left gimbal has simple friction on the throttle axis, which is different from the Radiomaster TX16S which has the ratchet friction on the throttle axis by default.

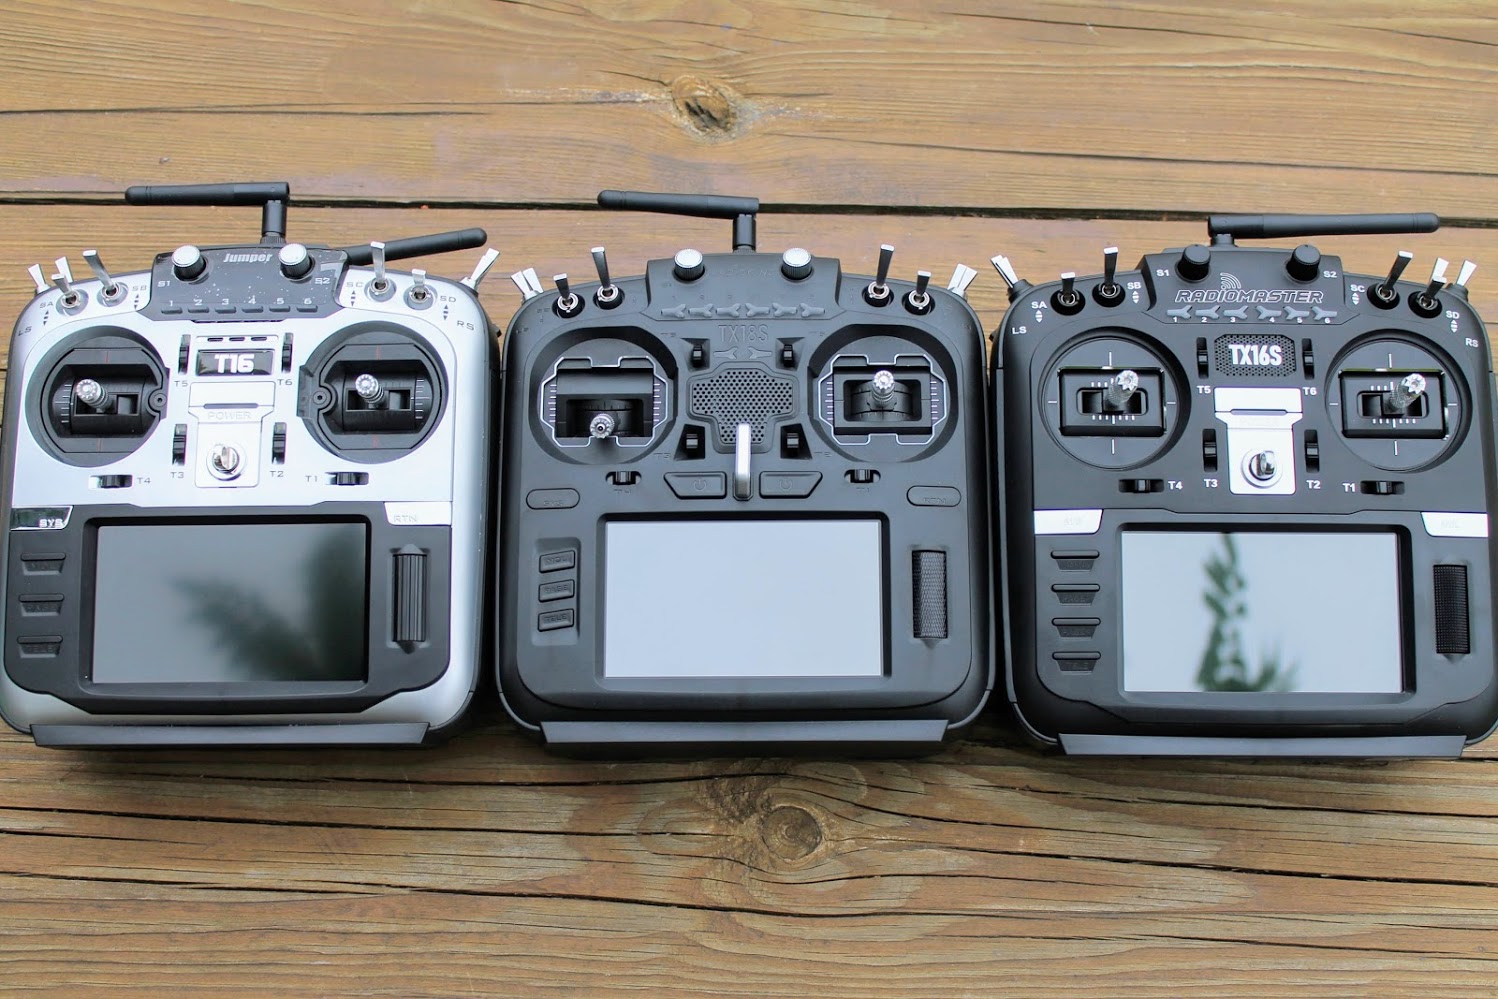
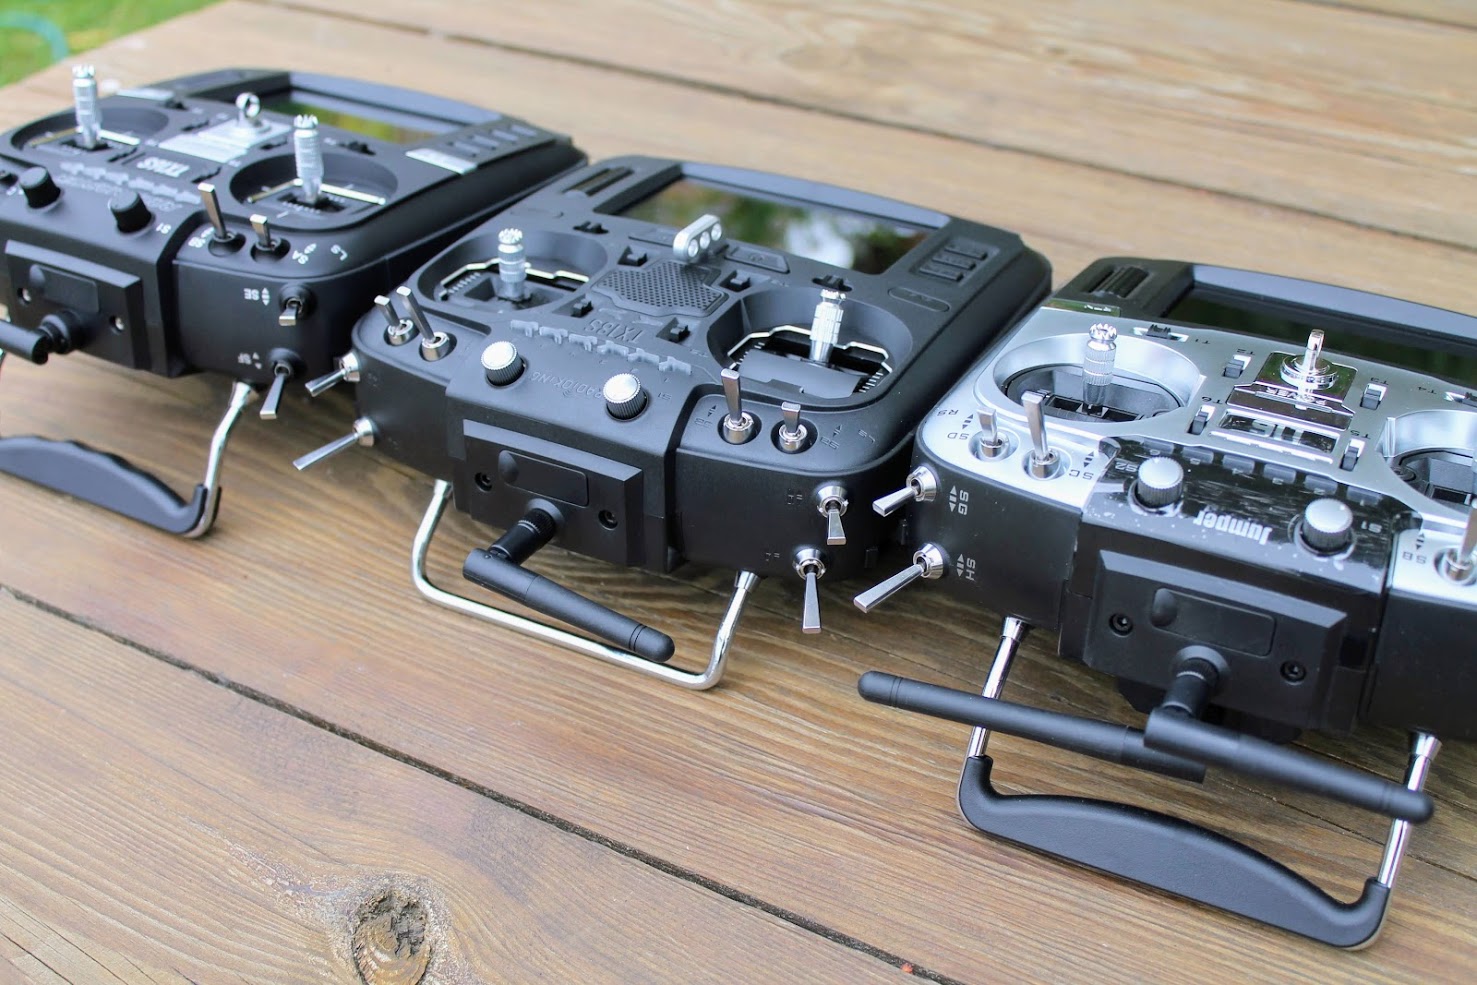
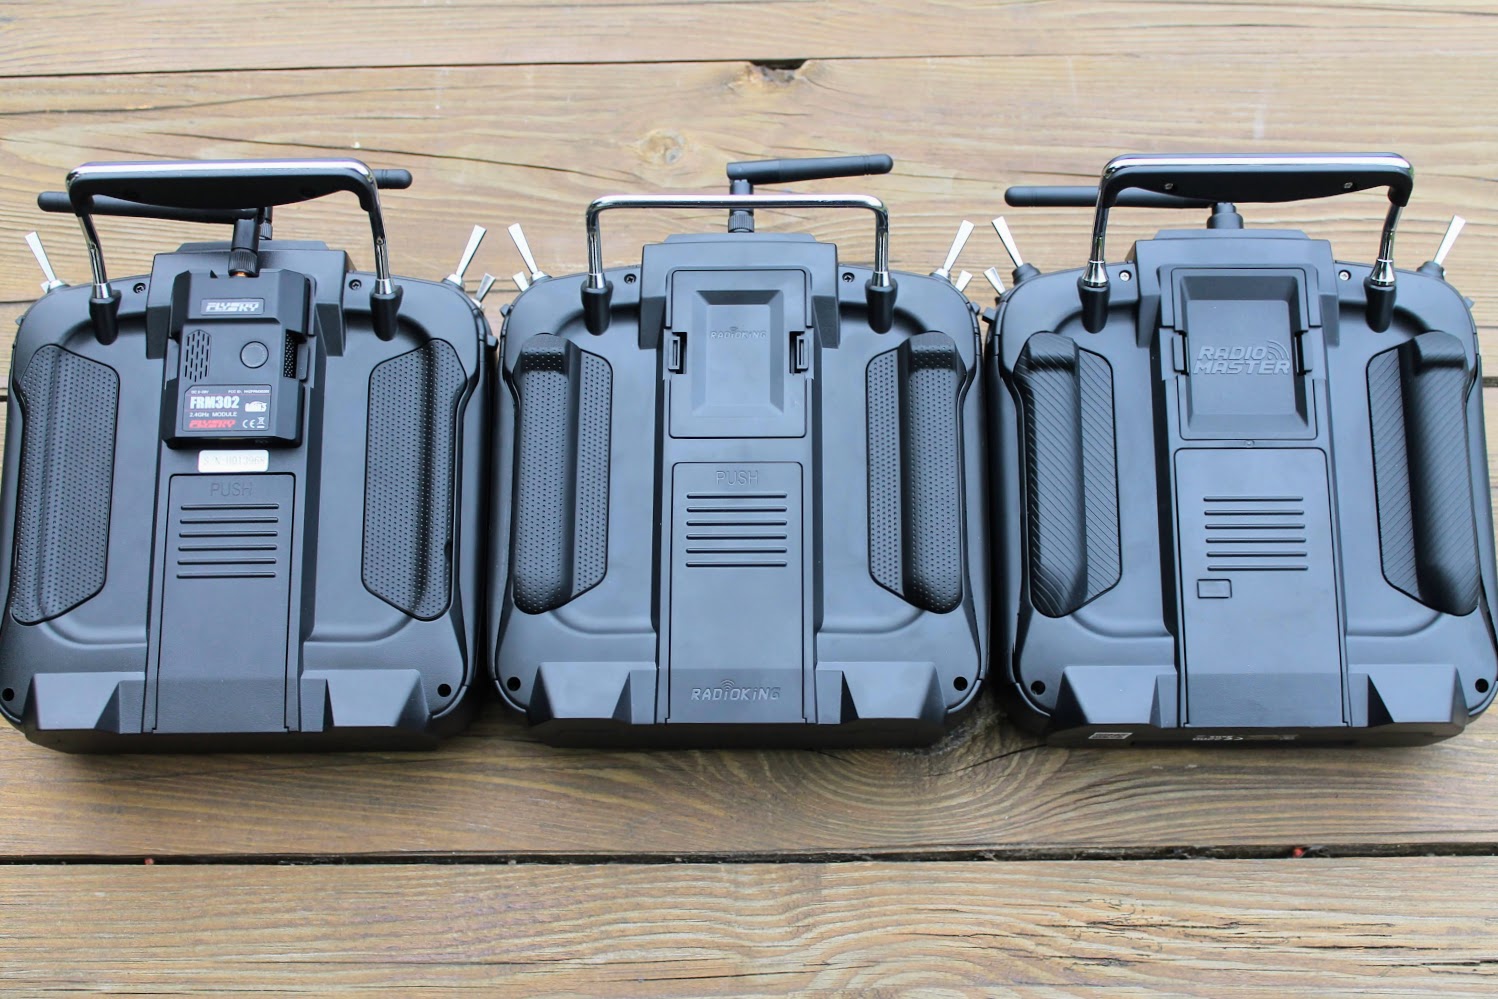
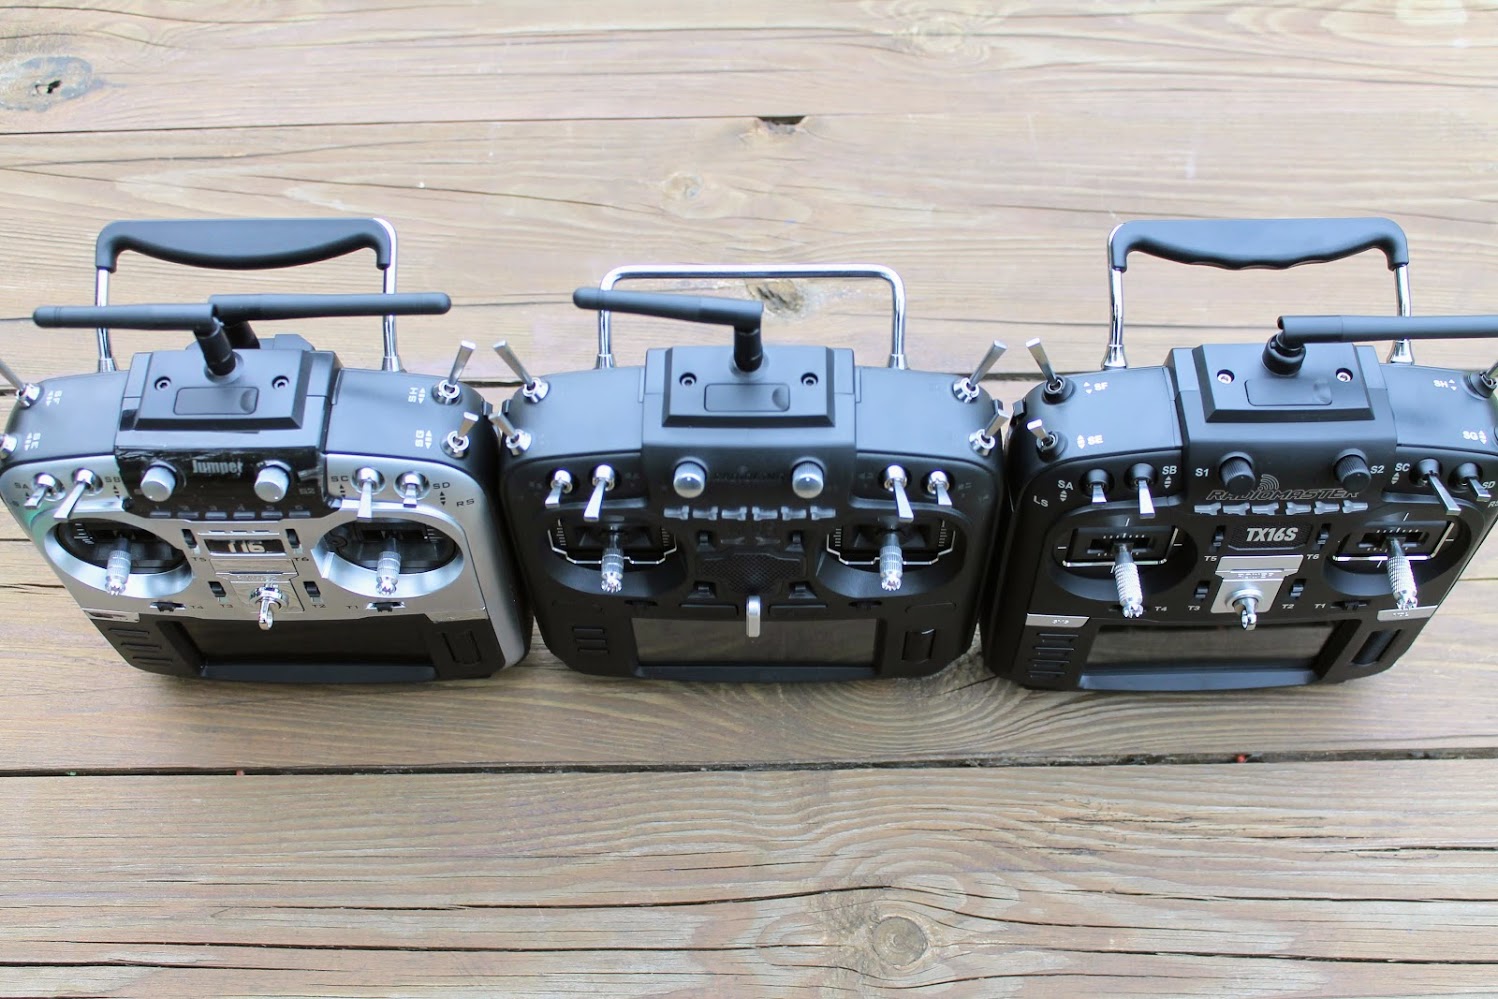
The number and the layout of the top and front switches are the same on all the radios of this lineup: Jumper T16, T18, Radiomaster TX16S and this Radioking TX18S radios.
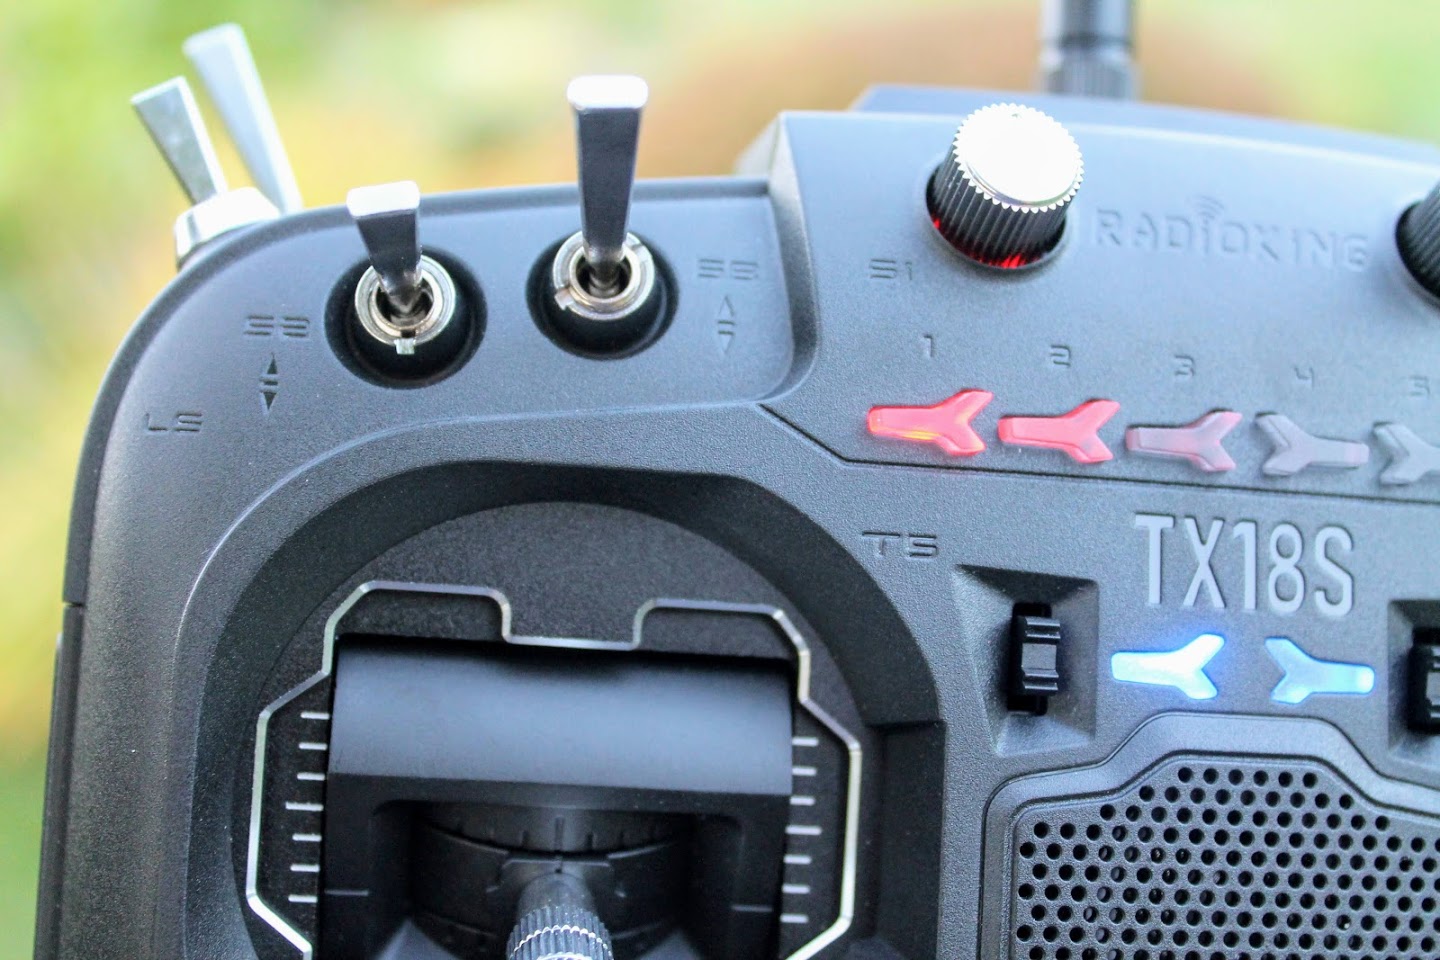
There are two sliders on the sides of the radio.
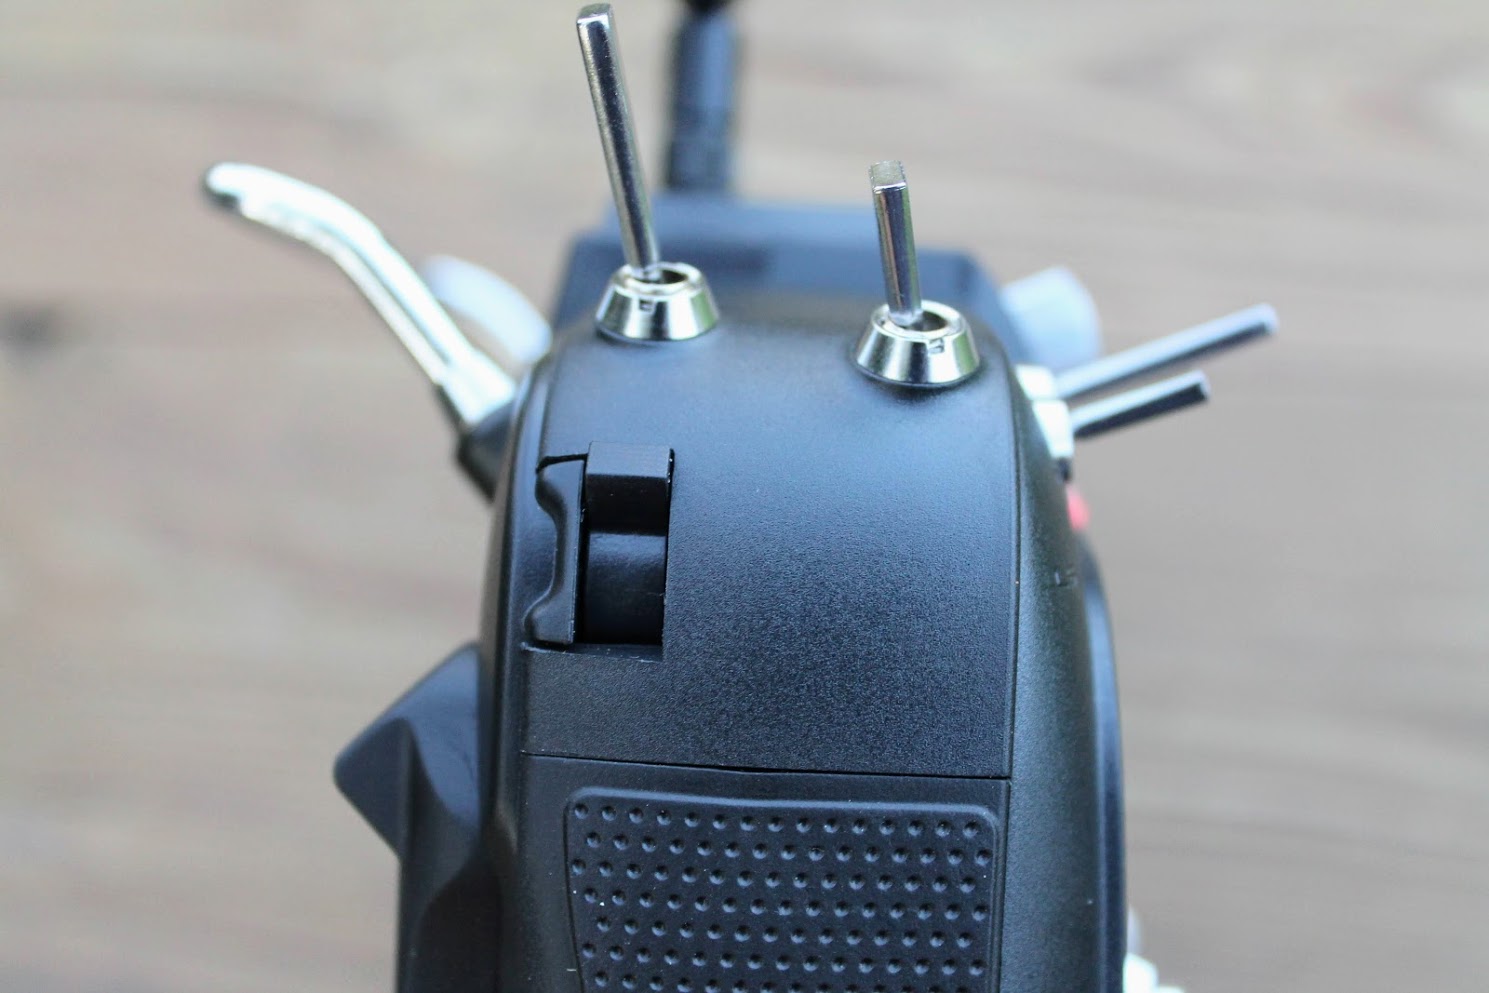
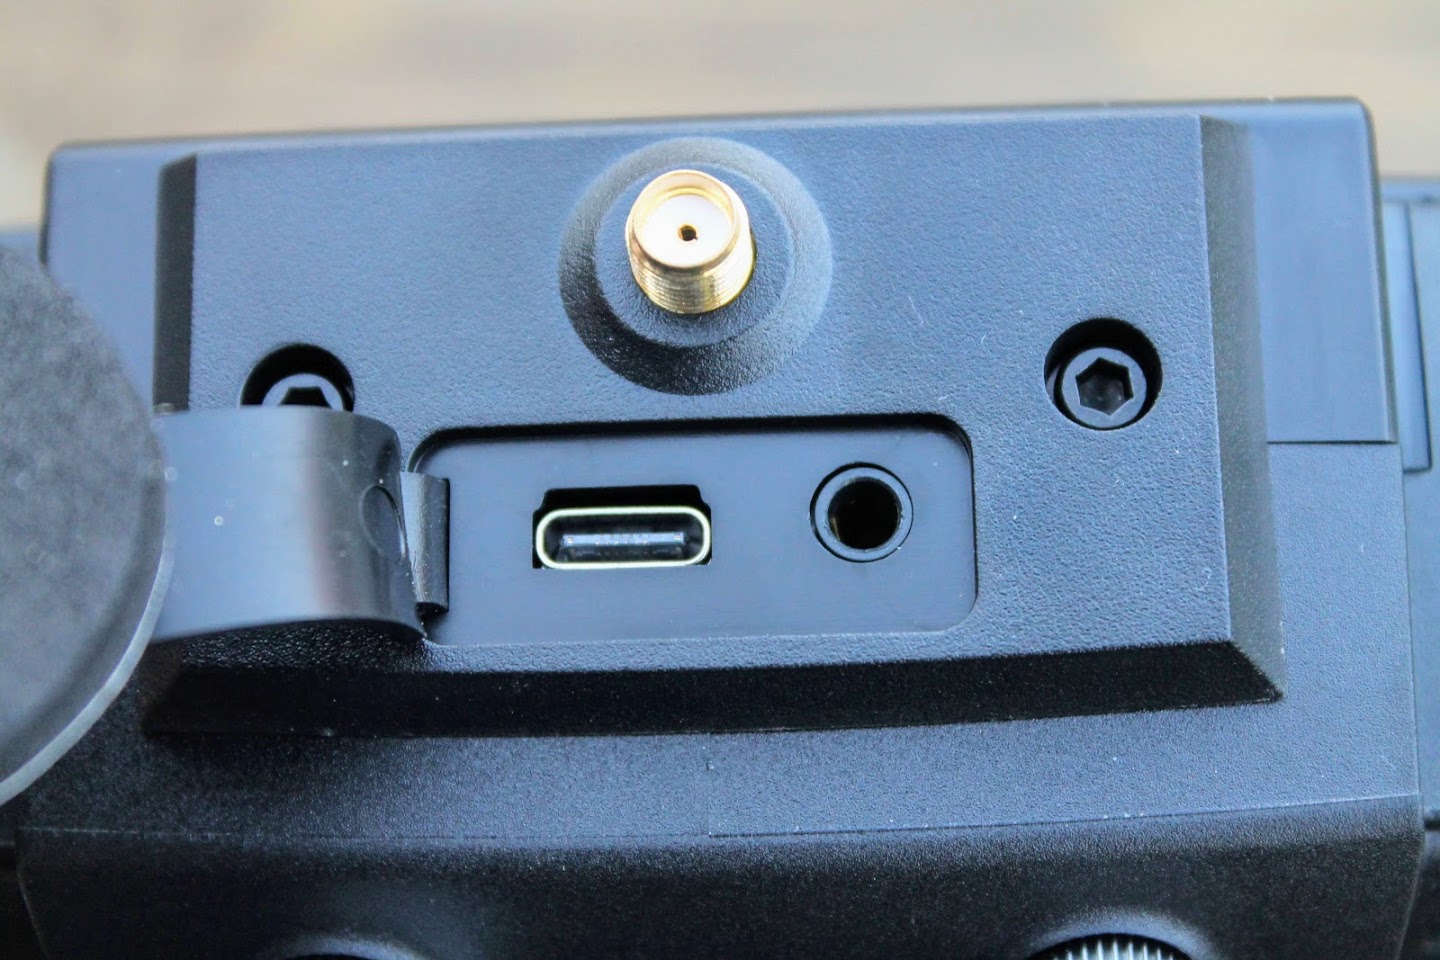
On the top of the radio you can find the SMA female antenna connector, USB-C port for charging internal battery and connecting to the PC. Also the 3.5mm jack for connecting the other radio for trainer function.
The back of the radio.
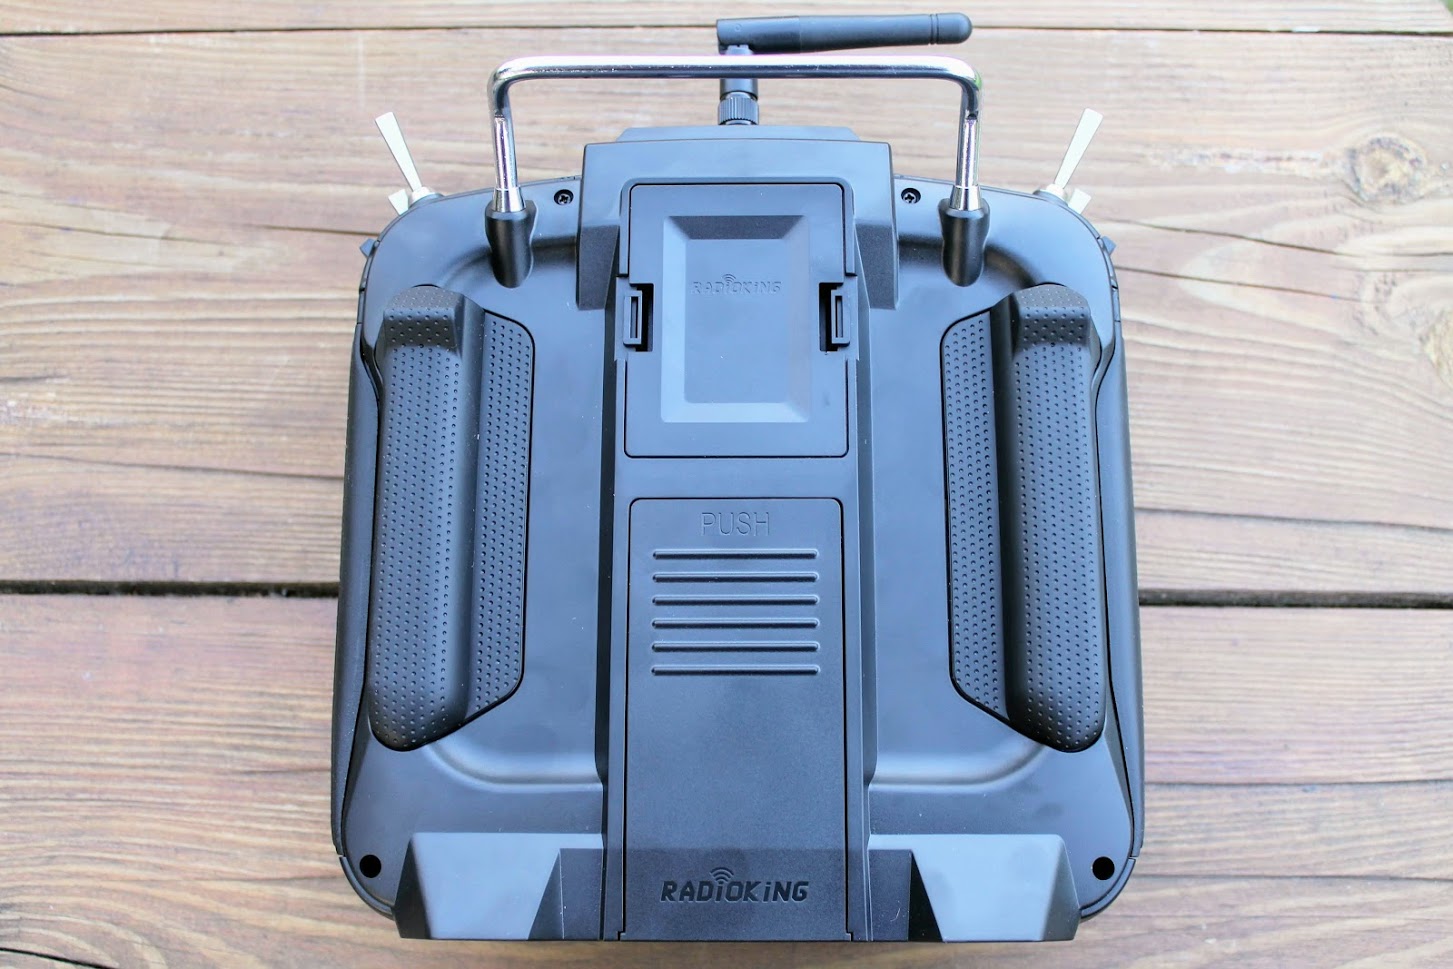
Radioking TX18S has the same shape rubber grips as the Radiomaster TX16S. However I find Radioking‘s grips more “grippy”.
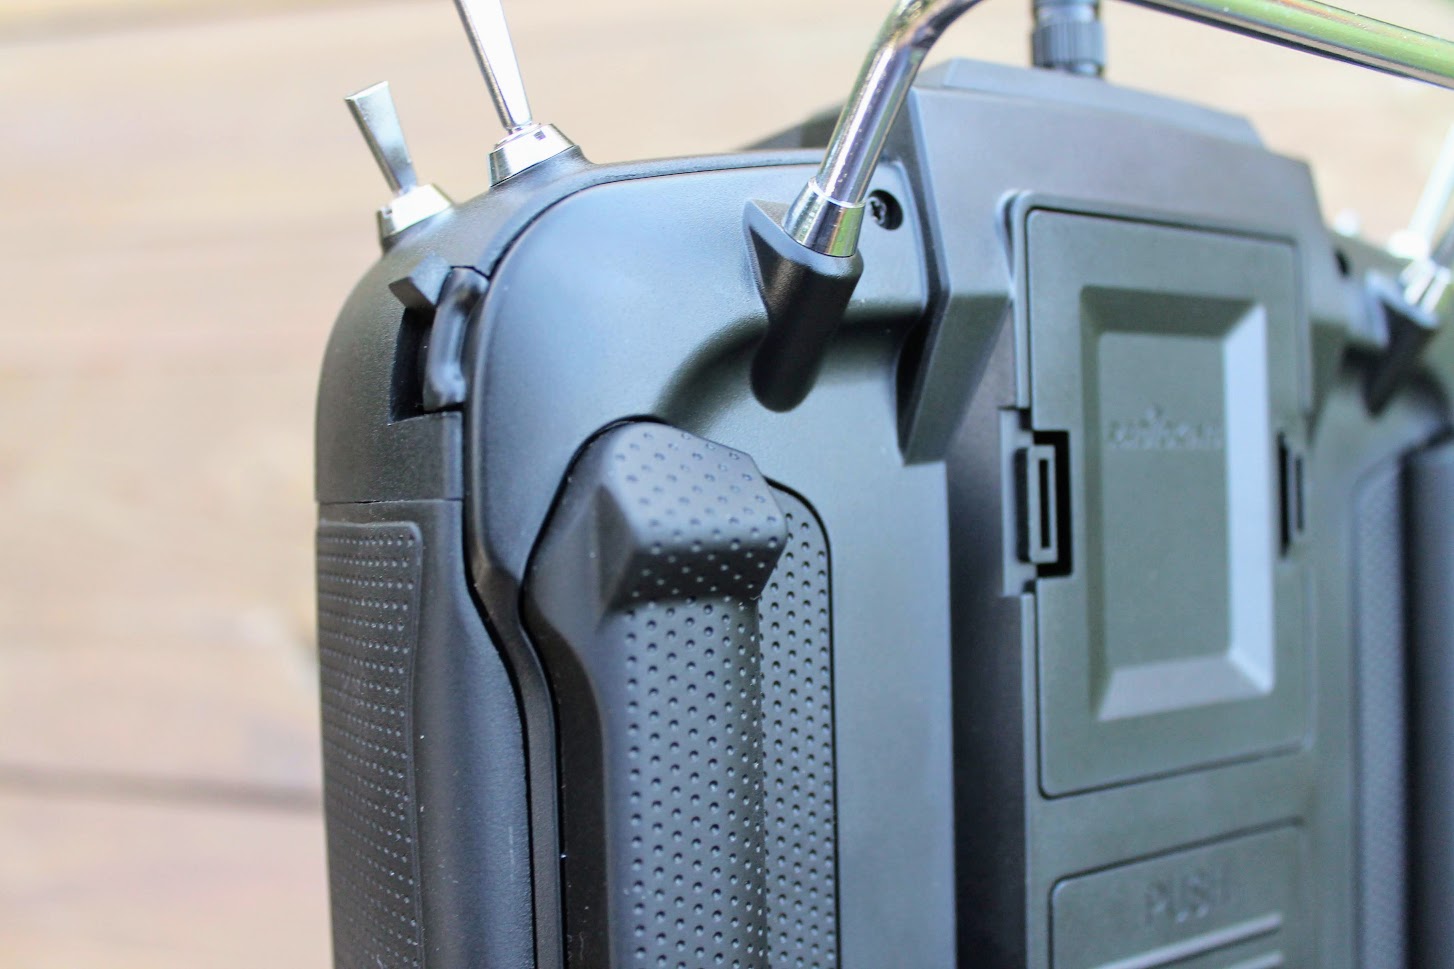
Rubber grips can be easily removed to access the screws that hold the case halves.
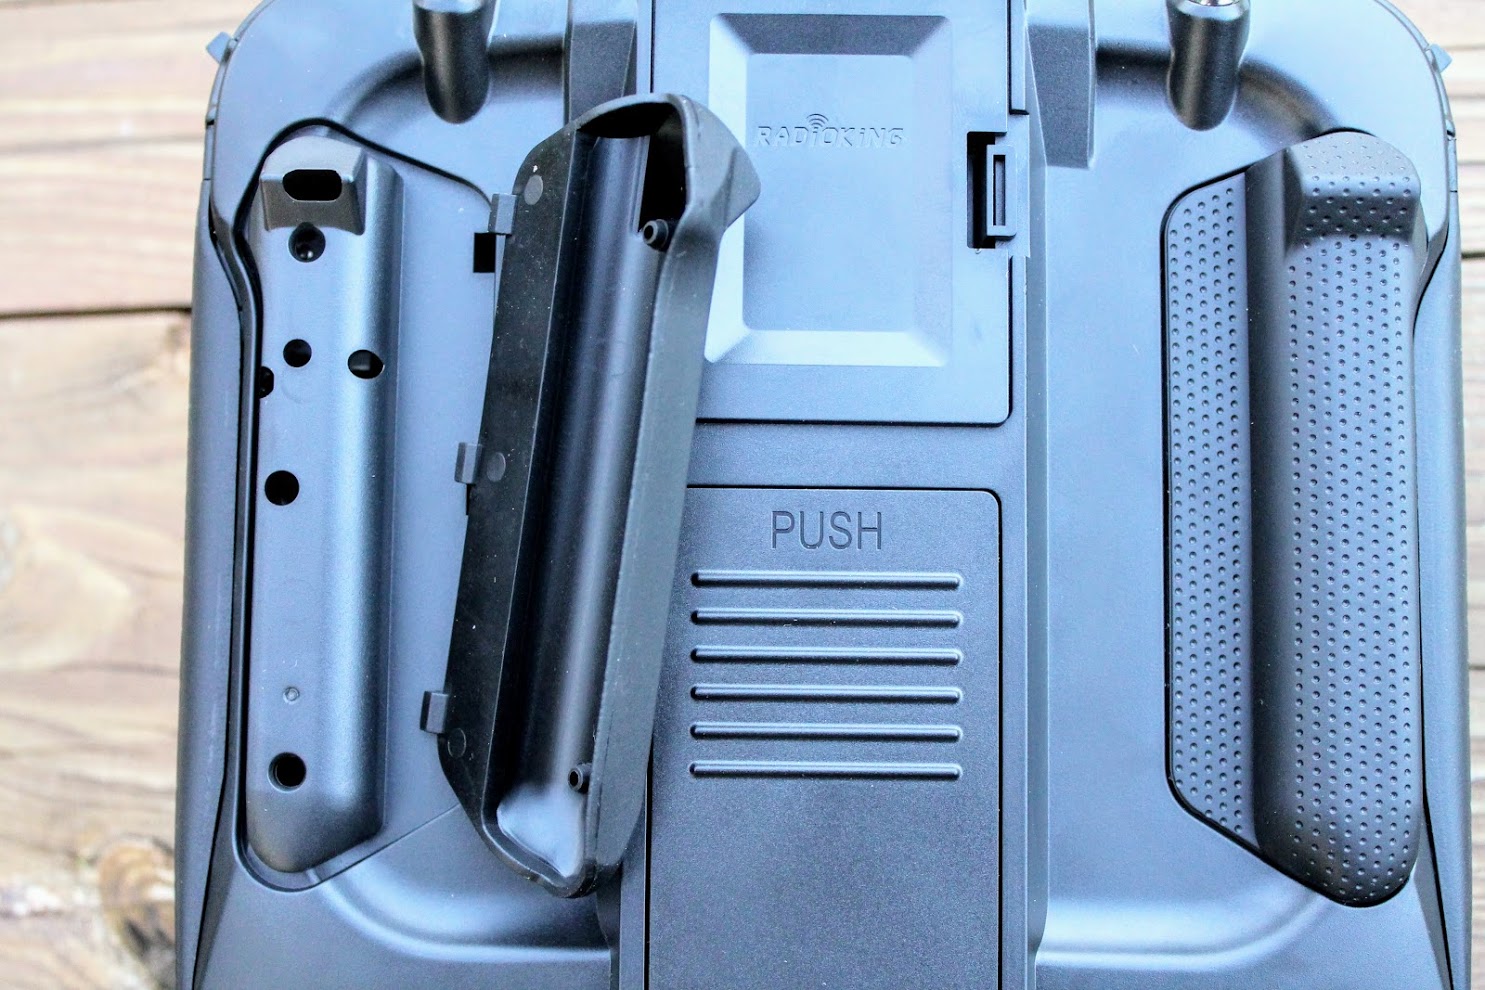
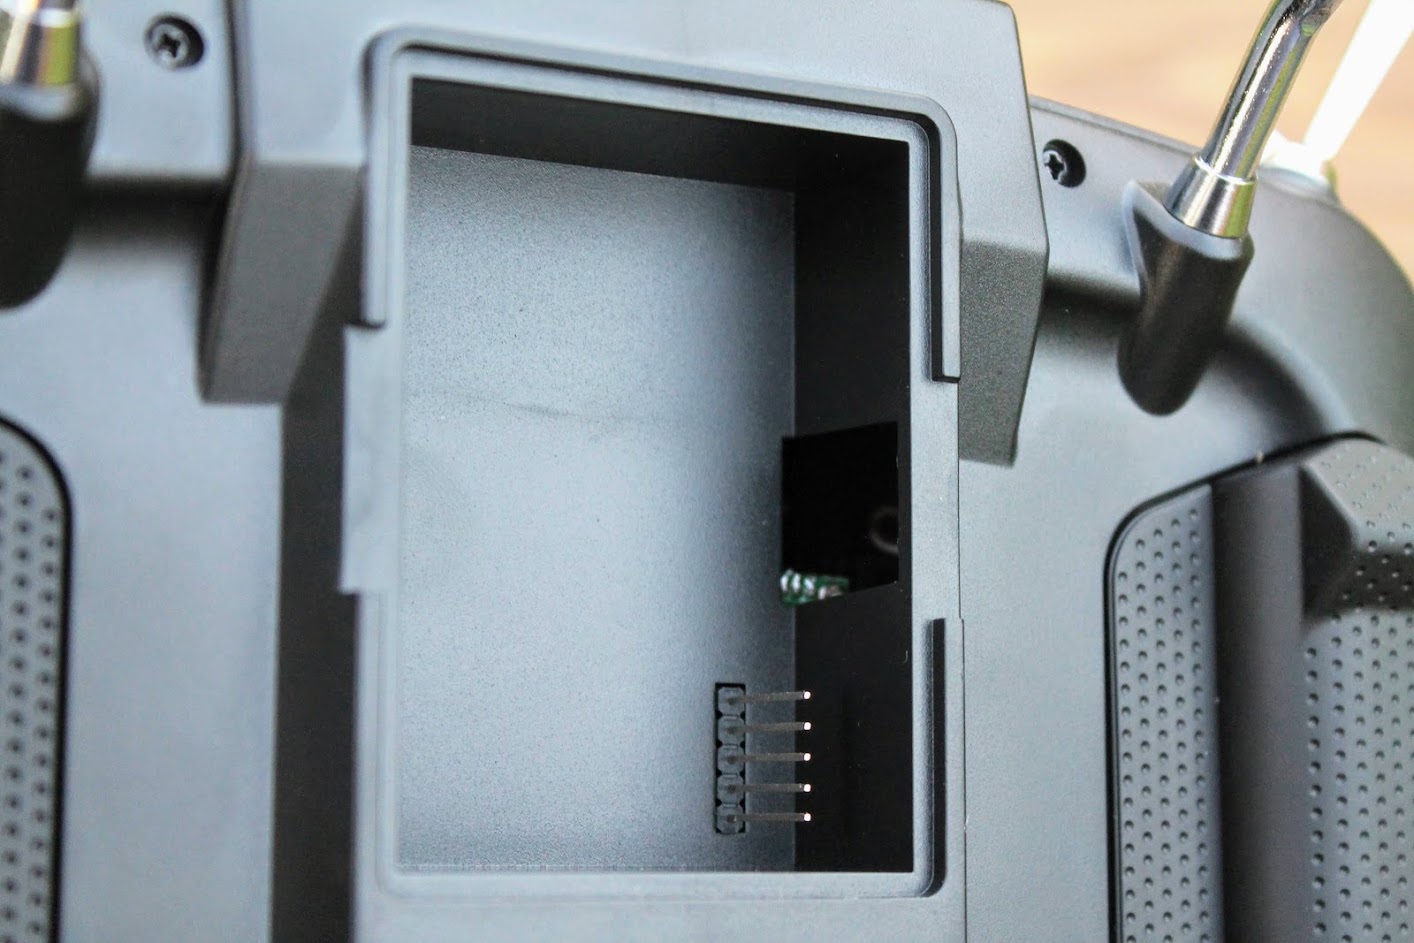
JR module bay and battery bay with the covers opened.
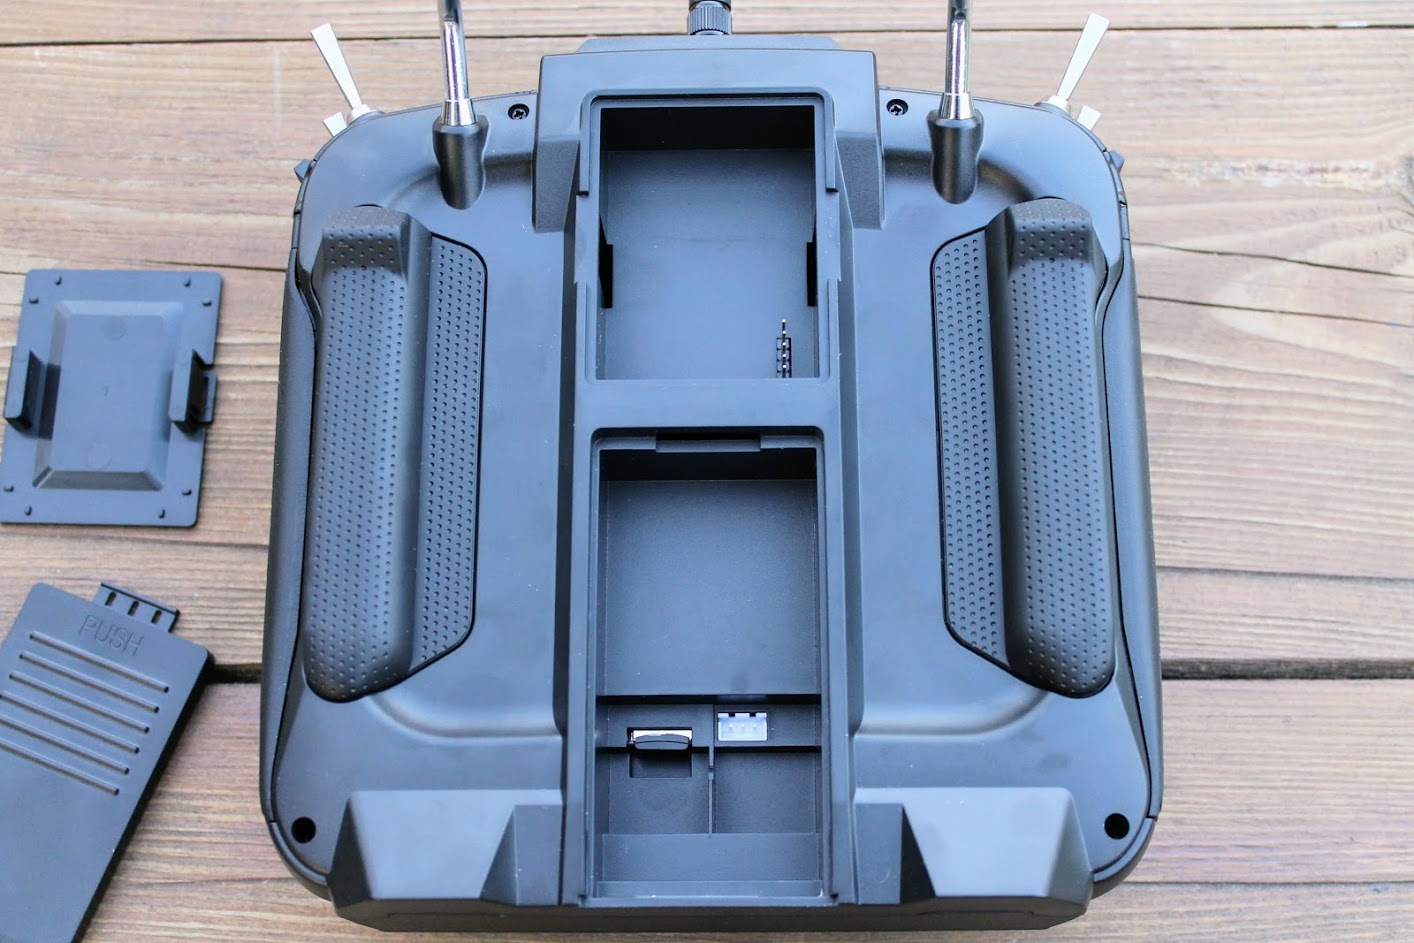
JR bay fits standard full size JR modules, like TBS Crossfire TX, Flysky FRM302 or FrSky R9M modules.
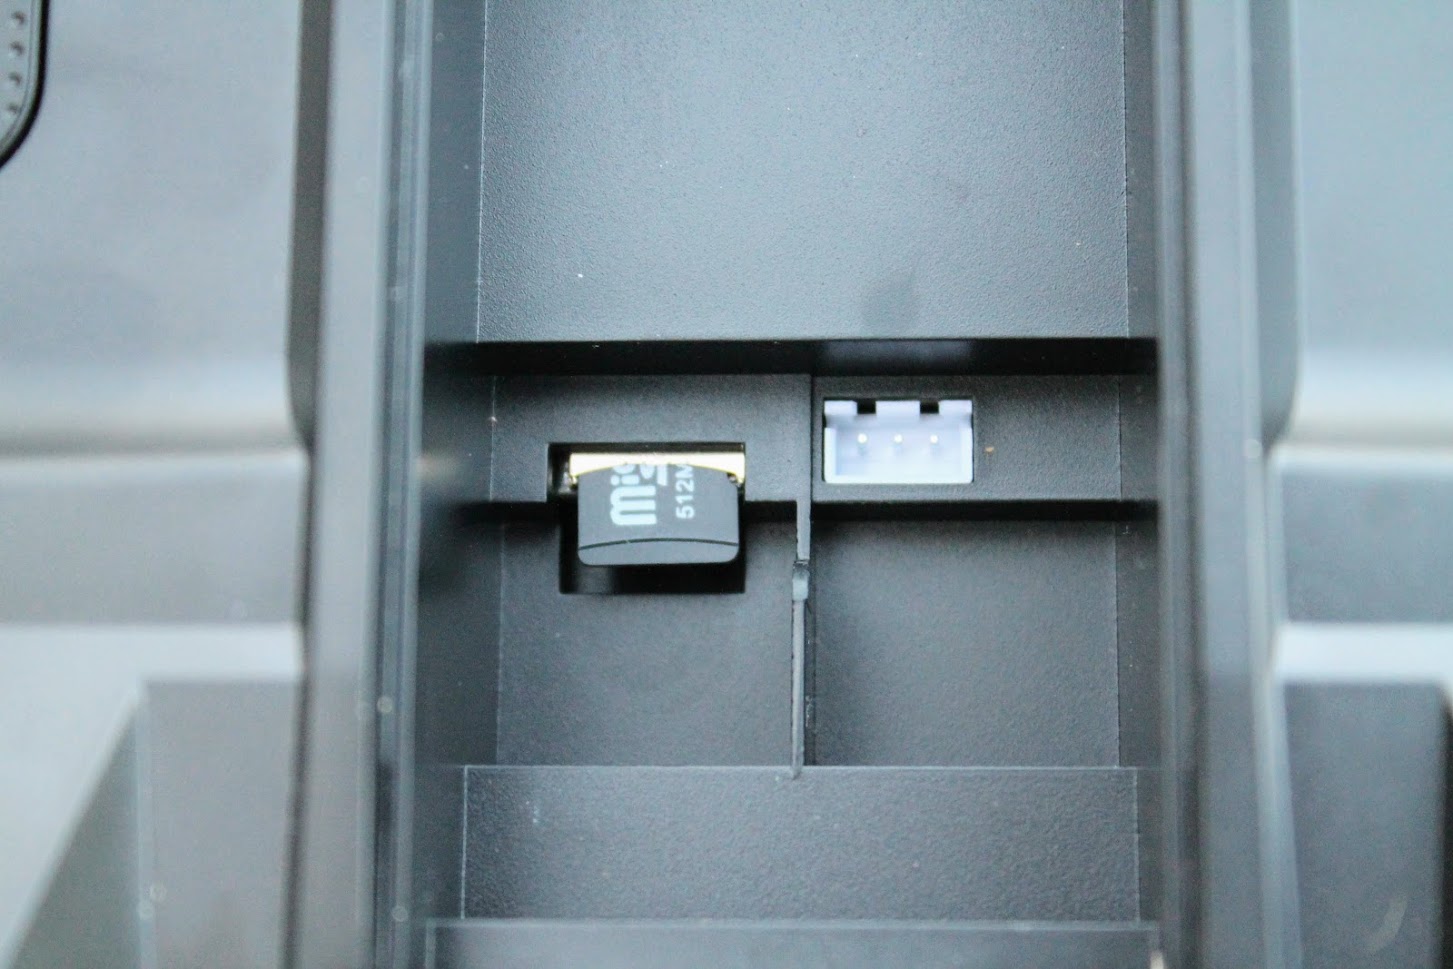
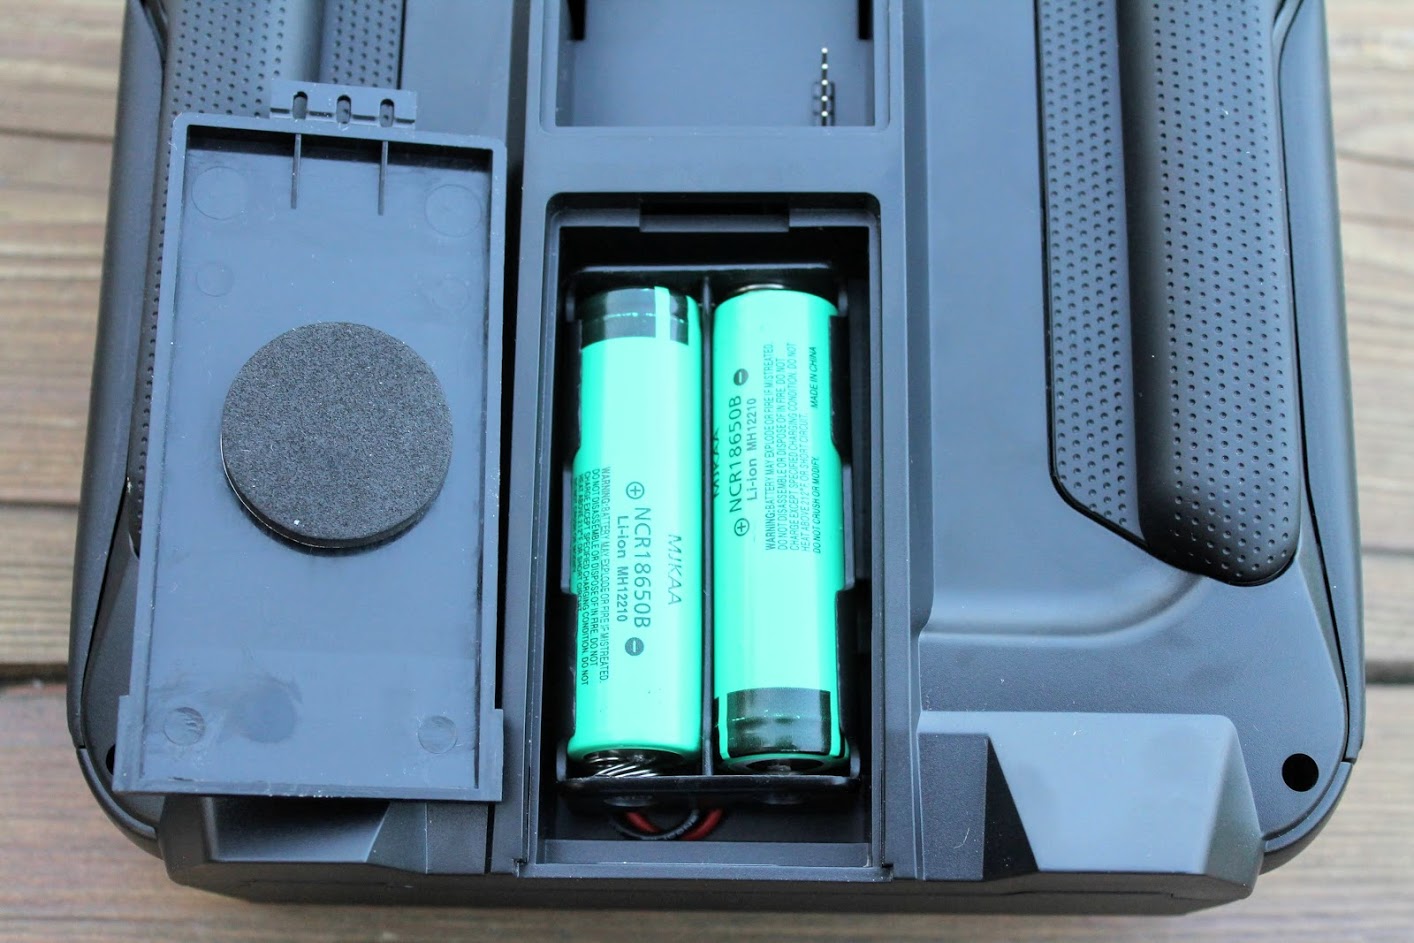
In the battery bay you can find the 512MB micro SD card installed and the socket for connecting the 2S Lipo battery balance cable or the supplied Li-On battery holder.
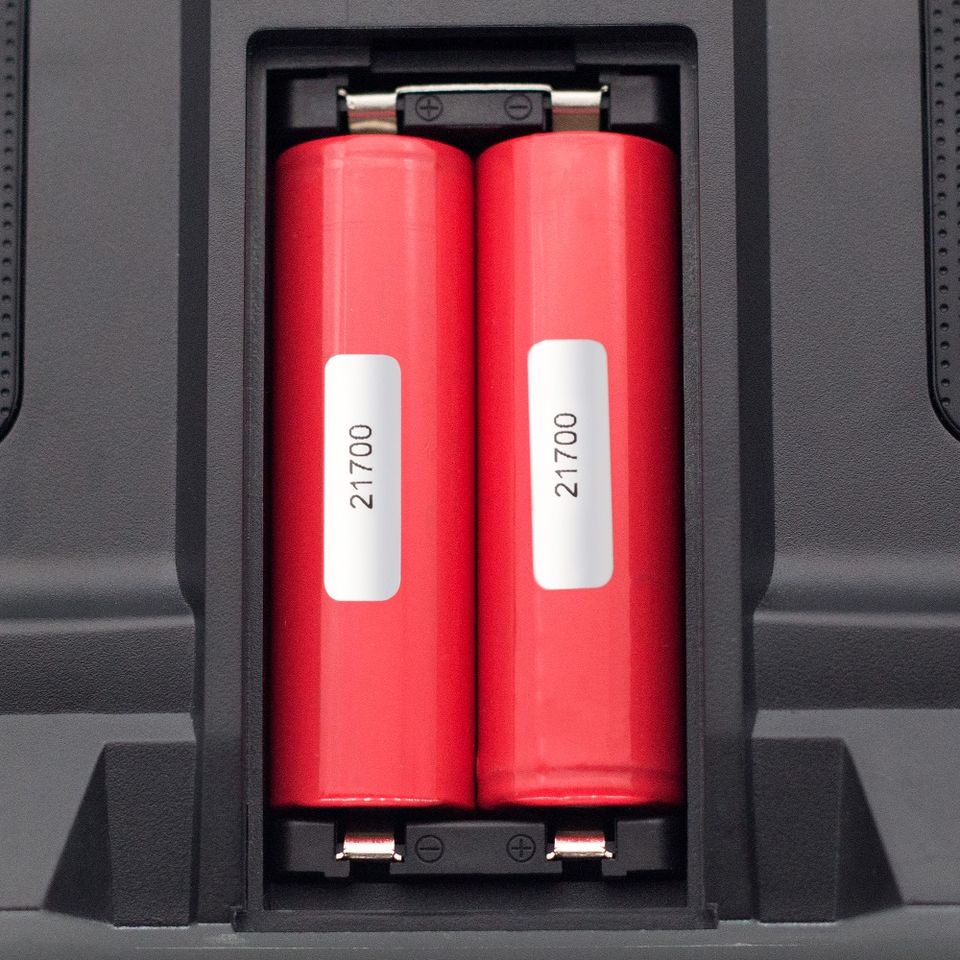
The battery bay fits 2 pcs 18650 Li-on batteries with the battery holder.
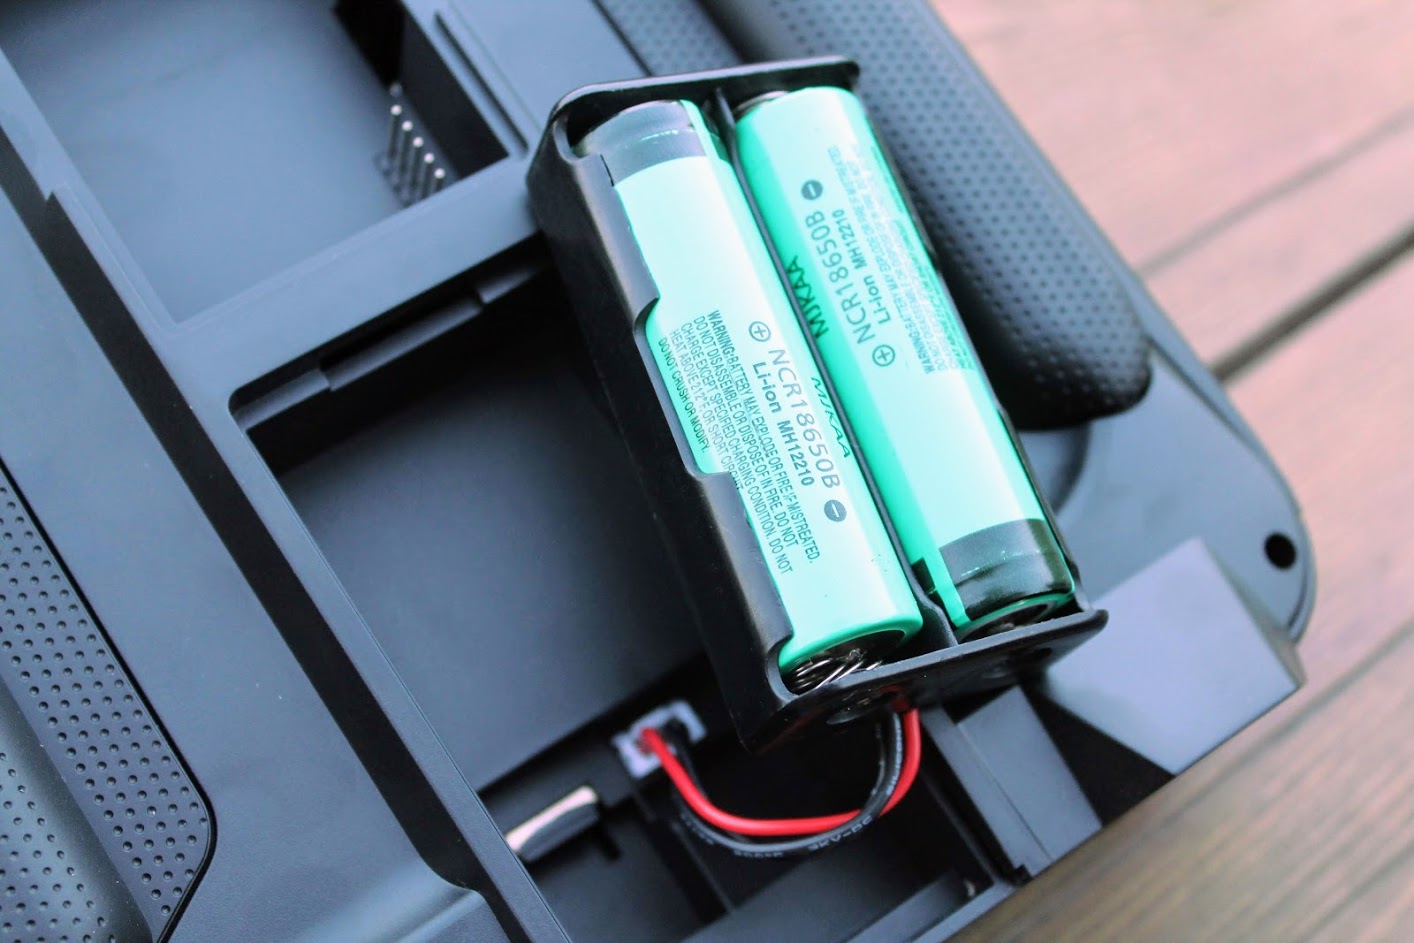
21700 sized li-on cells also fit this bay, but you have to solder the balance cable to them by yourself or try to get the Jumper 21700 battery holder for Jumper T18 radio (May be not available yet at the moment).
You can also use special Lipo battery as Gaoneng 7.4V 2S lipo battery: https://www.banggood.com/Gaoneng-GNB-7_4V-3000mAh-5C-2S-Lipo-Battery-XT30-Plug-for-Jumper-T16-or-T18-…-1679813.html
The supplied adhesive foam spacer can be attached to the battery bay lid to secure the Li-on or Lipo batteries in the bay. Otherwise the battery will be left loos and will rattle in the bay.
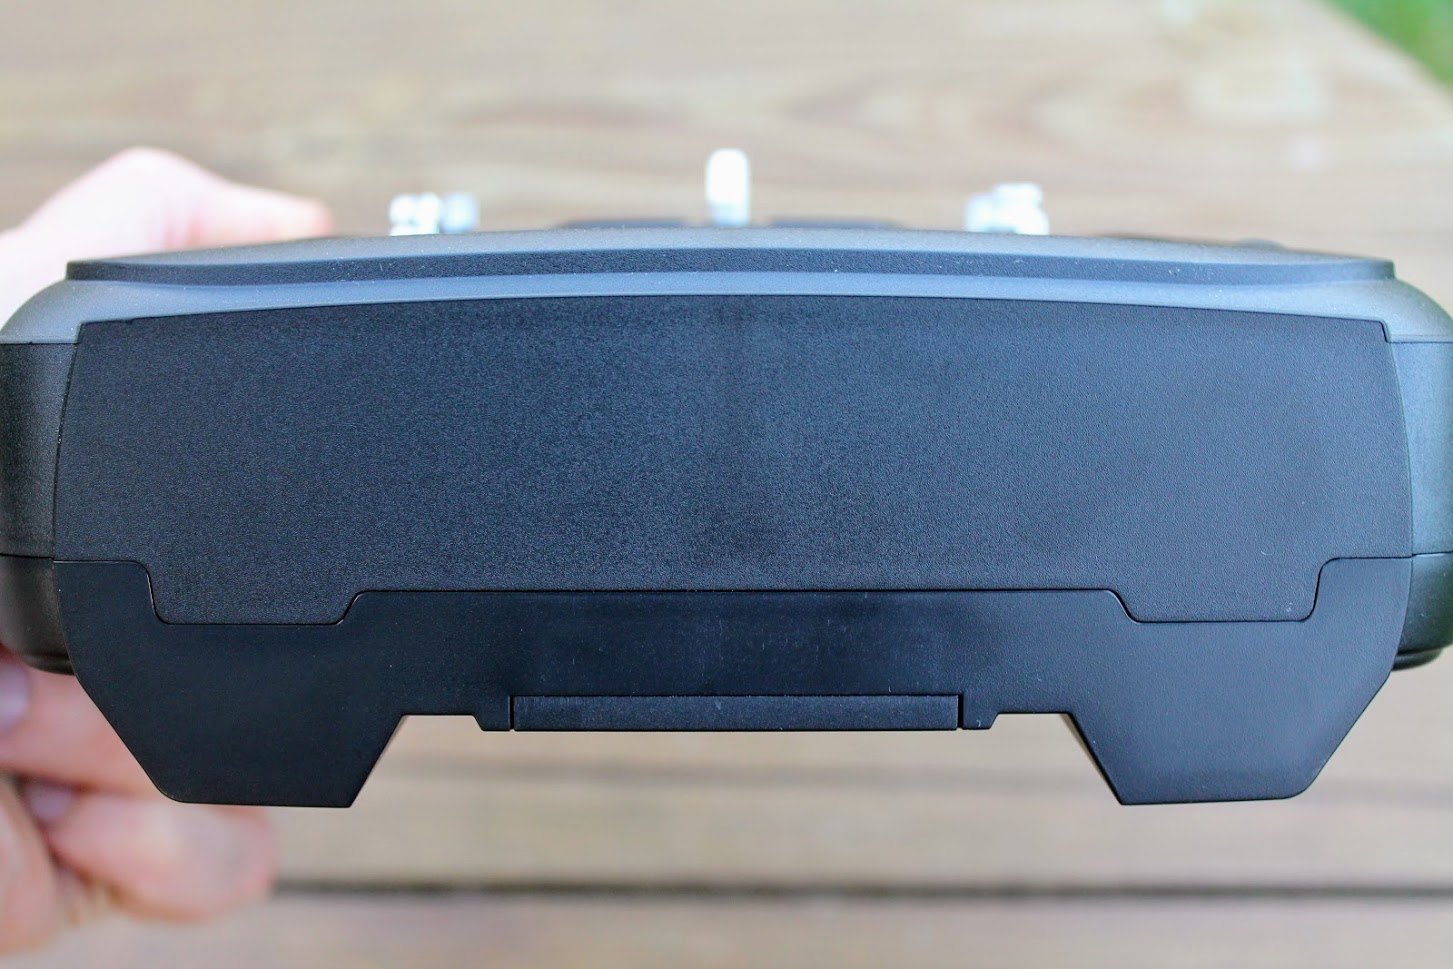
The bottom of the Radioking TX18S radio is flat, no more ports or connectors are present.
Comparison with Jumper T16 and Radiomaster TX16S
Touchscreen
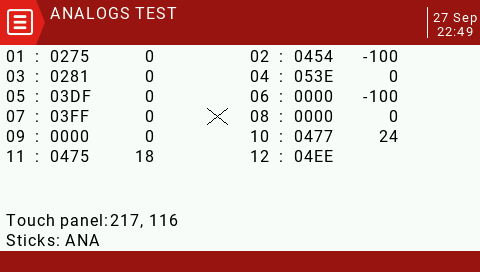
Yes, this 4.3 inch IPS 480×272 LCD screen has touch panel. Touch panel is capacitive type (as used in all modern electronics such as smartphones). You can check if the touch panel is working in the analogs test page.
There are rumors that support for touch screen will be available in OpenTX version 2.4.
OpenTX firmware
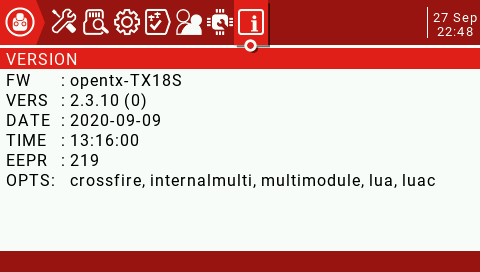
Radioking TX18S is shipped with custom OpenTX vers 2.3.10 TX18S firmware. This is the unofficial release version at the moment.
It is unknown if the Radioking TX18S will be supported by the OpenTX developers. But looking back the same situation was with Jumper T12/T16 radios. At first OpenTX devs even refused to support the radio, but as it gained the popularity and time passed they changed their mind and now these radios and Radiomaster TX16S are fully supported in OpenTX.
Update: Actually Jumper T18 firmware works on the Radioking TX18S. Although some of the users have reported that whenever on-screen brightness is lowered, there are hissing noise coming from the Radioking TX18S speaker (the same as in Jumper T18).
If the LCD backlight brightness is high (>70%) the hissing noise is gone. This happens after flashing Jumper T18 builds to Radioking TX18S, hissing sound is not happening with the stock RadioKing firmware.
Some more important info
While the design and the look of the radio is nice (remember it is a mix of the two radios), Radioking TX18S has some annoying rattling sound of the buttons and the scroll wheel if you shake the radio in your hands. This is typical issue with the cheaper radios and I was disappointed to find this issue in Radioking TX18S. Radiomaster TX16S and Jumper T16 does not have this.
Mine Radioking TX18S radio cam with the loose scroll wheel. Probably someone forgot to screw the scroll wheel properly.
I will have to disassemble it to look how I can fix these issues. Hopefully I will be able to.
Radioking is a new company without any known background. We don’t know good or how bad the support of this company will be. I have written an email to the Radioking support mailbox, but haven’t received any reply yet. We don’t know if this radio will be supported in the OpenTX. Time will tell. The similar situation in the beginning was also with the Jumper radios.

Conclusions
Cons
- Radio buttons and scroll wheel are rattling
- Mine radio came with the scroll wheel loose
- Irresponsive customer support
Pros
- A good mix of the Jumper T18 and Radiomaster TX16S radios.
- Metal scroll wheel
- No background noise (hiss) in the speaker
- Adjustable neck strap hook
- Cheaper than other similar radios
Bottom line: Radioking TX18S is a bit cheaper mix of the Jumper T18 and Radiomaster TX18S radios. Rattling buttons and scroll wheel is the biggest issue with this radio.
Available @:
Makerfire (In stock now! Coupon code SEPT5 or MFF10): https://shop.makerfire.com/products/radioking-tx18s-2-4g-hall-sensor-gimbal-…-radio
Disclaimer: This item was supplied by Makerfire for a fair and unbiased review. Makerfire never asked for a positive review and never influenced my opinion in any way. I’m trying my best to stay uninfluenced and give only my own opinion. All affiliate links, if there are any, help me purchase items for future reviews.
]]>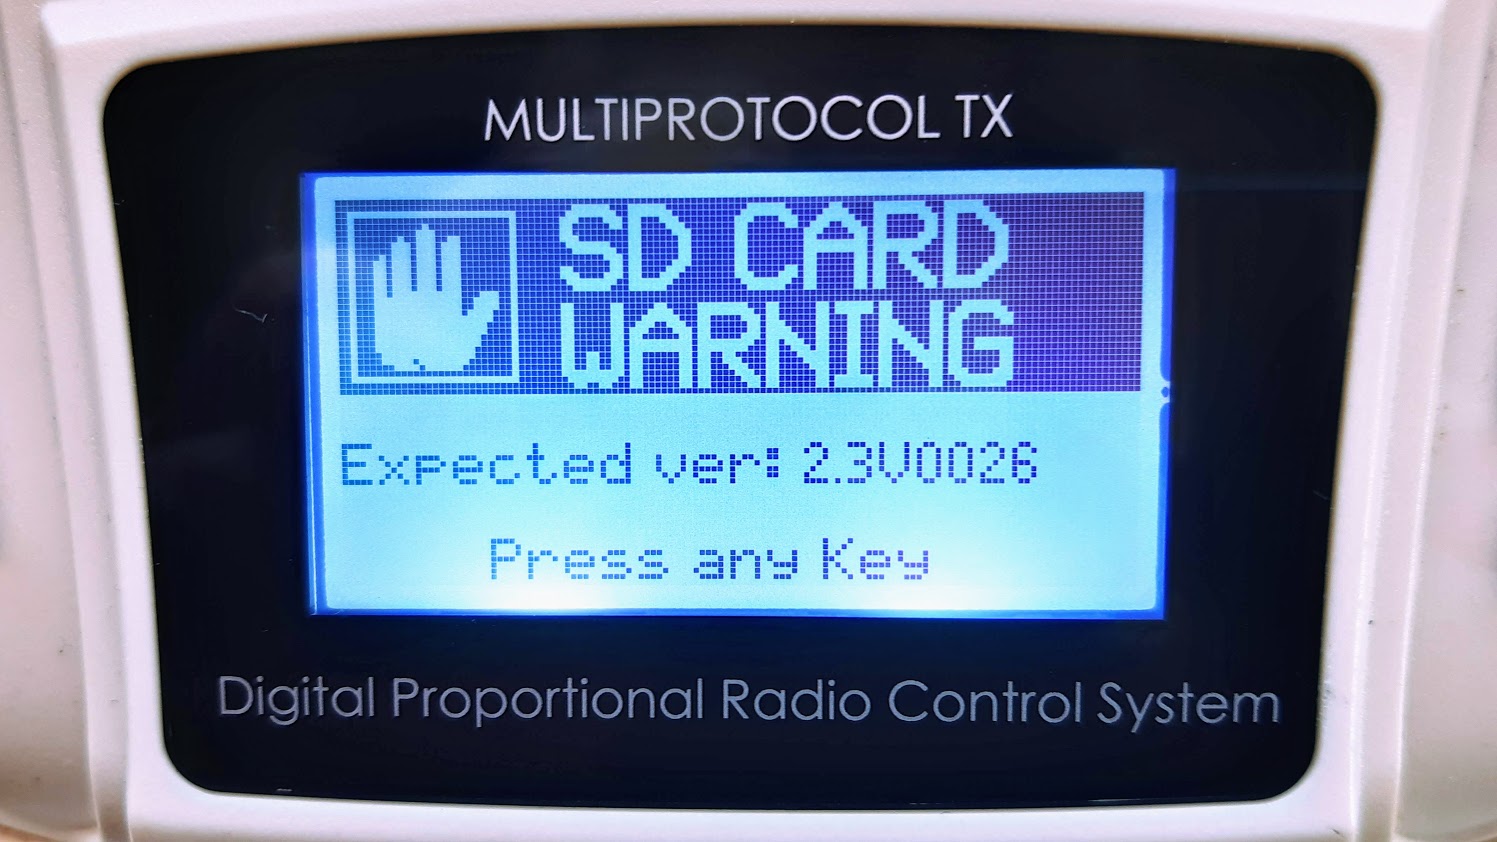
There are two ways to resolve this issue. One is simple and dirty and another is the recommended scientific way.
Simple change the version number
If you are not upgrading from very old version (as example upgrading from 2.3.6 to 2.3.7), then probably not much has been changed, and the radio should be working perfectly with the current contents of the SD Card. In this case you can simply change the version number, stored on the SD card.
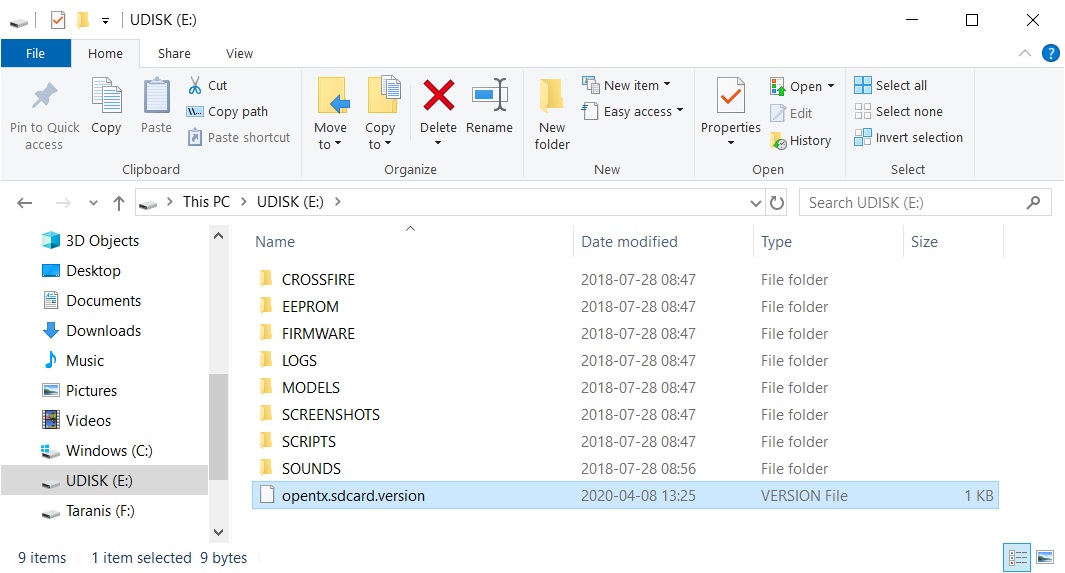
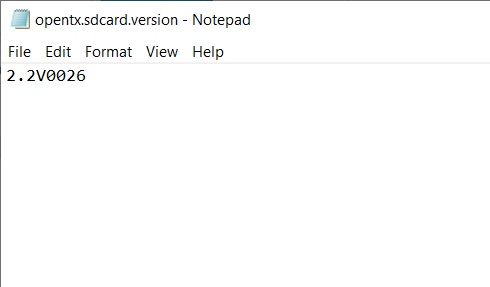
Connect the Radio with the USB cable to the PC or take the SD Card from the radio and open it on the PC. There is file called opentx.sdcard.version which has the current CD card content version stored in.
Right click on it, select “Open With” and choose Notepad.
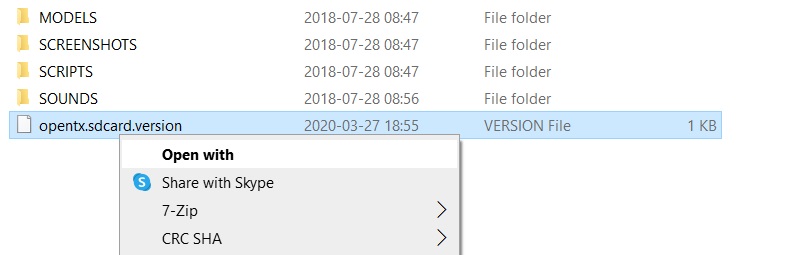
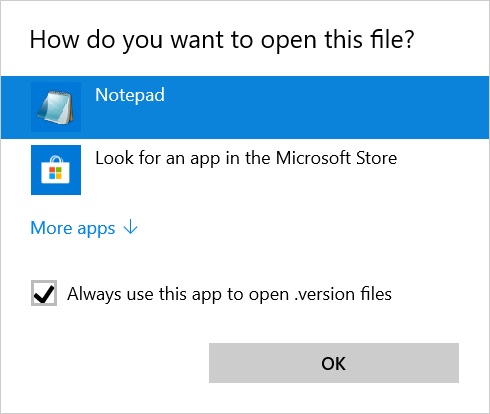
And change the version number to the needed one, as in our example “2.3V0026”.
Update the SD Card contents
While the first method is quick and easy, but it is recommended to update the SD Card content with the latest. First you need to download the CD Card contents for your version of the OpenTX from this link: https://www.open-tx.org/downloads. Unzip the contents of the archive to your hard drive. If you have nothing custom on your SD Card like custom sound pack, custom telemetry or wizard scripts installed, then you can simply overwrite the contents of the SD Card with the new contents you have downloaded.
If you have custom sound pack installed, then skip the SOUNDS\ folder, If you have custom scripts installed, then skip the SCRIPTS\ folder or copy/overwrite the selected Lua scripts only.
SD Card contents:
CROSSFIRE – contains TBS Crossfire Lua scripts
EEPROM – contains Eeprom backup files made from radio menu
FIRMWARE – contains firmware files (for OpenTX, multiprotocol module, internal/external RF modules, receivers)
LOGS – contains log files for special radio functions
MODELS – contains backup of the configuration data for individual model made from the radio menu
SCREENSHOTS – screenshots of the radio screen made by special function SCREENSHOT
]]>